Return To Course Overview

In lesson 3, we’re going to look at how to teach drawing, and it doesn’t matter if you already know how to draw or not.
First, you must change the way you think about drawing.
Accuracy, and how everyone talks about it, is one of the most important things you need to understand. You will need to learn to use different words when referring to artwork.
Drawing is usually evaluated by accuracy: making things on paper look like they do in real life. Drawings that do this well, become an illusion on the paper, depicting the 3-dimensional world on 2-dimensional paper.
Most artists, and most teachers too, will say that an inaccurate drawing doesn’t “look right”. Everyone understands, though, that they really mean, “it looks wrong”, and an artist does not like to be wrong any more than anyone else. However, being wrong about something external, like, “I think it’s going to rain tomorrow,” isn’t nearly as consequential as feeling like you’re wrong when doing the thing you identify yourself as – an artist.
Right and wrong, are so wrong
We must stop right here, and change the way we naturally think and speak about artwork. One of the first things I train any art teacher to do, is to stop saying, “right,” and, “wrong.”
In addition to “wrong” being applied to an artists’ sense of self-worth, artwork that is very innacccurate is some of the best work in the world! Look at Picasso. Look at Paul Klee, Van Gogh, Matisse, and many others.
Accuracy is a much better term, and Inaccuracy is way, way, way… way better than, “wrong”.
That means you need to make sure to use the terms accuracy and inaccuracy from now on whenever you are referring to any artwork, especially your own child’s. It will take some effort, but it is imperative if you want your young artist to be happy and confident.
Accuracy – So how do you do it?
Drawing accurately has always seemed to be a mysterious talent. That is, for anyone not gifted to do so intuitively. We look at someone who draws things easily, and say, “That’s crazy. How do they do that?” It really does seem like magic.
But it’s not magic. These people can draw accurately because they do specific things, in a specific order. And that’s great news, because it means the process of drawing accurately is not exclusive to those few who do it intuitively. The process can be broken down into simple steps, and learned by anyone willing to practice.
3 Steps To Accuracy
- Frame
- Big Shapes
- Details Last
You should memorize the 3 steps, as well as fully understand them. They’re important because they work – but even more important because most artists do them backwards.
Doing them backwards leads to extreme frustration, yet artists will continue to do so even after they understand this. It’s that hard. So you will need to remind your young artist often, to use the 3 steps in the order that works.
Vincent Van Gogh could not draw accurately at first and always had to work at it more than other artists. He was horrible with color and technique at first too. I think it’s safe to say that he overcame those obstacles very well. How? by practicing. Vincent practiced every single day.
I am one of the fortunate artists who learned how to draw accurately on my own. I’ve always been able to draw what I see pretty well (but practice helped me, too). When I began to teach, it led me to analyze what it is that I was doing in my head while I’m drawing, and compare it to what my students were doing. What I found was a huge revelation.
Most of my students do things in the opposite order that I do.
Instead of having a mysterious talent, I was simply doing specific things as I worked, in a specific order. Why didn’t everyone? I found out the answer to that as well.
Artists love to do the details.
The details are what artists love to do.
Did I say that artists really enjoy doing details? Well, they really, really do.
So the tendency for most students, is to draw the fun details first, like eating cookies instead of dinner. What that means, is that details are almost always drawn without a plan. Meaning they end up great, but in the wrong spot, or often being drawn the wrong size compared to other elements. This is because the artist didn’t take the time to figure out where, and how big, every element should be.
I know, this seems ridiculously simple and obvious when I state it like this, but it is far from it. In the artists’ mind, the details are everything. On any random piece of art, 90% of the work is the details. 90% of the fun is too.
Taking time to make sure you’re getting your proportions, alignments, sizes, and shapes accurately placed and drawn, with some lightly sketched guidelines… is soo o, b o r r r r r i n g.
So students skip it.
There is much more going on though, than impatience, and just being enticed by the details. Artists also skip the first two steps because they believe a myth: that “real artists” don’t actually need to do them. Intuitive artists (we sometimes erroneously call them “real artists”) always look at proportions and alignments first. Intuitive artists always draw the frame and the big shapes in light lines first. Intuitive artists wait to do the details.
An artist who skips to the details, will get to the end of their work, step back and look at it from an overview perspective, and then see all these inaccuracies – that they missed. It’s very discouraging, after all that work, to not like what you’ve done.
And then the lies come. They think to themselves, “I’m not a very good artist,” simply because things are misplaced, and because they thought it would be easy to do sizes, alignments, and shapes – without specifically working on them.
This happens all the time in my classes. Just today in fact, I was teaching a teenager who rushed to the details. She heard me say draw the big shapes, and that skipping them would make her portrait have problems. She agreed wholeheartedly! Then she drew all the details of one eye before figuring out where the it or the other eye should be. It was a wonderful eye. Probably the best eye she had ever drawn. But it was not where the eye was supposed to be, and it was too small to match the nose she had already drawn.
This is tragic to a young artist. All this work and all the beauty – all for nothing. So, now you’re wondering if I told her she did the steps wrong and made her start over.
I did not.
How to help a young artist become encouraged instead of discouraged.
First, I said it was a great eye, and she could just say to herself that these were nice little studies to get warmed up for the final portrait, or she could erase one of them and redraw it. But I said it was up to her how to handle this. She needed to feel like this was not a failure moment. And the truth is… it is exactly the opposite. It’s a learning moment. Artists need all the learning moments they can get, so be on the lookout for these “mistakes”. It’s a learning moment, which means it’s not actually a mistake at all.
I told her this was a great learning moment for her. There is no better way to really learn a concept – such as not rushing ahead to the details – as when your own work is the demonstration for it. I said she has taught herself this lesson better than any words I could ever use. This made her feel better and that her time had been well spent. As she started over, I told her that anyone who drew the eye she had just drawn, has “eye powers”. She can draw as many fantastic eyes as she ever needs. She is an eye master!
The second drawing she did was so much more accurate, but the first eye – in the wrong place – was the best moment for her that day. She will take the lesson forward, influencing every work she makes in the future. Wow! That is surely time well spent.
This is a combination of methods that I use all the time.
- Speak the truth – things you believe
- Turn a problem into a revelation.
- Focus on strengths and reinforce them.
- Let the student be in control.
Sadly, I have heard hundreds of stories where teachers did the opposite.
A teacher will see innaccuracy, and tell the student that they don’t know what they’re doing. They may get angry and berate the student for not listening to their instructions. They sometimes erase the beautiful work the student is so proud of. Sometimes, they will even draw things themselves right on the student’s work instead of teaching them how to do it. They shame the student, for trying to learn.
Here is what they’ve done.
- Speaking a lie. Students do know what they’re doing, they’re learning.
- Making the problem sound worse than it is.
- Focusing on errors and reinforcing the idea that it was worse than not even trying.
- Controlling the student and even their work.
Tragically, this kind of shaming is common. What’s worse, is that even one instance like this can shut down an artist for the rest of their life.
So never, ever, ever, say that your artist has made a mistake. There is no such thing in art. There is only learning. I tell all my students and teachers all the time, that every time you make something, regardless of whether or not it looks like you wanted it to… you will learn things. That means every effort on artwork is valuable time well spent!
No Mistakes Ever
The word, “mistake” implies that you should not have done something. That you should not have even tried. Artists never make mistakes. Not even “happy little ones”. It’s the word, mistake, that is so negative, just like using “right,” and “wrong”.
If you’re not an artist, here’s something you’re good at that they aren’t. One of the worst things that art teachers do, is fix the artist’s work for them. This tempts us all the time, because we can fix art so much faster and easier than we can explain it. But this is not a problem if you’re not an artist. In this, you actually have another advantage over most art teachers.
Here’s How The 3 Steps To Accuracy Work.
Step 1: Frame
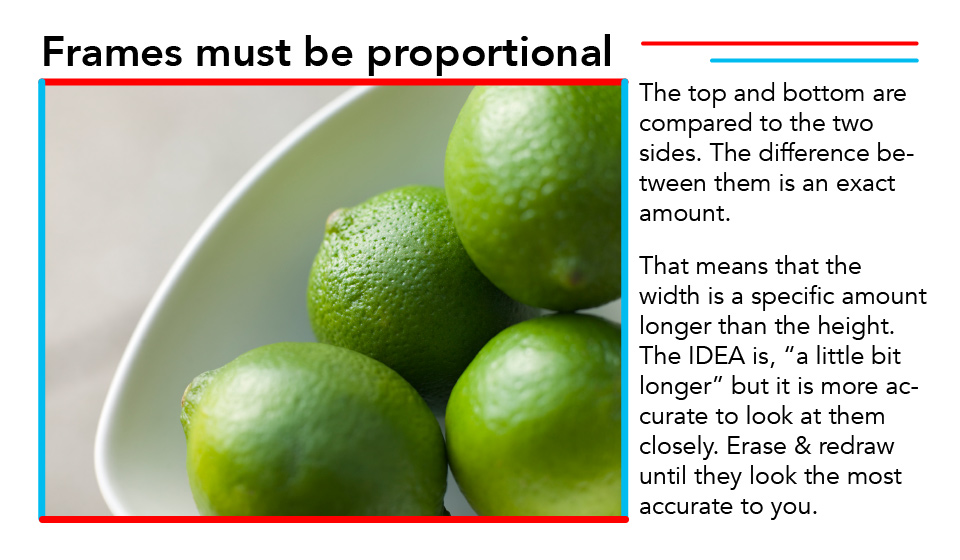
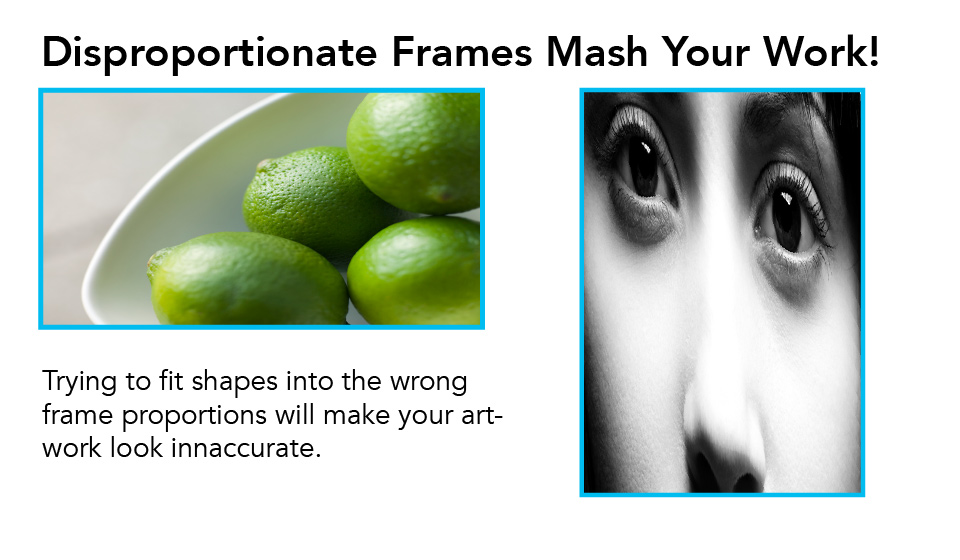
A frame is a square or rectangular box that contains artwork. A frame – as well as a canvas – has a proportion. The word proportion, is used when comparing two measurements. The measurements are either equal or not, and that affects their proportions. I tell my students to look at “this particular rectangle”. There are other types of rectangles that look different; taller or shorter rectangles. We want to match this exact type of rectrangle.
12” by 16” is a common size for canvas. That is a 3 to 4 proportion. Photo references have proportions too. A square photo from instagram has a 1 to 1 proportion. You can’t fit a square photo into a 3 by 4 box. It will never work.
I’ve seen students draw a box that is an innaccurate proportion to their reference photo so many times. Far more times than not. It just doesn’t even occur to them that the “frame” makes a difference.
That 12” by 16” canvas will be drawn as a square as they compose what to put on it. Sometimes they’ll have a vertical rectangle when they’re drawing from a horizontal photo. I can’t emphasize how important this step is, or how almost every student can’t see it.
Remember this important thing I’ve learned from experienced: It is not intuitive for most people to even consider what the proportions are for the frame of their artwork.
Getting the proportions accurately drawn though, is like having the matching wooden tray to fit a child’s wooden puzzle pieces into. If you have a different sized tray, then the pieces will never, ever fit into it. The elements of the art have to be stretched or smashed to fit, making the work impossible to ever look accurate.
So the FRAME is the most important and always the very first step.
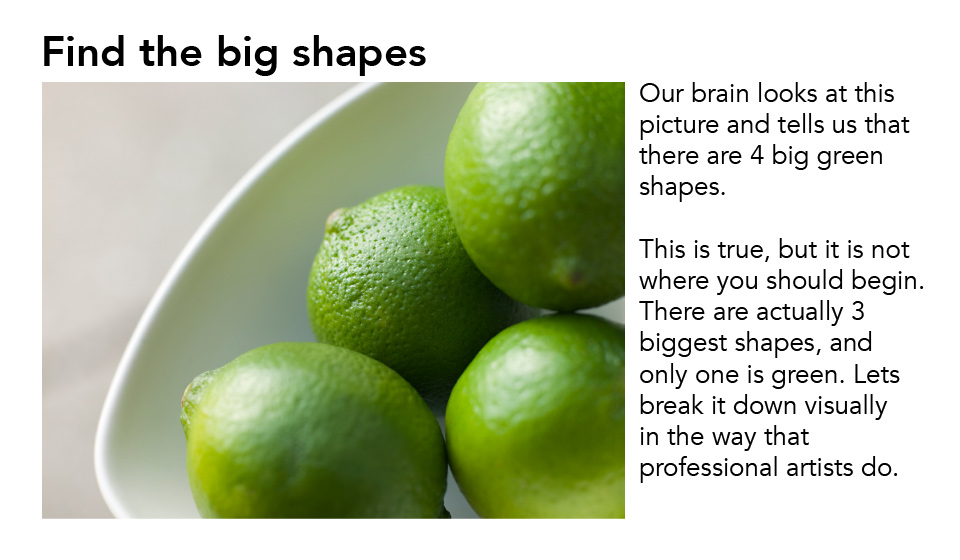
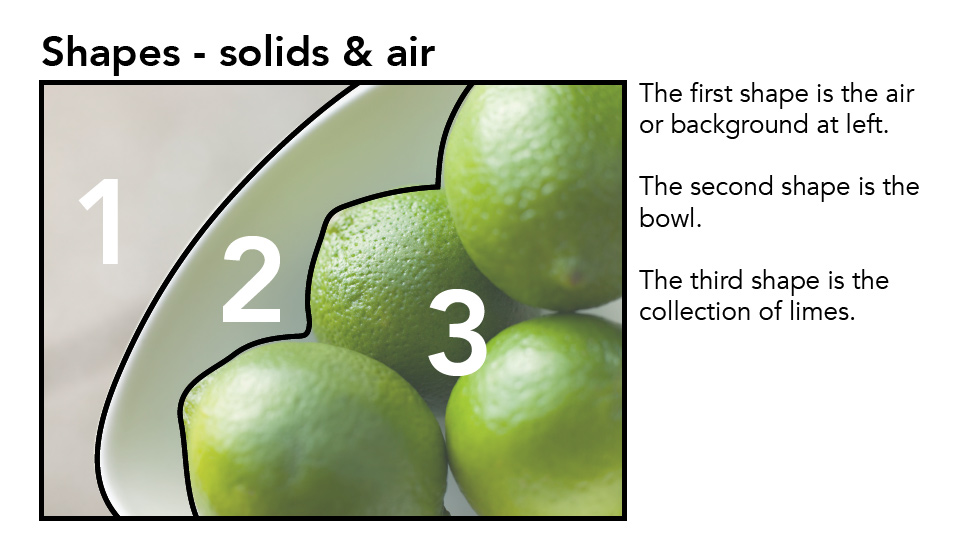
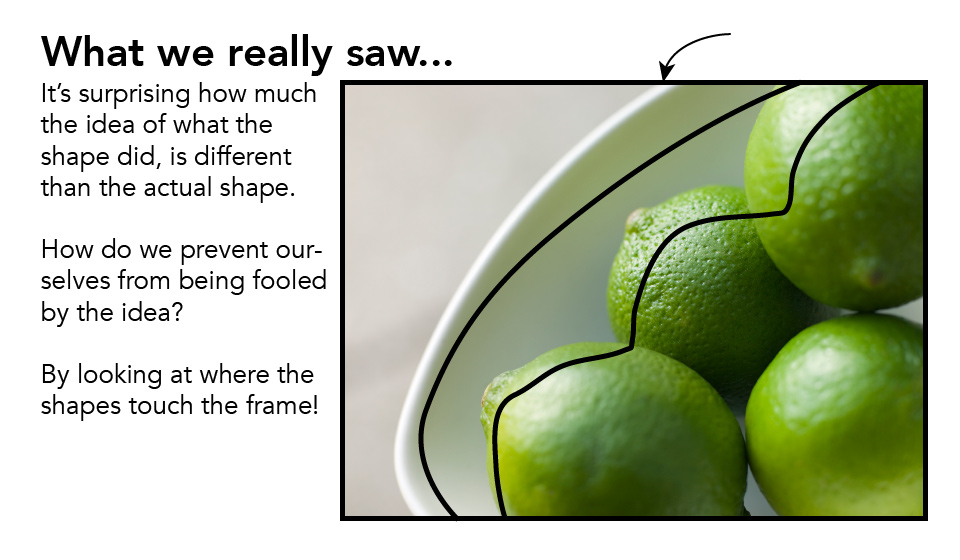
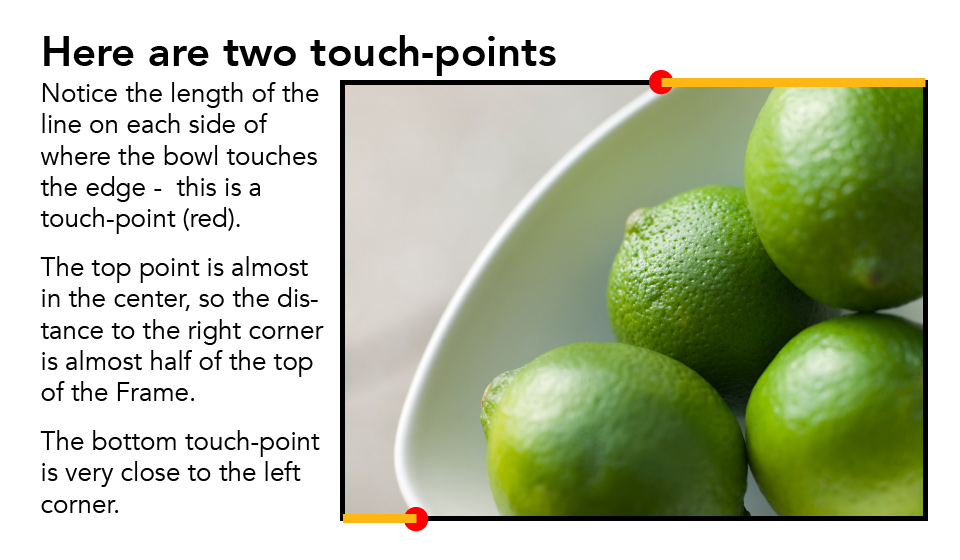
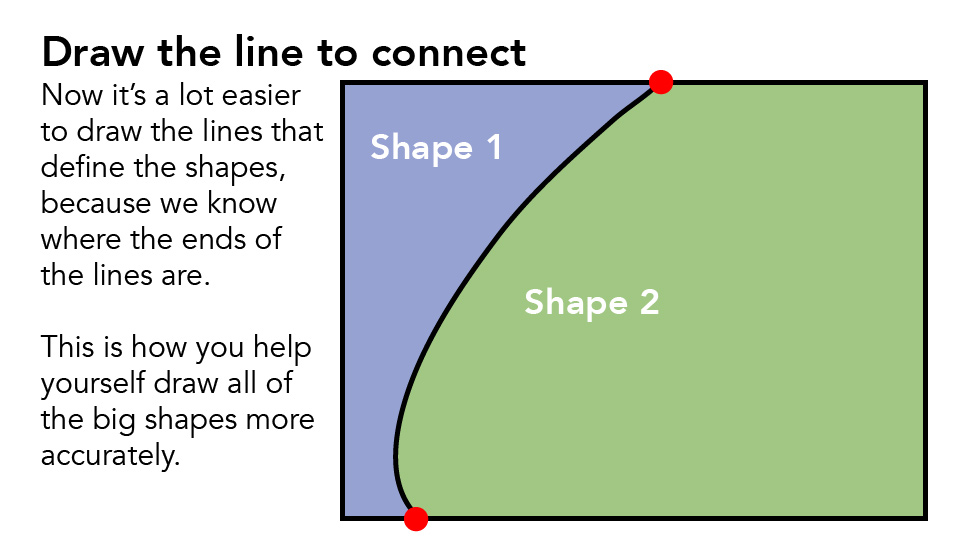
Step 2: Big Shapes
All of the remaining big shapes fit inside a proportional frame. There are usually about 4 to 5 big shapes, sometimes made by combining several smaller elements together. Most big shapes touch more than one side of the frame.
Getting the proportions of each big shape is crucial, and really doesn’t take much time at all. Line things up with the corners, the edges, and each other. If you notice that the tree trunk is about two thirds from the left side of the frame, and one third from the right side, then you can draw it at that same spot.
Kids tend to draw big shapes just like they do the frame; without a lot of thought about where it should be or how it relates to other shapes. You’ll see even experienced artists draw a horizon above the halfway point on a canvas, when their reference clearly shows it below. Then when the painting is done, they can’t believe they forgot to look before they drew.
Again, I can’t emphasize strongly enough, how common this problem is for most students.
Step 3: Details last
After getting the frame accurate, and fitting the 4 or 5 big shapes accurately inside it, the artist is free! You can draw all you want, and the things will be very close to where they should be, and there are enough reference guidelines to help sizes be accurate as well.
Don’t Push it, though
If an artist does not see the inaccuracies in their work, you cannot point it out. Keep mum until you are asked for help. That’s it. You just cannot push an artist to go where they don’t want to. Pushing will simply shut them down, making art no fun anymore.
Joy is what makes an artist work and practice. Pushing is the opposite of joy. Don’t do it.
Painters who don’t draw
Drawing can’t be avoided. If you have an artist who loves paint, but doesn’t like to draw, it’s because they’re not confident. They love the medium and the process of paint. So they cover up their weakness in drawing accurately, by making more expressive artwork. Gently keep these artists on track, using the 3 Steps To Accuracy. Every artist must draw often.
Draw before you paint because the drawing is what the painting is based on.
Draw for learning. Draw for drawing’s sake. Draw for joy. All art begins with drawing.
Accuracy Slideshow
This is from one of our lessons. Use it often to train your artist.
Tap an image to open.