
OVERVIEW
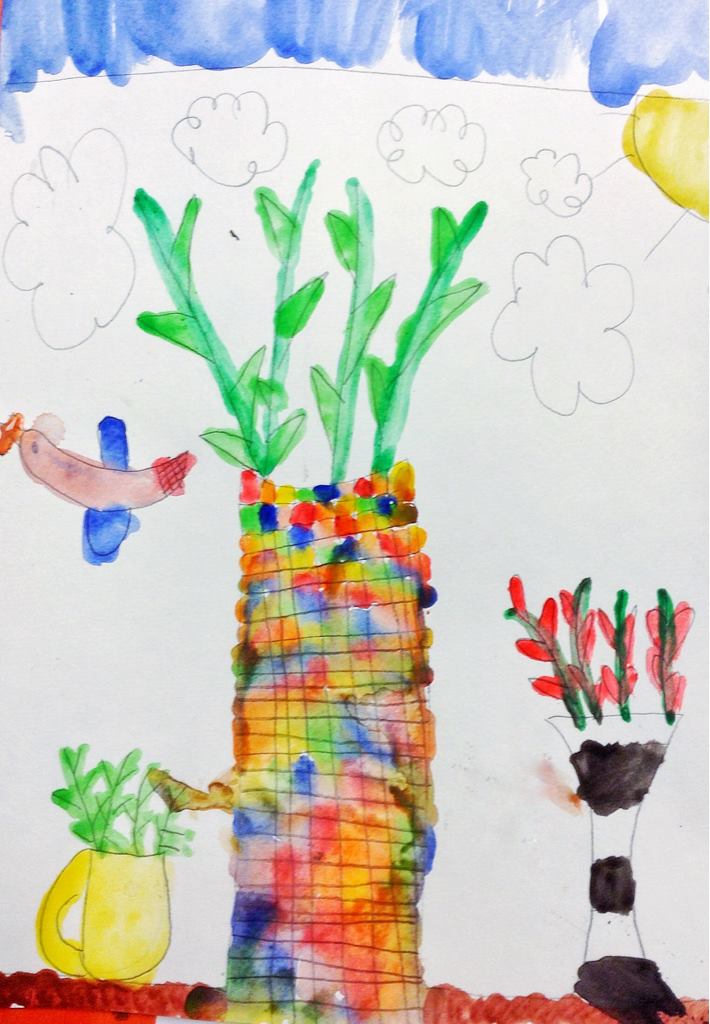
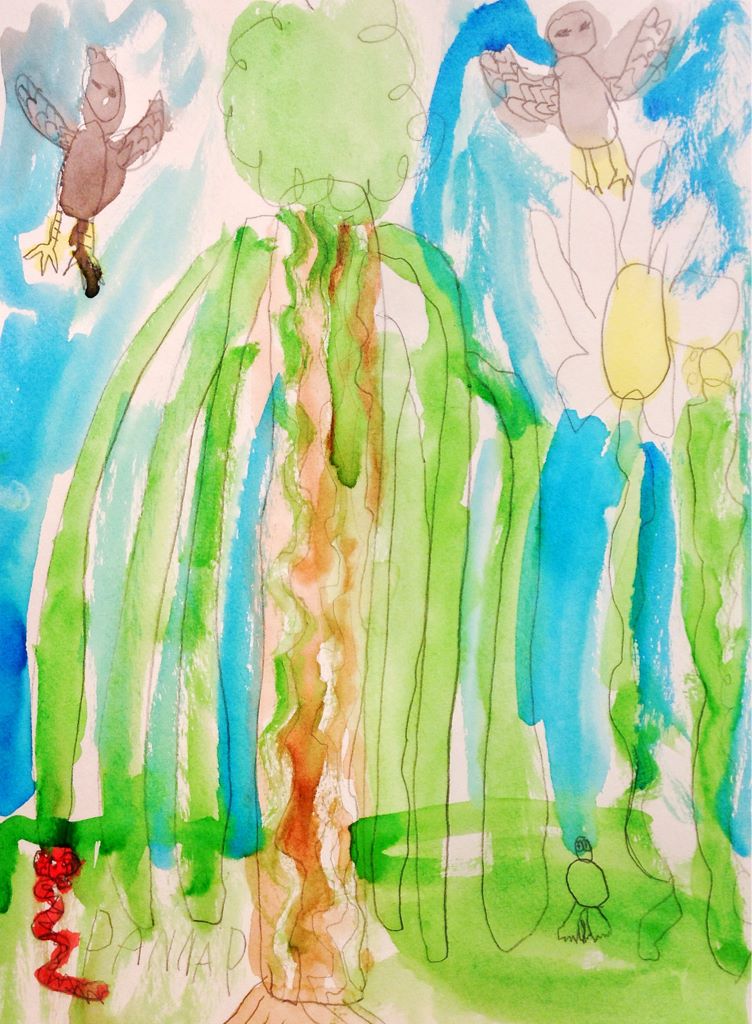
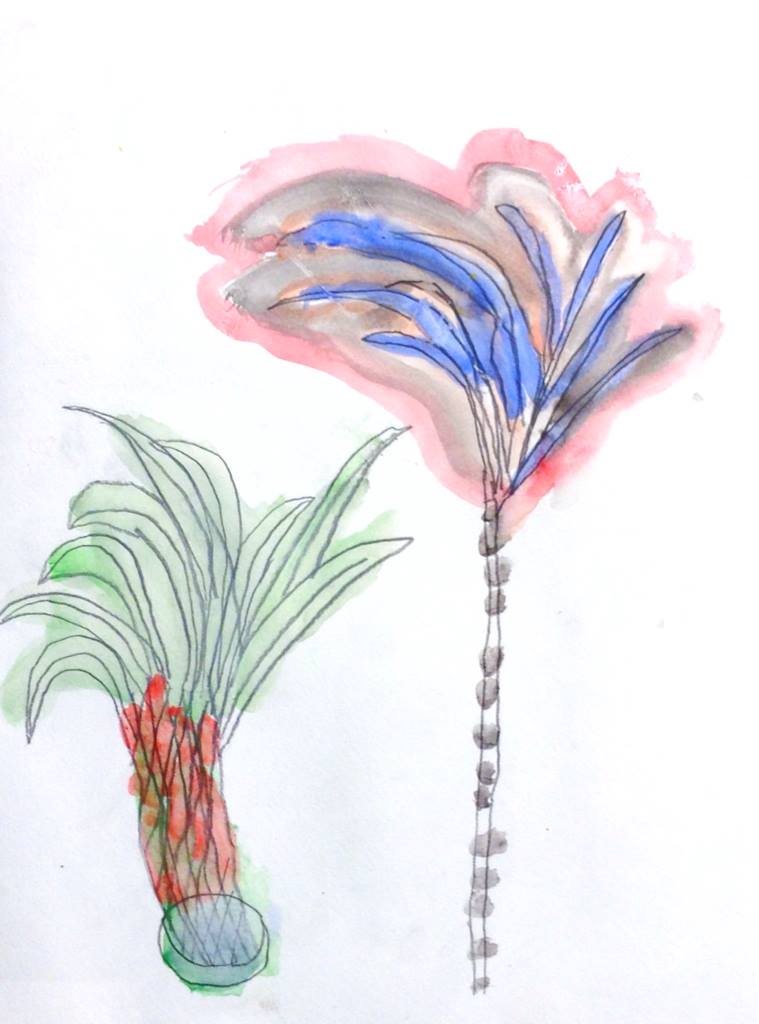
Artists enjoy drawing a still life that features plants, and then using watercolors to paint it. There is some review of shadows and highlights during the artwork time. After a break, the kids cut jungle-like shapes out of colored papers and use them to make a jungle rug collage. There is an extra project to create an oil pastel art of plants from the still life if there is enough time.– – –
Grades K – 2
Week of September 30 – October 4
1 Hour & 30 Minutes
Lesson At A Glance
A brief overview of each step. Buttons jump to each section for detailed information.
5 Min -Using the still life, point out highlights and shadows.
20 Min -Paint the drawing with watercolors
10 Min – cut out shapes in colored papers
32 Min – design a rug, then glue shapes down
If Time -Oil pastel of plants or some leaves
3 Min – Everyone helps
SCROLL & TEACH
LESSONPLAN
Each section is a different color. Read over once and then you can SCROLL & TEACH using any device you like. It’s designed to work best with your phone.
LEARNING TARGETS

Students know how to warm up by using their imagination
M A T E R I A L S
- 11″ x 17″ copy paper
- Pencil and eraser
- Markers and/or oil pastels
1.1 greet
Kneel down so that you are on their level. Bending over emphasizes the differences in your height, while kneeling makes them feel more important. Have tape and marker ready so you can stick some tape on the table by each student and write their name on it as they sit down.
1.2 choice
Everyone should take their time with the work and make a finished piece of art. Limiting the paper can also help kids focus on the work. If someone finishes in super-fast time, ask them what more they can do to the existing paper. Ask again several times – unless they appear overly frustrated; then you can allow them to move on to a new work.
LEARNING TARGETS
Students know how to identify shadows
M A T E R I A L S
- Still life objects with plants
- Lamp (directional, like a clip-lamp)
- A pointer
2.1 teach
Use a pointer, such as a long thin brush or pencil, to point to a highlight or a shadow.
“Look at this bright spot. That’s called a highlight, and it’s a reflection of the lamp, so it’s very bright on the leaf. Sometimes the highlight is round, and sometimes it gets stretched out on a long object so it looks more like a line.
Now look at the shadow along the edge, or under another leaf. These are darker. It’s like the shadow we made on the balloon, if you were here a few weeks ago. The highlight is the same as on the balloon too.
Highlights and shadows make things look realistic, and you can do that with your paint if you want. Later today we’re going to make things look more flat in a rug design.”
LEARNING TARGETS
Students know how to draw using a reference
M A T E R I A L S
- Watercolor paper
- Pencil and eraser
- Still life with plants or Jungle Reference PDF (below)
- Watercolor pans (drop some water to “wake” them)
3.1 Print
Reference
Jungle Print
Cut images apart and print enough for each student to choose from several.
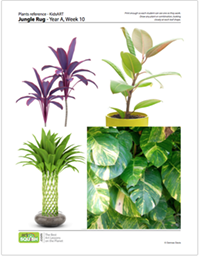
1 Page – Opens in new window
3.2 draw
Students observe reference and draw plants using lines only. In the next step these are painted with watercolors.
Before you hand everyone the watercolor paper to draw on, explain the process.
After, walk around and encourage your students to draw with lines only.
Because you’ll be painting these, you only need to use lines. No shading at all. Just make sure that you draw the still life large enough to fill the page. Part of the drawing can go off the edge even. Draw by looking at the shapes you see. Remember to look up at the plants often to see the leaf shapes and also the air shapes around them.”
LEARNING TARGETS
Students know how to use watercolors.
M A T E R I A L
- Watercolor paper with drawing
- Watercolor pans
- Brushes
- Mixing plates
- Water tubs
- Paper towels
Paint pigment list:
- Napthol or Pyrrol Red
- Hansa or Light Yellow
- Pthalo Green (blue shade)
- Cyan or Cerulean Blue
- Ultramarine Blue
- Dioxazine Purple
- Magenta
- Burnt Umber
- Raw Sienna
4.1 paint
Let them paint in any way they want, but encourage using a lot of paint and water. Watercolors work best when there is enough watercolor on the brush so that the brush doesn’t have to be pressed against the paper – the bristles don’t bend when there is enough paint. This can be helpful, but is a hard concept for this age, so don’t worry if your students don’t get it.
The main thing is for students to enjoy doing the painting and also to enjoy the finished work. Sometimes this is a balance between helping and allowing freedom.
Afterwards, make sure names are on the work in pencil in a corner. Set aside to dry.
4.2 Review
Before class, review how to teach watercoloring in KidsART
You don’t need to do the demo for your students today, but it helps if you review the video so you’ll be ready for helping when problems arise.
Tap the 4 arrows icon to enlarge the video to full screen.
LEARNING TARGETS
Students know how to cut out shapes and use scissors independently
M A T E R I A L S
- 11″ x 17″ Colored background paper – variety of at least 4 colors
- 8.5″ x 8″ Colored papers – large selection
- scissors
5.1 print
Reference
Jungle Shapes
Cut the two sides apart along the dotted line, and print enough for each student to have one.
Two Options (more details further below):
- Draw and cut shapes. Have students use the reference, printed on white paper, to draw their own shapes on colored papers.
- Pre-print the shapes. Print the Jungle Shapes PDF right onto 8.5″ x 11″ colored papers. In this case, cut the shapes prints into smaller sections so kids can get a variety of colors. Don’t actually cut the shapes all the way out though.
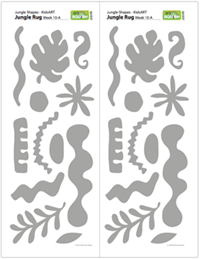
1 Page – Opens in new window
Help students keep their shapes small enough for a good design by providing smaller sheets of paper. Cut the 8.5″ x 11″ papers into 2 or 4 pieces.
5.2 Explain
Quickly introduce the rug design project.
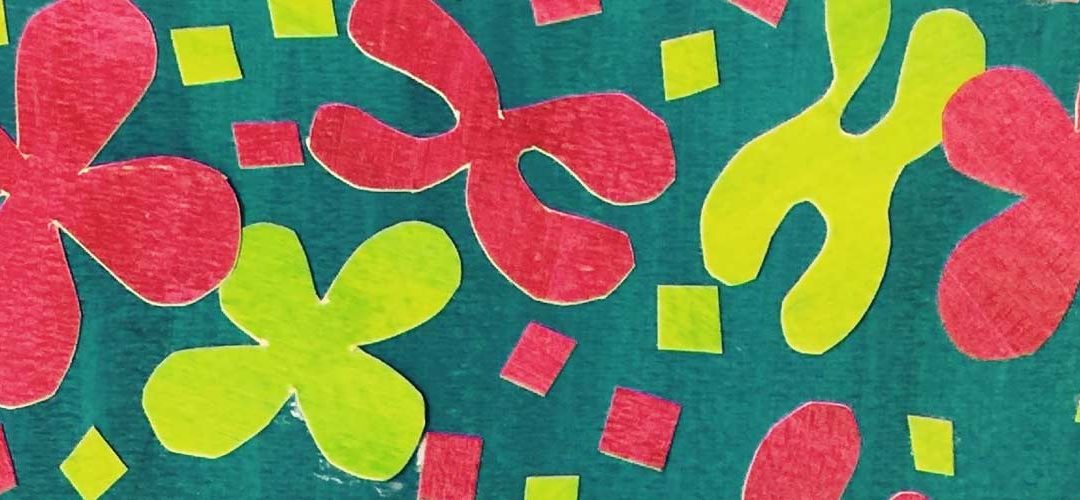
“Today we’re going to make a rug. It won’t be a real rug, because it’s going to be very small for a rug. We call it a design, and rug designers make small rugs before they make the big ones. You can think of it as a toy rug, but after you’re finished, it will be artwork. Our rug is going to be a Jungle Rug!
First we’ll choose a background color for the rug. Then you’ll get colors for all the jungle shapes that you’ll cut out for your design. I have some cool jungle shapes right here.”
5.3 Choose
Help your students choose colors for their rug backgrounds and their shapes.
Everyone should choose a full sheet for their background. Then choose 4 -5 more colors for the shapes.
Write names on a corner – as small as possible.
Two Options:
1) Draw and cut shapes.
Print the Jungle Shapes PDF on white copy paper and cut along the dotted line for 2 identical handouts per page. Students can look at these for ideas. They should either cut directly, “drawing” the shapes with their scissors, or they can draw the shape with a pencil first, which can be much easier for young students.
2) Pre-print the shapes. Print the Jungle Shapes PDF right onto 8.5″ x 11″ colored papers. In this case, cut the shapes prints into smaller sections so kids can get a variety of colors. Don’t actually cut the shapes all the way out though.
You can print the Jungle Shapes PDF right onto some colored papers and let students cut them out directly. The print will darken the color, but they can be glued on either side so using the bright or darker printed side of the shape is the student’s choice. This is not only easier, but also a time saver.
The downside is that all the kids’ shapes will look the same, so if you can do it, you’ll get more individual expression with option number 1: by letting them cut or draw their own shapes by observation.
Just place all of the cut-out shapes on the background paper to get ready for the next step. Be careful to not let paper collections get mixed up or dropped on the floor.
5.4 Cut
Everyone cuts their jungle shapes from colored papers.
Show your students how to turn the paper in one hand while cutting with the other in order to “draw” with the scissors. (Video below).
Have students place all of their cut-out shapes on their background paper to get ready for the next step. Be careful to not let paper collections get mixed up or dropped on the floor.
3.2 demo
Show students how to use both hands to cut shapes, turning the paper with one hand, and cutting with the other.
LEARNING TARGETS
Students know how to make a collage
M A T E R I A L S
- Cut colored papers from STEP 5
- Glue sticks or white glue/brush
Placing some white glue in a bowl with a small amount of water mixed in works well if you have some brushes you can use for this. Soak brushes to clean.
6.1 design
First your students should slide the color shapes around to try different ideas. Explain carefully that a design can be changed several times until you like it, and that we won’t glue until you’re ready with a design. You can hold back the glue for a bit until they’ve tried at least 2 ideas.
Walk around and encourage design changes that will make it more interesting, but let the students choose what they like. You should only encourage and make suggestions!
Take your time and make an awesome rug design!”
6.2 Paste
After a good design is found, then glue the shapes down in place.
Use a large scrap piece of paper of some copy paper as a glue mat. Use plenty of glue and be sure to get all the edges. Press the shapes down after everything has been glued.
Set aside to dry and double check that names are on the work.
LEARNING TARGETS
Students know how to use their imagination to make artwork
M A T E R I A L S
- 8.5″ x 11″ copy paper or card stock – white
- Oil pastels
- Pencils and erasers
- Blending sticks & paper towels
7.1 Create
If you have any girls and boys who are restless and getting bored with “serious art”, you can encourage a cartoon jungle scene if you want. Or have them create a jungle jeep, a jungle house, or a jungle party with jungle animals! Make it fun.
LEARNING TARGETS
Students know the importance of cleaning up.
M A T E R I A L S
- Paper Towels
- Cleaning wipes
- Sink
- Waste baskets
- Well-lit spot for photos
- Camera or phone-camera
8.1 clean
- Wash hands
- Super-wash brushes if used
- Put art supplies away
- Wipe tables & toss trash
- Remove any smocks (last)
- Check for items on floors and tables
8.2 photo
OBJECTIVES
- Practice and improvement in painting in watercolors
- Understanding shapes and taking time to compose/design artwork
- Accomplishment in creating 2 colorful artworks
- Fulfillment by creating a rug design and having fun with a jungle theme
TROUBLESPOTS
Shapes too small – The rug designs need large simple shapes to work. Make sure students draw their shapes large enough to fill the square or rectangle they’re cutting it from.
Shapes too big – sometimes shapes will be so big they don’t actually change the initial shape of the paper. Make sure the shapes are drawn inside the paper and not just making different edges on the existing shape.
ART WORDS
Line Drawing – a drawing that has no color or shaded areas, just lines.
Design – when an artist tries several ideas and works to make their picture look better, it is called designing.
Composition – an art word we use for design. You can say, “that art has a good design”, or, “that art has a good composition”.
CLASSROOM
PREP
Review the videos in the lesson, and decide on the two options you have in STEP 5. If you can provide live plants, get several that have different leaf shapes, and set up a lamp to review shadows.
Print all of your PDFs from the lesson plan and cut any references apart as needed.
What your room needs
Here are your printable lists and room prep instructions.
Opens in new window
CLASSROOM
MATERIALS
- 11″ x 17″ copy paper
- 11″ x 17″ colored papers
- 8.5″ x 11″ colored papers – copy papers if using Option 2 in STEP 5
- Pencils
- Erasers
- Safety Scissors
- Water containers
- Water droppers
- Watercolor paint sets
- Mixing trays or plates
- Glue or glue sticks
- Oil pastels
- Blending sticks
- Paper towels
- Smocks
PREVIEW
Week 8: The Boss of Shapes
Students will learn that doing several variations of their art gives them a choice, which is often much better than going with your first idea. We’ll play-act that they are a boss. They’re also the boss of their art, and can move shapes around until they like a composition more. Watercolor and pastels are used to paint images of hand tools, and a shape-finding game is played, strengthening visual skills.
Week 9: Artist Choice!
Use this button to view our parent’s blog. Share the link: http://parentart.org, with your student’s parents so your they can read about the lesson each week.