
OVERVIEW
Students will learn that doing several variations of their art gives them a choice, which is often much better than going with your first idea. We’ll play-act that they are a boss. They’re also the boss of their art, and can move shapes around until they like a composition more. Watercolor and pastels are used to paint images of hand tools, and a shape-finding game is played, strengthening visual skills.– – –
Grades 1 – 2
Week of October 14 – 18
1 Hour & 45 Minutes
Lesson At A Glance
A brief overview of each step. Buttons jump to each section for detailed information.
5 Min -show how to move a tool around and trace it
10 Min – Set up to paint, and fill shapes with imaginative color
15 Min -Use tool parts to design a robot face. Slideshow examples.
10 Min -Draw and color your own robot face.
10 Min -Go over the watercolor with oil pastels
5 Min – finish their oil pastels or make an art-holder (portfolio)
2 Min – Everyone helps
SCROLL & TEACH
LESSONPLAN
Each section is a different color. Read over once and then you can SCROLL & TEACH using any device you like. It’s designed to work best with your phone.
LEARNING TARGETS

Students know how to use their imagination to make artwork
M A T E R I A L S
- 11″ x 17″ copy paper
- Pencils and erasers
- Oil pastels
- Markers
1.1 draw
While your students are working, encourage them to talk about pumpkins, faces, and fall. However, steer away from “scary” topics (Halloween, ghosts…) for any more sensitive students.
Always try to greet students as they come in and kneel down when you can so that you are on their level.
Artists’ Choice
Encourage students to work with one piece of paper for a while. If someone uses the phrase, “free draw”, explain that artists’ choice is something only artists can do, while free-draw is something anyone can do. You want to use the phrase to elevate the students’ expectations of their work.
Everyone should take their time with the work and make a finished piece of art. Limiting the paper can also help kids focus on the work. If someone finishes in super-fast time, ask them what more they can do to the existing paper. Ask again several times – unless they appear overly frustrated; then you can allow them to move on to a new work.
Preview the lesson for next week:
“We will paint pumpkins next week, so bring one with you! It should be a small or medium sized pumpkin. Not too big.”
LEARNING TARGETS
Students know how basic shapes can be repositioned to make different compositions
M A T E R I A L S
- Tools
- Pencil & eraser
2.1 demo
As you talk to them, begin tracing a tool with a pencil, onto a sheet of paper.
Show your students how to move tools around until they look good before tracing. Mention that it helps to close one eye and trace right on the edge instead of just guiding the pencil around. You can get the line closer to the actual shape if you try a little of this technique.
Make sure to begin a tool trace, maybe your second or third tool, and then stop. Erase the line, move the tool a couple of times, and then land on the place you like the best and resume tracing. It’s important that you make a decision to move it. Explain that this is what artists call designing their artwork: changing position, colors, and techniques – trying different things to make your artwork look better and better.
POINT: You are the boss of your artwork! Change it until you like it more and more.
If you go to the store to get ice cream, its not very much fun if they only have pistachio every day, right? You’d much rather have a lot of choices, like chocolate, vanilla or cookie dough. Well, it’s better to have several “flavors” (options) to choose where your shapes should go on your artwork too. That’s why we try different ideas.”
LEARNING TARGETS
Students know how to create composition
M A T E R I A L S
- Variety of tools
- 11″ x 15″ watercolor paper
- Pencils & erasers
- “Wake” the watercolors for the next step by adding a bit of water to the cakes.
3.1 Print
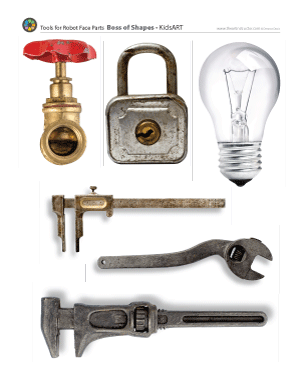
Reference
Tools
Cut images apart and print enough for each student to choose from several.

3 Pages – Opens in new window
3.2 draw
Set up the tools in a tool “store” for the kids to choose from or set tools at their table as they work. Have everyone share, passing tools around if someone else wants to use the same one. They can use up to 3 or 4.
Students trace around one tool at a time. Make sure to have them move each tool 2 or 3 times before deciding where to draw it. Remind them that this is their decision to be the designer, or boss, of their shapes.
Try to get tools without any dangerous edges. Even then, be cautious and make sure you know your students and that they understand that tools can be heavy and sometimes have sharp or pinching parts. Explain that they’re like scissors, and you have to prove you are mature enough to get to handle them.
LEARNING TARGETS
Students know how to watercolor
M A T E R I A L S
- Watercolor pans
- Water tubs
- Mixing plates or trays
- Small to medium brushes
- Tool drawings from previous step
4.1 paint
Using watercolors, your artists can invent colors and fill in each tool. Anything goes! Encourage wild colors and creativity but if they want to do it realistic, that’s ok too. Set them aside to dry when finished, and make sure everyone has put their name on the work.
LEARNING TARGETS
Students know how to design composition
M A T E R I A L S
- 8.5″ x 11″ copy paper
- Pre-cut face part pages (into sets with a few images per piece.)
- scissors
- Tape or glue sticks
- Black markers
5.1 print
Reference
Robot Face Parts
Cut images apart and print enough for each student to choose from several.
1 Page – Opens in new window

robotface3

robotface1
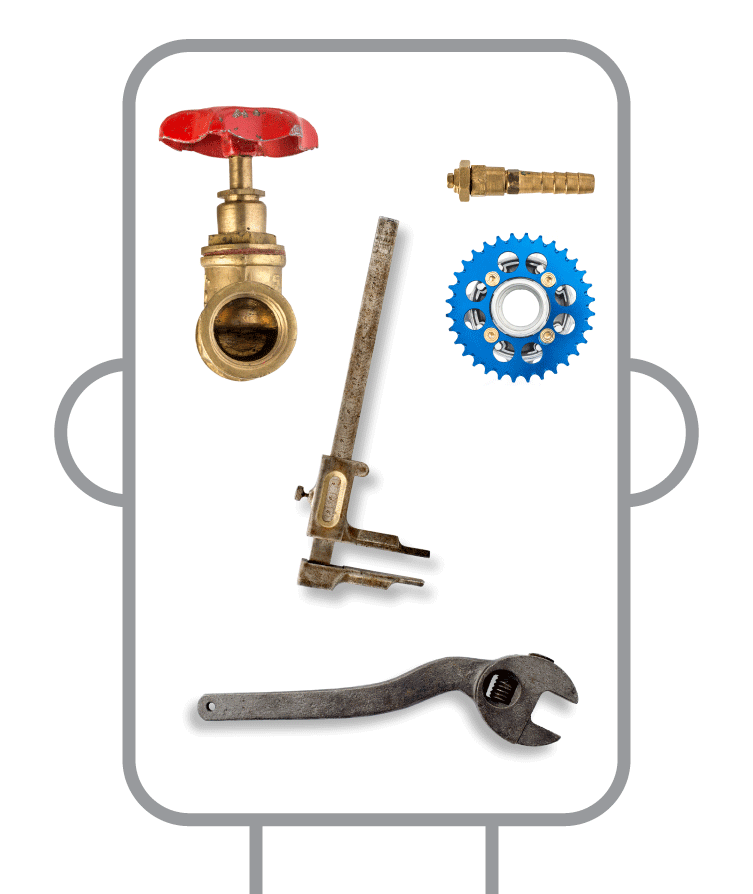
robotface2
5.2 design
Display the examples in the slideshow. Have all the students choose parts and cut them out.
Do NOT provide glue or tape until a design is finished. Every student gets to have parts only for these 3 facial features:
- Eyes and eyebrows
- Nose
- Mouth
If you do more than that, the project becomes endless, with hair, bows, hats, etc.
Have students change their face idea several times, to try different robot designs. Having a bunch of parts helps this happen. It should be a lot of fun with laughter at the silly faces. The point is to practice changing designs, or composition. Don’t stress them out if they don’t want to try any at all, but you can ask if you can show them one idea that you’ll put right back. If they don’t like it, then they designed it to go back to the first idea, and that still reinforces the idea.
LEARNING TARGETS
Students know how to design
M A T E R I A L S
- 8.5″ x 11″ copy paper
- Pencil and erasers
- Oil pastels
- Blending sticks
6.1 draw
Anything goes for this quick fun project! Mention that this is a new design they’re making.
STEP 7. Oil Pastels Tools
Students have the option of adding oil pastels to their watercolors 10 MinutesLEARNING TARGETS
Students know how to design
M A T E R I A L S
- Dry paintings of tools from Step 4
- Oil pastels
- Blenders
7.1 color
Get out the oil pastels and add at least 2 or 3 colors to each tool area, blending them together. You can shade or just fill in with fun color and textures. Have fun and be expressive with color and bold outlines.
LEARNING TARGETS
Students know what a portfolio is
M A T E R I A L S
- 11″ x 17″ copy paper or card stock
- markers (not oil pastels)
8.1 craft
Explain how a portfolio can protect artwork and make it easier to carry around. Decorate them with markers and put names on them.
LEARNING TARGETS
Students know the importance of cleaning up.
M A T E R I A L S
- Paper Towels
- Cleaning wipes
- Sink
- Waste baskets
- Well-lit spot for photos
- Camera or phone-camera
9.1 Print
Flyer
Pumpkin Party
A pumpkin painting party invitation for your students to take home. It tells parents what to bring next week.
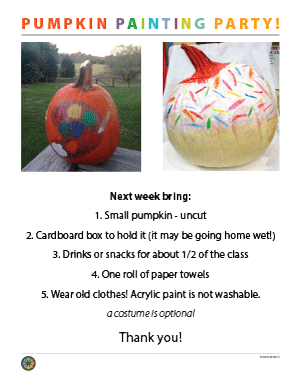 1 Page – Opens in new window
9.2 CLEAN
- Wash hands
- Super-wash brushes if used
- Put art supplies away
- Wipe tables & toss trash
- Remove any smocks (last)
- Check for items on floors and tables
9.3 PHOTO
OBJECTIVES
- Practice and improvement in observing shapes, and composing a design
- Understanding that more than one idea for an art design can be tried
- Accomplishment by making their own decisions about artwork
- Fulfillment in using several different media, and having plenty of art to bring home
TROUBLESPOTS
Playing with tools – Make sure students realize these are real tools and should not be played with or you’ll have to take them away. Remind them that they know how to use scissors, which are also a tool that can be dangerous if not handled safely.
ART WORDS
Design – When an artist moves shapes, lines, and colors, around, to make artwork look better, it’s called design.
Portfolio – A holder to carry and protect artwork.
Watercolor – Paints that use mostly water and special paper, and that are see-through.
CLASSROOM
PREP
Flat tools that don’t have a sharp edge are best: wrenches, tin snips, large washers (metal disks with a hole like a donut), all kinds of clamps, screwdrivers, and even sockets for a socket wrench to make circles.
Print all of your PDFs from the lesson plan and cut any references apart as needed.
section below coming later today
What your room needs
Here are your printable lists and room prep instructions.
Opens in new window
CLASSROOM
MATERIALS
- 8.5″ x 11″ copy paper
- 8.5″ x 11″ card stock
- 11″ x 17″ copy paper
- Rulers
- Scissors
- Box cutter (teacher only)
- Large Drawing boards with clips
- Water containers
- Spray bottles
- Water droppers
- Paper towels
- Smocks
STUDENT’S
MATERIALS
- 14″ x 17″ Sketch Paper
- 11″ x 15″ watercolor paper
- 2B Pencil
- 4B pencil
- Ebony pencil
- Black Sharpie
- Markers
- India ink
- Ink dip pen with metal nib (not too sharp a point)
- Soft compressed charcoal sticks (not pencils)
- Canvas pencil (dark gray colored pencil)
- White erasers
- Kneaded erasers
- Acrylic paints
- Oil pastels
- Blender sticks (stumps)
- Sandpaper boards (to clean blenders)
- Paper palette pad, or disposable trays/plates
- 11″ x 14″ Canvas (loose or from real canvas pad)
- Canvas boards (optional)
- Tape – blue painter’s tape
- Brushes – All sizes
PREVIEW
Week 9: Pumpkin Painting Party
The week before Halloween, we practice painting fun, simple faces in tempera paints, and then paint a face on a real pumpkin using grown-up acrylic paints. It’s also a great time for a party: have parents bring some drinks or snacks, and have students each bring a small pumpkin to paint. Bring the pumpkins in a small cardboard box to take it home while still wet!
Week 10: Zig Zag Art
Students will create an interactive color oil pastel work that changes from day to night when you change your viewing angle. They’ll use their memory to draw their own home and yard, so it’s a personal piece. This also takes away any worries about content, so students can focus on the colors and different day and night versions of the scene. We’ll use this fun project to learn about viewpoints, lighting effects, 3D artwork, interactive artwork, and the work of 20th century abstract artist, Yaacov Agam.