
Painting
Each lesson Plan focuses primarily on one of the 4 Cornerstones of Art:
Drawing | Painting | Color | Style
OVERVIEW
Students will learn how to paint with watercolor, using the drop-in method and our 4 watercolor insights. First they draw some autumn leaves, and after a demo, they will paint leaves using watercolors they’ve made from acrylic paints. Emphasis is on letting the watercolor work by itself and brush technique.– – –
Grades 3 – 5
Week of October 15 – 19
1 Hour & 45 Minutes
Lesson At A Glance
A brief overview of each step. Buttons jump to each section for detailed information.
12 Min -Set up for watercolor painting and inkg
10 Min – Re-draw the leaf outlines in ink.
10 Min – Watercolor painting – drop-in technique.
40 Min -Paint your leaves. Blot the ink dry first. One leaf at a time.
Extra -Early finishers can add details: shadows, and splatters
2 Min – Everyone helps
SCROLL & TEACH
LESSONPLAN
Each section is a different color. Read over once and then you can SCROLL & TEACH using any device you like. It’s designed to work best with your phone.
LEARNING TARGETS

Students know how to draw from real life
M A T E R I A L S
- 3 or 4 real fall leaves (fresh)
- White copy paper (11″ x 17″ works best)
- Pencil and eraser
- 14″ x 17″ sketch pad – clean page
1.1 Print
Reference
People Photos
Cut images apart and print enough for each student to choose from several.
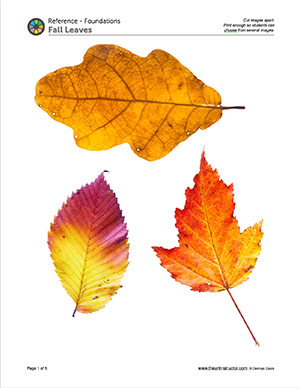
1 Page – Opens in new window
1.2 DRAW
Students spend 20 minutes drawing the leaves realistically by observation
Have everyone choose a few leaves, and place them on a sheet of copy paper so they’re clearly visible. Use pencil to draw lightly at first, and then more finished as they progress. There is no wrong way to sketch! Just enjoy drawing and observe closely. Add shadows underneath the leaves.
Use the Pinterest link below to display examples of this watercolor technique on our Pinterest page.

Pinterest Gallery – Watercolor Leaves
Tap the icon to the left to open our special Pinboard showing examples of artwork to display to your class. See our Article for making Pinterest work on larger displays. You can also use a laptop or large tablet and gather everyone around like you’re using a book.
CREATIONS - tap here to open
Our Creations lessons are for students who have completed the two years of Foundations and are ready to begin using all that they have learned to create new work. These more challenging versions of the same concepts and techniques are easily taught along-side students in the Foundations course. This allows for excellent review, and is encouraging for students to see progress from each viewpoint.
Use the Student Instructions printout below to distribute to your Creations students. Tap the image to open the PDF in a new window.
Watercolor Painting
Overview: Students will create a watercolor painting using their own ideas for subject matter and reference.
Step 1. (10 minutes) Plan your painting. Find a reference you like and draw some thumbnails to figure out your composition. Since it’s paper, you can make it a square or rectangle.
Step 2. (15 min) Draw guidelines in graphite pencil on your watercolor paper.
Step 3. (5) Set up for working in watercolors.
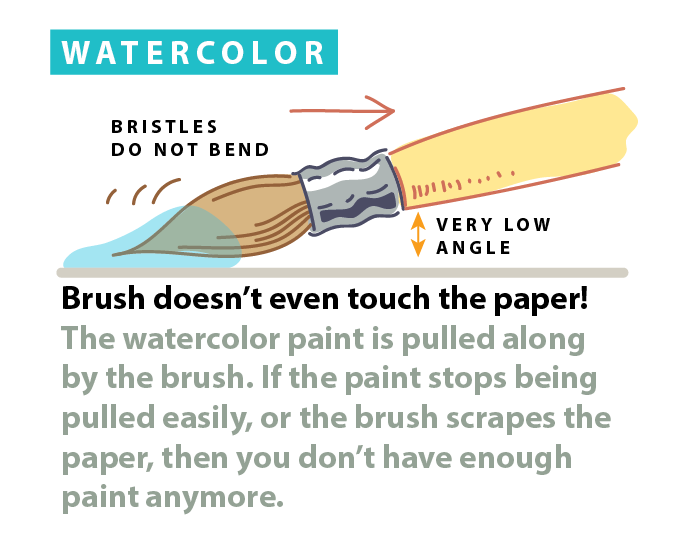
Step 4. Paint the work using the drop-in technique or regular watercolor technique. Listen to the demos for review and the 2 most important insights about watercolor: 1. Brush doesn’t touch the paper; 2. Leave it alone, because wet watercolor isn’t finished.
Tap images to open Creations Student Instructions and Reference Materials in new windows

LEARNING TARGETS
Students know how to set up their work area for painting with watercolor.
M A T E R I A L S
- 11″ x 15″ Watercolor paper
- Pencil and eraser
- TWO water tubs – 2/3 full each
- Acrylic or watercolor paints (do not open)
- Palette pad and/or tray for mixing
- Medium sized brushes
- Eye droppers
- Ink bottles
- Ink pen and nib
- Plate and tape or clay to secure the ink bottles (prevents tipping over)
- Paper towels
Brushes should be nylon for springiness and durability. Round brushes are the most versatile.
Paint pigment list:
- Napthol or Pyrrol Red
- Hansa or Light Yellow
- Pthalo Green (blue shade)
- Cyan or Cerulean Blue
- Ultramarine Blue
- Dioxazine Purple
- Magenta
- Burnt Umber
- Raw Sienna
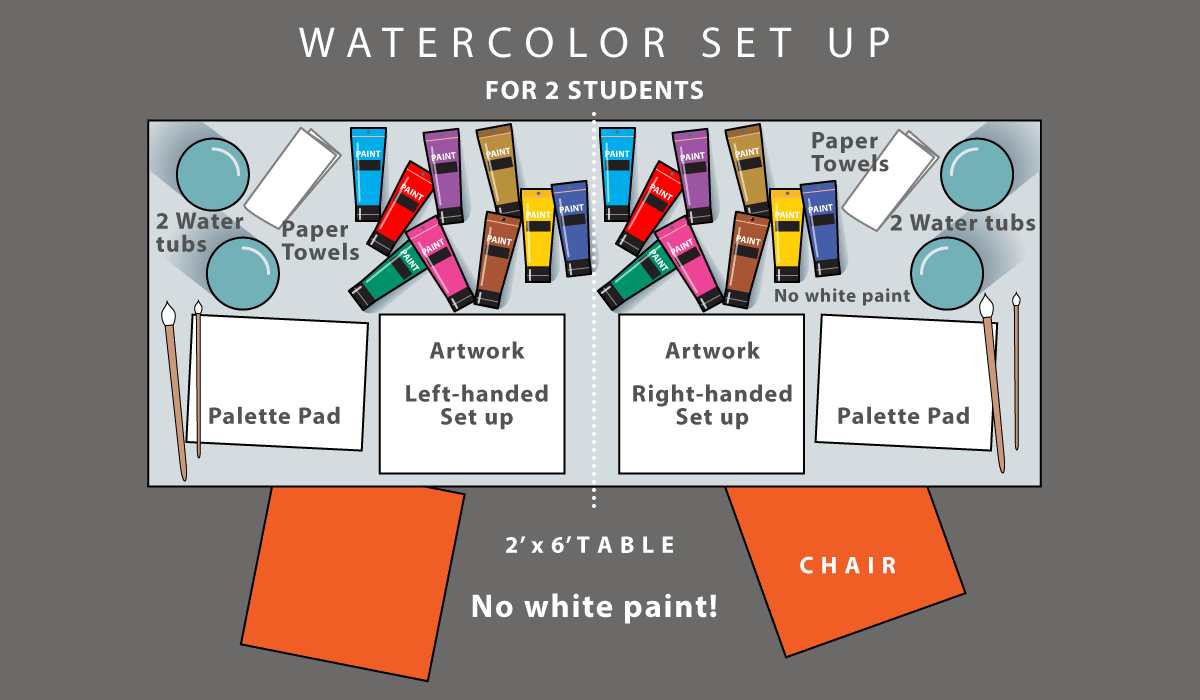
2.1 setup
This is a great opportunity to work on organization. Water tubs, palette, paints, and brushes should all be on the side that the student’s favored hand is. Ink can be placed on top of the palette for working with first.
LEARNING TARGETS
Students know how to draw an outline
M A T E R I A L S
- 2B Pencil
- White Eraser
3.1 draw
Make sure the students realize they should draw guidelines. Light lines can be erased and modified to work on the composition, or design of the work.
LEARNING TARGETS
Students know how to use ink to make an outline
M A T E R I A L S
- Ink bottle – India ink
- Pen and nib
- Paper towels
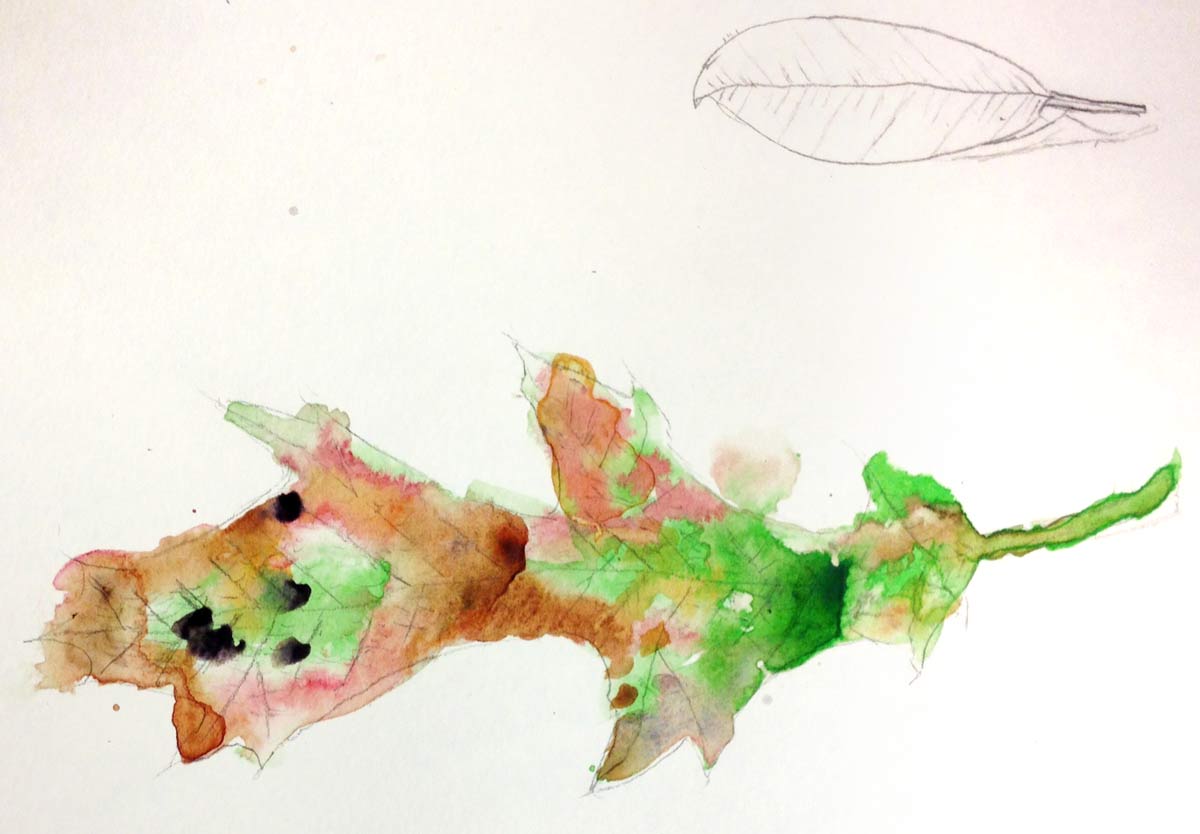
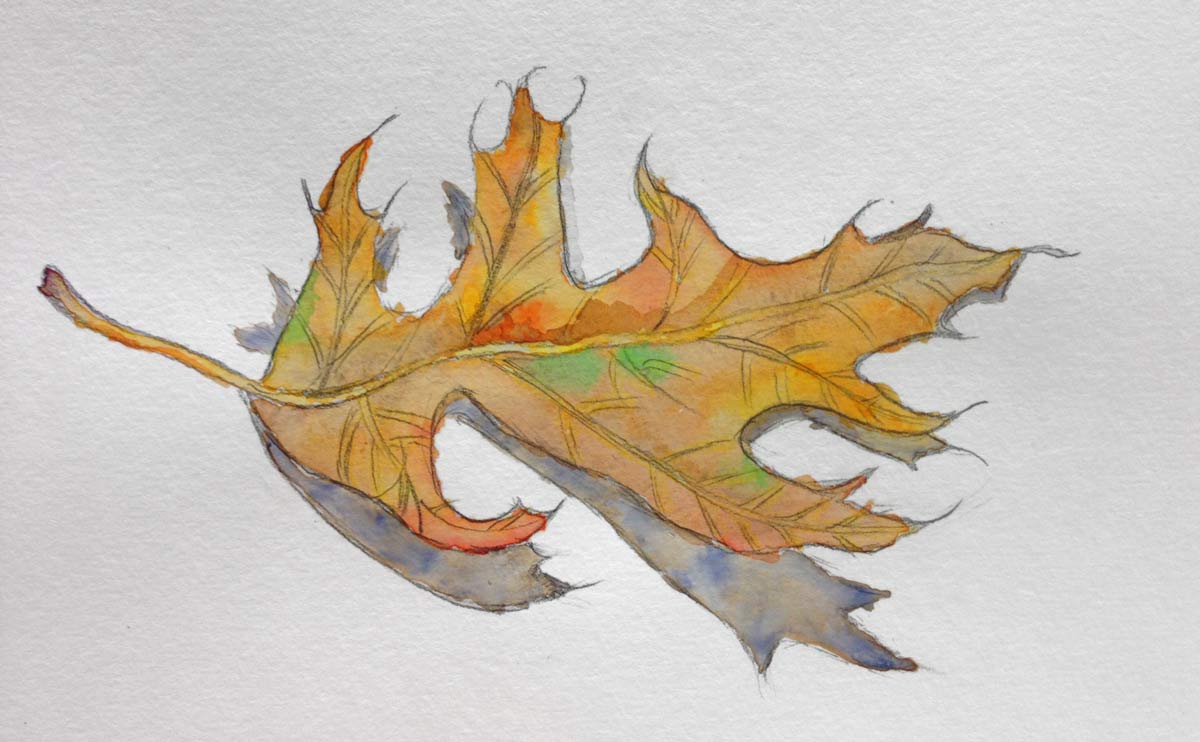
4.1 ink
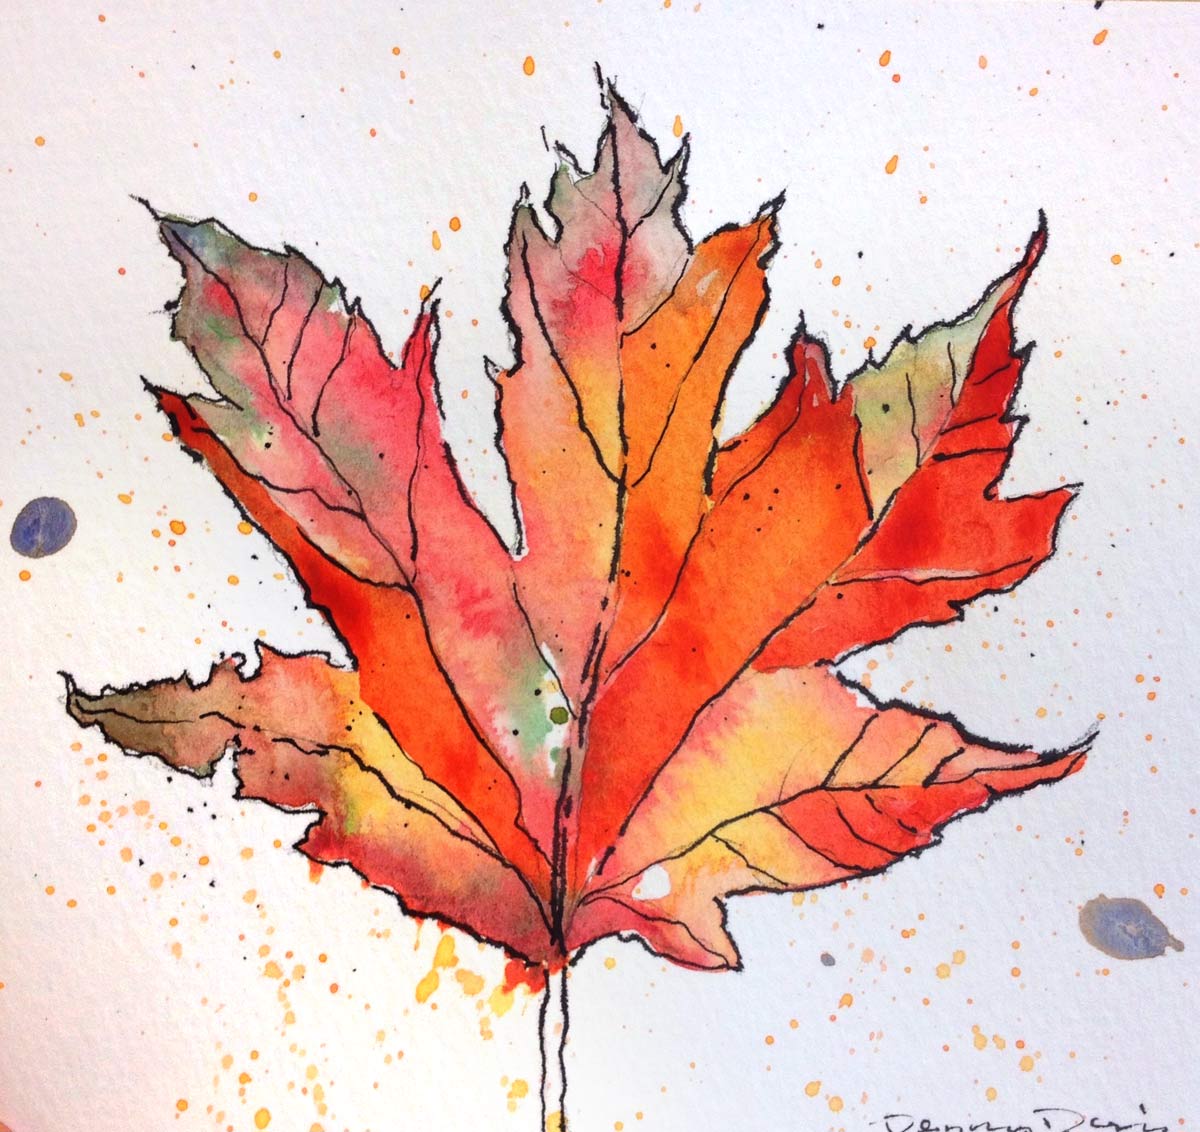
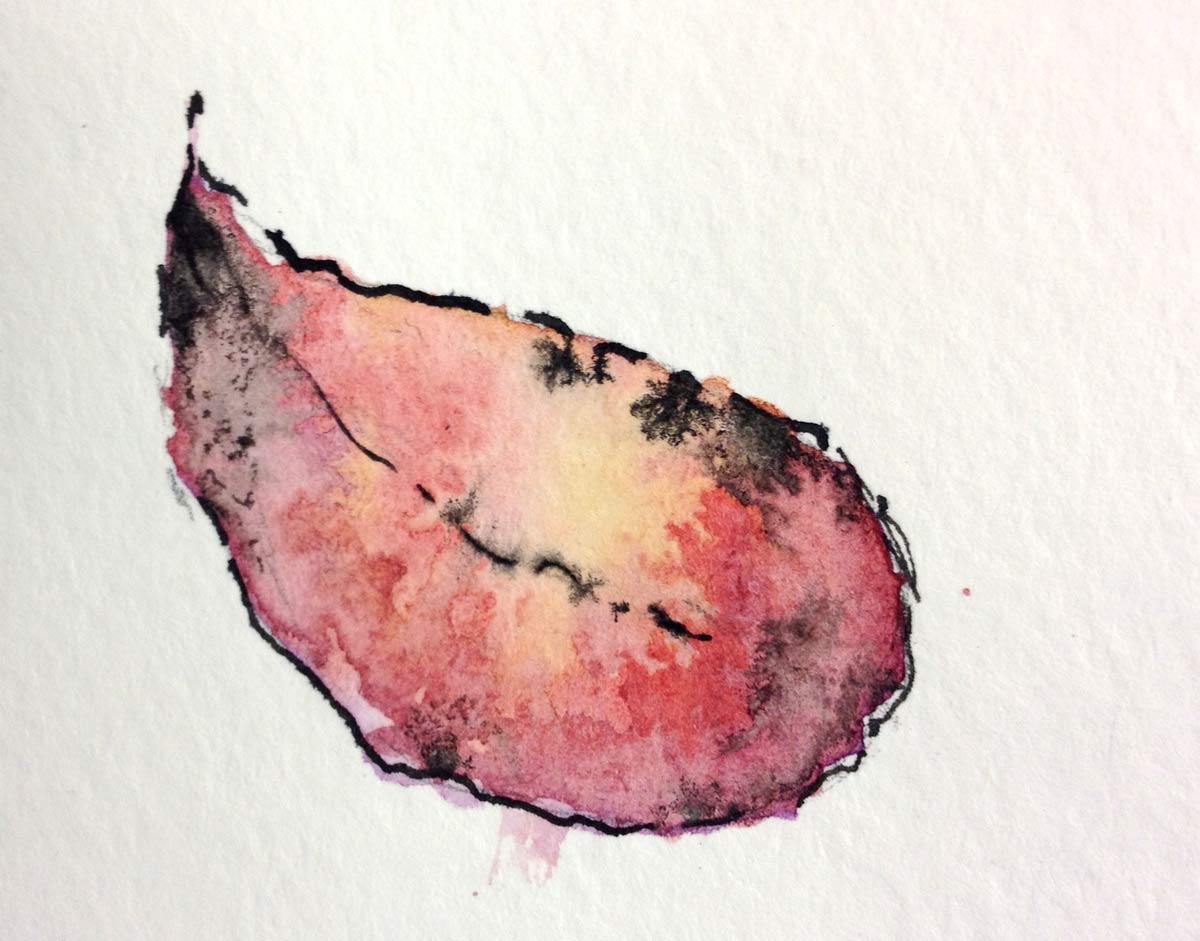
It’s good to only create a few internal lines for veins if they want to add them. Too many and the details overpower the color.
When finished, add names in the corner and set aside to dry while during the demo.
LEARNING TARGETS
Students know how to set up their work area for painting with acrylics.
M A T E R I A L S
- Pre-draw leaf on watercolor paper
- Acrylic or watercolor paints
- Palette pad or tray to mix paints
- Smocks
- Water containers
- Eye droppers
- Paper towels
5.1 demo
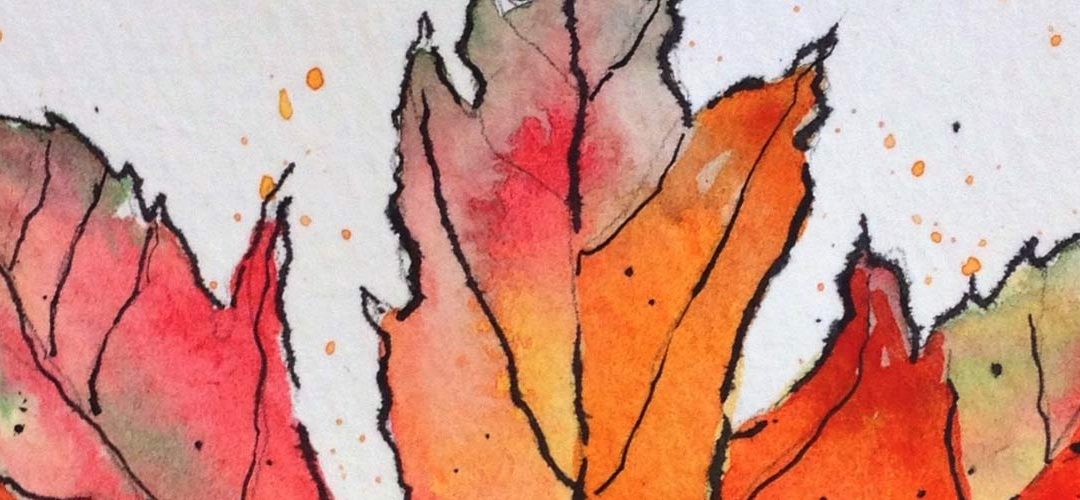
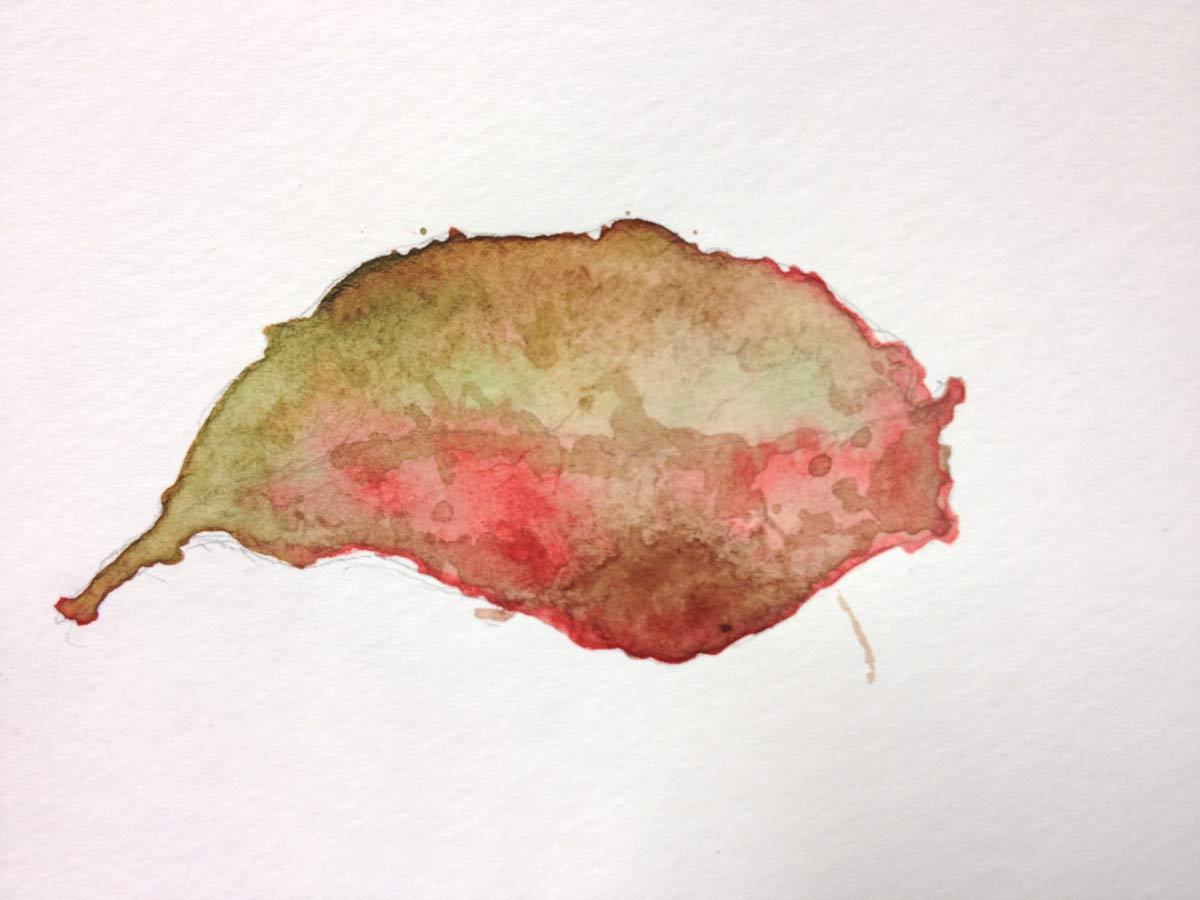
This technique is called “drop-in”, but we like to call it “Watercolor Rodeo!”
Have your students gather around and show them this technique. It’s very easy and a lot of fun.
- You have 2 tubs: one for cleaning & one is the paint; water is the paint
- Don’t use white. Paper is white so clear water is like white paint.
- Make your colors by mixing translucent acrylics into water. Mix thoroughly.
- Make the color strong but still watery. Not syrupy. ( heavy paint is like having fat cattle in your rodeo; they can’t run around)
- Mix colors; don’t use pure pigments.
- Make more than you think you need. It’s just water.
At this point, take a quick breather, and explain how to work with watercolor. Read the teacher talk and display the slideshow, reading the captions carefully, before moving on to finish the DEMO.
“Watercolor is very different from other paints. It usually takes artists a lot of time to learn how to handle this difficult medium. However, I have a special trick that will allow you to understand how watercolor works almost instantly.”
The Perfect Way To Teach Watercolor (tap any image to open viewer)

5.2 demo
This technique is called “drop-in”, but we like to call it “Watercolor Rodeo!”
- Paint ONE leaf with CLEAR water. Pencil or ink outline is like a fence that the “horses” run in – watercolor will stay inside wet area. There should be enough water so that your brush can enter the leaf again but not have to touch the paper much or at all.
- Big bubbles of water at edges that look scary – means you have too much water.
- Seeing paper texture or not shiny – means you have too little water.
- Fill your brush with a lot of brilliant color – again, not pure pigments, but mixed colors.
- Dab and streak it into the clear-water leaf. Watch it spread! That’s the rodeo!
INSIGHT 1:
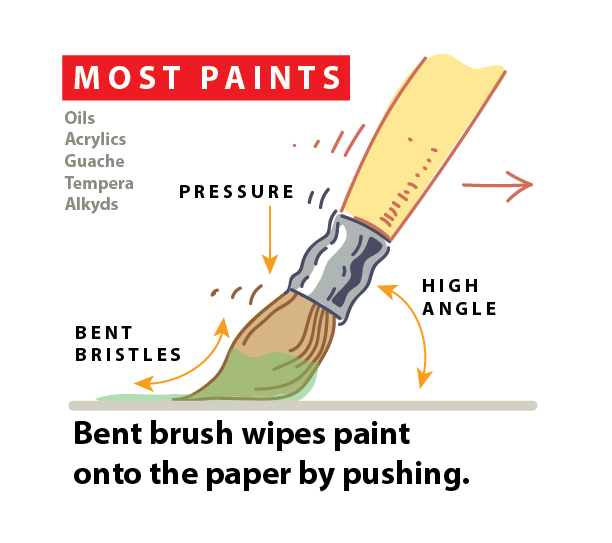
“Don’t touch the brush to the paper“. The secret to watercolor is that the water connects the brush to the paper, but the brush and paper don’t actually touch. That’s why you need so much water. You can practice this when you put the clear water on the paper. You can overdo it though, so don’t let the water be so big that it looks like it will easily escape and run across the paper.
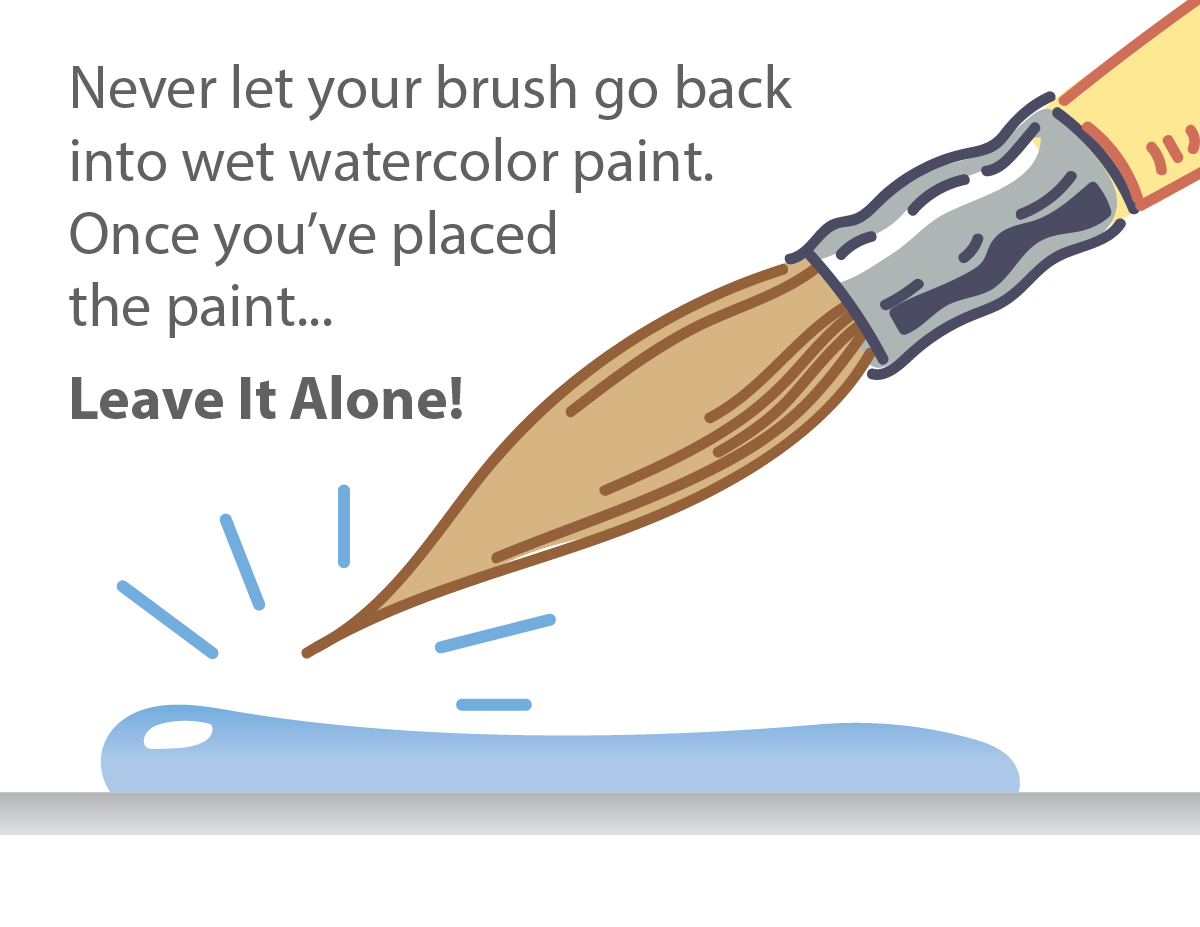
INSIGHT 2:
“Leaf it alone“. Watercolor must work by itself. You make the fence and the water area, then you let it loose like horses in the rodeo. It runs all over and does it’s own thing. If you mess with watercolor, you’ll mess watercolor up. Leave it alone and let it go by itself. It won’t look good until it’s finished and dry.
LEARNING TARGETS
Students know how to paint with watercolors
M A T E R I A L S
- Watercolor paper with leaf drawings
- Paints
- Brushes
- Water tubs
- Paper towels
- Eye droppers
6.1 paint
Before beginning, it helps to carefully blot any ink that might not be completely dry. Use a paper towel and do not wipe or press hard.
Travel around the room helping students, and asking what they think about their work and the technique. If you see too much water on part of a leaf, twist up a paper towel corner and carefully sop up some of the excess water. This works just like a brush: if you don’t touch the paper, it doesn’t damage the paint technique.
Remind your students often, that watercolor does not look “right” until it’s dry. Leave it alone.
“Remember, only do one leaf at a time. Ask for help, and make sure you LEAF IT ALONE!
You can think about it like this. If you wanted to serve your friends some nice homemade popsicles, you wouldn’t keep taking them half frozen out of the freezer every few minutes and put them on a plate to see how they were doing. No, you would wait until they are frozen solid.
That’s how it is with watercolor. You can’t mess with it until it is dried completely.”
LEARNING TARGETS
Students know how to dd details to their paintings
M A T E R I A L S
- Watercolor paper with leaf drawings
- Paints
- Brushes
- Water tubs
- Paper towels
- Eye droppers
7.1 paint
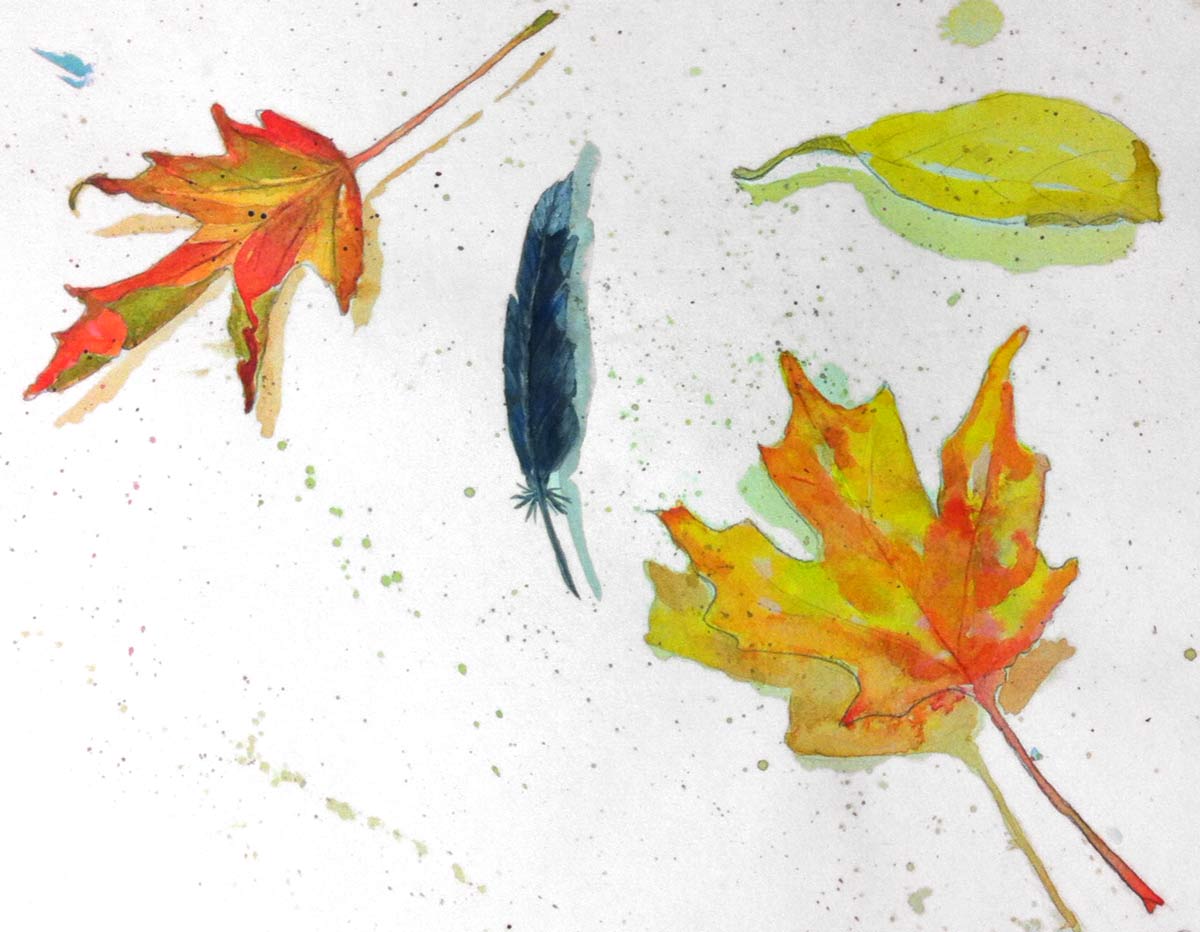
Early finishers can add details. Sign names to work.
Add splatters by tapping a brush full of paint against your hand, while over the artwork. BE GENTLE!
IMPORTANT!
Do not move artwork that is still wet. Watercolors cannot be picked up without the paints running across and creating streaks. If they must be moved, slide paintings onto a flat board and carefully move the board where you can slide it off in another place.
LEARNING TARGETS
Students know the importance of cleaning up
M A T E R I A L S
- Paper Towels
- Cleaning wipes
- Sink
- Waste baskets
- Well-lit spot for photos
- Camera or phone-camera
8.2 clean
- Wash hands
- Super-wash brushes if used
- Put art supplies away
- Wipe tables & toss trash
- Remove any smocks (last)
- Check for items on floors and tables
8.3 photo
OBJECTIVES
- Practice and improvement using new painting techniques
- Understanding how watercolor is completely different from other paints
- Accomplishment in creating watercolor artwork, which is difficult to do and to teach
- Fulfillment in choosing colors and composition
TROUBLESPOTS
Using white paint – some students may not hear you say not to use the white.
Too much water – large puddles can get loose and run across the paper.
Not enough water – when the brush is touching the paper too much, it creates a scrubbed, unattractive look.
Forgetting to mix colors – using ArtSquish pigment colors right out of the tube will look too harsh, especially the yellow.
ART WORDS
Drop-in – adding watercolors to clear water that has already been applied to the paper.
Sizing – a starchy additive that is on the surface of watercolor paper and which prevents the water from soaking in too fast. This is what makes the watercolor able to work on it’s own, slowly, and create beautiful blends and patterns.
Translucent – anything that lets some amount of light show through, such as watercolor, which lets the light shine through to the paper and then back up through the color, making it look brighter.
Glaze – any translucent medium is referred to as a glaze. Stained glass windows are also called glazed windows.
CLASSROOM
PREP
Coming soon
Print all of your PDFs from the lesson plan and cut any references apart as needed.
What your room needs
Here are your printable lists and room prep instructions.
Opens in new window
CLASSROOM
MATERIALS
- 8.5″ x 11″ copy paper
- 8.5″ x 11″ card stock
- 11″ x 17″ copy paper
- Rulers
- Scissors
- Box cutter (teacher only)
- Large Drawing boards with clips
- Water containers
- Spray bottles
- Water droppers
- Paper towels
- Smocks
STUDENT’S
MATERIALS
- 14″ x 17″ Sketch Paper
- 11″ x 15″ watercolor paper
- 2B Pencil
- 4B pencil
- Ebony pencil
- Black Sharpie
- Markers
- India ink
- Ink dip pen with metal nib (not too sharp a point)
- Soft compressed charcoal sticks (not pencils)
- Canvas pencil (dark gray colored pencil)
- White erasers
- Kneaded erasers
- Acrylic paints
- Oil pastels
- Blender sticks (stumps)
- Sandpaper boards (to clean blenders)
- Paper palette pad, or disposable trays/plates
- 11″ x 14″ Canvas (loose or from real canvas pad)
- Canvas boards (optional)
- Tape – blue painter’s tape
- Brushes – All sizes
PREVIEW
Week 14: Animal Shadows
Students will learn about the basic nature of shadows using familiar round shapes as an example. Then they’ll apply this information to a drawing & watercolor painting of an animal using photo reference.
Week 15: Animal Shadows
Students will learn about the basic nature of shadows using familiar round shapes as an example. Then they’ll apply this information to a drawing & watercolor painting of an animal using photo reference.