
OVERVIEW
Students have fun drawing leaves from photos, and using oil pastels to color them. Then a straw and blow technique is used to create ink tree branches. The last project is to draw a tree in pencil and then wet the paper. Watercolors are used to create a soft fall foliage work using warm colors that spread into the wet paper.Grades 1 – 2
Week of October 27 – 31
1 Hour & 30 Minutes
Lesson At A Glance
A brief overview of each step. Buttons jump to each section for detailed information.
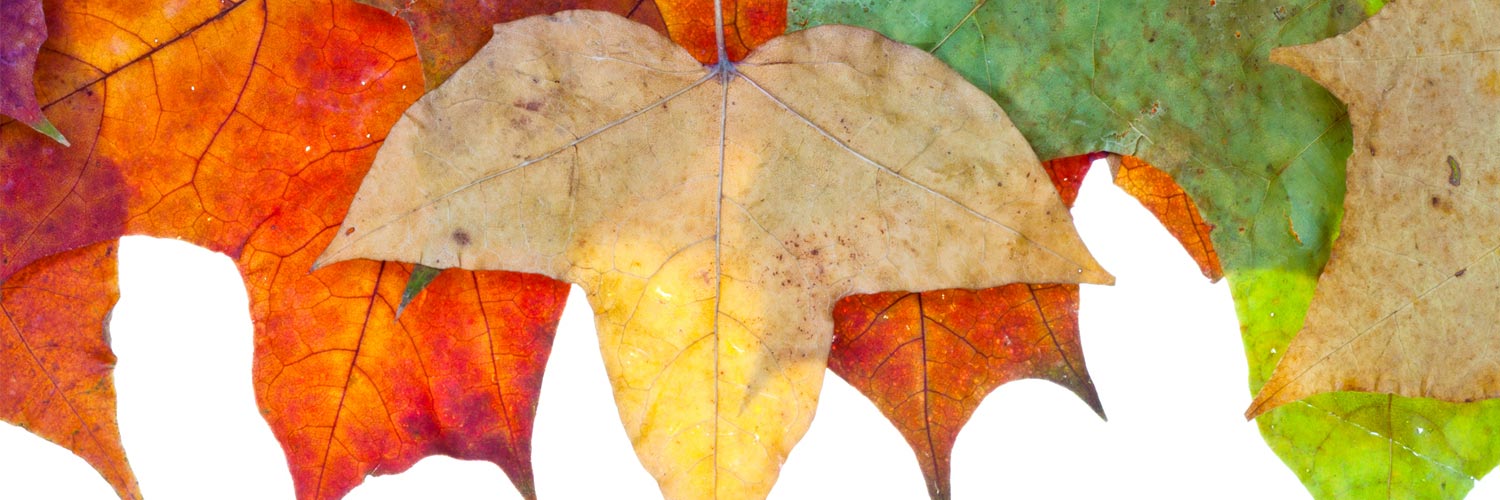
5 Min – Each student gets 3 Fall leaves.
20 Min – Use fall colored leaves
15 Min – Ink & Straws
5 Min – Discuss branches
5 Min – Draw a tree & branches
5 Min – Wet paper
10 Min – Warm colors
5 Min – Everyone helps
If Time -Leaf rubbings on paper
SCROLL & TEACH
LESSONPLAN
Each section is a different color. Read over once and then you can SCROLL & TEACH using any device you like. It’s designed to work best with your phone.
LEARNING TARGETS

Students know how to draw from memory
M A T E R I A L S
- 11 x 17″ Copy Paper
- Markers
- Oil Pastels
1.1 leaf
Students draw a leaf from memory before moving to artists’ choice.
Begin with a short warmup. Have students draw a leaf from their memory using markers. They can make more leaves that look different from each other, or get a new piece of paper for artists choice.
Use this button to jump down to the preparation section.
LEARNING TARGETS
Students know how to choose a reference.
M A T E R I A L S
- 11″ x 17″ Copy Paper
- Real leaves you’ve collected OR
- Printed Leaves from the PDF below
2.1 Print
Reference
Fall Leaves
Printable leaves for when finding real ones is difficult.

5 Pages – Opens in new window
2.1 Collect
Students “collect” 3 leaves.
Lay all your leaves on a table in the front of your classroom. Fall colors are great, but if the leaves haven’t changed yet, you can easily use green leaves, telling the kids to make them change to the fall colors. If you have some of those imitation fall leaves you can toss a few of those in too.
If you can’t get good leaves, use our printable leaf collection above. Just cut the leaves close to the shape of each one so they can be arranged just like real leaves.
Students can then come up to a table (a few at a time) and choose 3 leaves. Encourage them to pick leaves that all look different. Once they have chosen 3 leaves, they can take them back to their seats.
Use this button to jump down to the preparation section.
LEARNING TARGETS
Students know how to draw from reference
M A T E R I A L S
- 11″ x 17″ Copy Paper – two sheets per student
- The second sheet can be cover stock paper
- Real Leaves or cut-out Leaves from the PDF in STEP 2
- 2B Pencil
- White Eraser
3.1 design
Students arrange leaves on one sheet to create their design.
Have the 2 sheets of paper stacked in front of each student. On the top sheet of copy paper, have everyone lay 3 leaves out in a nice design. A great idea is with one of the leaves overlapping another one, and the third one over to one side, but they can do whatever they like.
Encourage students to try more than one arrangement and experiment until they find one they like. Carefully slide this away from them so that it doesn’t cover the second sheet of paper.
3.2 draw
Students recreate the outlines of their 3-leaf design using pencil.
Begin with one leaf, and draw it in the same place and the same size, on the new paper. Continue drawing the other two just like they look, and in the same positions. Don’t do any shading at all. We will be using oil pastels to color the leaves in the next step.
Remind students to use line to show edges. Encourage everyone by noting how well they are doing as they are using lines to create shapes. If a few students are struggling with the shapes, let them turn their paper over, and try again, or even trace the first leaf to get started. You can even ease up on the realistic objective, and let everyone trace the leaves after the first drawing. Trying is the important thing, and you don’t want stressed or unhappy artists at this age. You will know best for your students.
For tracing, you’ll need to have regular weight copy paper ready, since you can’t see through the card stock.
Use this button to jump down to the preparation section.
LEARNING TARGETS
Students know how to add color to their artwork with oil pastels
M A T E R I A L S
- 11″ x 17″ Copy Paper
- Oil Pastels
- Blender sticks (stumps)
4.1 color
Students will color the leaves.
Each student will use oil pastels, beginning with yellows and then adding orange and reds. Finally use a little purple, green or brown on the edges if you want. Look at the pictures of leaves to see where colors should go (or the fall leaves you have if they are colored.)
End by blending with yellow and white and/or blending sticks. Early finishers can add a background.

At first, oil pastels look a lot like bright crayons

You can layer the color and start to blend them. They mix more like paint than crayons.

Yellow has been layered over both sides so you can see the smearing effect on the red.

Mix colors that seem similar. Red and yellow are warm colors, and mix well. Blue and green are cool, so they mix well too.
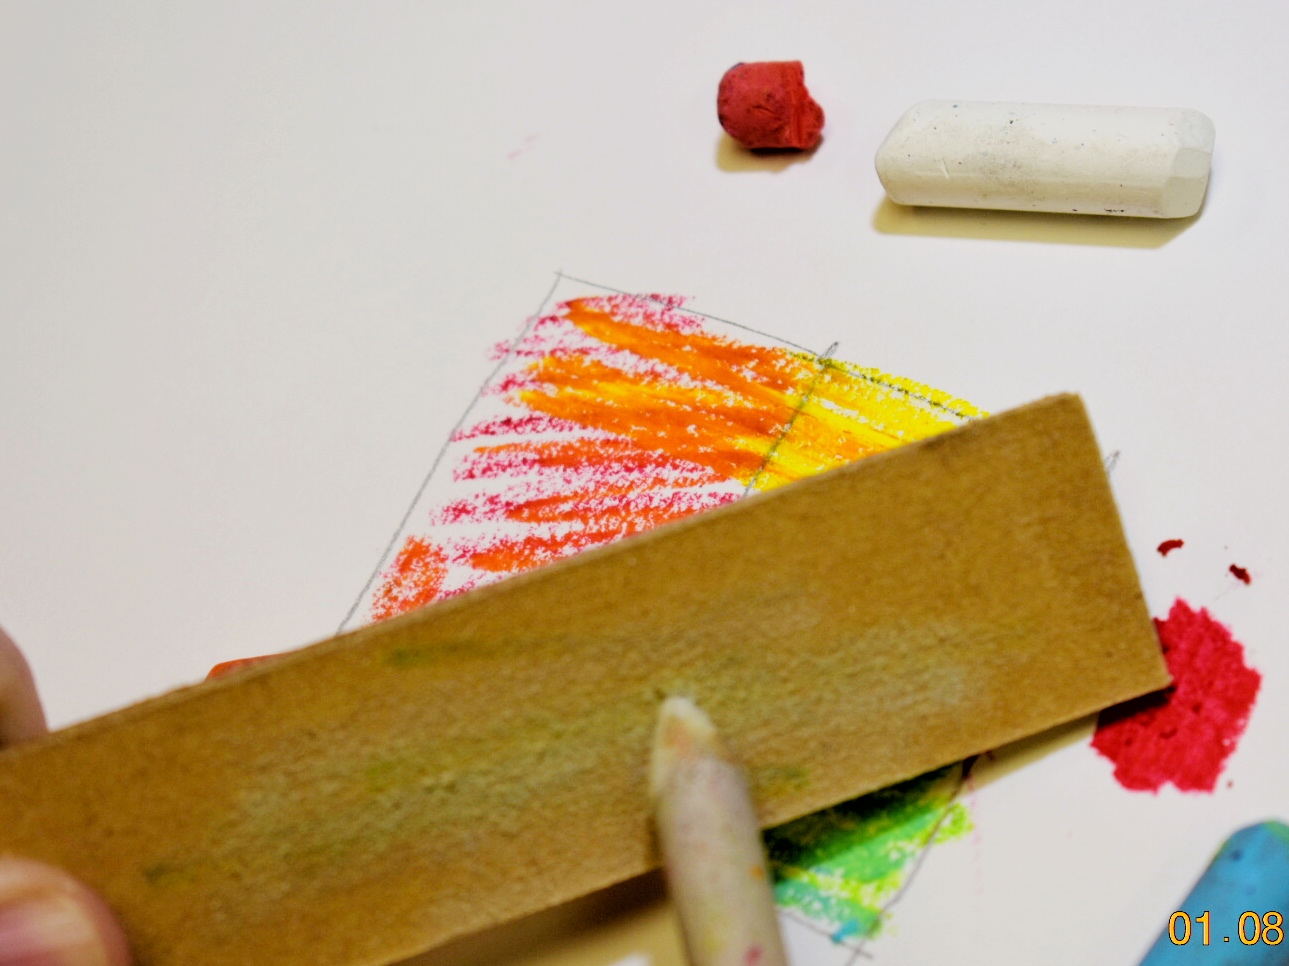
A paper stump (blender stick), can be used. Clean it off by rubbing on a sandpaper board

Smearing the colors together with the blender looks awesome!

White can also be used to blend, as well as lighten. Now the pastels look very much like paint
Use this button to jump down to the preparation section.
LEARNING TARGETS
Students know how to use ink with different techniques
M A T E R I A L S
- 11 x 17″ Card Stock Paper
- Bendy straws
- Ink
- Water
- Ink Dropper
- Smocks
- Paper towel
5.1 Display

5.1 Prepare
Get ready ahead of time by mixing ink and water.
Each student will need card stock paper and a bendy straw. You will need to prepare a dark grey ink color by mixing ink and a small bit of water in a jar. The water makes it flow better. Make sure you mix enough for all your students to get some. Have an ink dropper ready as well.
5.2 blow
Give each student paper and a bendy straw. Show that you use it upside down, with the bent part down at the paper to blow onto your paper away from you. It’s a great idea to demonstrate as you tell them how to blow through the straw.
Too much blowing will make kids dizzy! Make sure you have students stop and start blowing according to your direction. You can facilitate this by having them only blow when the music in on, and stop when the music stops.
Give students 2 or 3 tries on more papers if you want. You may need to add a few more drops at the bottom as you go around and watch your students. Once they are finished, set papers aside to dry.
“I am going to put a drop of ink on the bottom of the page. This drop is the beginning of a tree branches. How will you make tree branches? By blowing and pushing the ink upwards with your straw! The ink will jump around and look a lot like tree branches.
Be careful when blowing in the straw. If you let out too much air at once, it can create a splash that won’t look like branches. Having a steady stream of air coming out of the straw will give you more control in creating branches, but you do need a strong air flow. Take a deep breath and slowly let the air out through the straw. Now you try!”
Place the ink about 2 inches from the bottom of the page instead of the very bottom edge if in shower position. You can try these in both bathtub and shower position.
Also, be careful moving these. The ink should be ok, but they still might run. Try to keep them flat so you don’t get random drips as you move them.
Use this button to jump down to the preparation section.
LEARNING TARGETS
Students know how draw from reference
M A T E R I A L S
- Tree Branch PDF
6.1 Look

Use this button to jump down to the preparation section.
LEARNING TARGETS
Students know how to create a realistic drawing from a reference.
M A T E R I A L S
- 11 x 15″ Watercolor Paper
- 2B Pencil
- Black and Grey Oil Pastel
- White Eraser
7.1 draw
Students begin a painting by drawing the trunk and branches using pencil and pastel.
Have the sheet of watercolor paper in the shower position. Have students draw a large tree and branches using pencil, by looking at the tree image on display. Encourage them to draw lightly, but don’t expect it. Students should begin at the bottom and travel upwards, creating branches like they see in the picture and also like their ink did. Be sure all students have their names at bottom corner.
They should be free to create branches different than the reference if they want to.
Students will now trace over their pencil lines with a black pastel. Then have them blend into it with a grey pastel to create lighter areas. They can add width to the trunk and larger branches to make them more realistic.
Use this button to jump down to the preparation section.
LEARNING TARGETS
Students know how to use different watercolor techniques
M A T E R I A L S
- 11 x 15″ Watercolor Paper
- Large Paint Brush OR
- Sponge
- Watercolor Pan
- Water Container
- Paper Towels
8.1 bath
Students will continue with the bare tree drawing, and turn the watercolor paper over to begin a paper bath. Begin by wetting the back using a large brush or sponge and water jar. Let the water soak in and expand the paper. Blot with a paper towel or squeezed out sponge to get puddles up and turn back to the front. Wet the front too, but don’t use as much water, and be careful to not smear the oil pastels. If you use a sponge, you’ll need to use a patting method instead of wiping. If using brushes, just keep a light touch and have them wet around the pastels in the larger areas first. After paper is wet, blot up all the excess water and smooth out any wrinkles. Paper should still be wet, but not glossy from the water, when you begin painting.
When they finish giving their paper a water bath, have students “wake up” their paints by dipping the paint brush into the water and adding a little bit of water to each color. We will only be using the warm colors (and maybe a little yellow green) so students only have to add water to warm colors.
Use this button to jump down to the preparation section.
LEARNING TARGETS
Students know how to use watercolors
M A T E R I A L S
- 11 x 15″ Watercolor Paper
- Large Paint Brush OR
- Sponge
- Watercolor Pan
- Water Container
- Paper Towels
9.1 paint
Students will use two movements for the leafy areas, which are not individual leaves, but bunches of leaves. It’s good to let the paper sit for a short moment before you begin, while you are preparing.
Get out watercolors and mixing trays/plates. Explain that we are only going to use the warm fall colors. You can try a bit of yellow green if you want, but mostly yellows, orange and reds.
Mix up some strong colors, and add to the branch areas to make a soft, spreading, and colorful fall tree. Have fun!
“We’re going to use our moving, or color dancing, in this painting in two ways. You can add color by dabbing, like making a dot, and also by drawing your brush in a short line. Go back and get more paint after every line, and after 2 dabs, because you need a lot of color on your brush for this to work well. When you touch the wet paper, the colors will spread out on their own! There is one very important rule to remember:
Watercolor paper does not like the brush! Do not touch the same area more than once, and only tickle the paper, not pressing the brush to the paper at all. Always move to a new place for every touch on your paper. You will fill up your tree pretty fast, so this won’t take long.”
Use this button to jump down to the preparation section.
LEARNING TARGETS
Students know how to create textures
M A T E R I A L S
- 11 x 17″ Copy Paper
- Real Leaves
- Oil Pastels
10.1 extra
If there is extra time at the end of the class, hand each student a piece of copy paper. Don’t feel like you need to rush through other steps to complete this activity. If students are enjoying painting, it is ok to skip this step.
Have the students try leaf rubbings using fall colors in pastels. Use thin copy paper for the best results.
Use this button to jump down to the preparation section.
LEARNING TARGETS
Students know how to keep their work space tidy.
M A T E R I A L S
- Sink
- Waste baskets
- Well-lit spot for photos
- Camera or phone-camera
- Paper towels
- Cleaning wipes
11.1 Clean
- Empty water containters
- Super-wash brushes if used
- Put art supplies away (sop up runny paint before disposing of palette paper)
- Wipe tables & toss trash
- Remove any smocks (last)
- Check for items on floors and tables
11.2 photo
- Try to get photos of your student’s artwork. Find a good spot for quick lighting without highlights or shadows from your hands and device. Ideally in-between two strong lights on each side.
OBJECTIVES
- Practice and improvement coloring and drawing from life
- Understanding shapes (leaves) and how branches look
- Accomplishment in making two fall-themed artworks
- Fulfillment by using 2 new techniques
TROUBLESPOTS
Drawing misshapen Leaves – Sometimes students will draw the fun shapes on the edges and not notice the big shapes of the whole leaf. They may become very skinny and all about the edges. Point out how wide and tall leaves are, and refer to them as “big shapes”.
Overworking – when painting wet in wet, with the watercolors in step 9, be on the lookout for scrubbing and going back and forth. Just touching the brush a few times is all they need to do
ART WORDS
Realistic – when artists make work that looks very much like the real world. Cartoons are not realistic at all. Neither are collages or drawings from memory. Realistic drawings are full of details that can only be made by looking very carefully at the real world as you draw it.
India Ink – Ink is not like paint. It’s very dark and can easily stain. Be careful to not get it on your clothes. If you get it on your hands, it will mostly wash off, but make sure to wipe your hands on paper towels instead of clothing.
Tickle brush – Not touching the paper much with the watercolor brushes is an important technique.
“Waking up Paint” – Setting a bit of water on your watercolor cakes, about 4 or 5 minutes before you are using them, will help them get soft. This makes it easier to mix and to create stronger colors.
CLASSROOM
PREP
Have a bunch of amazing supplies ready, and cut a few things apart before-hand in a way that make you look amazing.
Print all of your PDFs from the lesson plan and cut any references apart as needed.
What your room needs
Here are your printable lists and room prep instructions.
Opens in new window
CLASSROOM
MATERIALS
- 11×17” Copy Paper
- 11x 17 Card Stock Paper
- 11 x 15” Watercolor Paper
- Large Paint Brush/or Sponge
- Watercolor Pan
- Water container
- Real Leaves OR
- Printed leaves from PDF
- Tree Branch PDF
- 4B pencils
- Erasers
- Markers
- Oil pastels
- Blender sticks (stumps)
- Bendy Straws
- Ink Dropper
- Ink
- Smocks
- Clipboards
- Paper towels
PREVIEW
Week 13: Fall Funnies
Students will have tons of fun learning the parts of cartoon faces and practicing how to put them all together. After creating their own original character, they get to create a silly cartoon head using fun-dough.
Week 14: Cartoons Again!
Students will continue with cartooning, and work on cartoon hands and feet. Then we move on to creating crazy creatures and silly monsters. It’s a fun day of cartoon art.