
OVERVIEW
The week before Halloween, we practice painting fun, simple faces in tempera paints, and then paint a face on a real pumpkin using grown-up acrylic paints. It’s also a great time for a party: have parents bring some drinks or snacks, and have students each bring a small pumpkin to paint. Bring the pumpkins in a small cardboard box to take it home while still wet!– – –
Grades 1 – 2
Week of October 21 – 25
1 Hour & 30 Minutes
Lesson At A Glance
A brief overview of each step. Buttons jump to each section for detailed information.
10 Min – Good ideas that artists need to use
15 Min – Practice 3 pumpkin drawings in pastels
10 Min – Practice pastels on paper taped to pumpkin
10 Min – Set up for ACRYLIC PAINTS
20 Min – Paint the actual pumpkin
If Time – Color pumpkin cartoons
5 Min – Wet Pumpkins go home in boxes
SCROLL & TEACH
LESSONPLAN
Each section is a different color. Read over once and then you can SCROLL & TEACH using any device you like. It’s designed to work best with your phone.
LEARNING TARGETS

Students know how to set up their work area for painting with acrylics.
M A T E R I A L S
- 11″ x 17″ copy paper
- 2B Pencil
- Markers
- White erasers
- Party snacks
1.1 Warmup
Start with the snacks and drinks right off today. Your students can listen to music while they eat and draw. Move along to each step; it’s easy to lose track of time with the party going.
Always try to greet students as they come in and kneel down when you can so that you are on their level.
Artists’ Choice
Encourage students to work with one piece of paper for a while. If someone uses the phrase, “free draw”, explain that artists’ choice is something only artists can do, while free-draw is something anyone can do. You want to use the phrase to elevate the students’ expectations of their work.
Everyone should take their time with the work and make a finished piece of art. Limiting the paper can also help kids focus on the work. If someone finishes in super-fast time, ask them what more they can do to the existing paper. Ask again several times – unless they appear overly frustrated; then you can allow them to move on to a new work.
Use this button to jump down to the preparation section.
LEARNING TARGETS
Students know how to use color to create emphasis.
M A T E R I A L S
- Continue with markers and large copy papers
- Slow and easy music to play, like Enya’s “Drifting”
2.1 Choose
After they’ve chosen the markers they like, have them push the others away so they’re not tempted to use them.
2.2 Explain
Get your music ready too.
I want you to use the markers, one at a time, and make big swirling circles and curls all over you paper – but very slowly. Go with the music I’m going to play. When the music stops, you also stop, and then get a new color. When the music starts, you start too.”
2.3 Create
Once they get going, turn the music down or off, and explain about how the Most Important Spot is made with an accent color.
2.4 Teach
Once you’ve explained (using the teacher talk below), turn off the music and have everyone stop.
- The Most Important Spot – Something on your artwork should look like it’s way more important than anything else. It helps artwork look better, if people know the most important thing when they first look at it.
- Accent Color – Using a really different kind of color, in only one small spot can look awesome! It’s a great way to create a Most Important Spot.
- Using all Warm colors, like we’ve done, and then having using just a little bit of a Cool color, makes the cool color the accent.
Just make sure you only use a little bit of the accent color and in one spot, or it stops being an accent.”
2.5 Finish
Encourage everyone to make just one small accent spot! Turn the music on to begin and then turn it off pretty quickly so they don’t do too much.
Use this button to jump down to the preparation section.
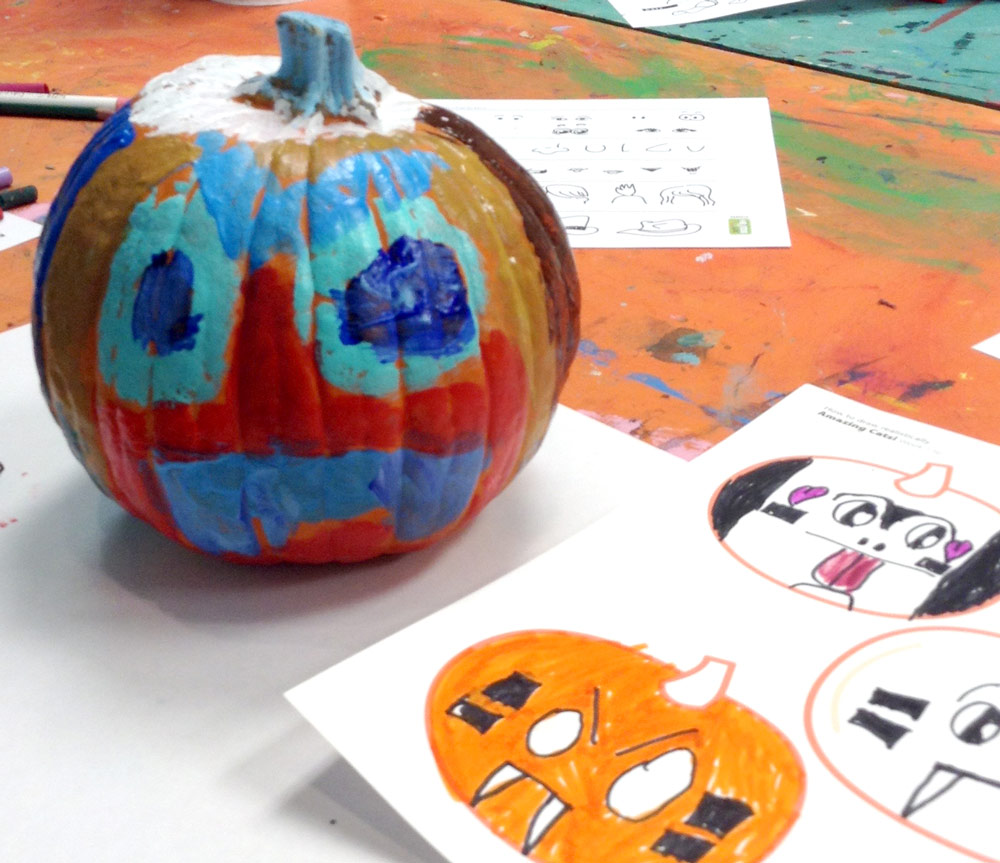
STEP 3. Cartoon Faces
Students will draw fun faces as a prelude for painting on their pumpkinsLEARNING TARGETS
Students know how to put different simple and exaggerated elements together to make a cartoon face.
M A T E R I A L S
- 8.5″ x 11″ copy paper
- 2B Pencil
- White erasers
3.1 Print
Reference
Face Parts
A set of cartoon face ideas for students to copy and get inspiration from. Print one for each student to have or for two students to share between them.
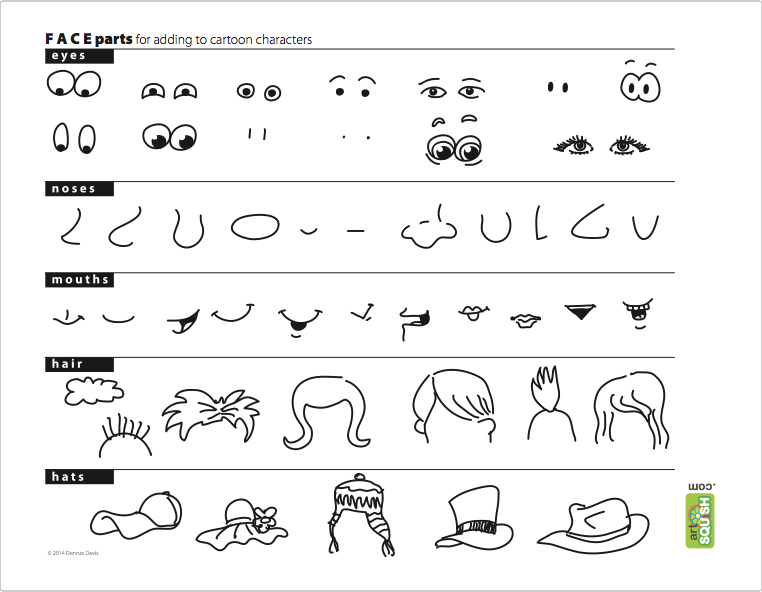
1 Page – Opens in new window
3.2 Draw
Use pencils or markers if you like. Anything is good for this so encourage being silly with the drawings. A good rule is that everything they do will be shown to their parents and it should make them happy to see it.
3.3 Preview
Use the teach talk below:
- The paint we’re using today is different than what we usually use. This is grownup paint, and it’s not washable. Try to not get it on your clothing, wear a smock, and get some help to roll up your sleeves. Don’t just push your sleeves up.
- All our paint needs a little bit of white mixed in so it will show up well. Just a little bit though.
- Make your pumpkin fun!”
Use this button to jump down to the preparation section.
LEARNING TARGETS
Students know how to try different ideas before creating new artwork.
M A T E R I A L S
- 2B Pencil
- White erasers
- Oil pastels OR Markers
- Scissors
- Optional yarn and hole punch
4.1 print
Worksheet
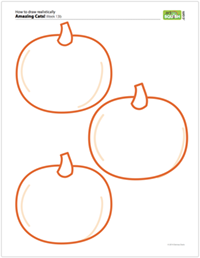
3 Pumpkins Practice
Here are 3 outlines of pumpkins to explore ideas on. Print one for each student to keep. If you want to save for holiday decorations using optional yarn and punching holes for hanging, then print these on card stock.
Rough-cut the pumpkins apart before drawing on them if you like.
1 Page – Opens in new window
4.2 Draw
Students can try using a pencil to make guidelines or go straight to the oil pastels or markers.
Encourage having fun but also being simple so it can be painted easily.
Use this button to jump down to the preparation section.
LEARNING TARGETS
Students know how to practice before doing final artwork.
M A T E R I A L S
- 8″ x 11″ copy paper
- Masking or painting tape
- Scissors
- Oil pastels
- Paper towels
- Smocks
5.1 Tape
TAPE the paper to the pumpkin, folding as needed to conform to the curves. Use tape all around.
Wet pumpkins won’t take tape or paint well. If a pumpkins comes cold from the refrigerator, water will condense all over it. Dry with a paper towel before using tape.
Also, sometimes pumpkins are waxed, and will resist the paint in the next steps. Wash pumpkins with soap and scrub the wax off if you have this problem.
5.2 Color
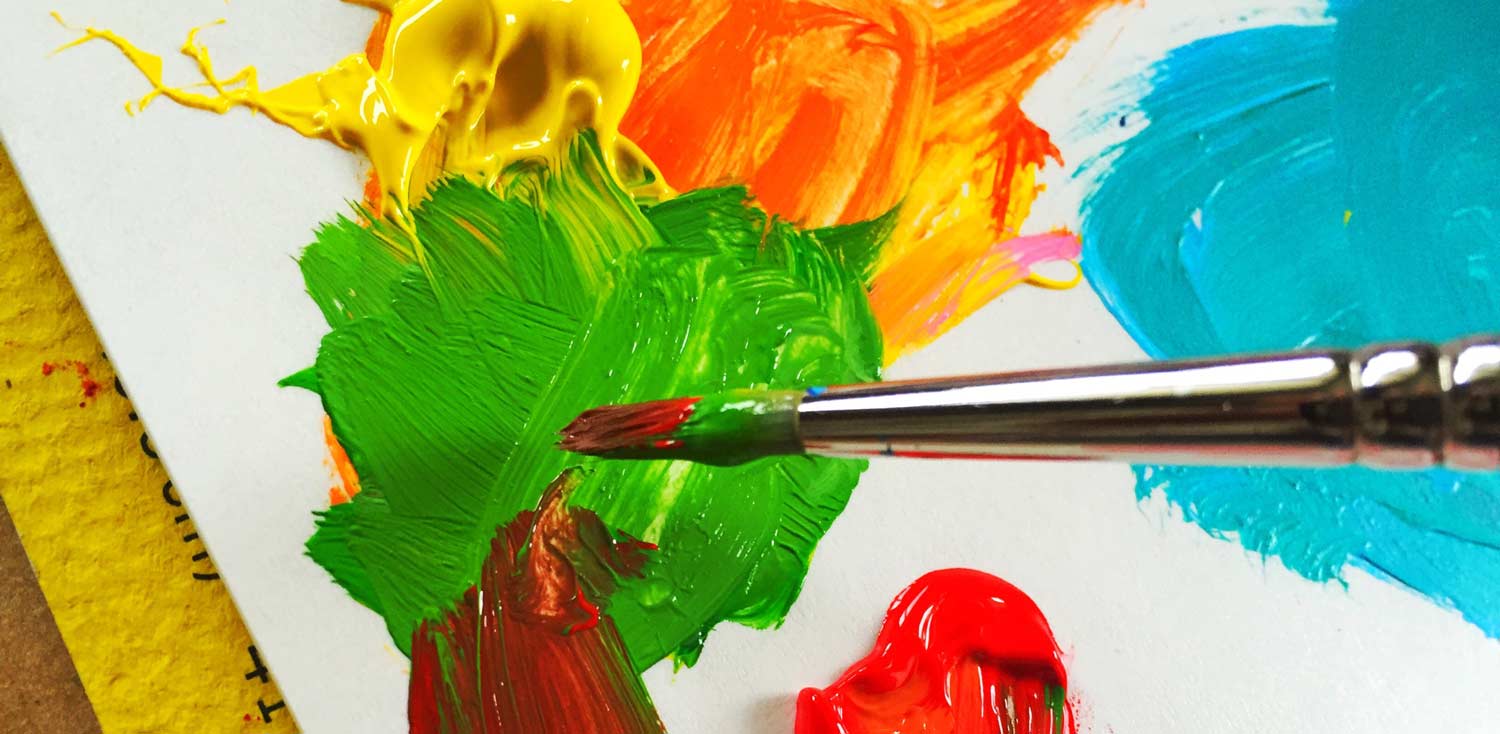
Help your students mix paint:
- Use white in the colors
- Mix colors to invent new ones – the tube colors are too dark or intense to look good straight (if using the Foundations color palette).
- Keep extra paint for use when painting the pumpkin in the next step.
- Keep cool colors together, and warm colors together, but don’t mix the them too much or they’ll become muddy.
While they work, remind them that this is acrylic grown-up paints and how it doesn’t wash out. BE CAREFUL! This is just a practice round, so it’s shorter than the actual pumpkin painting in the next step. They can change their minds as much as they want in the next step.
Use this button to jump down to the preparation section.
LEARNING TARGETS
Students know how to set up their work area for painting with acrylics.
M A T E R I A L S
- Acrylic paints
- Brushes – All sizes
- Water containers
- Getting plates or trays
- Mixing plates or trays
- Paper towels
- Smocks
Brushes should be nylon for springiness and durability. Round brushes are the most versatile.
Paint pigment list:
- Napthol or Pyrrol Red
- Hansa or Light Yellow
- Phthalo Green (blue shade)
- Cyan or Cerulean Blue
- Ultramarine Blue
- Dioxazine Purple
- Magenta
- Burnt Umber
- Raw Sienna
- Titanium White (professional grade only)
6.1 Prepare
While you get out the paints, artists can put on smocks and go get tubs of water for cleaning off their brushes. (You should have the tubs ready ahead of time, and waiting on a table or counter.) Make sure everyone is wearing a smock BEFORE you begin. Acrylic paint only comes out of clothing if you catch it immediately.
Have a plastic divided plate or food tray ready for kids to get colors that you’ve squeezed out, and a second one for mixing new colors. We call these “Getting Plates” and “Mixing Plates”. We also call mixing colors, “inventing colors”, to emphasize the benefits of mixing. The paint in the Getting Plate should not be used straight if possible (except when bright white is needed).
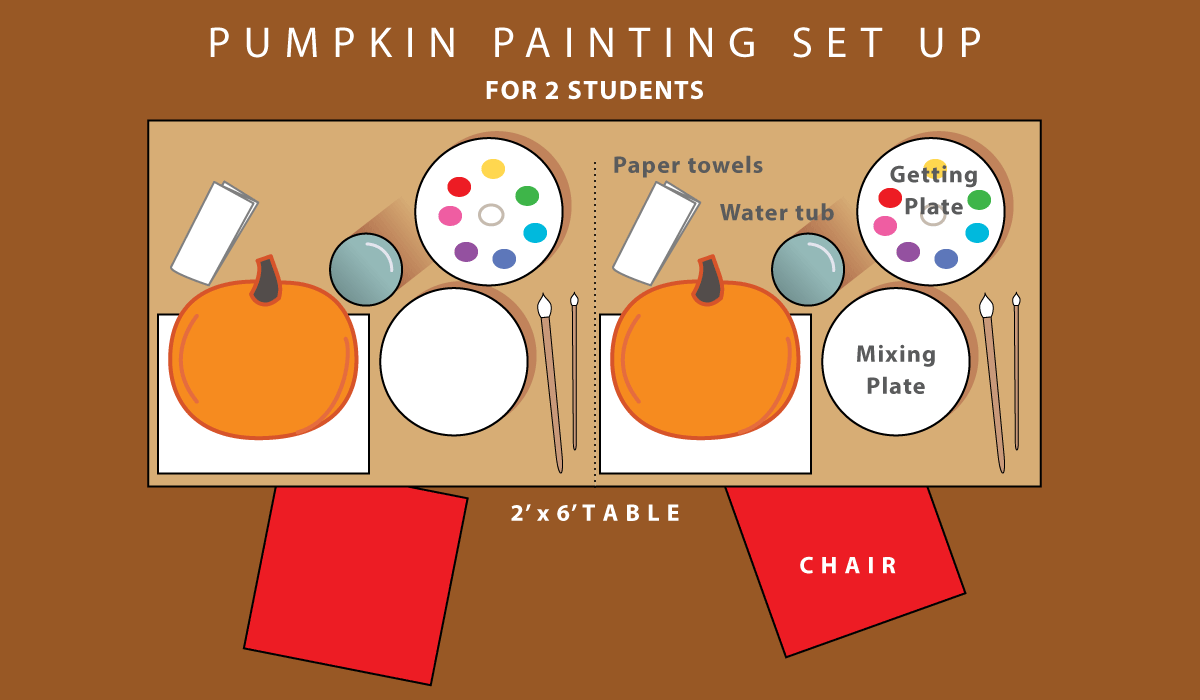
1) Help students keep their warm colors separate from their cool colors. This will make sure they stay bright and vivid.
2) Mix some white into all your colors to make them opaque, and they will cover the pumpkin better.
Use this button to jump down to the preparation section.
LEARNING TARGETS
Students know how to set up their work area for painting with acrylics.
M A T E R I A L S
- Acrylic paints
- Brushes – All sizes
- Water containers
- Getting plates or trays
- Mixing plates or trays
- Paper towels
- Smocks
7.1 Remove
Help students carefully remove the oil pastel work on paper.
Throw the papers away if possible. Help students understand that practice work is like rehearsing for a concert. Now they’re going to perform it.
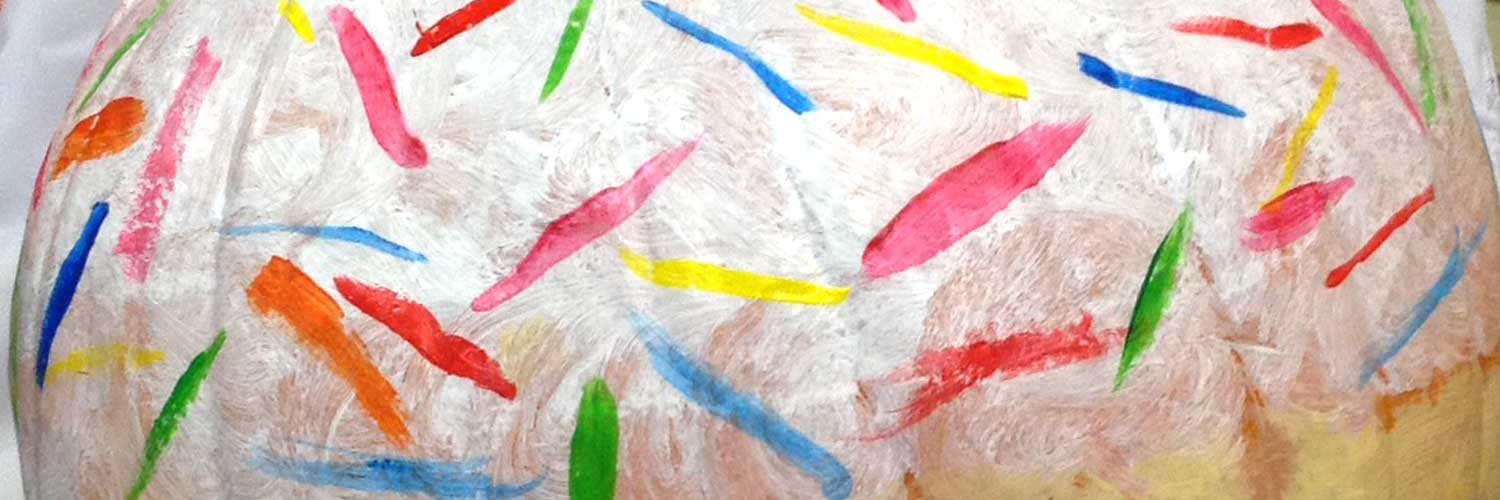
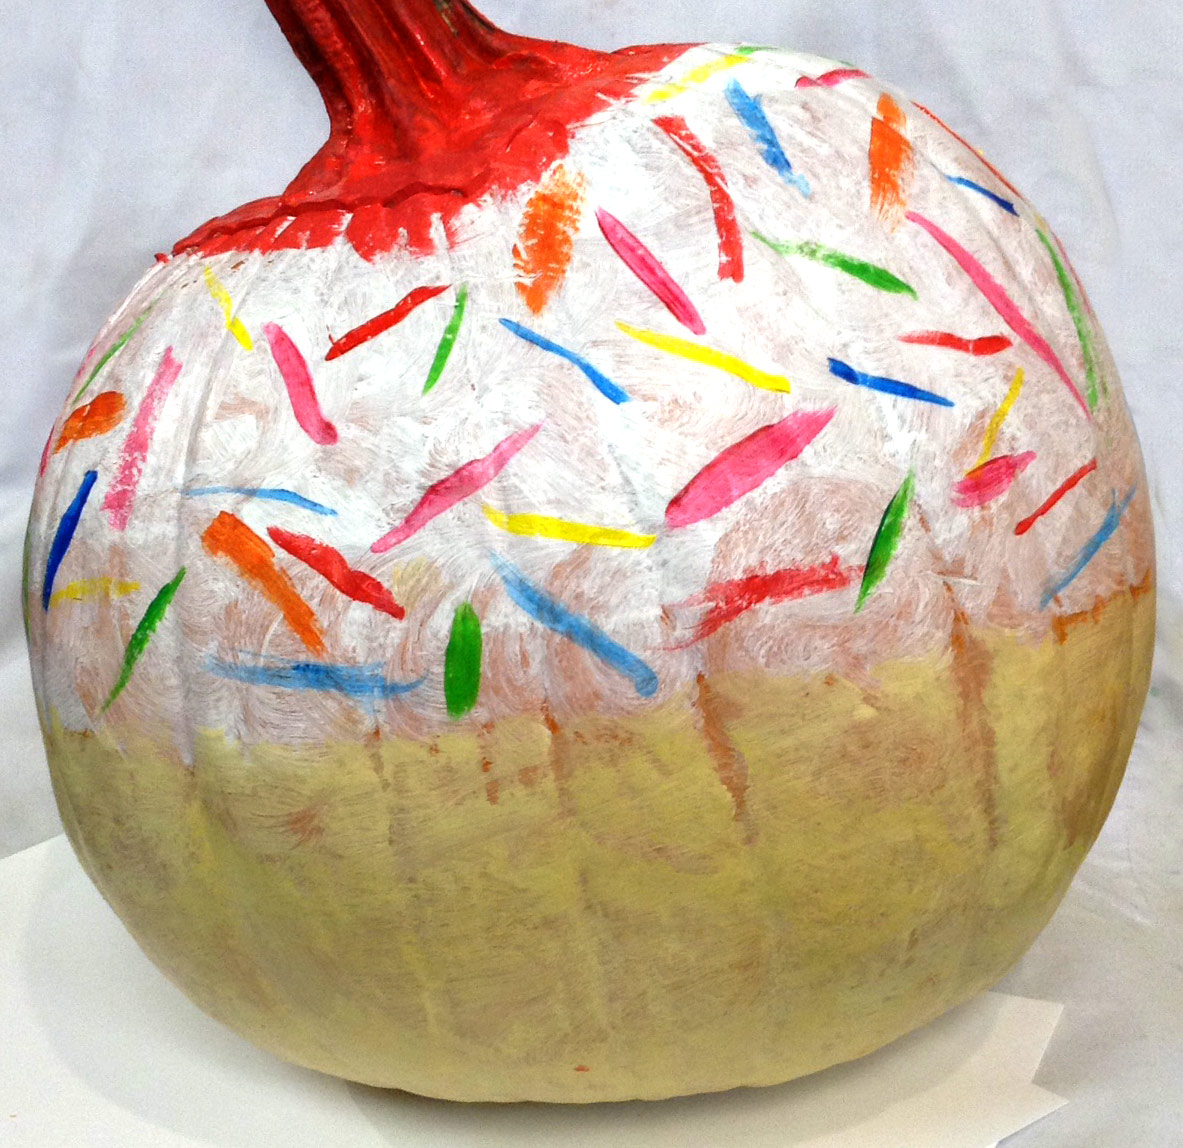
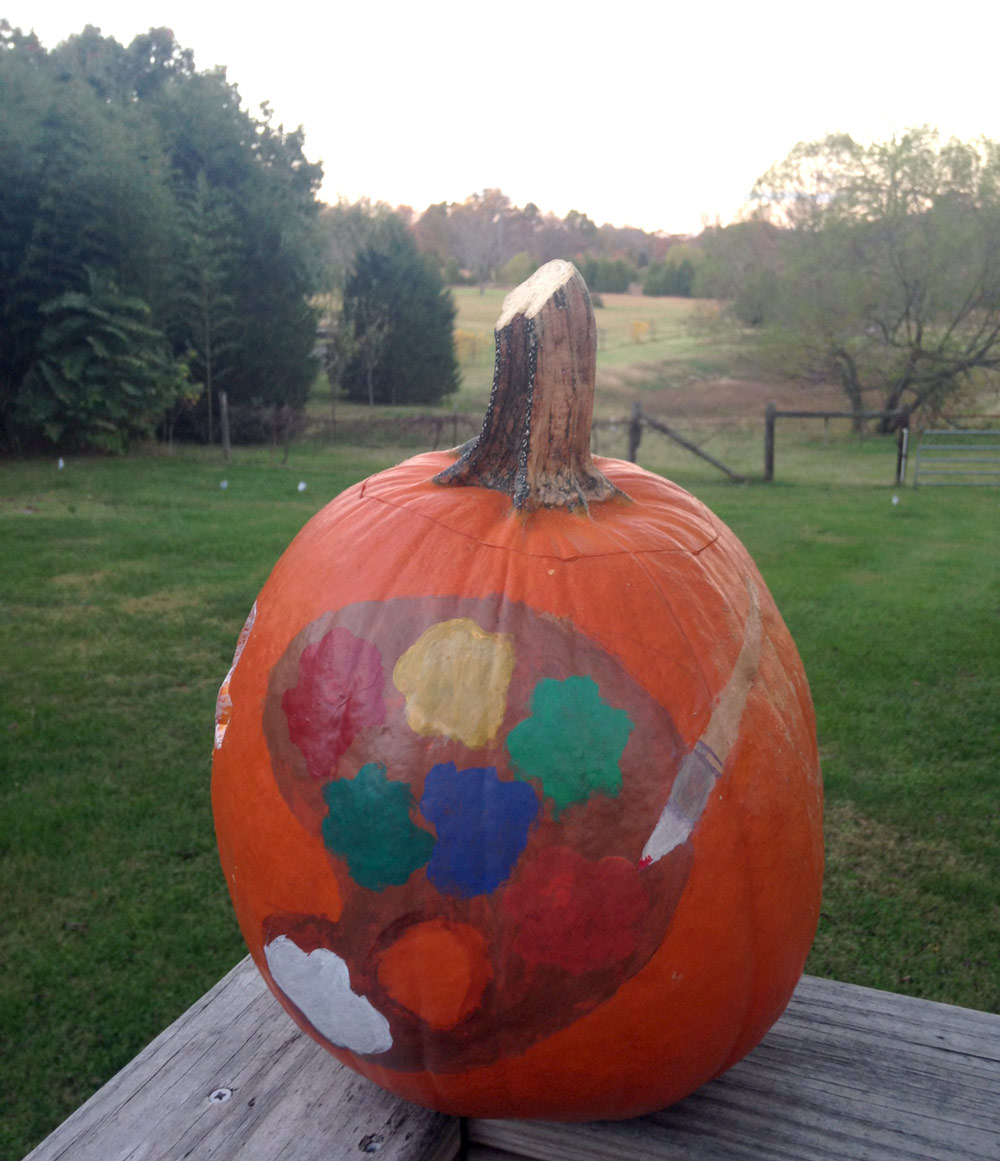
7.2 Paint
Use the leftover colors from the practice version in the last step. Let your artists be creative and have fun! Walk around the room, offering help if they seem like they need and want it.
Don’t worry if these turn out different than you hoped. That’s what art is often about.
Use this button to jump down to the preparation section.
STEP 8. Extra
Early finishers can use oil pastels to color their pencil cartoons from STEP 3LEARNING TARGETS
Students know how to color their work.
M A T E R I A L S
- 11″ x 17″ copy paper
- Oil pastels
- Blender sticks (stumps)
- Sandpaper boards (to clean blenders)
- Paper towels
- Smocks
8.1 Color
Markers are ok for this too. Encourage students to draw some new cartoon faces too.
Use this button to jump down to the preparation section.
STEP 9. Clean up
Everyone should help and place wet painted pumpkins into cardboard boxes for transporting to home if needed.LEARNING TARGETS
Students know the importance of cleaning up.
M A T E R I A L S
- Paper Towels
- Cleaning wipes
- Sink
- Waste baskets
- Well-lit spot for photos
- Camera or phone-camera
- Cardboard Boxes for taking wet pumpkins home
9.1 CLEAN
- Wash hands
- Super-wash brushes!!!
- Put art supplies away
- Wipe tables & toss trash
- Remove any smocks (last)
- Check for items on floors and tables
Wash them under running water, fanning out the bristles as much as possible until there is no color coming out at all.
9.2 PHOTO
OBJECTIVES
- Practice and improvement in painting and mixing colors – using acrylics
- Understanding how to make emphasis (important spot)
- Accomplishment in creating an awesome decoration for the family at home
- Fulfillment from showing off personal skills
TROUBLESPOTS
Acrylic paints will only wash out of fabric and clothing if done so immediately. Read up on how to handle acrylic paint accidents:
How To Deal With Acrylic Paint Accidents
ART WORDS
CLASSROOM
PREP
Make sure you have a set of acrylic paints ready with a way to quickly set them up on several “getting” plates or trays. Have some extra boxes in case parents don’t supply enough, and it’s a good idea to buy a couple of pumpkins for those who forget if you have the resources and/or can charge the parents for them.
Queue up some slow flowing music like Enya’s “drifting” to play in STEP 2.
Wet pumpkins won’t take tape or paint well. If a pumpkin comes cold from the refrigerator, water will condense all over it. Dry with a paper towel.
Also, sometimes pumpkins are waxed, and will resist the paint. Wash pumpkins with soap and scrub the wax off if you have this problem.
Print all of your PDFs from the lesson plan and cut any references apart as needed.
What your room needs
Here are your printable lists and room prep instructions.
Opens in new window
CLASSROOM
MATERIALS
- 8.5″ x 11″ copy paper
- 8.5″ x 11″ card stock
- 11″ x 17″ copy paper
- 2B Pencil
- Markers
- White Eraser
- Oil Pastels
- Blending sticks (stumps)
- Sandpaper boards
- Optional: Yarn and hole punch (STEP 4)
- Set of Acrylic Paints (see list at right or below)
- Disposable plates or trays for paints and mixing
- Brushes
- Masking or painting tape
- Scissors
- Water containers
- Paper towels
- Smocks
- Cardboard boxes
Acrylic Paint Pigments
- Napthol or Pyrrol Red
- Hansa or Light Yellow
- Phthalo Green (blue shade)
- Cyan or Cerulean Blue
- Ultramarine Blue
- Dioxazine Purple
- Magenta
- Burnt Umber
- Raw Sienna
- Titanium White (professional grade only)
PREVIEW
Week 13 – Fall Posters
Students create a fun and colorful poster announcing fall, using tape-resist and oil pastels for the lettering, and leaf reference for the picture.
Week 14 – Zig Zag Art
Students will create an interactive color oil pastel work that changes from day to night when you change your viewing angle. They’ll use their memory to draw their own home and yard, so it’s a personal piece. This also takes away any worries about content, so students can focus on the colors and different day and night versions of the scene. We’ll use this fun project to learn about viewpoints, lighting effects, 3D artwork, interactive artwork, and the work of 20th century abstract artist, Yaacov Agam.
Use this button to view our parent’s blog. Share the link: http://parentart.org, with your student’s parents so your they can read about the lesson each week.