
OVERVIEW
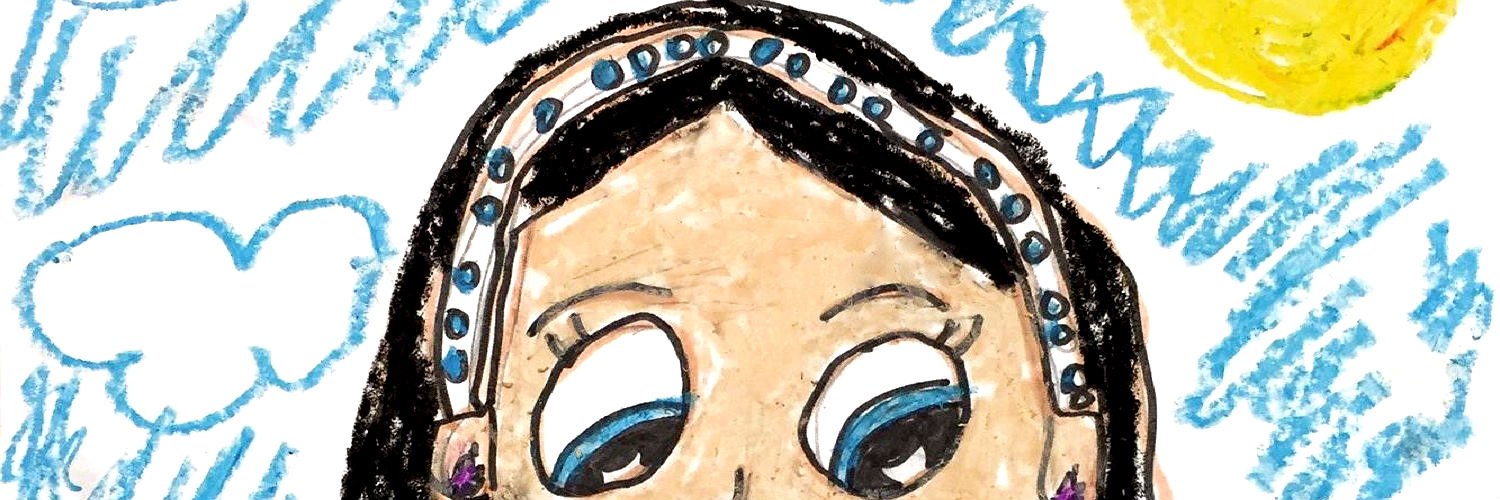
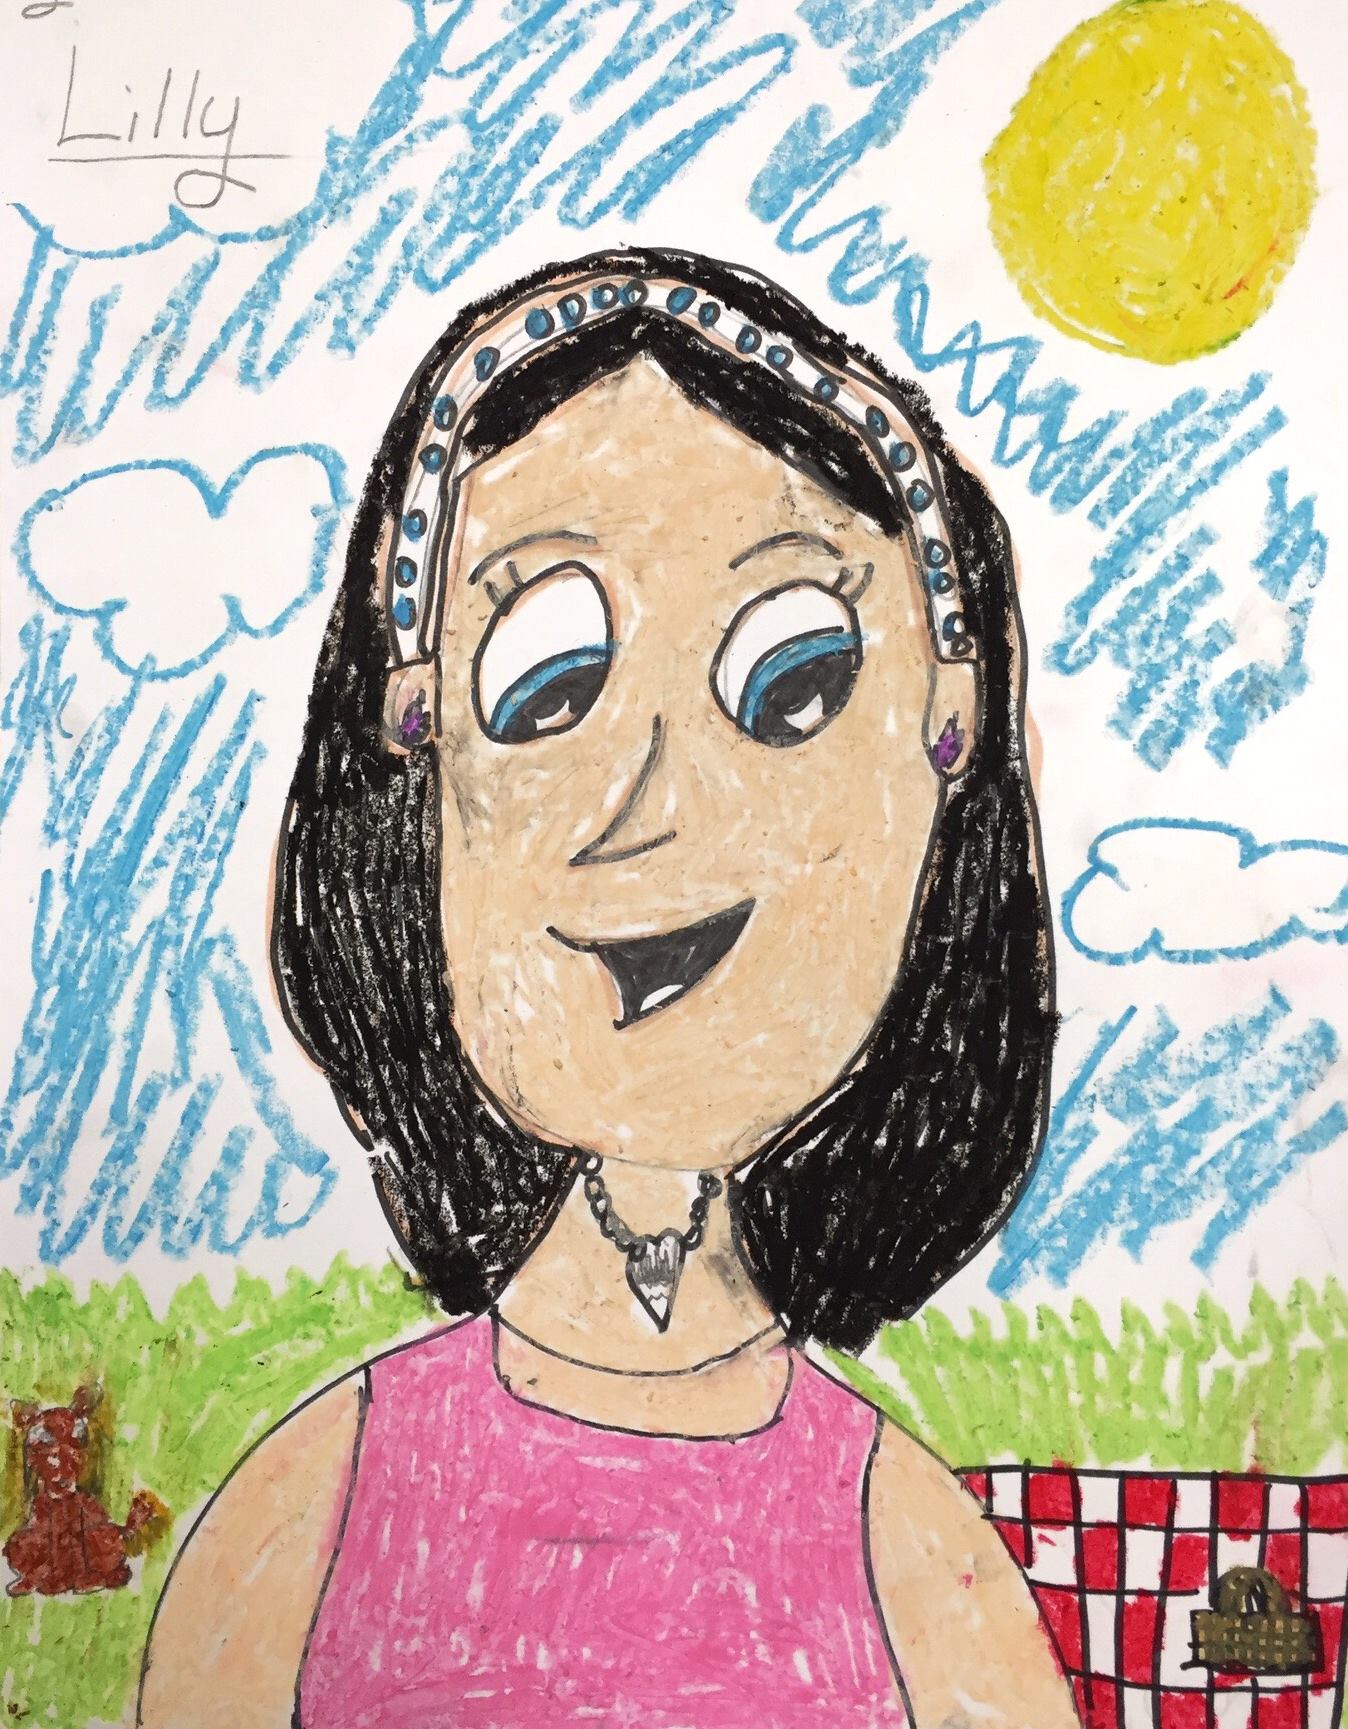
Students will have tons of fun learning the parts of cartoon faces and practicing how to put them all together. they'll finish with a final cartoon in marker outlines and coloring with layers of oil pastels.Grades 1 – 2
Week of November 3 – 7
1 Hour & 30 Minutes

Lesson At A Glance
A brief overview of each step. Buttons jump to each section for detailed information.
5 Min – Discuss 3 cartoon elements
10 Min – Add eyes to each head
10 Min – Add features to each head
10 Min – Add hair and/or ears & extras.
10 Min – Choose favorite & redraw in light marker
8 Min – Redraw in black with overlapping
10 Min – Oil Pastels
5 Min – Use black pastel
2 Min – Everyone helps
SCROLL & TEACH
LESSONPLAN
Each section is a different color. Read over once and then you can SCROLL & TEACH using any device you like. It’s designed to work best with your phone.
LEARNING TARGETS

Students learn to express themselves through creating from their imagination.
M A T E R I A L S
- 11″ x 17″ Copy Paper
- 4B pencil
- Eraser
- Markers and/or oil pastels
- Blenders (stumps)
- Paper Towels
1.1 Greet
Greet students as they come in and help them choose a chair.
Kneel down so that you are on their level. Bending over emphasizes the differences in your height, while kneeling makes them feel more important. Have tape and marker ready so you can stick some tape on the table by each student and write their name on it as they sit down.
1.2 choose
Warm up with Artists’ Choice.
Encourage students to work with one piece of paper for a while. If someone uses the phrase, “free draw”, explain that artists’ choice is something only artists can do, while free-draw is something anyone can do. You want to use the phrase to elevate the students’ expectations of their work.
Everyone should take their time with the work and make a finished piece of art. Limiting the paper can also help kids focus on the work. If someone finishes in super-fast time, ask them what more they can do to the existing paper. Ask again several times – unless they appear overly frustrated; then you can allow them to move on to a new work.
Use this button to jump down to the preparation section.
LEARNING TARGETS
Students understand the differences between cartoon and real life
2.1 teach
Explain the 3 things that make drawings look like cartoons.
Ask students several questions to help figure out what makes a cartoon different than realistic artwork. Get them thinking! After they’ve struggled with the idea, use the graphic (display on a large screen if possible) to reveal the elements that make cartoons look cartoony. Repeat the 3 things several times.
“Sometimes artists draw realistically, and sometimes they draw cartoons. Where do you see cartoons used? What do artists do with cartoons? – to make us laugh! Sometimes cartoon artists make us think about important things.
What makes a drawing look like a cartoon? By doing these three things:
- Simplify
- Exaggerate
- Use strong lines”

Use this button to jump down to the preparation section.
LEARNING TARGETS
Students know how to draw a big shape for a cartoon head
M A T E R I A L S
- 11″ x 17″Copy Paper
- 2B Pencil
- White Eraser
- Cartoon Head PDF
3.1 Print
Reference
Head Shapes
Print enough for each student.

1 Page – Opens in new window
3.2 draw
Students trace 4 head shapes on one side of a large sheet of paper, and draw 4 more of their own.
Lay the Head Shapes page on the table and place the large paper on top so that the PDF is lined up on the left side. Have everyone trace 4 head shapes from the 8.5 x 11″ paper on the left side of the larger 11″ x 17″ paper
Then draw 4 more of their own head shapes on the right side. Encourage them to make their shapes potato-like blobs, and not too crazy. Remember; simplify!
- Round
- Tall and thin
- Football shape
- Squarish
- ETC.
Use this button to jump down to the preparation section.
LEARNING TARGETS
Students know how to draw cartoon features.
M A T E R I A L S
- 11″ x 17″ Copy Paper
- 2B Pencil
- White Eraser
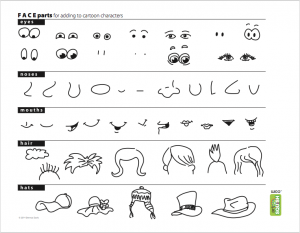
- Face Parts PDF
4.1 print
Reference
Face Parts
Print enough for each student.
Hand out prints. Make sure each student gets one to use for ideas.
Students will look at the Face Parts PDF for ideas in the next 3 steps.
1 Page – Opens in new window
4.2 draw
Have everyone add eyes to each of their 8 head shapes.
Students should have 8 head drawings on their paper. They will use Face Parts examples to copy 6 sets of eyes onto the heads and then they can make up the last two on their own.
So they don’t get stuck (or do too many crazy ideas that ruin the cartoons), have them follow along with these steps for the first 6 heads:
- Choose one set of eyes and draw them on a head you think they will look good on.
- Choose a different set of eyes and draw them really big on another head. Any head you like (exaggeration)
- Choose another set of eyese and draw them really small and far apart on another one.
- Choose eyes to draw up high on a head.
- Choose eyes to draw low on a head.
- Finish the rest making your own choices.
Use this button to jump down to the preparation section.
LEARNING TARGETS
Students know how to draw cartoon features
M A T E R I A L S
- 11″ x 17″ Copy Paper
- 2B Pencil
- White Eraser
- Face Parts PDF
5.1 draw
Continue copying ideas from the Face Parts PDF.
Follow the same ideas for the nose and mouth. They can use the Face Parts PDF for ideas and they can also make up a few on their own. Tell your class to add noses and mouths to the heads where they think they will look the best for each head. Help your students when they get stuck by giving suggestions. When you see something you like or that’s funny, make sure to say so!
Use positive behavior praise to “speak” to negative behaving students.
Be on the lookout for a student who may just scribble the same features in the same place on each head. Tell other students very loudly, how they are doing such a good job beause all the heads look so different.
Use this button to jump down to the preparation section.
LEARNING TARGETS
Students know how to draw cartoon features
M A T E R I A L S
- 11″ x 17″ Copy Paper
- 2B Pencil
- White Eraser
- Face Parts PDF
6.1 draw
Students will continue using Face Parts PDF to draw hair, ears, and more.
Students will work on one head at a time, finishing each one by adding ears and/or hair, and then one or two extras, such as a mustache, glasses, hats, etc. Walk around to encourage and help students.
Use this button to jump down to the preparation section.
LEARNING TARGETS
Students know how to practice and redraw
M A T E R I A L S
- 8.5″ x 11″ Card Stock Paper – 2 sheets per student
- 2B Pencil
- Light Pink or Yellow Marker
7.1 align
Students will measure how large to make their new drawing on a new sheet of paper.
- Place the second sheet of copy paper over the first, in bathtub position, making a cross shape.
- Make a light pencil dash (on the bottom sheet), at the top and the bottom edges of the bathtub paper.
- Take away the top paper and draw your head shape in-between the two marks and a little bit smaller. Leave room for a hat!

7.2 draw
Students will redraw their favorite design using a light marker.
Students will make sure to keep their design within the borders placed in the above step.
Use this button to jump down to the preparation section.
LEARNING TARGETS
Students know how to redraw a final cartoon
M A T E R I A L S
- Black Marker
8.1 redraw
Students will redraw over the light marker with a black marker, fixing any overlapping problems.
Emphasize that this is not really tracing, but what an artist calls, re-drawing. Demo this for the students while you do the following talk, because it may not make sense unless they see it. This is a hard concept for this age, so take your time learning this step.
“Now you get to redraw your cartoon like professional artists do at Nickelodeon and Disney. This will be your final actual cartoon. But there’s a twist! You’re going to do the parts backwards, beginning with the extras like hats and hair. We do this so that you can draw things that cover up other things. Like when the hair is over the top of the head. We don’t want to draw the head line under the hair. If you can see the lines under things they look like they’re see-through! That’s not what we want! You’ll see your light marker lines there, but that’s why they are in such a light color. We will make them go away when we fill in with pastels and cover them up.
Begin by drawing the things that are in front of other things, or covering up other things, such as hats and glasses, using your black marker. Once you have finished drawing one part of your cartoon, such as a hat, do not draw any more lines inside of that part. That would make it look see-through!
So then draw the hair, but not anywhere inside the hat, making sure to stop any lines at the edge of the hat. Then add all the face parts one by one, and finally fill in what you can see of head shape at the very last.”
Use this button to jump down to the preparation section.
LEARNING TARGETS
Students know how to draw & color cartoons
M A T E R I A L S
- Oil Pastels
- Blender Sticks
- Paper Towels
9.1 color
Students will use oil pastels to fill in their cartoon with colors.
Students will mix at least 3 colors in each area blending them with white and alike colors. They should not use any black.
Use this button to jump down to the preparation section.
LEARNING TARGETS
Students know how to outline a final design
M A T E R I A L S
- Black Oil Pastel
- 8.5″ x 11″ Copy Paper
- 2B Pencil
- White Eraser
10.1 Outline
Students who aren’t finished with their cartoon can continue working. This last step is for early finishers.
If there is time, students can go over their lines one more time with the black pastel to make them stand out more and look consistent with the color.
Early finishers can create a new cartoon drawing in pencil on new copy paper: make lots of extras like hats and bow ties!
Use this button to jump down to the preparation section.
LEARNING TARGETS
Students know how to keep their work space tidy.
M A T E R I A L S
- Sink
- Waste baskets
- Well-lit spot for photos
- Camera or phone-camera
- Paper towels
- Cleaning wipes
11.1 Clean
- Empty water containters
- Super-wash brushes if used
- Put art supplies away (sop up runny paint before disposing of palette paper)
- Wipe tables & toss trash
- Remove any smocks (last)
- Check for items on floors and tables
OBJECTIVES
- Practice and improvement in exaggerating for a cartoon effect
- Understanding the idea of re-drawing your work to improve it
- Accomplishment in creating a final color cartoon artwork
- Fulfillment from creating a new character of their own
TROUBLESPOTS
Over-adding – When adding the extras to a cartoon, keep it at 1 or 2 only. Remind students that they’re artists, and the purpose is to make a great character today. Otherwise you will see a cascading phenomenon, where kids begin to compete to see how many silly things they can add to one head. It’s like a nuclear reactor meltdown and will never end if it tips over the “silliness” point. But it is a lot of fun, and if you ever run out of things to do, this is a great game at the end of class!
Over-Exaggeration – Very similar to over-adding. A class can get too silly pretty quickly and begin drawing eyes larger than their paper. It’s hilarious and fun, but hard to reign back in. If you have an outburst of super-silly, laugh along and then change the mood suddenly by having everyone do something totally different. Instead of blaming students for problems, simply lead them out of it.
Re-drawing rebellion – Artists often draw the same thing more than once. Young artists have a really hard time with this because to them, everything they create is finished art. Appealing to identity and making it a challenge can help a lot, as can phrasing your words into statements instead of questions.
“Ok. We’re going to see how amazing you can be!” is much better than a question that can be answered negatively, such as, “Can you make it look even better?” This age needs to be pulled along as a group and encouraged to show off.
ART WORDS
Exaggeration – Making features silly by making features stronger than they actually are, or showing more of the things that make them unique. Such as a larger nose, or wider eyes, flatter head. People often exaggerate to make a point, but also to make things funnier. Artists use exaggeration in cartoons to make them funny.
Symbol – parts of a cartoon drawing that tell us more about it.
Re-draw – Instead of tracing, an artist gets a chance to draw a new and better work, using guidelines as, well, guides. Anyone can trace and just follow a line, but only an artist can re-draw each part of their work fresh.
CLASSROOM
PREP
Make sure you have
enough supplies for each student and have
PDFs printed.
What your room needs
Here are your printable lists and room prep instructions.
Opens in new window
CLASSROOM
MATERIALS
- 8.5″ x 11″ copy paper
- 11 x 17″ Copy Paper
- 4B Pencil
- 2B Pencil
- White Eraser
- Markers
- Oil Pastels
- Blenders
- Paper towels
- Cartoon Head PDF
PREVIEW
Week 12: Cartoons Again!
Students will continue with cartooning, and work on cartoon hands and feet. Then we move on to creating crazy creatures and silly monsters. It’s a fun day of cartoon art.
Week 13: Amazing Cats!
Students will look at artwork of cats and photographs. They’ll make some realistic drawings and cartoon cat drawings too, discussing the features that make them look like cats. A drawing will be used to glue yarn onto, creating a yarn-drawing print block that can be used the following week.