
Style
Each lesson Plan focuses primarily on one of the 4 Cornerstones of Art:
Drawing | Painting | Color | Style
OVERVIEW
Since the holiday season is almost here, it’s time to take a week for a personal project and also finish up anything that is still in progress from this fall. This may become a gift, or just a great piece for the portfolio. Young art students are always asking to, “do what I want to do!” This is their chance. The overwhelming choice of “everything in the world” is narrowed by 1) requiring reference and 2) the use of several handouts to help you teach that making decisions about what to do can be fun and easy.– – –
Grades 3 – 5
Week of November 11 – 15
1 Hour & 45 Minutes
Lesson At A Glance
Here’s a brief overview of the complete lesson. It’s also on your prep page in the Ready, Set, Go! section (below the lesson).
Colored buttons jump to each section in the full lesson plan below.
7 Min – View Gerhard Richter’s work. Provide worksheets.
5 Min – Set up paper or canvas – 3 Steps to Accuracy.
15 Min – Modify work on final media
5 Min – Set up your chosen media
42 Min – Enjoy working & expressing yourself
5 Min – Everyone helps
SCROLL & TEACH
LESSONPLAN
Each section is a different color. Read over once and then you can SCROLL & TEACH using any device you like. It’s designed to work great with your phone.
LEARNING TARGETS

Students know how to find a reference
M A T E R I A L S
- 14″ x 17″ Sketch pad
- Pencils & erasers
- Reference sources
- Still life objects
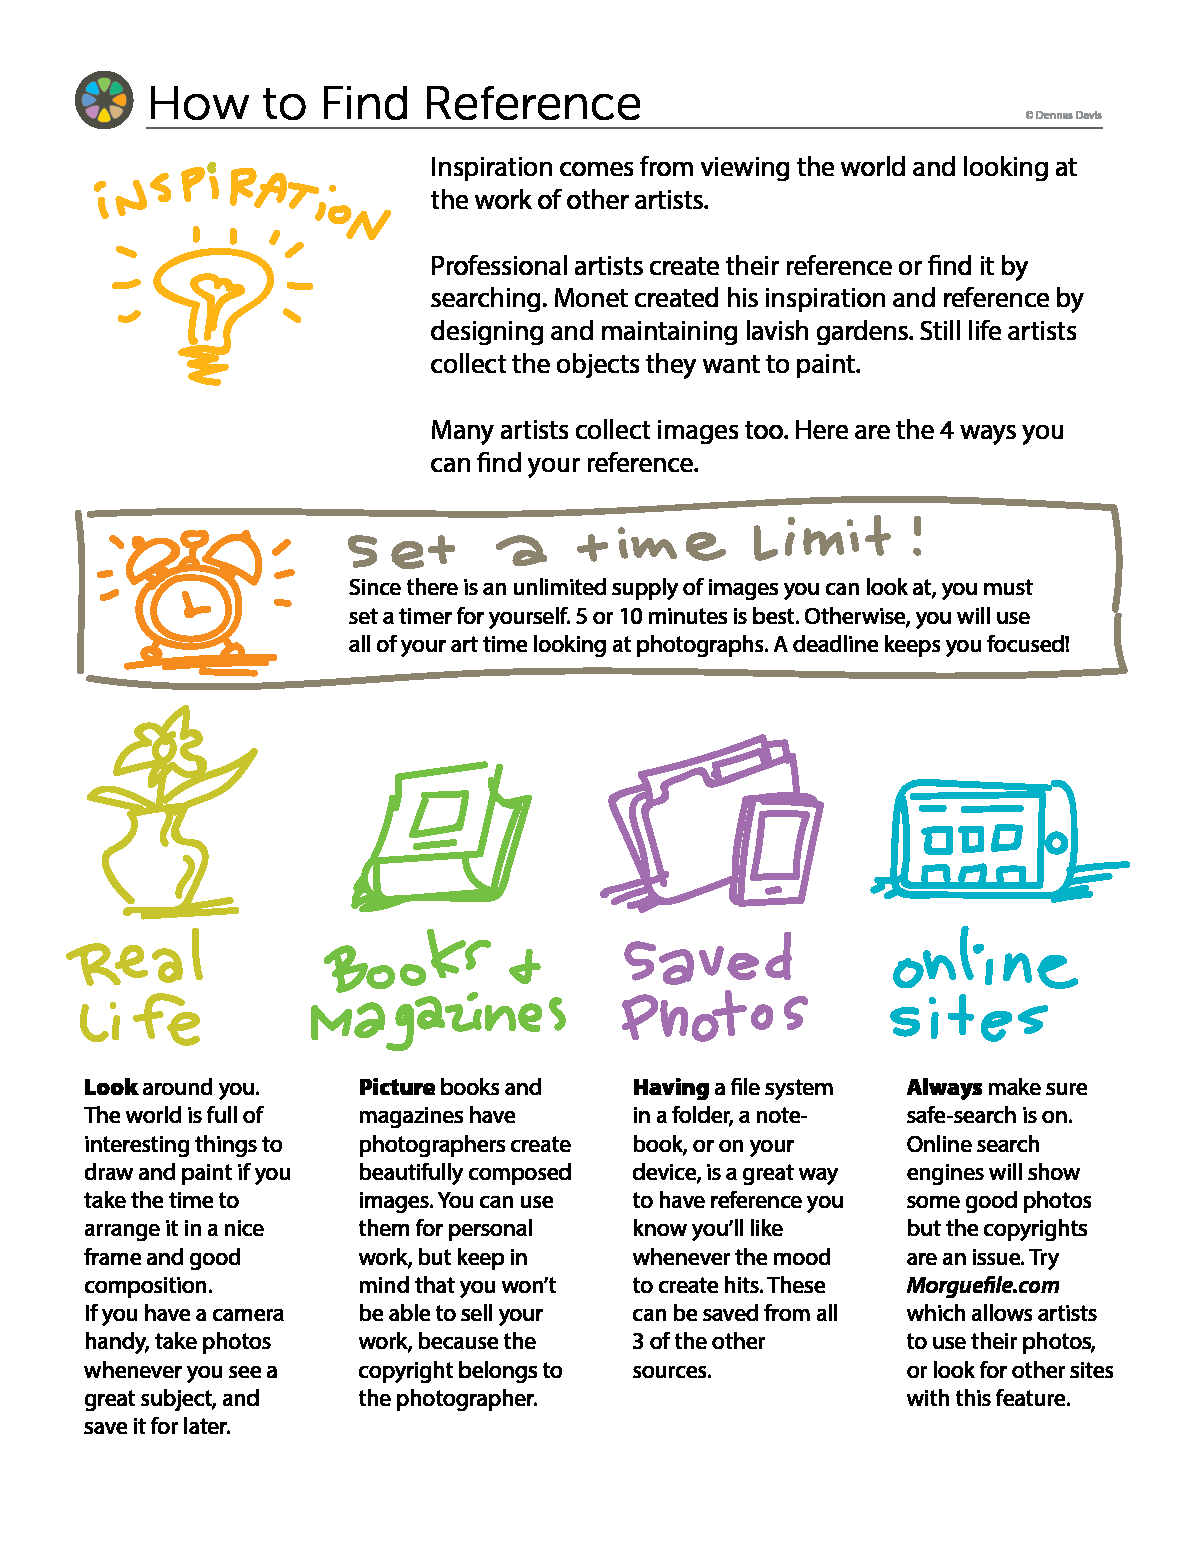
1.1 Print
How to
Find Reference
A colorful infographic to help students quickly find what they need to begin their work.
1 Page – Opens in new window
1.2 Intro
Tell students about the next two weeks of lessons.
Explain that everyone works at different paces, so it’s good to have special times for catching up, and it’s also good to have time to do your own ideas and your own projects. If anyone has work that’s not finished (Many Minis, Landscapes, Watercolors, Color Journals), that’s the first thing to work on. if past projects are done, then we get to begin with some choices.
The first choice is finding your subject matter.
The first two steps in creating your own art is to be inspired to do something, and to find the reference for it.”
1.3 teach
Give everyone the handout for finding reference materials.
There should be a still life set up for those who want to do it. Feel free to take suggestions and let the kids help build the still life. Have several different sources of reference ready.
Cartooning is also allowed, but only original characters, using real-life or photo reference. Not by copying a character from other sources. If doing a cartoon, begin with realistic drawings and then simplify and exaggerate features, redrawing it many times until it looks good. Cartoons should be done in color.
Students may take the whole two weeks (or more, in open studio and other class times to come), to create one painting, OR they can do several faster works.
Encourage the use of various materials.
CREATIONS - tap here to open
Use the Student Instructions printout below to distribute to your Creations students. Tap the image to open the PDF in a new window.
Self Expression Painting
Overview: Students will take two weeks to create their own project in their own way, following the same procedure as the Foundations students.
No prints are needed
Use this button to jump down to the preparation section.
STEP 2. Inspiration
Students will learn about an influential German artist, Gerhard RichterLEARNING TARGETS
Students know about a modern contemporary artist of great influence
M A T E R I A L S
- 14″ x 17″ Sketch Paper

Pinterest Gallery – Richter
Tap the icon to the left to open our special Pinboard showing examples of artwork to display to your class. See our Article for making Pinterest work on larger displays. You can also use a laptop or large tablet and gather everyone around like you’re using a book.
2.1 teach
Gerhard Richter, German artist, 1932 – present.
One of a handful of influential and well-known artists of the last few decades of the 20th century and to date, Gerhard Richter has had one of the most diversified and prolific careers of any artist. He is a very outspoken voice, and recently has observed and complained that auctions of artwork, including his own, are very overpriced and do not benefit the artist.
His work began in the 60’s when he entered the western world, escaping from behind the iron curtain. He has explored many subjects, but often seems to portray some sort of blur or other form of obfuscation of an image, which has become his trademark technique. He also relies heavily on photographic reference and even uses the photo itself at times. A full view of his work shows a huge variety of subject matter, from figurative, to candles, to overhead views of cities. He works in a wide variety of techniques as well, from photorealism to complete abstract expressionism.
Many of his works are so unusual that some people do not find them especially captivating. They are best viewed in person, and do not convey the artists’ intent in a reproduction such as a photograph. While not very well known in popular culture, his work is extremely sought after in the elite art world.
He has said there is little difference in his mind, between the original and a copy. Quite a controversial statement, it is also ironic, since his originals have sold for millions. To protest the inflated prices of his own work, he once created 100 small originals. The market defeated him, however, and all were purchased and almost immediately sold at auctions to benefit the original buyers. He has had two works sell at auction that broke the record for the highest price of any living artist’s work. One at 34 million in 2012, and another at 37 million. Then the first work sold again in 2015 for a new record of over 46 million dollars.
Here’s an ARTICLE in Architectural Digest about the sale.
Caution: A few works can appear in a random internet search on this artist that should not be shown to children, so use our Pinterest link for safety.
Use this button to jump down to the preparation section.
LEARNING TARGETS
Students know how to plan their artwork
M A T E R I A L S
- 14″ x 17″ Sketch pad
- Pencils & erasers
- Reference sources
- Still life objects
3.1 Print
How to
Decide on Media
A fun “media maze” that helps students quickly make decisions about the way they’ll create their work.
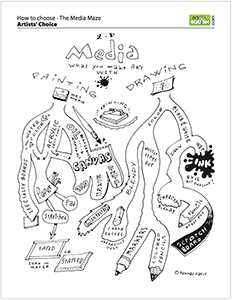
1 Page – Opens in new window
3.2 Think
View the handout and follow paths to good media ideas. Don’t worry about getting a definite answer immediately. Quickly move to sketching and let the brain percolate on your media ideas.
3.3 Sketch
Sketch from reference and make media plans.
Here are some essential points to remember when creating artwork. Bring each one up during the sketching, asking questions when you can.
There are 3 steps to accuracy: Frame, big shapes, and details last.
Planning your ideas really helps. Thumbnail sketches are the best way to plan.
Doing large warm-up sketches really fast helps you to see the big shapes and get the feel for the subject. Make friends with the subject. The more quick sketches you do, the less you will erase and struggle on the actual work.
Set up your work space to make it fun and easy to create. Wear a smock if you need to.
Leave time to clean up at the end of class.
Use this button to jump down to the preparation section.
LEARNING TARGETS
Students know how to set up their work area
M A T E R I A L S
- Paper or canvas
- Painters tape
- Drawing board
4.1 prep
Set up paper or canvas.
Emphasize the first two steps to accuracy: Frame and simple Big Shapes – These don’t take much time, yet make all the difference.
Use this button to jump down to the preparation section.
LEARNING TARGETS
Students know how to redraw a final design
M A T E R I A L S
- Canvas pencil OR
- 2B pencil
- Kneaded eraser
5.1 draw
Remind students that guidelines are not the actual artwork, but are essential for knowing where to paint or draw. Erase often and redraw to make the work as good as it can be.
Use this button to jump down to the preparation section.
LEARNING TARGETS
Students know how to set up their work area
M A T E R I A L S
- Whatever materials needed for your chosen media
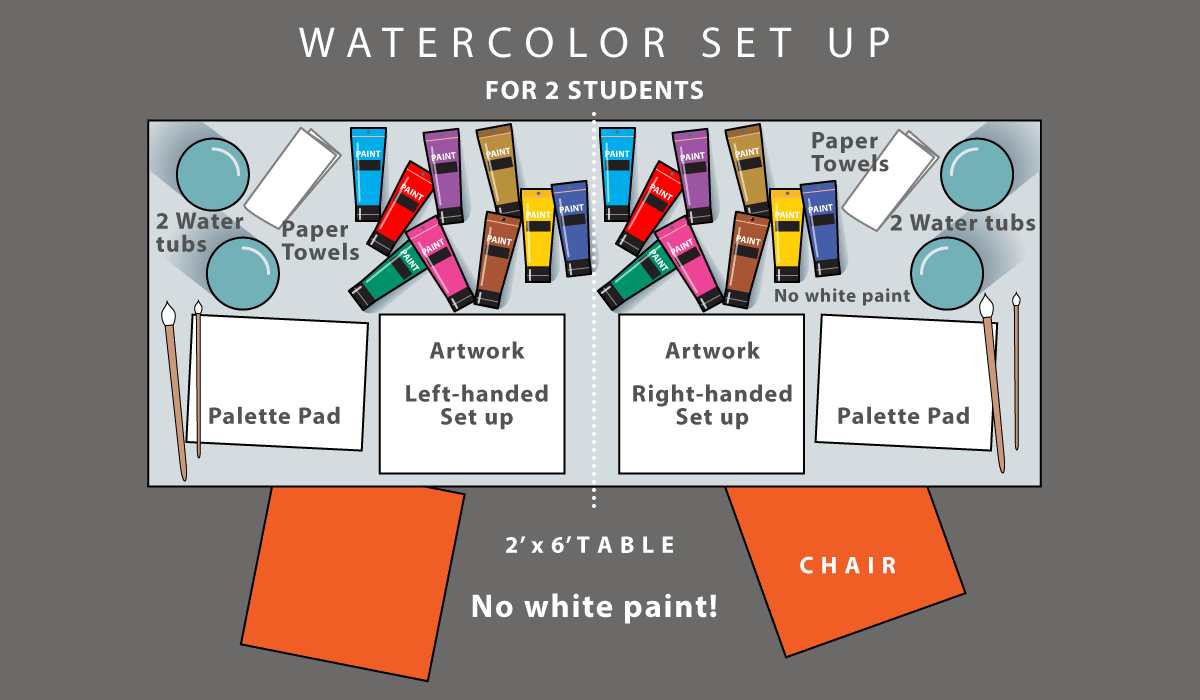
Brushes should be nylon for springiness and durability. Round brushes are the most versatile.
Paint pigment list:
- Napthol or Pyrrol Red
- Hansa or Light Yellow
- Pthalo Green (blue shade)
- Cyan or Cerulean Blue
- Ultramarine Blue
- Dioxazine Purple
- Magenta
- Burnt Umber
- Raw Sienna
- Titanium White (professional grade only)
6.1 setup

Use this button to jump down to the preparation section.
LEARNING TARGETS
Students know how to express themselves through art
7.1 create
Go around the room, encouraging students, and pointing out things you like about their work. Be on the lookout for discouragement, and ask what’s wrong and ask if you can make suggestions. Don’t tell discouraged students that their work is good and they shouldn’t be discouraged about it. Try to find out what is bothering them and help them find solutions.
Use this button to jump down to the preparation section.
LEARNING TARGETS
Students know the importance of cleaning up.
M A T E R I A L S
- Paper Towels
- Cleaning wipes
- Sink
- Waste baskets
- Well-lit spot for photos
- Camera or phone-camera
8.1 clean
- Wash hands
- Super-wash brushes if used
- Put art supplies away
- Wipe tables & toss trash
- Remove any smocks (last)
- Check for items on floors and tables
8.2 photo
OBJECTIVES
- Practice and improvement in whatever medium is chosen
- Understanding how to make decisions and narrow choices
- Accomplishment in creating artwork and/or finishing work in-progress
- Fulfillment in “getting to do what I want”
TROUBLESPOTS
Overwhelmed and/or disinterested students – This lesson is all about narrowing the overwhelming number of directions an artist can choose to pursue. Use the handouts and be on the lookout for students who still don’t know how to get to the first step. The solution is very much the same if you have a student is not motivated. Here’s a great way to help make the artwork get going:
Ask if they want one of two simple choices for basic direction, as in “do you prefer a landscape or an animal today?” If the answer is, “I don’t know”, then you say…
“Awesome, because that means either one will be good for you. Let’s choose [select what you think will be good for them].”
If they balk, then they really want the other one, or something else. You can try:
“Let’s choose between a still life, or architectural. Which do you like best?”
Once you have a basic subject, proceed to 2.
Ask a narrowing down question, such as, “farm animal or African animal?” or “old architecture or modern?”.
Continue narrowing down with simple two-choice questions, and if you’re still getting resistance, say, “Since you want to do lots of things, you need to follow my direction today or choose something yourself, but you only have 3 minutes to make you final decision or I’ll assign your project today.”
ART WORDS
Media – The pliable material used to apply to a surface or platform, that is manipulated to create visual art. Graphite, Acrylic, Watercolor, Clay, etc.
CLASSROOM
PREP
Have some still life objects and good photo references ready. Print all of your PDFs from the lesson plan and cut any references apart as needed.
What your room needs
Here are your printable lists and room prep instructions.
Opens in new window
CLASSROOM
MATERIALS
- Still Life Objects
- Drawing Board
- Paper towels
- Cleaning wipes
- Camera or phone-camera
STUDENT’S
MATERIALS
- 14” x 17” Sketch Pad
- Pencils & Erasers
- Paper or Canvas
- Painter Tape
- Canvas pencil
- Kneaded Eraser
- Any Materials needed for your chosen media
PREVIEW
Week 12: Continue Artists’ Choice
The personal work begun in week 14 is continued or a new work is created in the same manner. Early finishers can work on past projects to complete things like Color Journals or Many Minis.
Week 13: Color Journal: Blues & Browns
Our amazing color journals are continued with a set of blue colors and another one of browns. The colors created are made using the method that professional painters use, and are all useful colors instead of random formulas. Our method teaches what happens when paint is modified, instead of simply giving students a few color formulas to fall back on.
Use this button to view our parent’s blog. Share the link: http://parentart.org, with your student’s parents so your they can read about the lesson each week.