
OVERVIEW
Students will continue with cartooning, and work on cartoon hands and feet. Then we move on to creating crazy creatures and silly monsters. It's a fun day of cartoon art.Grades K – 2
Week of November 10 – 14
1 Hour & 30 Minutes
Lesson At A Glance
A brief overview of each step. Buttons jump to each section for detailed information.
5 Min – Talk about cartoon hands
7 Min – Draw different styles of hands
10 Min – Practice hands & feet
10 Min – Make a silly monster
15 Min – Oil Pastels
8 Min – Draw pet monster
2 Min – Everyone helps
SCROLL & TEACH
LESSONPLAN
Each section is a different color. Read over once and then you can SCROLL & TEACH using any device you like. It’s designed to work best with your phone.
LEARNING TARGETS

Students know that simple and exaggerated drawings look like cartoons
M A T E R I A L S
- 11″ x 17″ Copy Paper
- 2B Pencil
- White Erasers
- Markers
1.1 Print
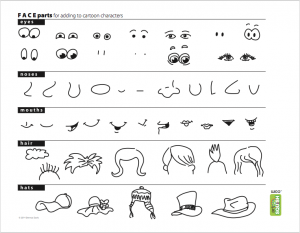
Reference
Face Parts
Print enough for each student to have one.
1 Page – Opens in new window
1.2 draw
Remind them as they work about last week’s cartoon face. Ask if they remember what 3 things make drawings look like cartoons.
- Simplify
- Exaggerate
- Bold lines
You can also ask these fun and thoughtful questions:
- “What do you like to draw first on a face?”
- “Should you put the eyes high or low on the face?” (either is great, and they make it look different even with same kind of eyes).
- “Do you think there is a best style for cartoons?” (No, any style is good!) “
- “How do you think grown-up cartoonists became so good at it?” (Practice!)
Have students draw a second face, and make it totally different using every face part differently, in both style and placement around the face. Which one is their favorite?
“I’m calling on amy, because she has her hand raised and is being quiet. Thank you for helping me make the class work better, Amy!”
Use this button to jump down to the preparation section.
LEARNING TARGETS
Students know how hands and fingers connect to arms
M A T E R I A L S
- Handy Hand Handout PDF
- 8.5″ x 11″ copy paper
- 2B pencil
- Eraser
2.1 Print
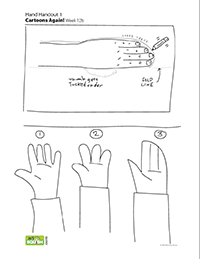
Reference
Hand Handout
Print one for each student, or for two students to share between them.
1 Page – Opens in new window
2.2 Explain
Make sure they know where their pencil is before beginning this follow-along exercise.
If you look at the back of your hand, and tuck the thumb under, you can see how the arm, wrist, hand and index finger all share the same almost straight edge. Look at the drawing of this on the handout. That makes it a little bit simpler to draw if you remember this. The thumb is just sticking out of this edge and makes us think the whole thing is very hard, but it is not as hard as it seems at first.
We will learn how to draw several kinds of simple cartoon hands today. It will be very handy to have the hand handout on hand while you use your hands to draw hands.
New paper: Now try to draw your own hand like this.
- First, with the paper in bathtub position, fold the paper long-ways by taking the bottom edge up and matching it to the top edge. Press a fold in the middle and then open back up. This is what you see under the hand drawing on your handout.
- Using the hand that you don’t draw with, tuck your thumb way underneath your palm. hold your arm across your chest and then set it down on the paper with your thumb hidden underneath.
- Line up the bottom of your arm and hand on the fold line, and keep your fingers together. Just like on the handout.
- Without moving your arm, pull your thumb back out and let it rest normally.
- Now you can use your pencil to trace around the top of your arm and hand loosely. Don’t draw in between your fingers though. Just keep them together and go around the tips in a loose curve.
- Trace around your thumb too.
- Take your arm away and it looks like you’ve drawn a mitten.
- Finish by drawing 2 lines to show fingers. Real hands have 3 lines but we’re only going to make 2.
This looks a lot like a cartoon hand, doesn’t it? That’s because tracing loose like that, makes a simplified and exaggerated drawing, and those are 2 of the things that make a cartoon. And we only made 3 fingers, which simplifies too. Do you remember the third thing?”
(bold lines)
Use this button to jump down to the preparation section.
LEARNING TARGETS
Students know how to draw cartoon hands
M A T E R I A L S
- 11″ x 17″ Copy Paper
- 2B Pencil
- White Eraser
3.1 draw
Using the same Hand Handout from STEP 2, have everyone try drawing each of the cartoon 3 hands shown on the bottom.
3.2 outline
See if you can get them to go around the thumb instead of drawing through it and then adding it. No worries if they don’t though.
Encourage your artists as they create a cartoon hand!
Use this button to jump down to the preparation section.
LEARNING TARGETS
Students practice variations of cartoon hands and feet
M A T E R I A L S
- 11″ x 17″ Copy Paper
- 2B pencil
- White Eraser
- Hand &Foot Handout
4.1 print
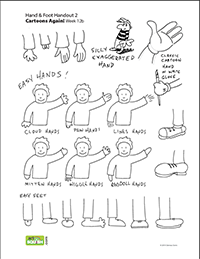
2nd Hand & Foot Handout
Cartoon hands & feet print. Print one for every student or for two students to share.
1 Page – Opens in new window
4.2 try
Have everyone draw the bottom of a sleeve without the hand yet. It’s just a square-bottom U-shape. Draw a second sleeve. Then each student should choose two of the hand styles to try out, adding them to the sleeves.
Context is helpful. If you draw almost anything at the end of an arm people see it like it’s a hand! (Don’t use the word, “context”, though).
Show the picture below while reading the Teacher Talk. Tap on the picture to open in a larger format to display.
Also, just because we see a blob at the end of an arm, we know this is a hand. It doesn’t actually have to look much like a hand because it’s just in the right place.
Making a cloud-like blob is an easy way to make cartoon hands.”

Use this button to jump down to the preparation section.
LEARNING TARGETS
Students practice drawing skills
M A T E R I A L S
- 11″ x 17″ Copy Paper
- 2B Pencil
- White Eraser
draw
Some of the examples on the Hands & Feet PDF are really easy, and some are more challenging. Encourage your class to try different styles, but to not worry about which ones work and which ones don’t. That’s why everyone draws in different styles!
There are also a few feet included for early finishers to practice if they want to.
Use this button to jump down to the preparation section.
LEARNING TARGETS
Students know how to create images using guide lines
M A T E R I A L S
- 11″ x 17″ Copy Paper
- Very light marker, such as light yellow or beige
- Black Marker
draw
Start with the light marker to make a bunch of guide lines. Then students can redraw in black, making details and any new ideas as they go.
In the first steps, we are going to make a body using a bubble shape. Have everyone pick up their light marker and have the paper in the shower position (vertical).
- Draw two circles like a snowman right in the middle of the page.
- Trace around them to make a body like a peanut-shape.
Explain that these are their guide lines, which artists use underneath their drawings to help them know where to draw. It’s like tracing your own work.
Now put the cap on the light marker and get the black marker. We’re going to draw all of the features, and then finish with the body shape last.
- Draw a bunch of legs and feet. They can even be tentacles or whatever monster legs you can come up with.
- Draw an arm on each side, curving up. If you want, draw 2 more arms curving down!
- Draw hands on each arm. Use your favorite hand style.
- Draw a face with really big eyes. How many eyes do you think it should have? 1, 2 or 3 eyes?
- Draw a couple of horns on the head. Add some crazy hair. Does it need ears? Antlers? A hat?
- Make a happy mouth! (if any student makes angry eyebrows, see if you can get them to draw a wiggly mouth to soften the expression. Angry eyes with happy mouths translate to evil expressions and can be scary.)
After all the features are drawn, have students connect the arms and feet, tracing along SOME of the guide lines, using the black marker. Encourage them to stop and start the body lines instead of just drawing a big peanut shape on top of everything. But do not worry if that’s how they do it!
Use this button to jump down to the preparation section.
LEARNING TARGETS
Students know how to add color to a cartoon drawing
M A T E R I A L S
- Monster drawing
- Oil Pastels
- Blender sticks (stumps)
- Paper towels
Color
Do not allow using a black pastel until the very end.
Remind everyone to invent colors by mixing and blending alike colors – with lighter colors, blenders, fingers, or paper towels. After all the color is done, make bold outlines with the black pastel. Early finishers can color the background too. Also, take time to fill in all the way to the edges and not to leave many empty spots. Cartoons look great when filled in fully.
Use this button to jump down to the preparation section.
create
If anyone is finished and wondering what to do, have them make up their new character. Start with a body bubble-shape in the light marker, and see if you can draw some hands or feet. Use the 2nd Hand & Foot Handout for ideas.
Write your pet monster’s name at the top!
Use this button to jump down to the preparation section.
LEARNING TARGETS
Students know how to clean up.
M A T E R I A L S
- Sink
- Waste baskets
- Well-lit spot for photos
- Camera or phone-camera
- Paper towels
- Cleaning wipes
9.1 clean
- Empty water containters
- Super-wash brushes if used
- Put art supplies away (sop up runny paint before disposing of palette paper)
- Wipe tables & toss trash
- Remove any smocks (last)
- Check for items on floors and tables
9.2 photo
- Try to get photos of your student’s artwork. Find a good spot for quick lighting without highlights or shadows from your hands and device. Ideally in-between two strong lights on each side.
OBJECTIVES
- Practice and improvement drawing cartoons
- Understanding that there are many ways to draw
- Accomplishment in creating original cartoons
- Fulfillment by finding your own way to draw things
TROUBLESPOTS
Worry – If a student doesn’t like what they’re doing, that means they are beginning to develop a sense of judgement about their self, and their own work. This happens when they are nearing the age of 8, and is a normal stage of development. It is also a very important hurdle for artists and you can help. Make sure that your student realizes that artists begin to see what they don’t like in their work as they get older and that it means they are artistic. All artists create work they don’t like, so they practice to make it look better. Artists practice.
Over-silly – Cartooning is about being funny, and kids can take this into acting funny, really fast. You can stop the craziness by saying that the art needs to be funny, but that the artists still need to observe the rules, or you don’t get to have as much fun. When the artists become cartoons themselves, we have to stop the class and stop doing cartoons.
If you lose them, have everyone stand up and pretend to be their favorite cartoon for 10 seconds. Then freeze! Now the cartoons must go back to being artists.
ART WORDS
Re-draw – Instead of tracing, an artist gets a chance to draw a new and better work, using guidelines as, well, guides. Anyone can trace and just follow a line, but only an artist can re-draw each part of their work fresh.
Simplify – Drawing things without many details, and sometimes making fewer numbers of things, like 3 fingers instead of 4.
Bubble shapes – Like Big Shapes in regular drawing, cartoons begin by looking at large simple shapes that are like bubbles. Head shapes are bubble shaped, and body shapes are bubble shaped.
CLASSROOM
PREP
What your room needs
Here are your printable lists and room prep instructions.
Opens in new window
CLASSROOM
MATERIALS
- 11×17” Copy Paper
- 2B Pencil
- 4B pencils
- White Erasers
- Markers
- Oil pastels
- Blender sticks (stumps)
- Hand & Foot Handout
- Paper Towels
PREVIEW
Week 15: Amazing Cats!
Students will look at artwork of cats and photographs. They’ll make some realistic drawings and cartoon cat drawings too, discussing the features that make them look like cats. A drawing will be used to glue yarn onto, creating a yarn-drawing print block that can be used the following week.
Week 15: Have a Dog Day
Students will continue our pet theme. First we’ll make prints using the cat yarn print blocks from last week, and then create dog drawings and paintings. We end the day inventing a fantastic dog house!