
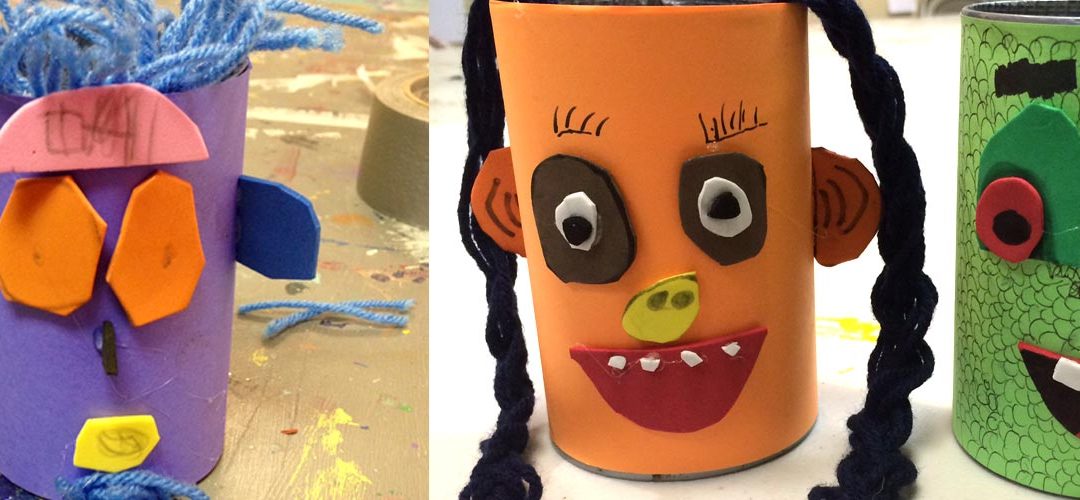
OVERVIEW
Students have fun learning how to make different cartoon expressions and drawing several cartoon faces. Then they get to create a “Can-Toon”. Using a used and cleaned regular-sized food can, they cover it with bright colored backgrounds first. Then face parts are cut out and glued on. Yarn and markers finish the characters, and the can may be used as a pen & pencil holder.– – –
Grades 3 – 5
Week of November 18 – 22
1 Hour & 30 Minutes
Lesson At A Glance
Here’s a brief overview of the complete lesson. It’s also on your prep page in the Ready, Set, Go!section (below the lesson).
Colored buttons jump to each section in the full lesson plan below.
15 Minutes – Artists’ Choice
10 Min – Cover can with background color
10 Min -Students will learn about facial expressions
10 Min – Draw cartoon faces to experiment
30 Min – Students will make faces for their cans
10 Min – Add more to can, or make a collage
5 Min – Everyone helps
Use this button to jump down to the preparation section.
LEARNING TARGETS

Students know how to use their imagination
M A T E R I A L S
- 11″ x 17″ copy paper
- 2B Pencil
- White Eraser
- Markers
All materials are suggestions and may be modified as you see fit. We have tried many items, and these seem to allow the most versatility for the cost.
1.1 Greet
Greet students as they come in and help them choose a chair.
Kneel down so that you are on their level. Bending over emphasizes the differences in your height, while kneeling makes them feel more important. Have tape and marker ready so you can stick some tape on the table by each student and write their name on it as they sit down.
1.2 Choice
Encourage students to work with one piece of paper for a while. If someone uses the phrase, “free draw”, explain that artists’ choice is something only artists can do, while free-draw is something anyone can do. You want to use the phrase to elevate the students’ expectations of their work.
Everyone should take their time with the work and make a finished piece of art. Limiting the paper can also help kids focus on the work. If someone finishes in super-fast time, ask them what more they can do to the existing paper. Ask again several times – unless they appear overly frustrated; then you can allow them to move on to a new work.
Use this button to jump down to the preparation section.
LEARNING TARGETS
Students know how to prepare for a project
M A T E R I A L S
- Metal food cans (empty and cleaned)
- Duct tape – for covering sharp edges
- Colorful papers (copy size)
- Clear plastic tape (“magic” wrapping tape)
- Scissors
- Pencil
- Ruler
2.1 craft
Prepare the metal cans and add the background color paper.
Add protective duct tape around inside edge of opening to keep fingers safe.
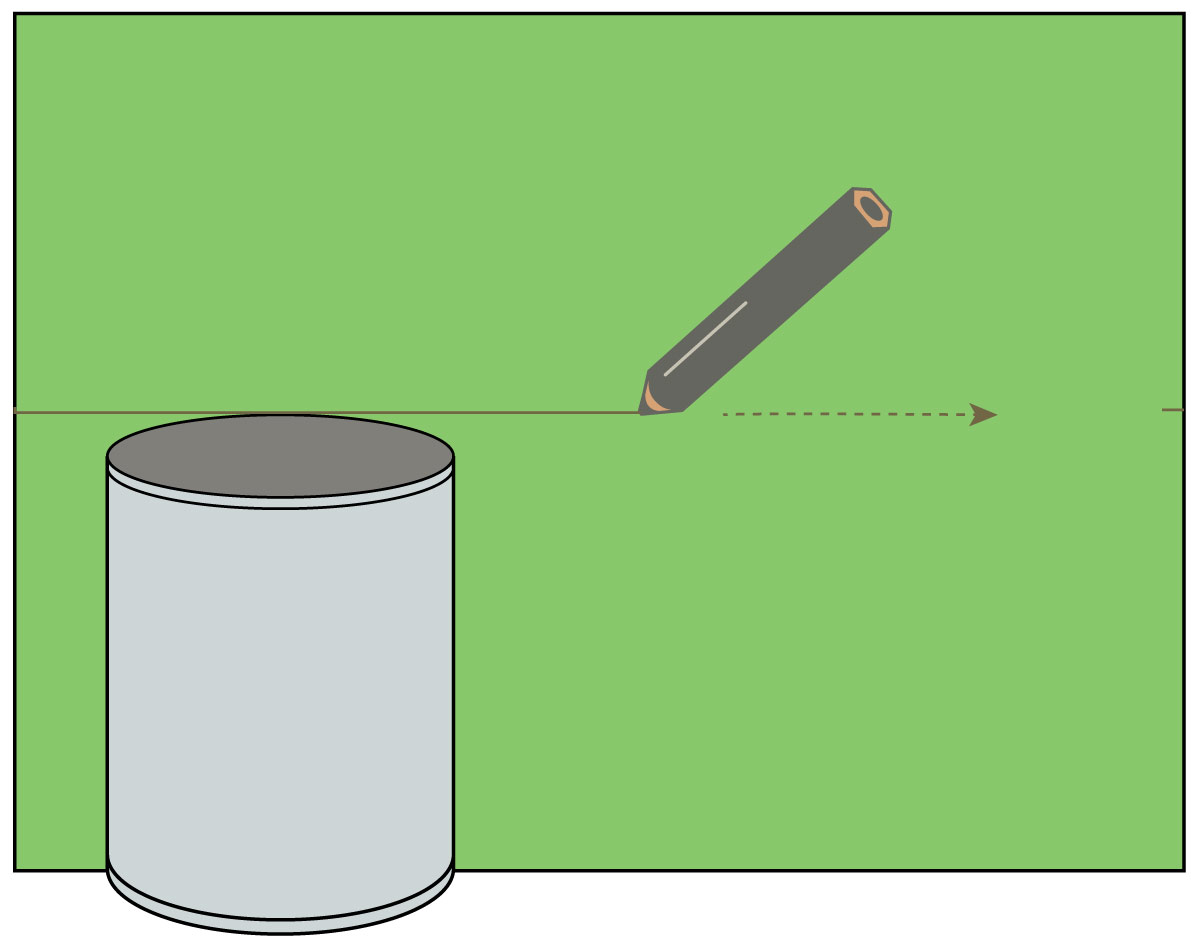
Students select a background color for their can from brightly colored papers. Explain that a wild color will make a really fun can face.
Set the can down on it’s side, with the bottom of the can lined up with the long edge of the paper. Make a mark at the top of the can, to measure the size you need to cut the paper. Move the can to the other side and measure a mark there too. Connect the two marks with a pencil line, using a straight edge like a ruler or the side of a pad.
Have students cut along the line using safety scissors.
Use clear tape to attach the paper to the can (one edge), then wrap it around and overlap. Secure the other end with a piece of tape along the entire edge.
Use this button to jump down to the preparation section.
LEARNING TARGETS
Students know how to draw different facial expressions
M A T E R I A L S
- TV or Ipad to view slideshow
Facial Expressions (tap any image to open viewer)
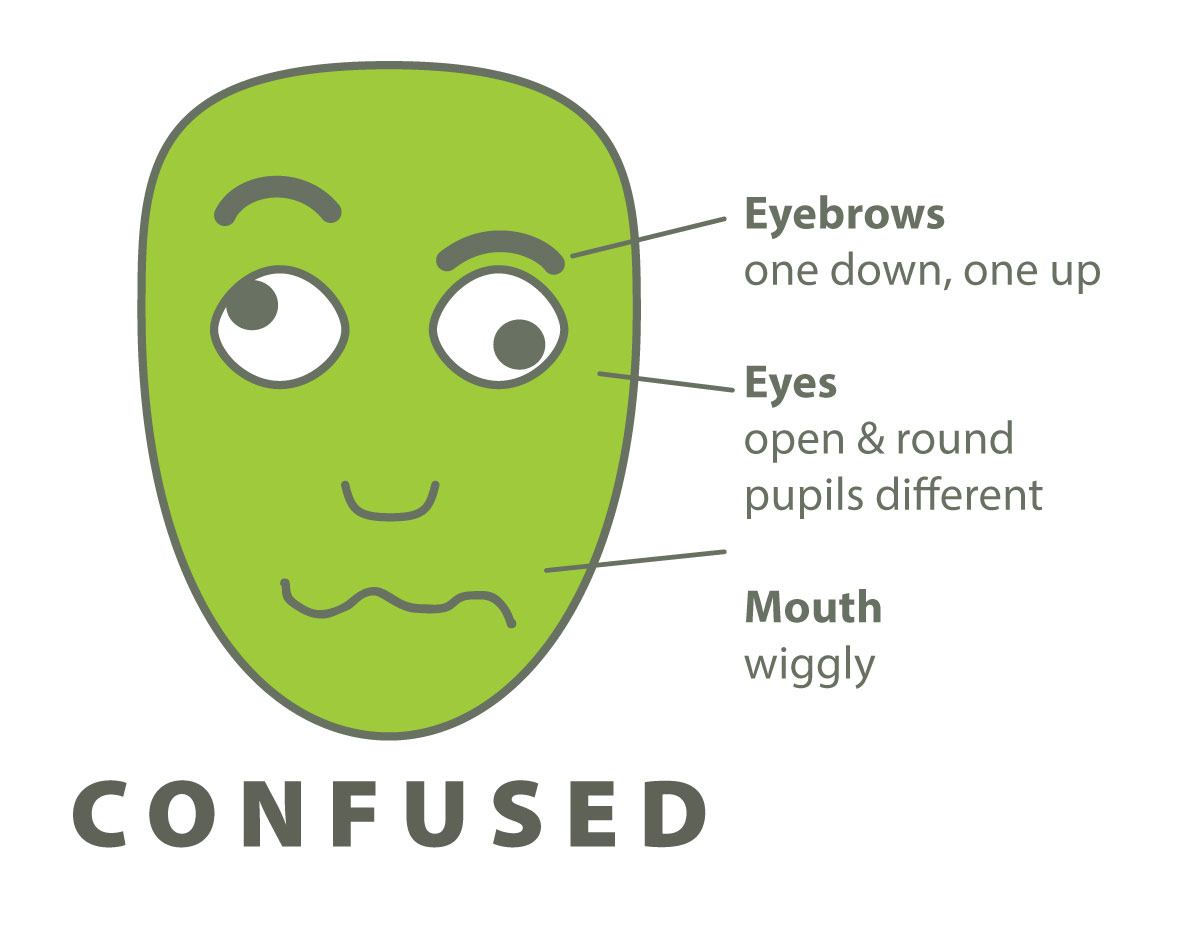
A confused face is fun and easy to make. Just confuse the features. Make one side of the face different than the other.
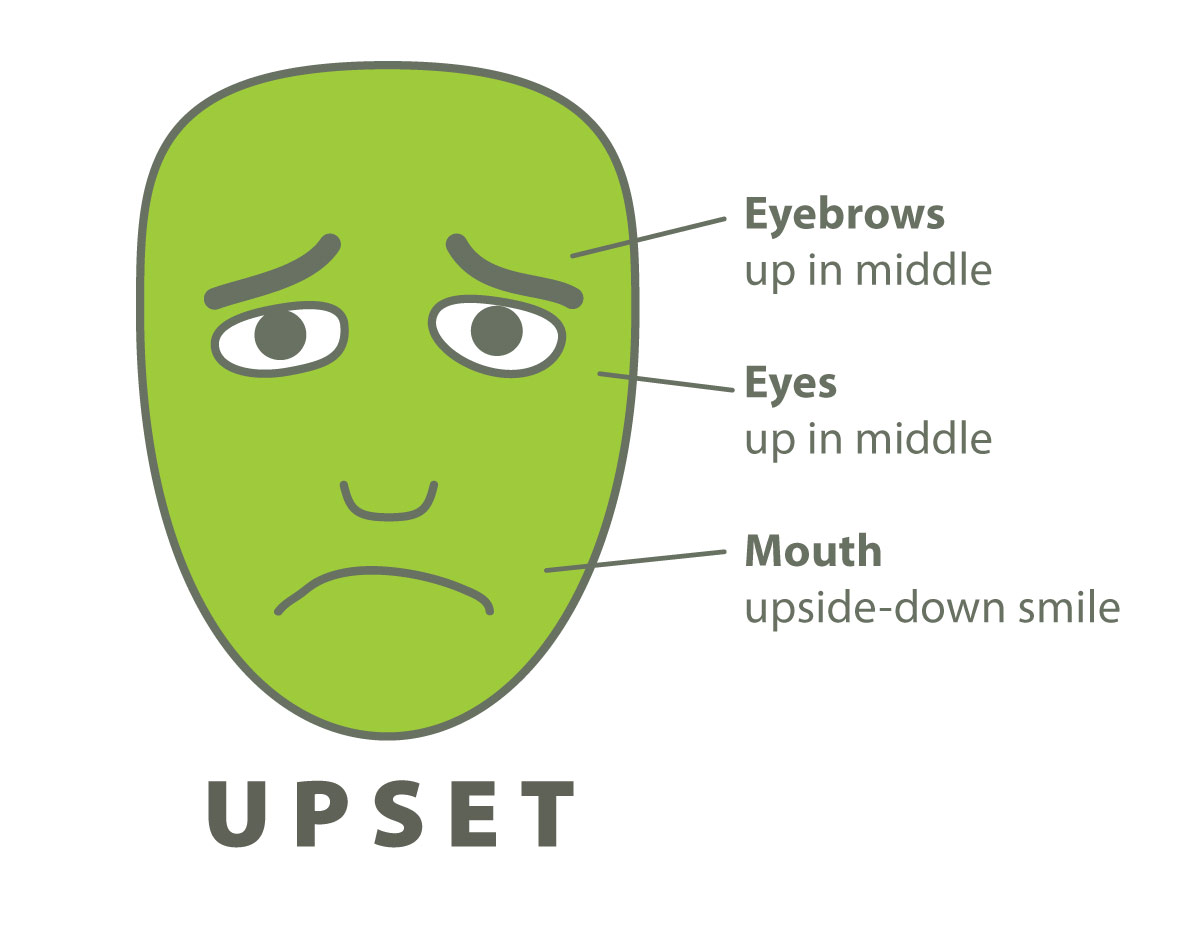
When a face is upset, the eyebrows pull up in the middle. Eyes can be slightly slanted up in the middle too.
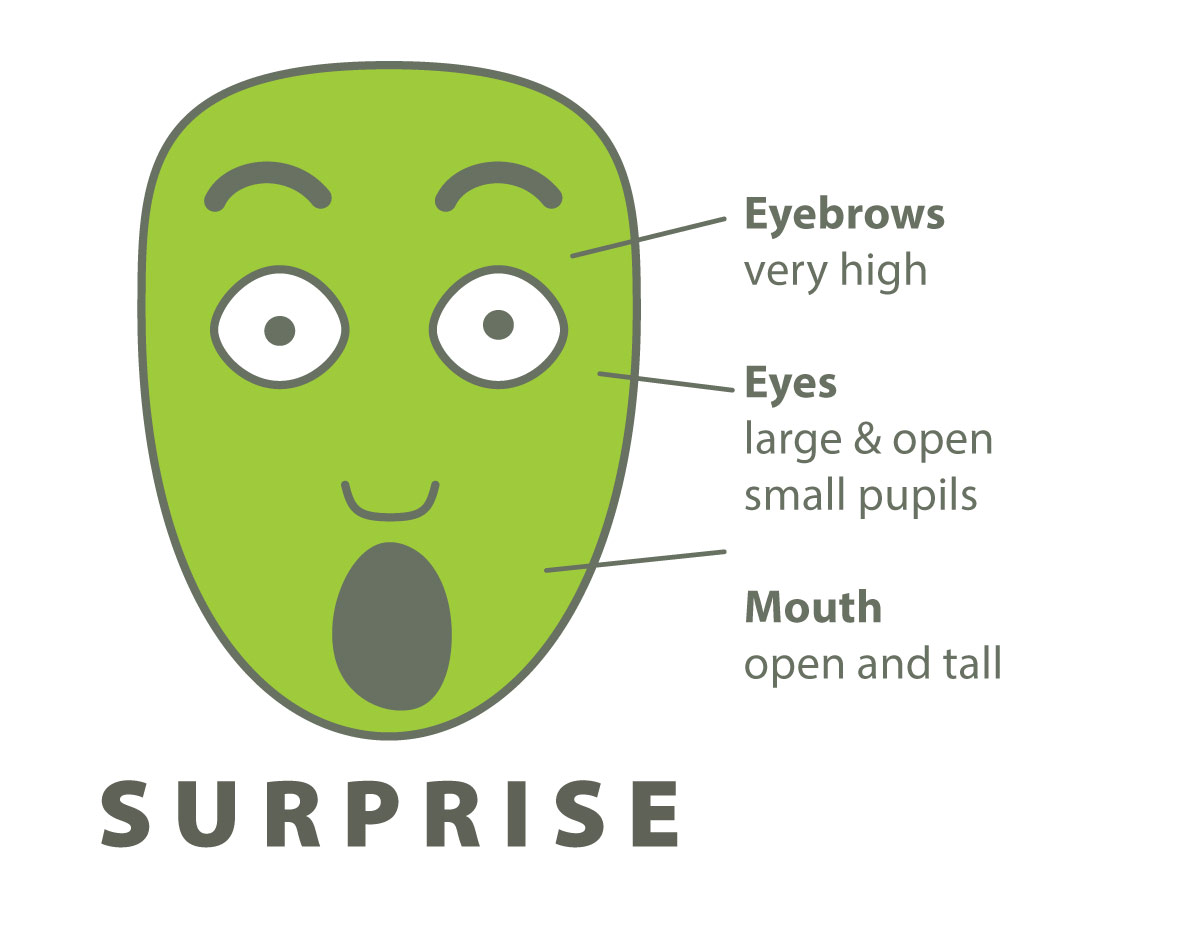
A face expression gets taller when we’re surprised. The eyebrows go way up, and the eyes get way open. So does the mouth, and if you make it taller than it is wide, it looks more surprised.
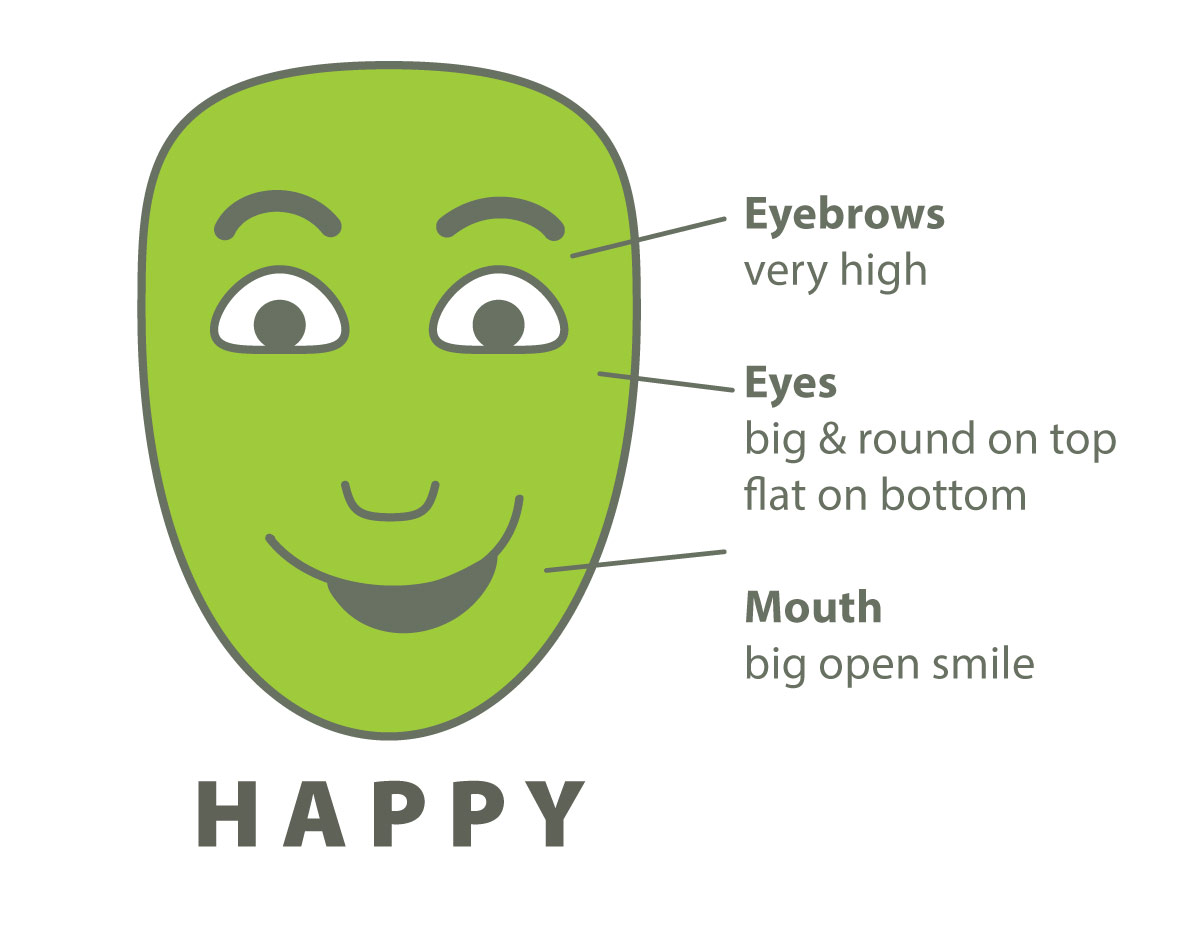
A happy face is pretty easy, but don’t forget to make the eyebrows high.
3.1 teach
Teach students how different expressions are shown.
Go through the slides slowly, and discuss how each of the 3 main facial features are different for each expression. Sometimes the difference is small, but makes a big difference. Read the captions too, and on the last one, you can cover up one side of the face and see a less confused expression. What makes it confused is that the two sides don’t match.
“Cartoon expressions are simple, but the eyebrows, eyes, and mouth must be drawn in certain ways to convey expressions.
Expressions are like words that people know; you have to use the right features just like using the right words. You can’t say chocolate when you mean broccoli, or you won’t be understood. You can’t draw a smiley mouth on a sad face, or low eyebrows on a surprised face either.”
Use this button to jump down to the preparation section.
LEARNING TARGETS
Students know how to make an expressive cartoon
M A T E R I A L S
- Copy paper or sketch pad
- Pencil and eraser
- Face Parts PDF
4.1 print
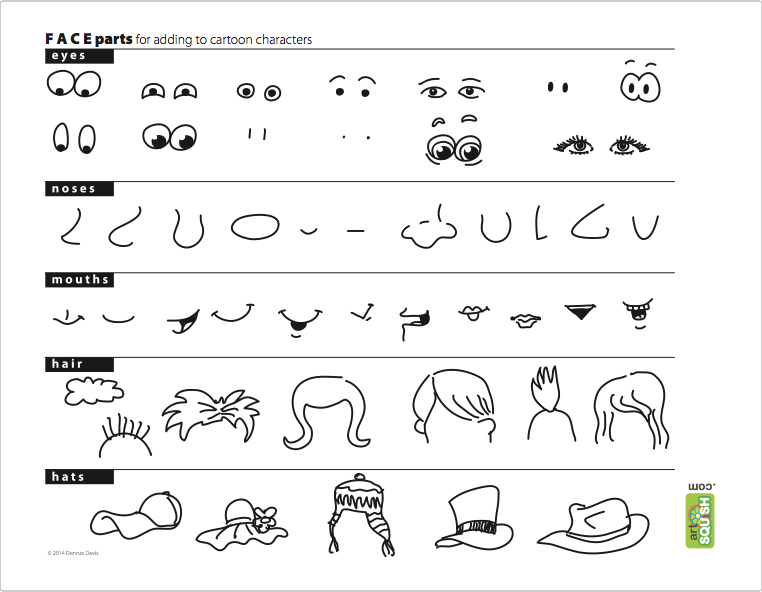
Reference
Face Parts
A reference page full of cartoon facial features and other head elements.
Hand out prints. Make sure each student gets one to see or two students to share between them.
1 Page – Opens in new window
4.2 draw
Students will draw some cartoon faces to experiment.
Provide the Face Parts PDF reference.
First have students make a window of 4 panels on their sketch book paper.
- Paper in shower position
- Draw a line from top to bottom right in the center, like the middle of a book
- Turn the paper in bathtub position
- Draw another line from top to bottom in the center, to create 4 panels
Students should draw a face in each one, experimenting with different expressions. Encourage silly crazy expressions and keep showing the slides as they work.
Everyone should choose one drawing for their can face. Most of the face parts will work with the yarn and foam pieces, but hats are pretty difficult. Make sure everyone knows they can’t create the hats. (However, if you have more time, you can try them!)
Use this button to jump down to the preparation section.
LEARNING TARGETS
Students know how to add graphic elements onto a 3D project
M A T E R I A L S
- Craft foam in many colors, pre-cut into smaller sized rectangles and squares
- Yarn in several colors
- Pencil
- Safety scissors
- Tacky Glue and/or a low temp glue gun OR
- Permanent glue sticks
- Black sharpies
5.1 create
Cut and paste foam and yarn to create character faces.
Encourage working on the main features first, and then progressing to hair and other details.
Steps for working on the cans
- Draw a face part shape on foam using pencil and looking at your drawn toon face.
- Cut out your shapes
- Use tacky craft glue to stick the parts on the can. (elmers will not work – parts will slide off)
- Add details with markers.
Yarn is fun for hair, beards, mustaches, and even eyebrows.
Glueing options
Tacky glue works and the kids can use it, but having a glue gun on low temp can make these ready to go home much faster. A glue station can work well if kids wait their turn, and you place a tiny dab of glue or two on their can and let them stick it their foam pieces carefully into the glue. You can also place the pieces yourself, under their direction, if you want to ensure there are no hot finger accidents.
Update: Elmers now has a great permanent version of their glue sticks that works pretty well, even to stick the foam parts onto a curved can shape.
TIP
Use this button to jump down to the preparation section.
LEARNING TARGETS
Students know how to finish a 3D project
M A T E R I A L S
- Cover or Card stock paper
- leftover foam and yarn
- Glue or glue sticks
- Pencil
- Safety scissors
6.1 create
For early finishers, you can encourage creating more things for their can, or move them to a 2-dimensional collage.
Suggestions: do another cartoon idea, or something different, such as a scene or a flower. Use plenty of glue!
Use this button to jump down to the preparation section.
LEARNING TARGETS
Students know the importance of cleaning up
M A T E R I A L S
- Paper Towels
- Cleaning wipes
- Sink
- Waste baskets
- Well-lit spot for photos
- Camera or phone-camera
7.1 clean
Students clean up their work area.
- Wash hands
- Super-wash brushes if used
- Put art supplies away
- Wipe tables & toss trash
- Remove any smocks (last)
- Check for items on floors and tables
7.2 photos
Try to get photos of your student’s artwork. Find a good spot for quick lighting without highlights or shadows from your hands and device. Ideally in-between two strong lights on each side
Use this button to jump down to the preparation section.
OBJECTIVES
- Practice and improvement in drawing cartoon expressions
- Understanding how specific features make different expressions
- Accomplishment in making a 3D can cartoon pencil holder
- Fulfillment by drawing and designing the cartoon face on the can
TROUBLESPOTS
Tiny cut-outs – Sometimes a student will continue to cut on a shape until there is not much left.
ART WORDS
Mixed Media – Creating art using more than one media, such as foam, yarn, a can, and markers.
CLASSROOM
PREP
Print all of your PDFs from the lesson plan and cut any references apart as needed.
What your room needs
Here are your printable lists and room prep instructions.
Opens in new window
CLASSROOM
MATERIALS
- 11×17” Copy Paper
- 2B Pencil
- White Eraser
- Markers
- Metal food cans (empty and cleaned)
- Duct tape – for covering sharp edges
- Colorful papers (copy size)
- Clear plastic tape (“magic” wrapping tape)
- Scissors
- Ruler
- TV or Ipad to view slideshow
- Craft foam in many colors, pre-cut into smaller sized rectangles and squares
- Yarn in several colors
- Tacky Glue and/or a low temp glue gun OR
- Permanent glue sticks
- Black sharpies
- Cover or Card Stock
PREVIEW
Week 16: Seeing Double
We use the idea of seeing double to have fun, and reinforce several artistic insights. Students learn symmetry with a collage using double-cutting and a mono print fold-over. There’s a fun lines and tigers game that morphs into a shadow lesson using a mirror image later one. A real mirror is also used to finish half a face.
Week 17: Prints & Presents
Students will make multiple art prints using a simple technique to engrave a design into styrofoam. They will also create a frame for the print and paint it with acrylics. The lesson will teach how printing creates duplicates and they are a mirror image. Also, how to plan and design a simple printed piece of art and make a great presentation. The end result is a wonderful holiday art gift!
Use this button to view our parent’s blog. Share the link: http://parentart.org, with your student’s parents so your they can read about the lesson each week.