
Painting
Each lesson Plan focuses primarily on one of the 4 Cornerstones of Art:
Drawing | Painting | Color | Style
OVERVIEW
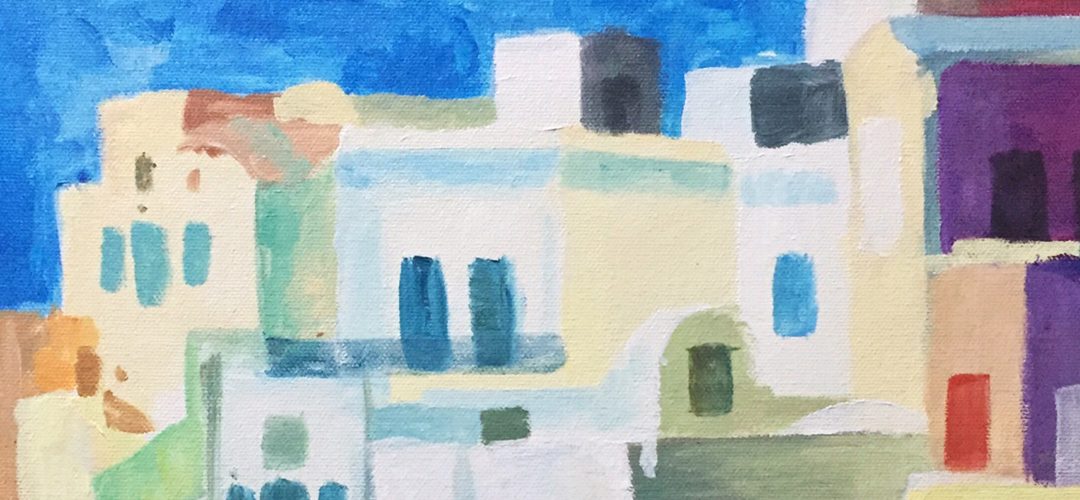
Students will enjoy an easy drawing of architecture shapes that don’t involve perspective, from photo reference. A review or intro to watercolor techniques is next, and then they spend the rest of the lesson painting.– – –
Grades 3 – 5
Week of Jan 30 – Feb 3
1 Hour & 45 Minutes
Lesson At A Glance
Here’s a brief overview of the complete lesson. It’s also on your prep page in the Ready, Set, Go! section (below the lesson).
Colored buttons jump to each section in the full lesson plan below.
NEW: You can use this week to allow students a chance to work on existing projects if they want to catch up on them.
Afterwards, they can either do artists’ choice or the lesson below. This is a great lesson and produces some nice artwork.
15 Minutes – Student architecture drawings
5 min – Organize before setting up for painting
10 min – Draw guidelines onto watercolor paper
10 min – Either demo review or show video
12 min – Everyone begins painting
50 Min – Paint until finished
2 Min – Everyone helps
Use this button to jump down to the preparation section.
SCROLL & TEACH
LESSONPLAN
Each section is a different color. Read over once and then you can SCROLL & TEACH using any device you like. It’s designed to work well with your phone.
LEARNING TARGETS

Students know how to create architecture drawings
M A T E R I A L S
- 14″ x 17″ sketch pad
- 4B pencil
- White and kneaded erasers
- Cheasel reference stand & clip
- Reference printed out
All materials are suggestions and may be modified as you see fit. We have tried many items, and these seem to allow the most versatility for the cost.
1.1 Print
Reference
Architecture Reference
Cut images apart and print enough for each student to choose from several.
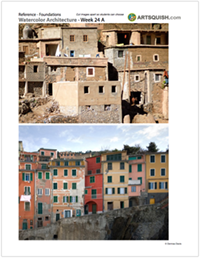
3 Pages – Opens in new window
1.2 draw
1.3 draw
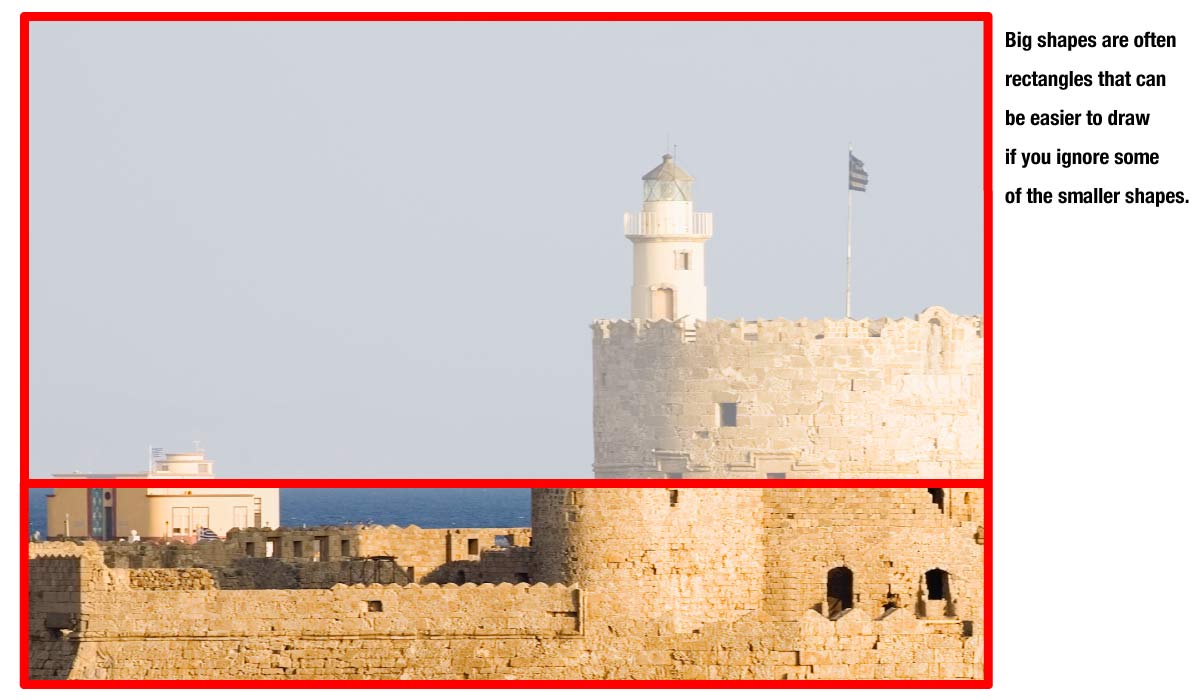
The biggest shapes are usually rectangles that define a group of objects together. Such as the sky above the coastal fort, but ignoring the tower shape that invades it. Guide lines are NOT the artwork. You use guidelines to help you draw the artwork accurately. Draw the guidelines very lightly so you can erase and change them several times without leaving ghost lines.
Use the term, “tickle lines” for young students, explaining that you tickle the paper so the line is barely visible.

Pinterest Gallery – Glexis Novoa
Tap the icon to the left to open our special Pinboard showing examples of artwork to display to your class. See our Article for making Pinterest work on larger displays. You can also use a laptop or large tablet and gather everyone around like you’re using a book.
“Glexis Novoa is a Cuban artist currently living and working out of Miami. Since the late eighties, Novoa has produced art in many different media, including painting, installation, performance and most recently graphite drawings on marble. He focuses on political and societal issues, although now his work attempts to explore the audience’s interaction with his drawings. He achieves that through layered works and tiny details.
Novoa’s work is currently featured in numerous international museums and many other venues.”
Advanced Student Lesson
CREATIONS - tap here to open
Our Creations lessons are for students who have completed the two years of Foundations and are ready to begin using all that they have learned to create new work. These more challenging versions of the same concepts and techniques are easily taught along-side students in the Foundations course. This allows for excellent review, and is encouraging for students to see progress from each viewpoint.
Use the Student Instructions printout below to distribute to your Creations students. Tap the image to open the PDF in a new window.
Architecture Painting
Overview:
The advanced students can use the same references to find a photo they’ve not done before. The goal is to create a new watercolor artwork that is stronger than work done in the past. If you want to have a file with more challenging architecture photos, that’s fine, but the images we have in our PDF above do not require drawing in perspective, which will take extra time. Instead, the goal is to work on watercolor technique, color, and color composition. And also to enjoy creating. The latter may involve allowing more freedom for some students, but try to not let them lose the day in selecting reference and sketching.
No need for special instructions today.
Use this button to jump down to the preparation section.
LEARNING TARGETS
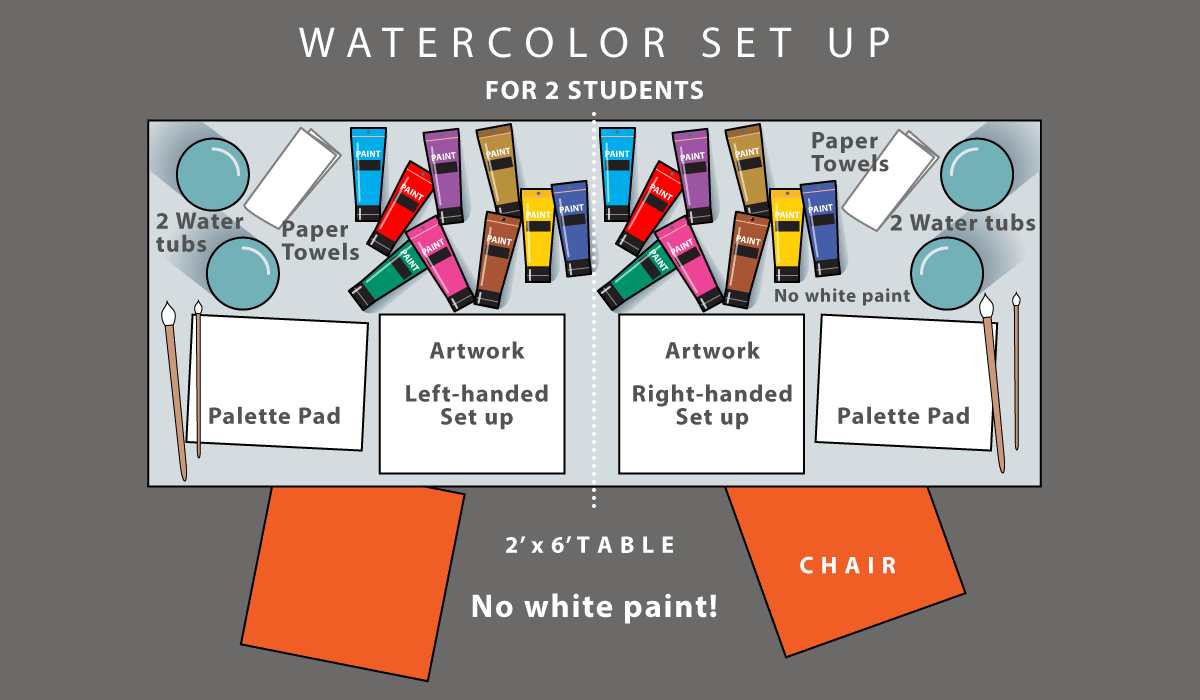
Students know how to set up their work area for painting with acrylics.
M A T E R I A L S
- Watercolor pad
- Palette pad
- Acrylic paints – all colors except white
- Brushes
- 2 water tubs
- Paper towels
Brushes should be nylon for springiness and durability. Round brushes are the most versatile.
Paint pigment list:
- Napthol or Pyrrol Red
- Hansa or Light Yellow
- Pthalo Green (blue shade)
- Cyan or Cerulean Blue
- Ultramarine Blue
- Dioxazine Purple
- Magenta
- Burnt Umber
- Raw Sienna
2.1 setup
Use this button to jump down to the preparation section.
STEP 3. Guidelines & Drawing
Students will draw very light guidelines onto watercolor paper before drawing. 10 MinutesLEARNING TARGETS
Students know how to draw guidelines
M A T E R I A L S
- Watercolor paper – 11″ x 15″ or so
- Reference photo on stand
- 2B pencil
- Kneaded eraser
3.1 draw
3.2 teach
3.3 draw
Use this button to jump down to the preparation section.
LEARNING TARGETS
Students know how to watercolor
M A T E R I A L S
- Watercolor paper – 11″ x 15″ or so
4.1 demo
- You have 2 tubs: one for cleaning & one is the paint; water is the paint
- Don’t use white. Paper is white so clear water is like white paint.
- Make your colors by mixing translucent acrylics into water. Mix thoroughly.
- Make the color strong but still watery.
- Mix colors; don’t use pure pigments.
- Make more than you think you need. It’s just water.
4.2 DEMO
Watercolor Demo
Tap the 4 arrows icon to enlarge the video to full screen.
Review the demo video and demonstrate to your students, or you can simply display the video on a larger screen for them to watch.
4.3 print
INFORMATION
Watercolor Points
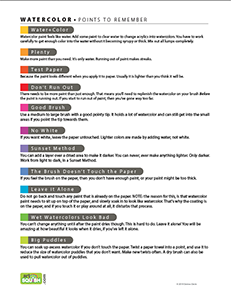
1 Page – Opens in new window
4.4 TEach
Watercolor Brush Secret (tap any image to open viewer)
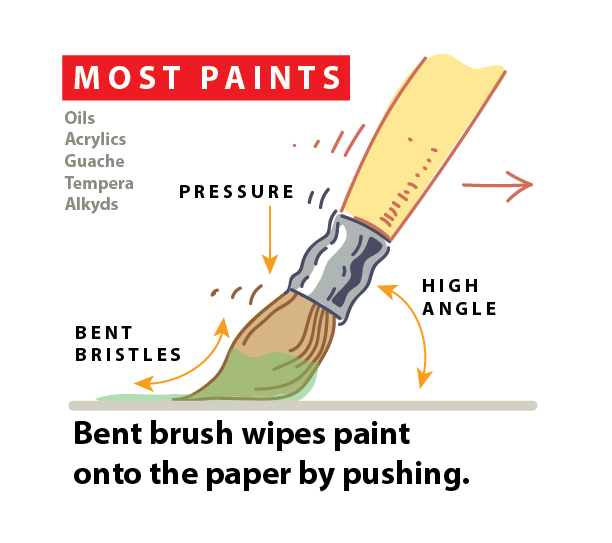
WatercolorBrush_illust1
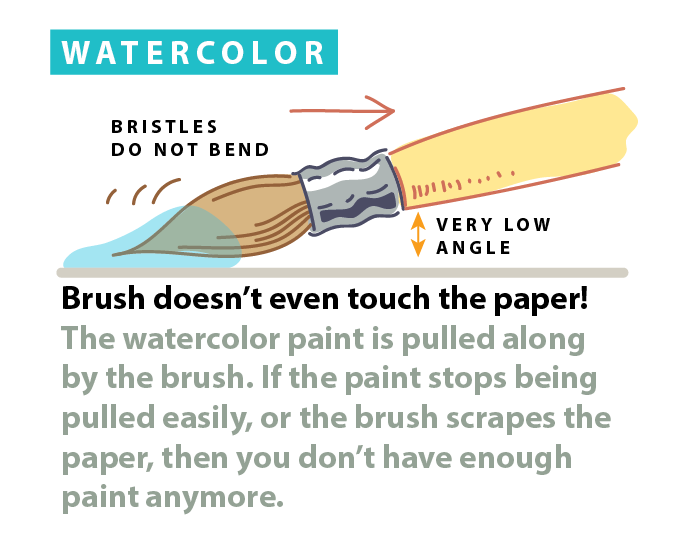
WatercolorBrush_illust2

WatercolorBrushillust
Use this button to jump down to the preparation section.
LEARNING TARGETS
Students know how to paint with watercolor
M A T E R I A L S
- Watercolor pad
- Palette pad
- Acrylic paints – no white
- Brushes
- 2 water tubs
- Paper towels
5.1 paint
Use this button to jump down to the preparation section.
LEARNING TARGETS
Students know how to use watercolors
M A T E R I A L S
- Watercolor painting & setup
- New Watercolor
6.1 WORD
Use this button to jump down to the preparation section.
LEARNING TARGETS
Students know the importance of cleaning up
M A T E R I A L S
- Paper Towels
- Cleaning wipes
- Sink
- Waste baskets
- Well-lit spot for photos
- Camera or phone-camera
7.1 clean
Students clean up their work area.
- Wash hands
- Super-wash brushes if used
- Put art supplies away
- Wipe tables & toss trash
- Remove any smocks (last)
- Check for items on floors and tables
7.2 photos
Try to get photos of your student’s artwork. Find a good spot for quick lighting without highlights or shadows from your hands and device. Ideally in-between two strong lights on each side
OBJECTIVES
- Practice and improvement painting with watercolors
- Understanding how watercolor is used
- Accomplishment from creating a finished painting of architecture
- Fulfillment by choosing reference and colors
TROUBLESPOTS
Running out of paint – The one thing most people do that ruins a watercolor painting is to continue to use a brush that has run out of watercolor.
Messing with a finished area – Watercolor doesn’t look finished while wet, so students will tend to dab and stroke in a finished areas. This will create a bad-looking effect. Leave it alone!
ART WORDS
Translucent – Anything you can see through to some degree is translucent. Watercolors allow the paper and other layers of paint to show through, because they are translucent.
CLASSROOM
PREP
Have a bunch of amazing supplies ready, and cut a few things apart before-hand in a way that make you look amazing.
Print all of your PDFs from the lesson plan and cut any references apart as needed.
What your room needs
Here are your printable lists and room prep instructions.
Opens in new window
CLASSROOM
MATERIALS
- Cheasel reference stand and clip
- Water tubs
- Paper towels
STUDENT’S
MATERIALS
- 14” x 17” Sketch Pad
- 4B Pencil
- White and kneaded erasers
- Watercolor pad
- Palette pad
- Acrylic paints
- Brushes
PREVIEW
Week 25: Eyeball Lesson
This week is the beginning of our winter anatomy lessons on the parts of the face. Students will sculpt a human eye as they follow along with a video. They’ll learn to draw accurate eyes by understanding the form and structure of the eyeball and the skin around it. Lighting is demonstrated so that shadows are also understood. There is a “before” and “after” version of their work so they can see the progress from today’s instructions.
Week 26: The Weird Nose
Students will make a clay model of the nose and then draw it. They will learn insights about the form of the nose and how to shade it. Then they’ll use reference to draw eyes and nose together.