

OVERVIEW
Emphasis is one of the most important aspects of good composition. However, this is a lot of abstract thinking for kids, so we say, “every artwork needs a Most Important Spot!” The lesson helps students think about what is in artwork, and to distinguish between wallpaper type designs and art that has that important spot that you see first. We begin with a fake art show using textures on paper but nothing else on them. Then we do some exercises with color. The end of the class has students taking the art show down and fixing the work by adding an important spot.– – –
Grades 1 – 2
Week of February 10 – 14
1 Hour & 30 Minutes
Lesson At A Glance
Here’s a brief overview of the complete lesson. It’s also on your prep page in the Ready, Set, Go! section (below the lesson).
Colored buttons jump to each section in the full lesson plan below.
10 Minutes – Artists choice
15 min – Use reference to draw and color in oil pastel
10 min – Texture rubbings
10 min – hang up texture drawings for art show
15 min – Use color to create the most important banana
15 min – Artists’s choice on top of texture drawings
13 min – Continue oil pastels of fruit
2 Min – Everyone helps
Use this button to jump down to the preparation section.
SCROLL & TEACH
LESSONPLAN
Each section is a different color. Read over once and then you can SCROLL & TEACH using any device you like. It’s designed to work well with your phone.
LEARNING TARGETS

Students know how to use their imagination
M A T E R I A L S
- 8.5″ x 11″ copy paper
- 2B Pencil
- White Eraser
All materials are suggestions and may be modified as you see fit. We have tried many items, and these seem to allow the most versatility for the cost.
1.1 Greet
Greet students as they come in and help them choose a chair.
Kneel down so that you are on their level. Bending over emphasizes the differences in your height, while kneeling makes them feel more important. Have tape and marker ready so you can stick some tape on the table by each student and write their name on it as they sit down.
1.2 Choice
Encourage students to work with one piece of paper for a while. If someone uses the phrase, “free draw”, explain that artists’ choice is something only artists can do, while free-draw is something anyone can do. You want to use the phrase to elevate the students’ expectations of their work.
Everyone should take their time with the work and make a finished piece of art. Limiting the paper can also help kids focus on the work. If someone finishes in super-fast time, ask them what more they can do to the existing paper. Ask again several times – unless they appear overly frustrated; then you can allow them to move on to a new work.
Use this button to jump down to the preparation section.
LEARNING TARGETS
Students know how to create a wallpaper inspired design
M A T E R I A L S
- 8.5″ x 11″ copy paper or card stock
- Colored pencil or 2B pencil
- Oil pastels
- Blending sticks (stumps)
- Reference PDF printed
2.1 Print
Reference
Wallpapers
Each student gets one, or have one on a stand between two students to share.

1 Page – Opens in new window
2.2 draw
2.3 color
Use this button to jump down to the preparation section.
LEARNING TARGETS
Students know how to create textured art
M A T E R I A L S
- Colored paper – thin, not card stock
- Plastic texture boards
- Textured objects:
- Bricks
- Pavers
- Textured tiles
- Wood – rough ends work well
- Old samples of wallpaper and upholstery fabric
- Leaves (use them all over to create a solid textured area instead of a leaf shape)
- Back of ceramic tiles or the front if they’re textured
- Oil pastels
- Paper towels
3.1 choose
Students select one texture and one colored paper for their first rubbing.
You can buy texture boards (available at parent teacher stores or online. Make sure to get smaller pattern textures, not pictures – DickBlickLink AmazonLink). On a budget, you can use the ends of 2 x 4 lumber (or larger), Stone pavers, bricks, textured tiles, and vinyl wall covering samples. Sometimes these are free if you go to stores that sell these things and ask for outdated samples and scraps.
3.2 color
Help everyone select a color that will show up on their paper color. Sometimes kids will select a combination that doesn’t show up well. Light opaque colors will work on darker papers, and darker colors work on lighter papers.
At first, have students use the side of a stick of oil pastel instead of the tip. If the texture is not showing up much, then they can switch to using the tip.
Do not blend!
TIP
Early finishers can make a second texture right on top of one of their first ones, using a different board and/or a different color.
Use this button to jump down to the preparation section.
STEP 4. Art Show
Students will view their art on the wall and discuss The Most Important Spot 10 MinutesLEARNING TARGETS
Students know how to identify the Most Important Spot
M A T E R I A L S
- Painter’s tape or “Mahvalous” brand tape
4.1 hang
Choose one texture drawing from each student and let them hang them on the wall for an art show. Use loops of painter’s tape in each corner. Everyone should sit down or stand back 6-10 feet and observe.
TT: These are interesting, but they all seem pretty similar except for the paper colors. What is missing?
Let the kids come up with answers. They should find more and more specific things that could be on the “pictures”, like houses, people, flowers, almost anything. Discuss how it is somewhat interesting, but there is not much of an idea to it. Most art is more enjoyable if the artist puts their ideas into it. We also like to look at things we know about, like people, houses and cats. Things like that.
But there’s one thing most people don’t know, but artists usually do, that makes art look the best. That is having a Most Important Spot. People love it when there’s one thing that jumps out first as soon as you look at artwork. It’s like the artist is saying to them, ‘this is my most important thing on this painting’.
4.2 discuss
Let students discuss what is missing. Try to get them to make suggestions and help them discover that the artwork is missing objects. Things we like to see and draw, like people, houses, trees, flowers, etc.
“These are fun to do, and are interesting, but they all seem pretty similar except for the colors.
What is missing from our artwork?”
4.3 teach
Introduce The Most Important Spot
“Most art is more enjoyable if the artist puts their ideas into it. We also like to look at things we know about, like people, houses and cats. These are things that are familiar to us.
But there’s one thing most people don’t know but artists do, that makes art look really good. That is having a Most Important Spot. People love it when there’s one thing that jumps out first as soon as you look at artwork. It’s like the artist is saying to them, ‘this is the most important thing on my painting. It’s what I want people to look at first’.”
Use this button to jump down to the preparation section.
Clean up
If splitting your lesson into two parts, have everyone use the last couple of minutes to clean up the work space.
- Wash hands
- Super-wash brushes if used
- Put art supplies away
- Wipe tables & toss trash
- Remove any smocks (last)
- Check for items on floors and tables
STEP 5. The Most Important Banana
Artists will use color to create a Most Important Spot. 15 MinutesLEARNING TARGETS
Students know how to identify The Most Important Spot
M A T E R I A L S
- Banana PDF
- Markers
5.1 print
Worksheet
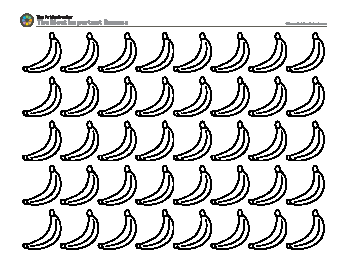
The Most Important Banana
Hand out reference prints. Print enough for each student.
1 Page – Opens in new window
“Look at all these bananas! Which banana do you look at first? Where is the Most Important Spot? That’s right, there is no one banana that stands out from all the rest. Right now they’re all just white bananas with black outlines and it looks like wallpaper. I don’t think we need a bunch of white bananas, do you? What color would you make bananas if you could make them any color you want?”
5.3 choose
5.4 color
5.5 color
5.6 talk
Use this button to jump down to the preparation section.
STEP 6. Add to Artwork
Artists will take down their pattern artwork and add more art to create a Most Important Spot 15 MinutesLEARNING TARGETS
Students know how to create emphasis
- Texture drawings from previous steps
- Oil pastels
- Blending stumps
- Fruit bowl setu
6.2 create
6.3 prep
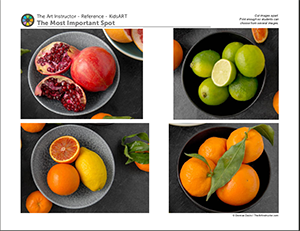
Place bowls of fruit around the tables on colored papers for the next step. Have one fruit a different color so it stands out. Like a green lime in several lemons, or green pears and one red apple. The colored paper should be similar to the majority of the fruit, ie: yellow or orange paper for a bunch of lemons with one lime.
Use this button to jump down to the preparation section.
LEARNING TARGETS
Students know how to draw a still life with oil pastels
M A T E R I A L S
- Bowl filled with fruit (PDF is provided if you can’t get real fruit)
- 8.5″ x 11″ white cover stock
- Colored pencils
- Oil pastels
- Blending stumps
- Paper towels
7.1 Print
Reference
Fruit Bowls
Cut images apart and print enough for each student to choose from several.
Hand out reference prints. Set all of the images out on a table or counter, and let groups of students come choose what they want..
1 Page – Opens in new window
7.2 prep
7.4 color
7.5 teach
Use this button to jump down to the preparation section.
LEARNING TARGETS
Students know the importance of cleaning up.
M A T E R I A L S
- Paper Towels
- Cleaning wipes
- Sink
- Waste baskets
- Well-lit spot for photos
- Camera or phone-camera
8.1 clean
Students clean up their work area.
- Wash hands
- Super-wash brushes if used
- Put art supplies away
- Wipe tables & toss trash
- Remove any smocks (last)
- Check for items on floors and tables
8.2 photo
Try to get photos of your student’s artwork. Find a good spot for quick lighting without highlights or shadows from your hands and device. Ideally in-between two strong lights on each side.
OBJECTIVES
- Practice and improvement in drawing and using color
- Understanding emphasis: the Most Important Spot
- Accomplishment in changing artwork to make it look better
- Fulfillment by creating several works with subjects and colors they’ve chosen
TROUBLESPOTS
There are many objectives that can be stated here for the purpose of stating objectives that need to be puposely objectified.
ART WORDS
Paper – That stuff you draw on.
Pencil – That thing you draw with
Paint – Messy stuff
CLASSROOM
PREP
Have a bunch of amazing supplies ready, and cut a few things apart before-hand in a way that make you look amazing.
Print all of your PDFs from the lesson plan and cut any references apart as needed.
What your room needs
Here are your printable lists and room prep instructions.
Opens in new window
CLASSROOM
MATERIALS
- 11×17” Copy Paper
- 8.5 x 11” Copy paper
- 4B pencils
- Erasers
- Oil pastels
- Blending sticks (stumps)
- Colored paper – thin not card stock
- Plastic texture boards
- Textured objects
- Painters’ Tape
- Paper towels
- Markers
- Fruit bowl setup
PREVIEW
Week 25: Color Wheels
Students will review radial balance and create basic color wheels. They will also learn how opposites make browns and greys, using these mixes on a fun cartoon painting of a cow.
Week 26: Artists’ Choice Fun
Students will enjoy a full lesson where they get to make their own choices. Instead of just letting them loose to play, we provide a framework that helps them make good choices while still being in charge. They’ll choose cards for subjects, such as “animals” or “flowers”, and cards for color schemes, and materials to use. The first project uses reference and observation, while the second half uses imagination.
Use this button to view our parent’s blog. Share the link: http://parentart.org, with your student’s parents so your they can read about the lesson each week.