

Drawing
Each lesson Plan focuses primarily on one of the 4 Cornerstones of Art:
Drawing | Painting | Color | Style
OVERVIEW
Students are introduced to some simple rules and practice with drawing and shading using graphite pencils from 3 different sources: 1) imagination, 2) photo reference, 3) observation (real life)Grades 6 – 12 + adult
Week of August 18 – 22
1 Hour & 45 Minutes
Lesson At A Glance
A brief overview of each step. Buttons jump to each section for detailed information.
10 Min – Intro to Supplies
15 Min – Practice drawing reference
5 Min – Art Room Rules & intro
10 Min – Practice sketch 2
5 Min
30 Min – Finish pencil drawing
2 Min – Everyone helps
SCROLL & TEACH
LESSONPLAN
Each section is a different color. Read over once and then you can SCROLL & TEACH using any device you like. It’s designed to work best with your phone.
LEARNING TARGETS

Students use their imagination to create a fun drawing for warmup.
M A T E R I A L S
- 14″ x 17″ Sketch Paper
- 4B pencil
- White erasers
- Cheasel reference stand & clip
1.1 SET UP
Students set up their work area. Remind students how to arrange their supplies with our set up:
1. Set bag on the floor leaning against the stool or table legs
2. Pull case out of the bag and place the
3. Case on the stool, facing away from table
4. Open case lid, leaning against the table.
5. Get needed supplies (sketch pad and pencils today) and place on table.
 If you don’t have small flat stools for cases, they can be placed on the floor. This keeps cases off of the table so that supplies and table space don’t become a battle ground.
1.2 WARM UP
Draw a creature that is able to fly but looks like it shouldn’t be. Have fun with it. The animal may by fanciful, funny, bizarre, known, unknown, or a combination of any of these directions. Be creative.
This warm-up is to help them get comfortable on their first day without the pressure of drawing something realistic.
You can use the reference photos to display if someone seems stuck. But have them draw from their imagination. Just show the photos for a moment to spark ideas.
Funny ideas for flying creatures (tap any image to open viewer)
FishCreatureIdeas
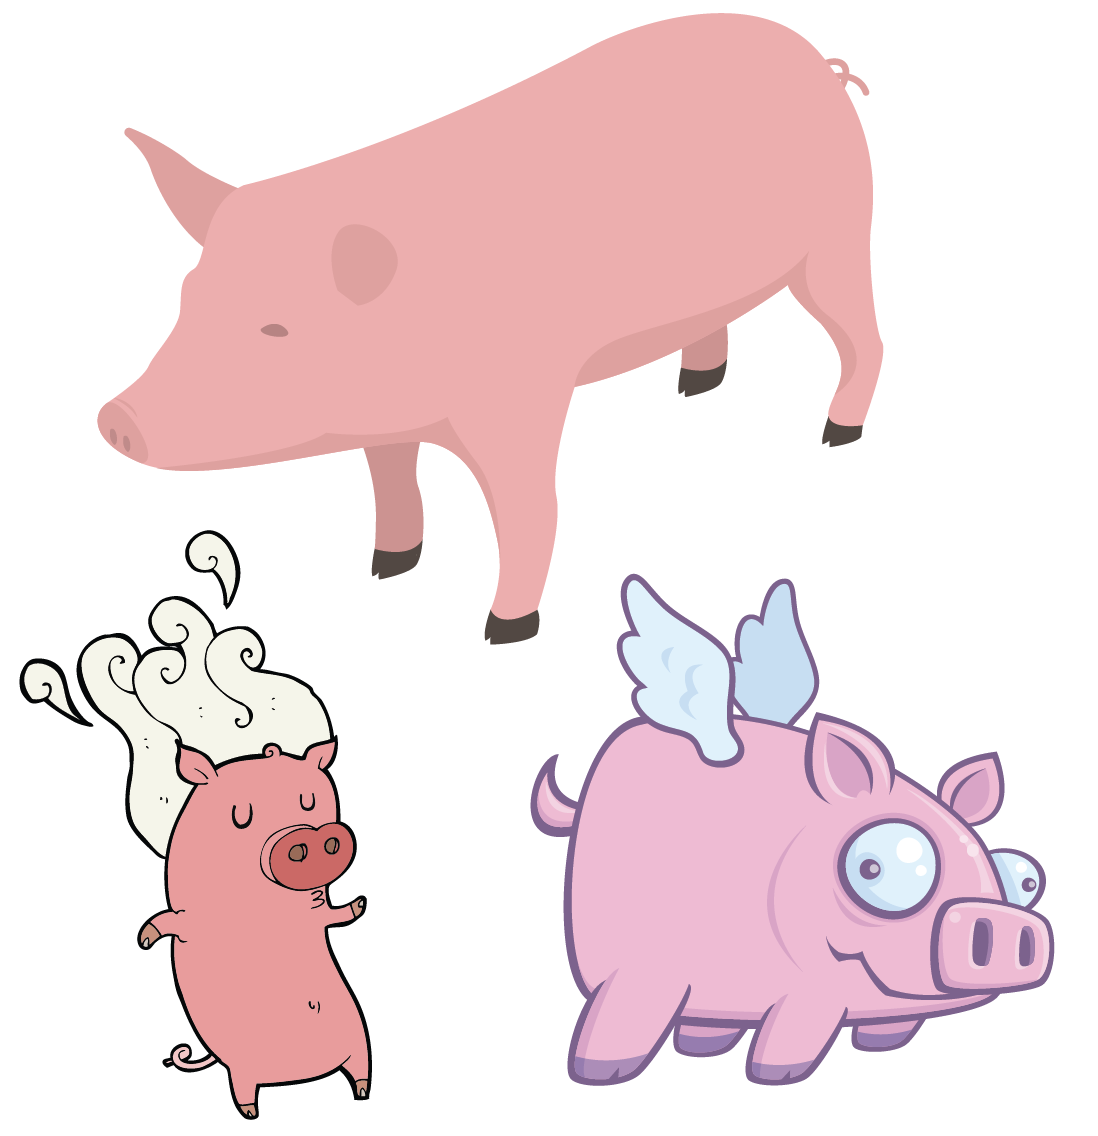
PigCreatureIdeas
1.3 SUPPLIES
Advanced Student Lesson
CREATIONS - tap here to open
Our Creations lessons are for students who have completed the two years of Foundations and are ready to begin using all that they have learned to create new work. These more challenging versions of the same concepts and techniques are easily taught along-side students in the Foundations course. This allows for excellent review, and is encouraging for students to see progress from each viewpoint.
Use the Student Instructions printout below to distribute to your Creations students. Tap the image to open the PDF in a new window.
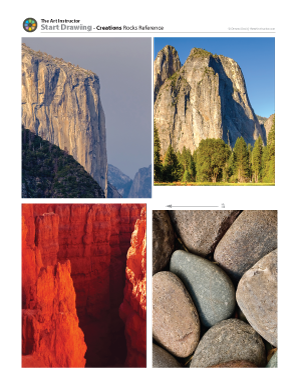
Rocks Drawings
Overview: Students will choose a reference from 4 advanced photographs of rocks and landscapes with rock formations. Then they’ll enjoy creating a detailed drawing from the reference in pencil.
Use a sketch pad.
Step 1: Warmup & Practice. (15 minutes) Warm up with a quick sketch or two of the stacks of rocks that are out on the tables, or a photo from the foundations prints of rock reference (below in STEP 4). Try several different sketch techniques with your shading to see what you like. (ie: hatch shading, cross-hatch shading, blending and line drawing, etc). Practice the technique until it is fairly easy and consistent.
Step 2: Choose. (5 min) Choose a reference from the Creations printout below, of 4 different more advanced rock formations in nature. Students may also choose to draw the stack of rocks.
Step 3: Big Shapes. (5) Draw light guidelines of the biggest shapes in your image. Notice the shape of the sky. Notice the shape and proportions of the Frame, or rectangle of your reference photo. Make sure the proportions are accurate and then make sure the Big Shapes are also accurate. Notice how the shapes align with the edges of the Frame and other Big Shapes.
Step 4: View the Degas examples. (STEP 4 Foundations) Take a moment to see the examples and maybe try some different techniques again based on Degas drawings.
Step 5: Draw. (Remaining time) Draw and shade your work. Enjoy yourself!
Tap images to open Creations Student Instructions and Reference Materials in new windows

This button jumps you down to the READY, SET, GO! section
LEARNING TARGETS
Students know about different drawing supplies
M A T E R I A L S
- 14″ x 17″ Sketch Paper
- 2B and 4B pencils
- canvas pencil
- White eraser
- Kneaded Eraser
- Charcoal
- Blending sticks
- Sandpaper block
2.1 SUPPLIES
Introduce the drawing supplies.
Have your students pick up and handle each item as you talk about them. Have them also finish writing their names on these (if practical – not on the kneaded eraser), and other supplies with sharpie markers as you talk.
- 11 x 17″ Sketch pad: This is large because sometimes you need to draw large. You can divide a page into smaller parts when you need less space.
- Graphite Pencils: There are 2 each of the 2B, 4B and Ebony pencils. These are soft, softer, and extra-soft graphite pencils. The softer the graphite, the darker it draws on your paper.
- Canvas Pencil: This is a dark grey or black colored pencil
- White Eraser: This is for changing your work with hard erasing. It is softer than most erasers though, so you need to be extra careful not to break it or pick at it. Never use this eraser on charcoal because it only smears it.
- Kneaded Eraser: This is in a wrapper, but you need to unwrap it and mash it up. Then stretch it! This eraser is even softer, and is good for light erasing, cleaning up smudges, and also for working back into pencil or charcoal. It can get dirty very fast, but that’s why you stretch it. Fold it back over a few times and it cleans itself. It also makes no eraser dust!
- Charcoal: This is a set of 4 charcoal sticks. Just like pencils, there are harder ones and softer ones. You can choose which ever you like to draw with. They are chunky, and so you can’t draw details with them. Don’t worry about that, because when you are using charcoal, you don’t want a lot of details. You can erase charcoal to some degree with the kneaded eraser.
- Blending Sticks: Also called B L E N D I N G – S T U M P S Solid rolled paper blending sticks will clean up nicely using a sandpaper board. Tortillions can be peeled to clean, but don’t last as long or hold up as well., and tortillions (which are actually slightly different). Use these instead of your finger to smudge and blend pencil, charcoal, and pastels. They can be cleaned off by rubbing on a piece of sandpaper.
- Sandpaper block: The wooden paddle has a small stack of sandpapers like a pad, for cleaning blending sticks. You can also sharpen a pencil tip with it. When the sheet of sandpaper eventually gets totally messed up, you can tear it off to reveal a clean piece.
LEARNING TARGETS
Students know drawing basics.
M A T E R I A L S
- 14″ x 17″ Sketch Paper
- 2B and 4B pencils
- Erasers
- Blender stump
3.1 GATHER
3.2 DEMO
Tap the 4 arrows icon to enlarge the video to full screen.
Review the demo video and demonstrate to your students, or you can simply display the video on a larger screen for them to watch.
Below are a few points you can say and actions to do as you are drawing:
- Drawing lightly lets you change where lines are by erasing – (draw a light line and erase it completely).
- Drawing heavy lines messes up the paper underneath – (draw a heavy line. Go to the next page and lightly shade over the same area to reveal the white line from the dent in the paper).
- If you draw heavily, you can use the last page of your
sketch pad and a large newsprint pad. - Shade very light at first, and darken slowly. Never make dark shadows all at once. (do some shading and then blend with a stick). Blending is just one shading technique. There are many more.
- Blending makes lines become fuzzy. (After you blend like this, you can re-draw your lines again to make them stand out).
3.3 PREPARE
LEARNING TARGETS
Students know how to draw from a photo reference.
M A T E R I A L S
- 14″ x 17″ Sketch Paper
- Reference photo on stand
- 2B and 4B pencils
- Erasers
- Blender stumps
- Paper towels
4.1 PRINTS
REFERENCE
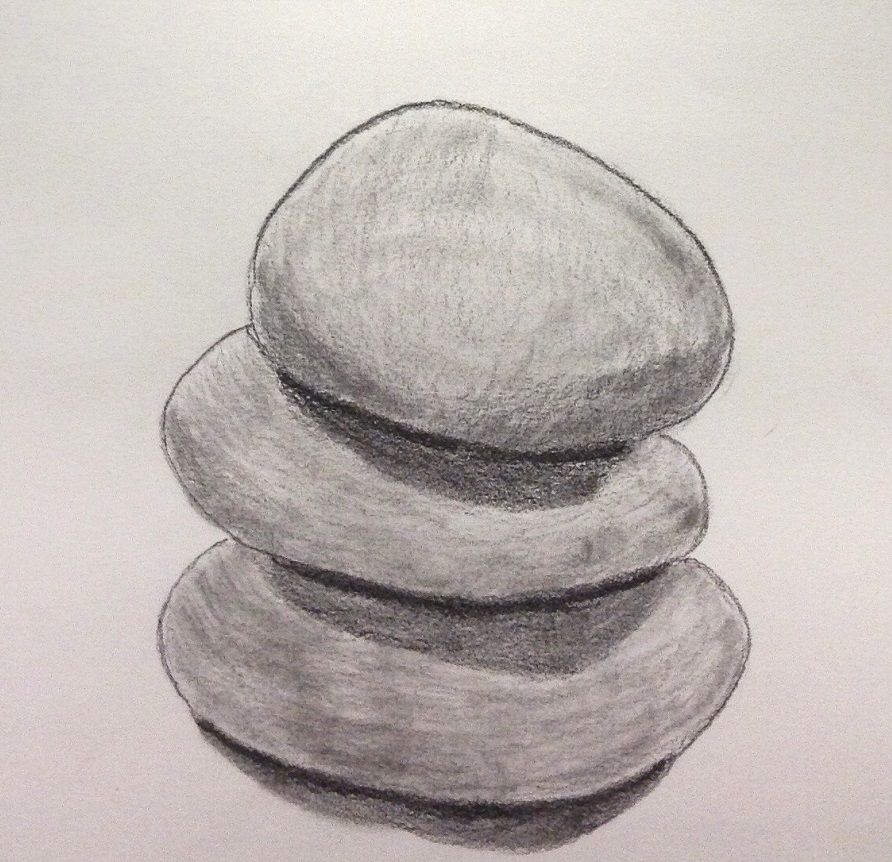
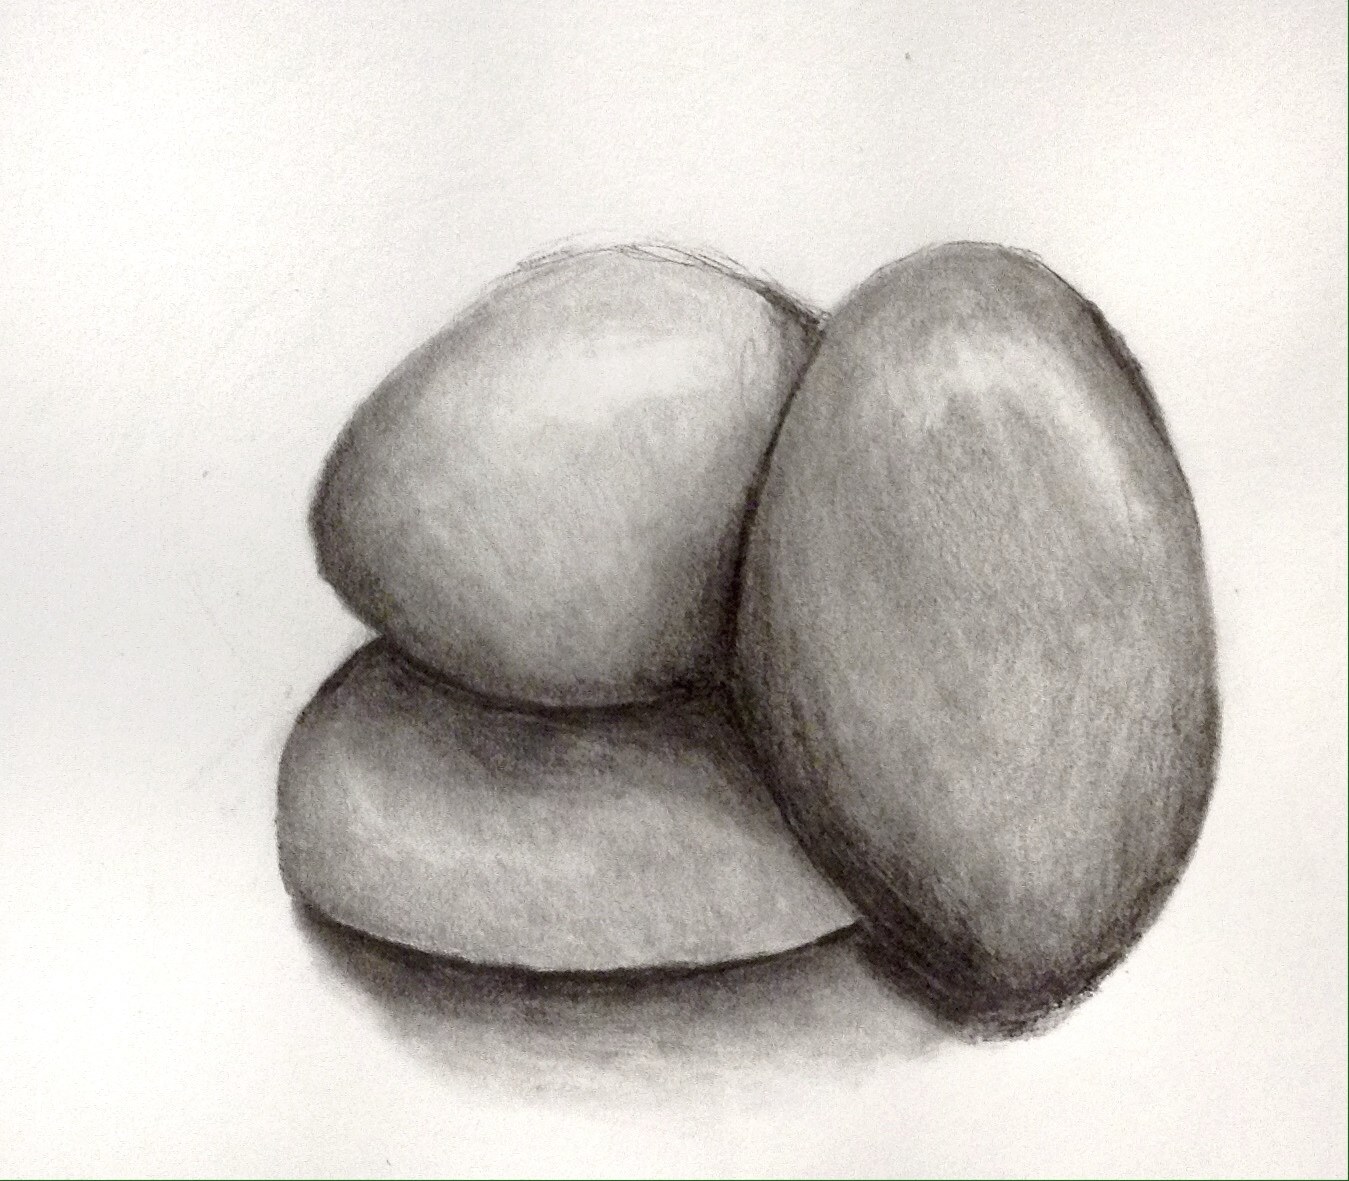
Rock Photos
Two versions of reference of stacks of grey rocks, each with some small guides off the the right that help students see the shadows more clearly.
Hand out prints. Cut along the dotted line. The top version is more challenging. Make sure each student gets one.
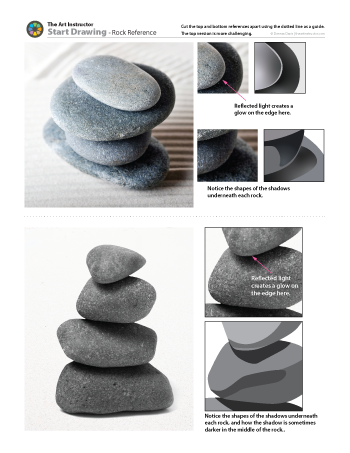
1 Page – Opens in new window
4.2 CHOOSE
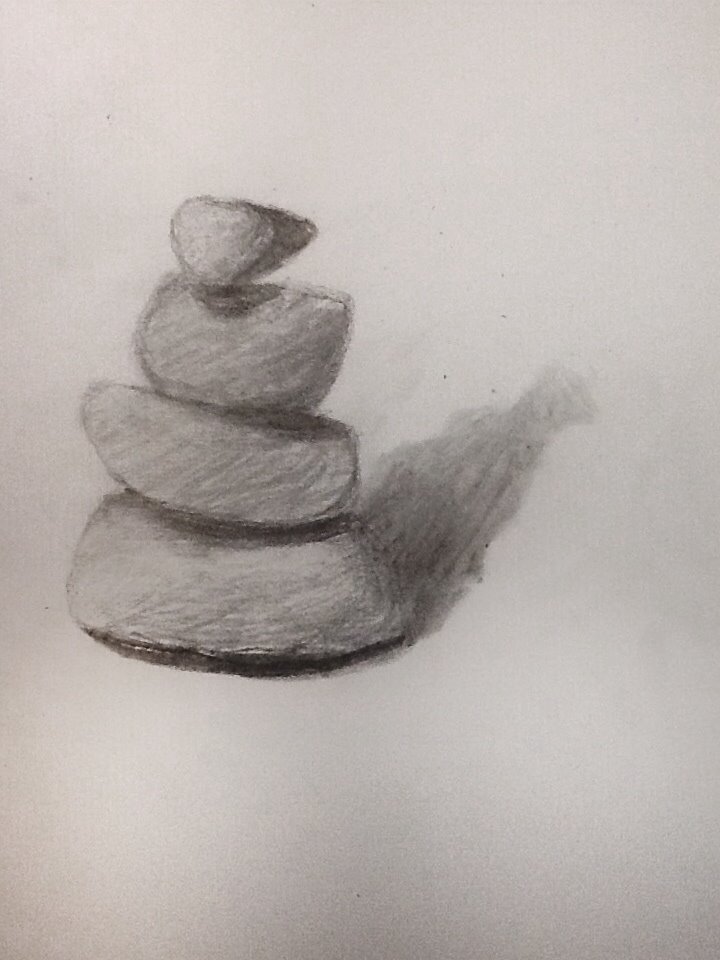
As students are getting their sketchbooks to a new page, walk around and hand each person a cheasel with a photo reference of the stacked rocks. It’s good to let students choose from the two references, so you’ll need a few extras.
4.3 SKETCH
Have students use the photo of a stack of rocks to make a rough sketch. Begin with lines and then do a little shading on at least one of the rocks.
NOTE: Don’t blend with fingers or stumps on this practice drawing, but if someone does anyway, that’s ok.
LEARNING TARGETS
Students will understand the importance of rules.
M A T E R I A L S
- Printout of rules for display
1. PRINT
graphic
Rules Poster
A small poster for your room or to use as a handout.

1 Page – Opens in new window
5.2 RULES
As students are finishing their first sketch you can casually begin to go over the art room rules.
Show the list on screen or write them out. Have fun with the first rule, but don’t elaborate on the rules this time. We will go over them in more detail next week. You may also print out a poster of the 4 rules by clicking on one of the versions here.
Because our rules are special and a big deal, use this handy guide like a teacher talk. This is a super-abbreviated version for today. Later in the lesson and next week we will go over these in more detail.
The 3rd rule is also explained in the next step, as students are working.
“Here’s an Introduction to our rules:
1. Not… too… many… rules.
This is funny, but it also makes a point. There are not a lot of rules for art. Making art is usually pretty fun and safe, so our rules are easy.
2. Be nice.
Everyone knows this rule. But did you know we have 3 ways this rule works? We’ll talk more about them next time.
3. No mistakes allowed. What?! More on that in a minute.
4. You Must Mix your colors”
LEARNING TARGETS
Students get experience drawing from observing real life.
M A T E R I A L S
- 14″ x 17″ Sketch Paper
- 2B and 4B pencils
- Erasers
- Blender Stick
- Paper for object to sit on
- Lighting
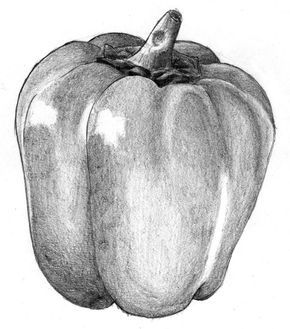
6.1 DRAW
Students will use their 2B pencil and white eraser to draw from life.
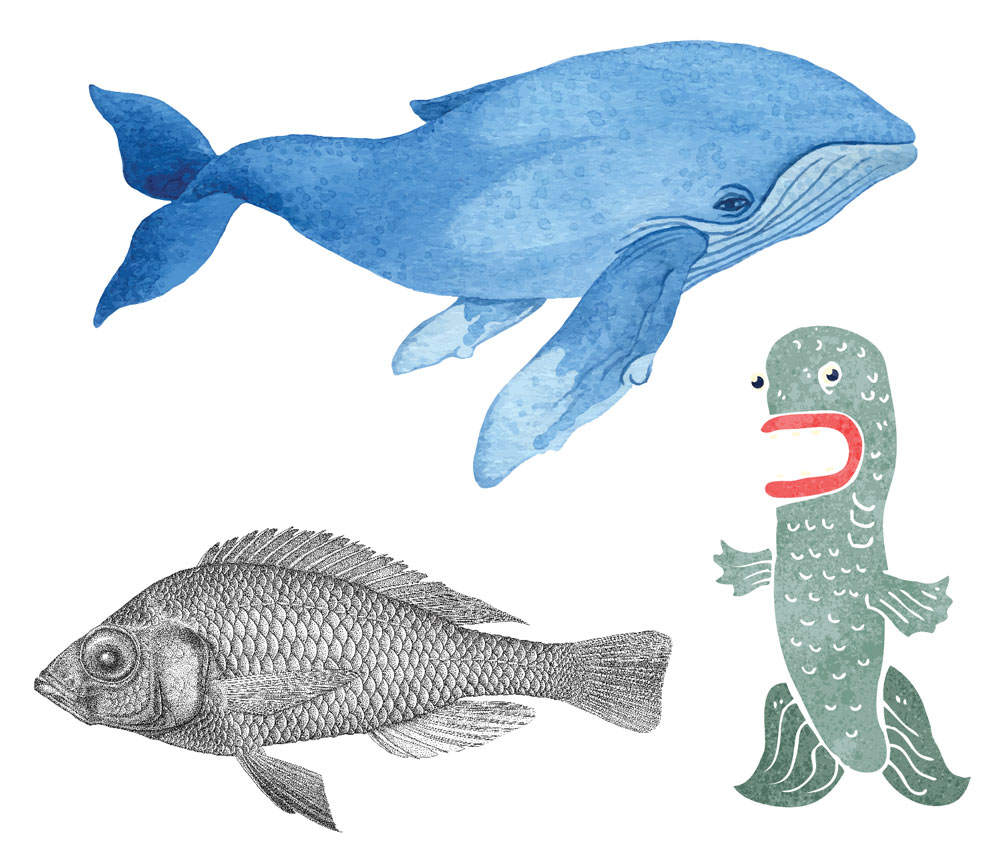
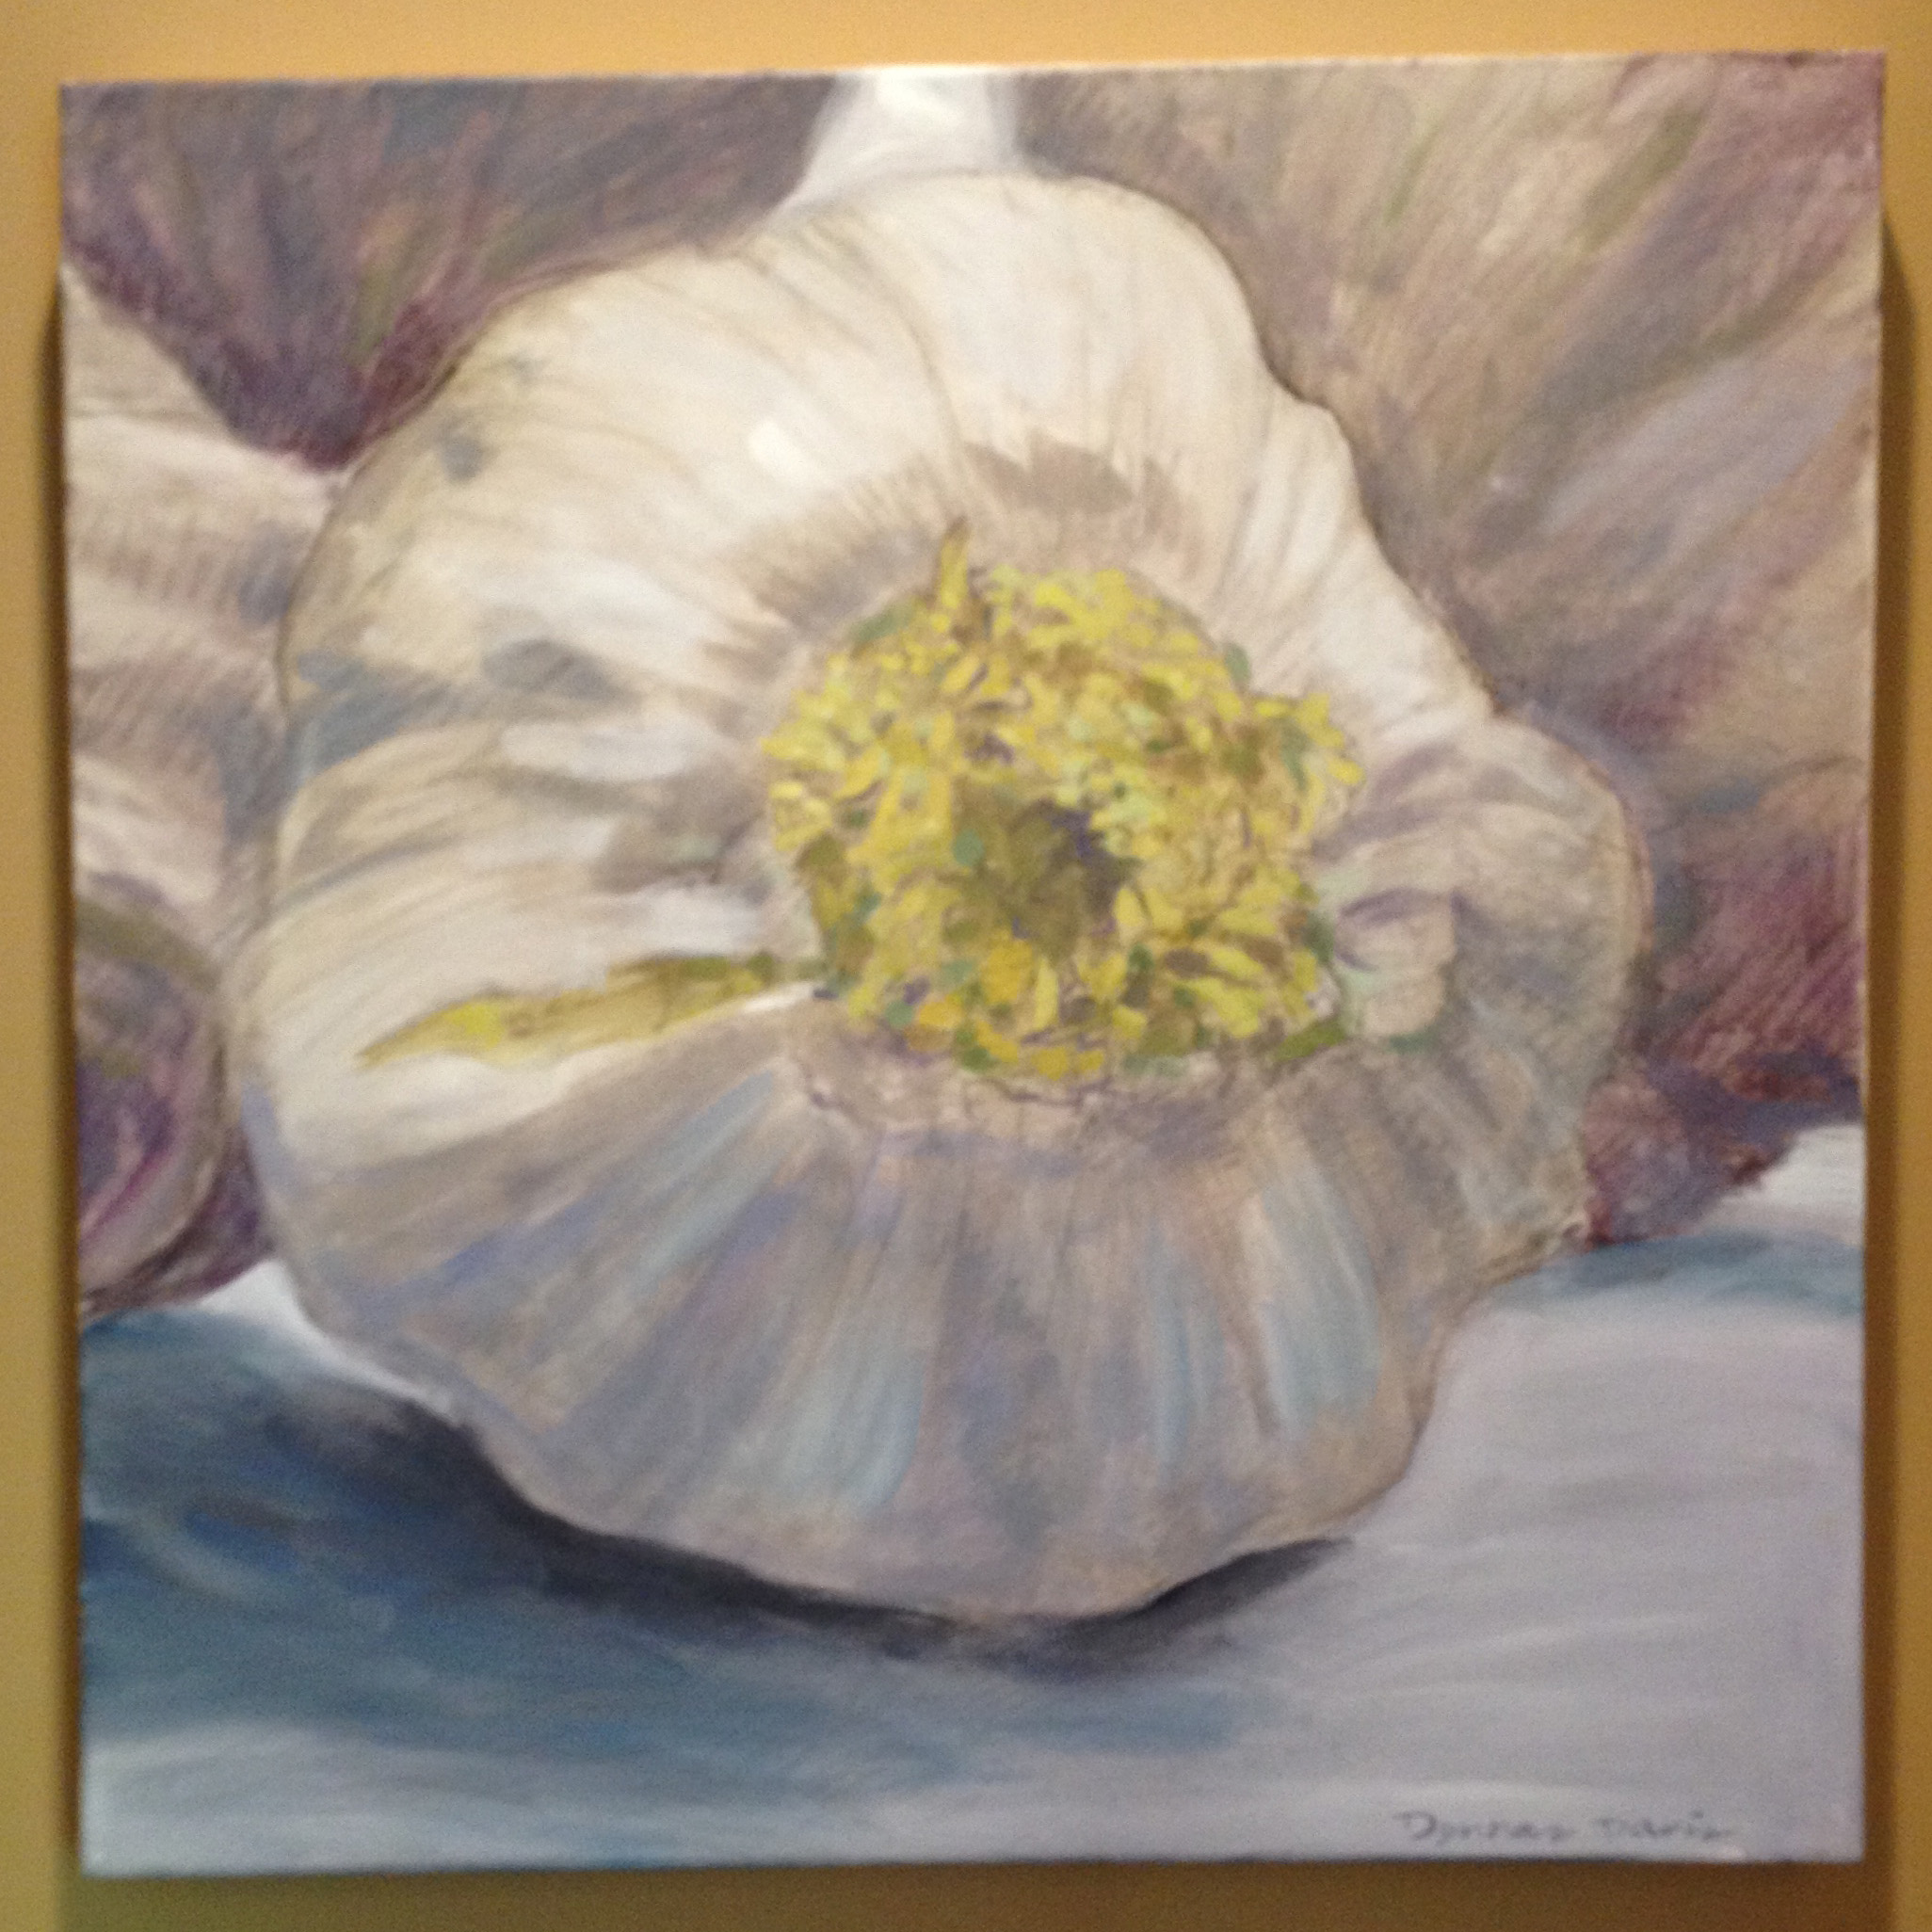
Use real green bell peppers and whole garlic buds as their subject. They can choose either the shiny pepper, or the dull garlic.
Allow students to arrange their object, trying several positions. Provide colored or white paper to place the object on, for contrast.
If you can set up some dramatic lighting, that will help a lot.
The goal is to work on shading more than getting the shape accurate. Encourage shading and blending. If they want to blend using their blending sticks, that is ok. (Finger blending should be discouraged.)
Note: there is no goal to these other than practice and warming up. Don’t criticize anything at all or even make suggestions – unless someone asks, or if they look frustrated. Encourage students to enjoy drawing and not to worry about how it looks right now. We will be learning a lot this year!
Drawing Examples (tap any image to open viewer)
Note that the garlic is a colored drawing. The color is very light and translucent (see-through), most of what you see is the pencil drawing.
6.2. MISTAKES
“No mistakes allowed!
Most people believe that if an artist creates something that looks bad, they have made a mistake. This is not only false, it’s impossible. Our 3rd rule is No Mistakes Allowed.
What does that mean? Well, it doesn’t mean that we think you’re going to be perfect. It means we know every single artist in the world is going to make artwork they don’t like. We just don’t call them mistakes. A mistake sounds like you shouldn’t have done it, but you should. In fact, it’s very important for every artist to create bad-looking artwork! You must practice and learn. Therefore we call these artworks learners.
This is one of the most important things you’ll ever hear.
An artist cannot waste time making art. You can make awesome work, which we call Keepers, or you learn more, and make a Learner or you make a Keeper. Both are extremely important.
Even if you hate what you end up with, you have spent your time well, doing important learning work. This is what every artist has always done and always will do.”
LEARNING TARGETS
Students understand the pros and cons to working with different references or imagination.
7.1 DISCUSS
“What is easier; drawing from imagination, a photo, or from real life? Why do you think so?
Which was more fun for you?”
7.2 IDEAS
Examples:
- From life because you can see it much more clearly than a photo
- From life because you can understand what the form is in 3D
- From life because you can change your Viewpoint and lighting if you want to
- From a photo because you don’t have to figure out how to make colors change to black and white
- From a photo because you can see it in 2D like you’re drawing it
- From a photo because your viewpoint stays put and you can measure distances.”
LEARNING TARGETS
Students will learn to complete a drawing.
M A T E R I A L S
- 14″ x 17″ Sketch Paper
- 2B and 4B pencils
- White eraser
- 11 x 17 sketch book
- Blender Stick
- Paper towel
- Bowls, garlic, peppers & fruit
- Photo references
8.1 Print
Reference
Object Photos
Cut images apart and print enough for each student to choose from several.
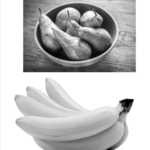
1 Page – Opens in new window
8.2 Choose
Students Choose either a photo or a live object to draw. Then set up their work area. Use a cheasel stand for photos. Place objects on contrasting paper and add lighting if you can.
8.3 INSPIRE
8.4 Draw
Have your students turn to a new page in their sketchbook.
Tell your class that now you are going to create a more finished-looking pencil drawing, instead of practice sketching. Everyone gets to choose whether they want to use a photo reference or draw from life. There the peppers and garlic they practiced with, and some photos that are fruit, garlic and some other things if someone wants more variety.
Let them know they have 30 minutes so they need to take their time! As they get ready, have them begin with a brand new clean page in the sketch book.
Everyone should try and draw outlines first, and then add shading. It’s ok if it looks different than you see in the references today. We are not worried about accuracy!
LEARNING TARGETS
Students know the importance of cleaning up.
M A T E R I A L S
- Paper Towels
- Cleaning wipes
- Sink
- Waste baskets
- Well-lit spot for photos
- Camera or phone-camera
9.1 CLEAN
- Wash hands
- Super-wash brushes if used
- Put art supplies away
- Wipe tables & toss trash
- Remove any smocks (last)
- Check for items on floors and tables
9.2 PHOTO
9.3 CONNECT
%
Insights
This lesson provides understanding
%
Technique
This lesson shows application and movement
%
Self Expression
This lesson allows personal freedom
OBJECTIVES
- Practice and improvement using pencils and looking for shadows
- Understanding how technique helps artists, and can be improved upon
- Accomplishment in in finishing a pencil drawing of rocks
- Fulfillment by taking ownership of tools and being referred to as an artist
TROUBLESPOTS
Younger Students – Grades 3-5 may want to spend more time with the 2 practice sketches, making them look more finished. That’s because they will have a harder time with the idea of a quick sketch. If that’s the case, you’ll have less time at the end, and no need for the final drawing in step 9. You can allow an artist choice time using pencils to draw from life, and encourage shading in pencil like they’ve just done on the rocks. You can also suggest going back to the warmup imagination drawing and using shading.
Floating shadows – Young artists will often make blobs of shadows that don’t touch the object that made them. Encourage them to “shade right up to the line, like it was disappearing underneath the object.”
Abrupt shadows – Help artists with shadows that look too solid and dark, by having them make a soft bit of lighter grey along their hard dark edges. It’s just a start and that’s all that is needed. Do not correct or criticize their efforts at all.
Smudging on purpose – when students are learning to shade, they tend to over-blend the graphite using their fingers. Don’t worry about it, because it’s a good beginning technique to help the shading look more even. Encourage students to use the stumps/blender sticks when they smudge.
Smudging by accident –
The base of the hand will smudge graphite as it rests on the page, and get very dirty. Point this out quickly when you see it, but after they are having the problem. This is a very important teaching technique, and it is called, Productive Struggle.
If you tell your students about a potential problem before it happens, when it does happen afterwards, it just makes them feel like they’re not doing what you expected of them; that’s a bummer. It can be a much better teaching technique to allow a problem to occur before you address it. Then the student is seeking the solution! Instead of you being a nag, you become the hero who rescues them. The concept also sticks in the memory better because it was their problem, instead of yours.
Here are some solutions for smudging problems:
- Begin in the upper corner, opposite of the hand you use (upper left corner for right-handed drawers). Work down the page so that the drawn part is above the hand.
- Use a slip of copy paper underneath your hand. Try to keep it from sliding around. You can tape it down.
- Wash your hand when it gets dirty
ART WORDS
Pencil Shading– Adding to a line drawing, areas of soft grays, that look like the shadows on objects, or underneath objects.
Blending stump/stick– A rolled paper stick with a point that helps to blend and smudge.
Technique– When artists use tools and/or their hands to apply or manipulate pencil, charcoal, or paint on a surface. Several things contribute to technique: The pressure applied, the specific tools, the way the tool is held, and the most importantly, the movements of the artist. It is very much like dancing.
CLASSROOM PREP
Collect smooth rocks to stack for drawing reference, or use our PDF photo reference. Also print the PDF poster.
What your room needs
Here are your printable lists and room prep instructions.
Opens in new window
CLASSROOM MATERIALS
- Smocks
- Cheasel stand & clip
- Paper towels
- PDF Printouts
STUDENT’S MATERIALS
- 14″ x 17″ Sketch paper
- 4B Pencil
- 2B Pencil
- White Erasers
- Kneaded Erasers
- Charcoal
- Blending stick(stump)
- Sandpaper block
PREVIEW
Week #4: Start Painting
August 26 – 30
Students will learn and work with alike colors (analogous), and practice simple brush technique using acrylic paints. A colorful background and bold line-based design are used for their first painting of the year. The rules are reviewed and explained in more detail. Creations students (advanced), will learn to make an abstract bold design based on photo reference.
Week #5: Underpainting Landscape 1
September 2 – 6
Students will begin the first of two lessons, where they create a landscape in acrylic paints, using the classic red underpainting technique.