
Style
Each lesson Plan focuses primarily on one of the 4 Cornerstones of Art:
Drawing | Painting | Color | Style
OVERVIEW
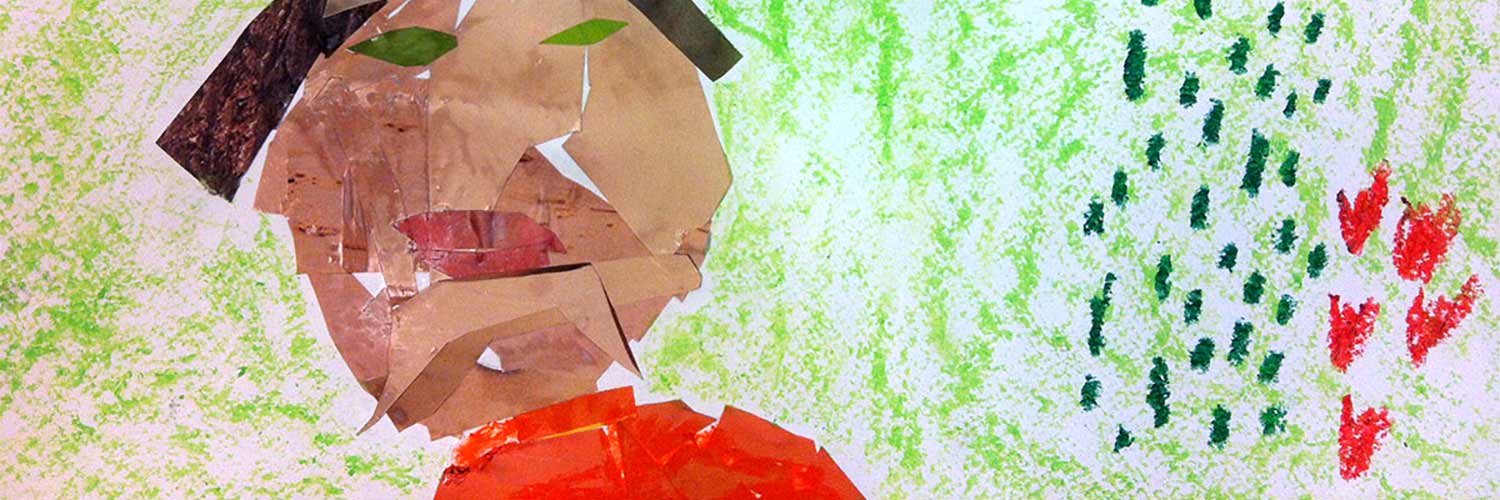
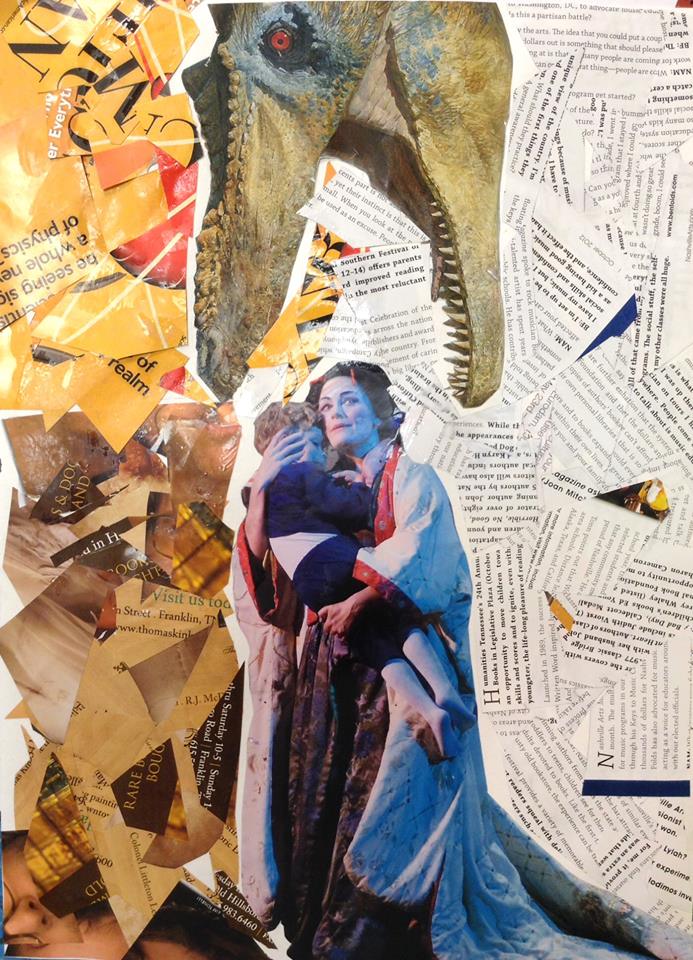
Students will use pages and clippings from magazines to create collage images that tell a story about themselves. They are also given the choice to work on a detailed pencil drawing with freedom to choose their subject matter.– – –
Grades 6 – 12
Week of May 2 – 6
1 Hour & 45 Minutes
Lesson At A Glance
A brief overview of each step. Buttons jump to each section for detailed information.
15 Min – Explain choices for the day & Show pinboards
12 Min – Everyone gets started
47 Min – Continue until finished.
5 Min – Everyone helps
SCROLL & TEACH
LESSONPLAN
Each section is a different color. Read over once and then you can SCROLL & TEACH using any device you like. It’s designed to work best with your phone.
LEARNING TARGETS

Students know how to draw from life
M A T E R I A L S
- 14″ x 17″ Sketch Paper
- Ebony Pencil
- White Eraser
- Charcoal
- Stretchy Eraser
1.1 draw
Have several large and medium sized objects set out and available to sketch. You can use items such as:
- A suitcase
- A chair or stool
- Basketballs
- A cooler
- Toys
- Kitchen items
Students should be standing and drawing in their large sketch pad (we use 14″ x 17″ ones). Remind them to use arm movements rather than just their wrist. Sketches should be fast, loose, and fun, but students should be observing carefully, and working towards accuracy, instead of just playing around.
CREATIONS - tap here to open
Use the Student Instructions printout below to distribute to your Creations students. Tap the image to open the PDF in a new window.
Artists’ Choice
Overview: Students can choose to work with collage, pencil, ink, oil pastels, painting in acrylic, or watercolor, as well as any combination of these. Before beginning a new project, any work in-progress should be completed first.
Step 1. (15 minutes) Decide 3 things and find reference:
1. Medium (pencil, oil pastel, paint, etc.)
2. Subject matter (landscape, animals, portrait, architecture, still life)
3. Technique (style, colors, movement & application)
Step 2. (15 min) Use a pencil or charcoal and sketchpad to create a few quick sketches to get familiar with the subject and the Big Shapes inside the Frame. Don’t worry about the details yet.
Step 3. (10) Prepare and set up your work area for the final artwork. Draw guidelines.
Step 4. Create.
Tap images to open Creations Student Instructions and Reference Materials in new windows

LEARNING TARGETS
Students know how to listen to directions and make a choice between two projects
M A T E R I A L S
- ipad or TV to display Pinboard
2.1 explain
Today, artists get to pick which project to spend lesson time on.
Magazine collage
- There are two ways to use magazines. 1) Use the colors as small mosaic pieces for creating larger images; 2) Use the photographic images and combine them in new ways. Artists may choose to combine the two methods. It’s also ok to use other papers in addition to magazines.
- Show the Drawing with Scissors video if you need to.
Pencil drawing
- Set up something on your own to draw or find reference from a magazine or book
- Remember that a still life needs a strong light source from one direction
Drawing With Scissors Demo

Pinterest Gallery – Collages
Tap the icon to the left to open our special Pinboard showing examples of artwork to display to your class. See our Article for making Pinterest work on larger displays. You can also use a laptop or large tablet and gather everyone around like you’re using a book.
Pinterest Gallery – Detailed Pencil Drawings
Tap the icon to the left to open our special Pinboard showing examples of artwork to display to your class. See our Article for making Pinterest work on larger displays. You can also use a laptop or large tablet and gather everyone around like you’re using a book.
LEARNING TARGETS
Students know how to plan out a project
M A T E R I A L S
- 14″ x 17″ Sketch Paper
- Pencils
- Erasers
- Scissors
- White sheets of copy paper to collect clippings
- Child-appropriate magazines
3.1 Prepare
- Collect images and/or colors for a mosaic effect
- Consider adding a self-portrait
- Cut and arrange
Pencil Drawing –
- Find reference – set timer & take no more than 5 minutes
- Sketches to familiarize
- Thumbnails to compose
LEARNING TARGETS
Students know how to make a collage or detailed drawing
M A T E R I A L S
- 14″ x 17″ Sketch Paper
- Pencils
- Erasers
- Scissors
- White glue OR Modpodge
- Water (for thinning glue)
- OR acrylic medium
- Flat brushes for glue/medium application
- Shallow bowls for glue/medium
- White sheets of copy paper to collect clippings
- Child-appropriate magazines
- Water & Paper Towels
4.1 print
Reference
Collage Instructions
Cut apart and print enough for each student.
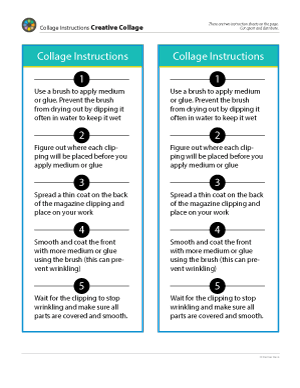
1 Page – Opens in new window
4.2 print
reference
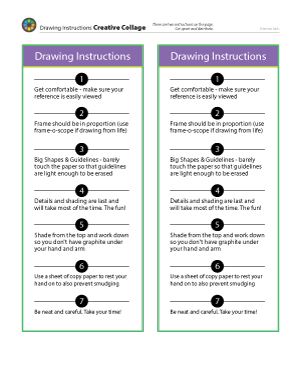
Drawing Instructions
Cut apart and print enough for each student
1 Page – Opens in new window
4.3 print
Reference
Frame-O-Scope
Cut apart and print enough for each student who needs one.
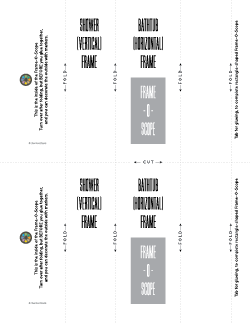
1 Page – Opens in new window
4.4 Review
There are two ways to use magazines. 1) Use the colors as small mosaic pieces for creating larger images; 2) Use the photographic images and combine them in new ways. Artists may choose to combine the two methods. It’s also ok to use other papers in addition to magazines.
4.5 begin
Provide the appropriate PDF instruction pages to each student for their project.
Use magazines, scrap papers, and even create your own colored papers with some paint if you need to. You can also tear edges for a different effect. Paint, pencil, pastel, ink, and markers can be applied after the collage has dried.
Magazine Collage – scissors, 11″ x 14″ watercolor paper (for a base to work on), medium or glue, brush, water tub, paper towels
- For gluing options: use white glue with a bit of water, Modpodge, or our favorite: clear gloss or matte acrylic medium. Glue sticks also work but can tear thin magazine paper.
- Use a brush to apply medium/glue and prevent it from drying out using water
- Figure out where each clipping will be placed before you apply medium/glue
- Spread a thin coat on the back of the magazine clipping and place on your work
- Smooth and coat the front with more medium/glue using the brush (reason why is below)
- Wait for the clipping to stop wrinkling and make sure all parts are covered and smooth.
Pencil Drawing
- Get comfortable – make sure your reference is easily viewed
- Guidelines – tickle lines on the paper so that they are light enough to be erased easily
- Frame (use frame-o-scope if drawing from life)
- Big shapes – make sure to find and accurately draw the 4 or 5 biggest shapes
- Details and shading last – this will take most of the time
- Shade from the top and work down so you don’t have graphite under your hand and arm
- Use a sheet of copy paper to rest your hand on to also prevent smudging
- Be neat and careful. Take your time!
If you have a new student or this is your first week with The Art Instructor, Frame-O-Scopes can be printed at the beginning of this step.
LEARNING TARGETS
Students know how to finish a project they have started
M A T E R I A L S
- 14″ x 17″ Sketch Paper
- Pencils
- Erasers
- Scissors
- White sheets of copy paper to collect clippings
- Child-appropriate magazines
5.1 finish
Early finishers may do artists’ choice but do not announce this to the room – you want others to remain focused on making their best work & not rush- and only bring it up after students are finishing and ask you what to do next.
LEARNING TARGETS
Students know the importance of cleaning up.
M A T E R I A L S
- Paper Towels
- Cleaning wipes
- Sink
- Waste baskets
- Well-lit spot for photos
- Camera or phone-camera
6.1 CLEAN
- Wash hands
- Super-wash brushes if used
- Put art supplies away
- Wipe tables & toss trash
- Remove any smocks (last)
- Check for items on floors and tables
6.2 PHOTO
OBJECTIVES
- Practice and improvement working on creative composition
- Understanding how to think outside of conventional boundaries
- Accomplishment in creating original artwork
- Fulfillment by self expression in collage or pencil
TROUBLESPOTS
Over soaked paper – If you brush and move a wet clipping around too much, it becomes very wet and will tear easily.
Shading without technique – In pencil shading, it’s important to have a consistent technique over the entire piece. If scribbly, it needs to be the same type of scribbles everywhere. If hatch shaded, then the hatch marks should all go in one direction – or – they can go in many directions but the variety of directions must be the same throughout.
ART WORDS
Thumbnail – Artists tend to jump right into their work and then modify it over and over because it was not composed before they began. Only by drawing tiny thumbnails (about 1″ across), can you work on the big shapes and the overall design of a piece without getting pulled into the drawing. Once you begin drawing, your mind enters a completely different mode of thinking in details.
Big Shapes – Every work and reference can be divided into just a few very large areas. If an artist works on getting these shapes accurate, then the details can be worked on afterwards without having to modify or begin over.
CLASSROOM
PREP
Real Simple and other household magazines have lots of nice large images. Be very cautious though, since some advertising and advice collumn images can be innapropriate. Go though your magazines and tear out these images ahead of time.
Print all of your PDFs from the lesson plan and cut any references apart as needed.
What your room needs
Here are your printable lists and room prep instructions.
Opens in new window
CLASSROOM
MATERIALS
- iPad or TV to display Pinboard
- Scissors
- White sheets of copy paper to collect clippings
- Child-appropriate magazines
- White glue OR
- Modpodge
- Water(for thinning glue) OR
- Acrylic medium
- Shallow bowls for glue
- Paper towels
- Cleaning wipes
- Sink
- Waste baskets
- Well-lit spot for photos
- Camera or camera-phone
STUDENT’S
MATERIALS
- 14” x 17” Sketch paper
- Ebony pencil
- White Eraser
- Charcoal
- Stretchy Eraser
- Flat brushes