
OVERVIEW
Students will have fun drawing and painting pigs in several projects. Simple shapes and symbols help us create pig cartoons with different expressions. More realistic pigs are drawn from photo reference, colors are mixed, and then they will paint the pig using tempera.Grades 1 – 2
Week of September 29 – October 3
1 Hour & 30 Minutes
Lesson At A Glance
A brief overview of each step. Buttons jump to each section for detailed information.
15 Min – Draw cartoon pigs using PDF
10 Min – Draw using tickle lines.
5 Min – Set up for tempera paints
5 Min – Review mixing colors
&30 Min – Paint pig & end with black outlines.
5 Min – Everyone helps
SCROLL & TEACH
LESSONPLAN
Each section is a different color. Read over once and then you can SCROLL & TEACH using any device you like. It’s designed to work best with your phone.
LEARNING TARGETS

Students learn to express themselves through creating from their imagination.
M A T E R I A L S
- 11″ x 17″ Copy Paper
- 4B pencil
- Eraser
- Markers and/or oil pastels
- Blenders (stumps)
- Paper Towels
1.1 greet
Greet students as they come in and help them choose a chair.
Kneel down so that you are on their level. Bending over emphasizes the differences in your height, while kneeling makes them feel more important. Have tape and marker ready so you can stick some tape on the table by each student and write their name on it as they sit down.
1.2 choice
Encourage students to work with one piece of paper for a while. If someone uses the phrase, “free draw”, explain that artists’ choice is something only artists can do, while free-draw is something anyone can do. You want to use the phrase to elevate the students’ expectations of their work.
Everyone should take their time with the work and make a finished piece of art. Limiting the paper can also help kids focus on the work. If someone finishes in super-fast time, ask them what more they can do to the existing paper. Ask again several times – unless they appear overly frustrated; then you can allow them to move on to a new work.
Use this button to jump down to the preparation section.
LEARNING TARGETS
Students know how to draw big shapes first.
M A T E R I A L S
- 11″ x 17″ Copy Paper
- 4B Pencil
- White Eraser
2.1 Prints
Pig Cartoon
Students can copy the large simple shapes to draw a cartoon pig.

1 Page – Opens in new window
2.1 shapes
Students will begin with circle practice. Then they’ll copy the simple shapes found in the pig handout to draw a pig.
Take a moment to practice drawing a circle in slow-motion, and going around and around the same circle several times. Students can use the practice circle or begin with a new sheet of paper.
2.1 emotion
Students will draw 1 or 2 more pig cartoons, making each one different in at least one or two ways. Below is a list of different emotions and expressions the pigs can have. Feel free to demo a few of them to your students or just read them off to give them some inspiration.
It’s ok to just do the face of the pig. You can use these to fill time or skip them if you’re running behind.
Here are some ways to make your cartoons have expressions using cartoon symbols:
- Make one sad or silly.
- Sad – upside-down smile
- Sad – tear and eyebrows up in center (worried)
- silly – one eye different than the other
- silly – wavy mouth – tongue out
- Make the other one angry or arguing
- angry – eyebrows down in center
- angry – gritting teeth or upside-down smile
- surprised – mouth open – big eyes
- ray lines (short dashes around head all pointing outwards from the head) these are often drawn around a sun, but around a head, it makes a character seem more of what their expression is. Add ray lines to make your pig more angry, or more surprised.
Use the slideshow below to illustrate these symbols.

Sad

Silly
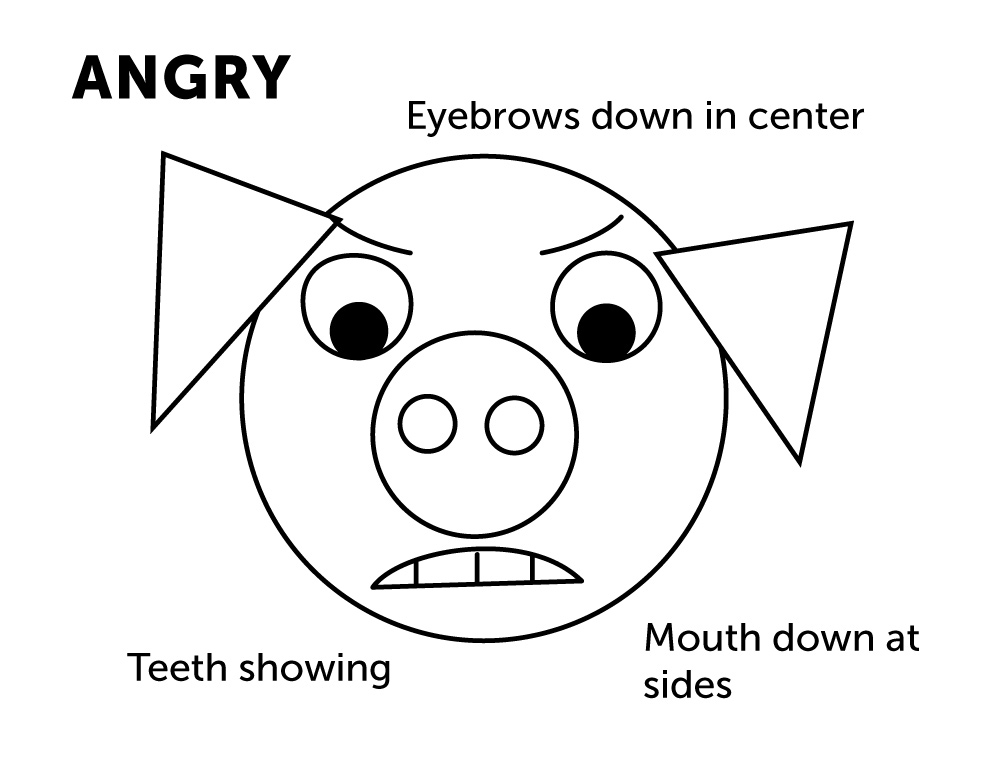
Angry
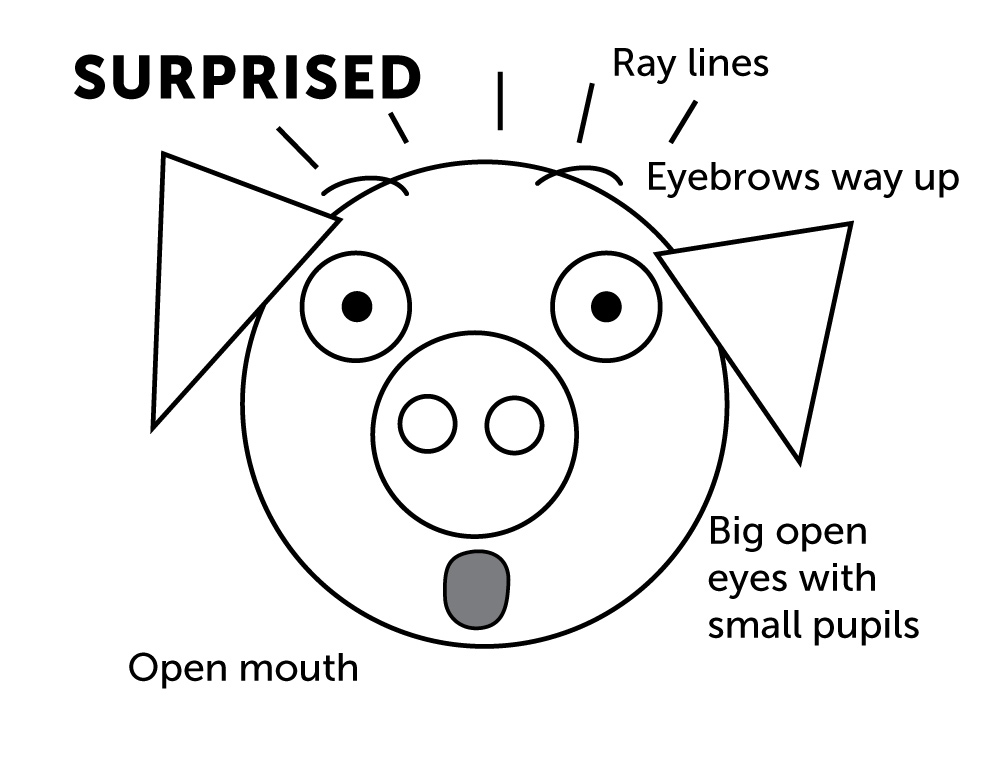
Surprised
Use this button to jump down to the preparation section.
LEARNING TARGETS
Students know how to choose a reference.
M A T E R I A L S
- Pig PDF Printouts
3.1 Prints
Reference
Pig References
Cut images apart and print enough for each student to choose from several.

1 Page – Opens in new window
3.2 Choose

“Is the face a perfect circle in any of the photos? (no, it’s sort of oval-shaped or even something else). What shape are the ears? They are sort of triangle-ish, but again, they are not as simple as that. Is the nose a circle? (Almost, but not quite) Sometimes artists make cartoons and simplify shapes a lot, and other times artists try to draw and paint more realistically. We’re doing both today. Since we’ve already done some cartoons, now everyone will try to draw a more realistic pig from a photo reference source.
Later you’ll paint it! Yay! Let’s all choose one of these pig pictures…”
Use this button to jump down to the preparation section.
LEARNING TARGETS
Students know how to draw from photographic reference.
M A T E R I A L S
- Card stock or watercolor paper – whatever size you like
- 2B Pencils
- White Eraser
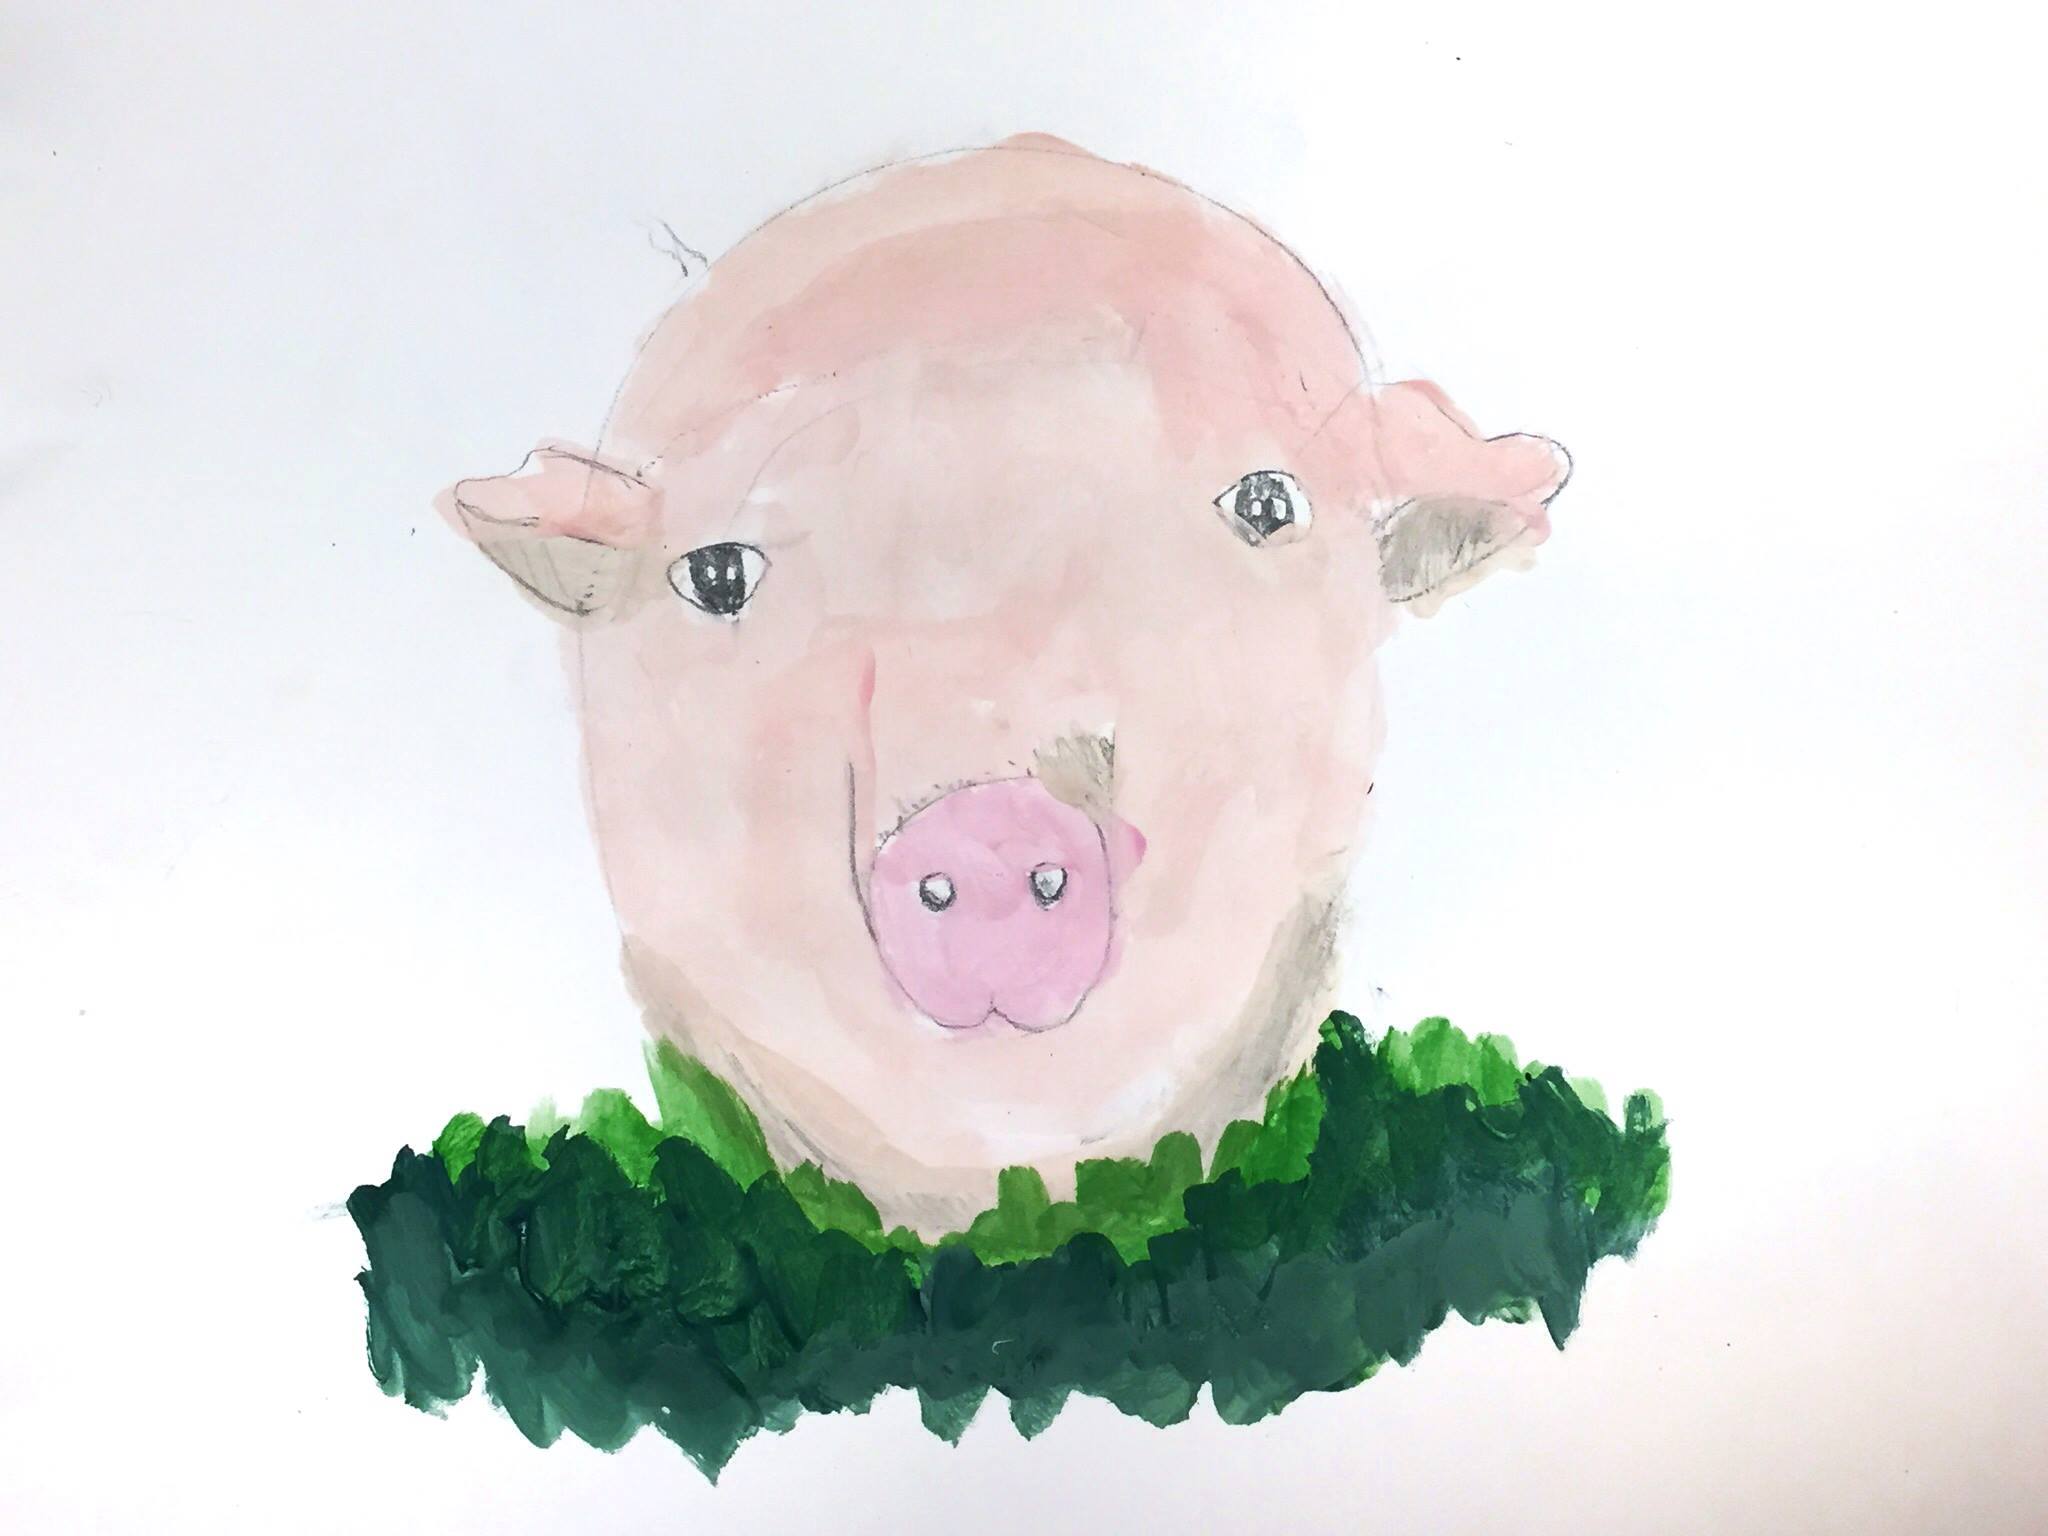
4.1 draw
Make sure each student has a pig reference to draw from. Set up photos on cheasels (cardboard stands) so students can easily look up and see the reference while drawing.
Encourage drawing lightly but do not worry about it. This will all be covered up by our paint in the next few steps. Once their drawings are complete, be sure that everyone has their names on the back of the paper.
Use this button to jump down to the preparation section.
LEARNING TARGETS
Students know how to set up their work area for painting.
M A T E R I A L S
- Pig Drawing from Step 4
- Tempera Paints
- Brushes (small and medium)
- Water containers
- Mixing trays or plates
- Paper towels
- Smocks
Brushes should be nylon for springiness and durability. Round brushes are the most versatile.
Paint list:
- Black
- Red
- Magenta
- Green
- Blue
- Aqua Blue
- White
- Yellow
- Brown
5.1 set up
Use this button to jump down to the preparation section.
LEARNING TARGETS
Students know how to mix colors.
M A T E R I A L S
- Tempera Paints
- Brushes (small and medium)
- Water containers
- Mixing trays (take-out trays)
- Paper towels
- Smocks
6.1 mixing
If using take-out trays, there are two sections for your paints. The lid is good for mixing colors and they other side is where you place and “get” your paints. Remind students that they only mix on the mixing side. This keeps the paints from getting too messy and muddy. You can use two paper or styrofoam plates instead. One is for getting fresh paints, and the other is for mixing two or three paints together to invent a new color.
You can also have bowls or trays that everyone shares for Getting colors.
Today, everyone will mix special colors together as you tell them to. Before students begin painting their pigs, they need to make 2 colors.
6.2 pig pink
6.3 shadow
Students will mix a shadow color. To make the shadow color (in a new, second spot), they will make a darker version of the pink, using less white with the magenta. Ok, rinse and wipe off the brush really well. Then dip the tippy tip just barely into the green, and add just a tiny bit of the green to the darker pink color. It should become brownish.
Look at your picture to see where there are shadows. We are making some pretty simple colors for our pigs today
Use this button to jump down to the preparation section.
LEARNING TARGETS
Students know how to create a painting with tempera.
M A T E R I A L S
- Tempera Paints
- Brushes (small and medium)
- Water containers
- Mixing trays (take-out trays)
- Paper towels
- Smocks
7.1 paint
Let kids enjoy painting. Background colors and patterns are their choice. Encourage mixing yellows, whites and greens, and blues, for vegetations, and white with blue for sky. End with black if artists want outlines.
Early finishers can paint a second pig portrait or try using pastels for it. If students are switching to a different medium like pastels, have them clean up their work area and put all painting supplies away first.
Use this button to jump down to the preparation section.
LEARNING TARGETS
Students know how to keep their work space tidy.
M A T E R I A L S
- Sink
- Waste baskets
- Well-lit spot for photos
- Camera or phone-camera
- Paper towels
- Cleaning wipes
8.1 clean
- Empty water containters
- Super-wash brushes if used
- Put art supplies away (sop up runny paint before disposing of palette paper)
- Wipe tables & toss trash
- Remove any smocks (last)
- Check for items on floors and tables
8.2 PHoto
- Try to get photos of your student’s artwork. Find a good spot for quick lighting without highlights or shadows from your hands and device. Ideally in-between two strong lights on each side.
OBJECTIVES
- Practice and improvement seeing shapes in reference photos
- Understanding how to mix colors
- Accomplishment in drawing cartoons
- Fulfillment by painting and mixing paint
TROUBLESPOTS
Fast circles – Circle have to be drawn in slow motion. Otherwise, they tend to be ovals and the ends dont meet. It’s also good to keep going around several times, redrawing it, until your circle is more round.
Over mixing colors – mixing too much or too many colors will create muddy colors.
Keeping plates separate – Encourage students to have a getting plate and to not mix on it, but only mix on the mixing plate.
Emotional cartoons – It’s unlikely, but if you have a student who is disturbed by something in or out of your classroom, the chance to show those feelings in the cartoon may lead to expressing some emotions that will be surprising to both of you. A student may also use this to express inappropriate ideas about another student in a safer, 3rd-person way, and that might hurt someone’s feelings.
Try to be ready and address the feelings and to remind students to be nice (the 2nd rule!)
ART WORDS
• Opposite color – You can make a shadow color by mixing a tiny amount of its opposite into it.
• Cartoonist – Simplified and sometimes funny drawings are cartoons. Some artists are called cartoonists.
• Portrait – a drawing or painting of a face.
CLASSROOM
PREP
Make sure you have enough paint in all the colors, and bowls, plates, and/or trays.
Print all of your PDFs from the lesson plan and cut any references apart as needed.
What your room needs
Here are your printable lists and room prep instructions.
Opens in new window
CLASSROOM
MATERIALS
- 11″ x 17″ Copy Paper
- 4B pencil
- Eraser
- Markers and/or oil pastels
- Blenders (stumps)
- Paper Towels
- Card stock or watercolor paper – whatever size you like
- 2B Pencils
- Tempera Paints
- Brushes (small and medium)
- Water containers
- Mixing trays or plates
- Paper towels
- Smocks
PREVIEW
Week 8: Shape Hunters
Students are introduced to an important design element, The Most Important Spot, (emphasis). We hunt for shapes, using tracing paper to capture them from photos. Students will also work with warm vs. cool colors using oil pastels.
Week 9: Just Line Around All Day
Students will spend the whole day creating and working with lines: line inventing; color line art; charcoal line art; backwards line art (white on black paper); and a line art game.