
Drawing
Each lesson Plan focuses primarily on one of the 4 Cornerstones of Art:
Drawing | Painting | Color | Style
OVERVIEW
Students learn or review the basic techniques involved in pencil shading using various textures and movement. Blocks and cubes are looked at, as an introduction to artist’s perspective and understanding of one of the 3 basic geometric forms.Grades 3 – 5
Week of October 20 – 24
1 Hour & 45 Minutes
Lesson At A Glance
A brief overview of each step. Buttons jump to each section for detailed information.
10 Min – Teach cubes
15 Min – demo shading
10 Min – practice shading
20 Min – play shape game
20 Min – Shade cube realistically
If time left – shade a cartoon
2 Min – Everyone helps
SCROLL & TEACH
LESSONPLAN
Each section is a different color. Read over once and then you can SCROLL & TEACH using any device you like. It’s designed to work best with your phone.
LEARNING TARGETS

Students know how to draw cube shapes from life.
M A T E R I A L S
- 14″ x 17″ Sketch Paper
- 4B Pencil
- White eraser
1.1 cubes
You can have slightly more elaborate boxy items such as a book, for Creations students. Make sure they are sitting where they can see at least 2 sides of a box. This should be a quick sketch but tell them to look for shadows to shade.
CREATIONS - tap here to open
Pencil Shading
Overview: Students use reference to make a pencil drawing, practicing their shading technique and also drawing the cube form. They can use the reference as is or crop to create a somewhat different composition.
Use pencils and sketch paper.
Tap images to open Creations Student Instructions and Reference Materials in new windows

Use this button to jump down to the preparation section.
LEARNING TARGETS
Students know how to draw a cube.
M A T E R I A L S
- Simple cube object
- Flashlight or lamp
2.1 action
Get students attention to teach about cubes. Make sure they understand the difference between a square, which is 2-dimensional, and a cube, which is 3-dimensional. Technically, 3-D shapes are called forms, but because almost everyone refers to them as 3-D shapes, or simply shapes, in every day life, it actually communicates much better to say 3-D shape.
Below is a list of questions you can ask your students and comments to make about cubes and light/shadow on a cube. They may seem easy, but most students have to think hard to figure these out, and thinking about the 3D form is helpful.
• How many sides does a cube have? (6)
• How many can you see at one time? (3)
• With one light source, how many will be in light and how many in dark? (3 & 3). This is because the light and your observation can both affect exactly half of any object.
• If you and the light are in the same place, you will see only the 3 lighted sides. We have a full moon when the sun is behind the earth, with the same view as we have. We see half the moon, but only the lighted side
• Much more often though, light is in a different place than our head, so usually we will see two sides in light and one dark, or two in dark & one light. The full moon happens only once a month.
• We use shading for two purposes in pencil drawings. What are they?:
- Shadows that are created by light sources for that 3D look
- To show how things are different colors, but in greyscale, by making some areas darker or lighter overall.
Note: Grades 3-5 have more difficulty with the idea of colors being shaded darker or lighter.
“If you drew a cube in pencil, that was covered in red and white stripes, how would you shade the stripes? You can also make a red cube sitting next to a white cube, darker too, to show that it is a different, darker color.”
Use this button to jump down to the preparation section.
LEARNING TARGETS
Students know how to draw a cube.
M A T E R I A L S
- 14″ x 17″ Sketch Paper
- 2B Pencil
- 4B Pencil
- Ebony Pencil
- White Eraser
3.1 Prints
Reference
Cube Helpers
Cut images apart and print enough for each student.

1 Page – Opens in new window
3.2 setup
3.2 setup
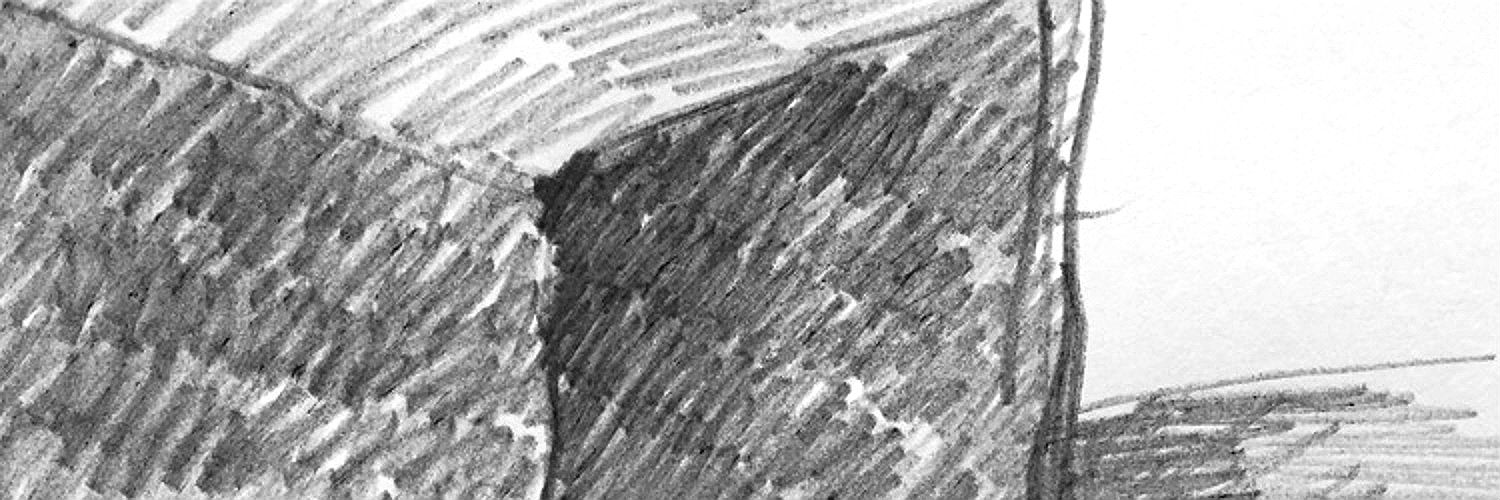
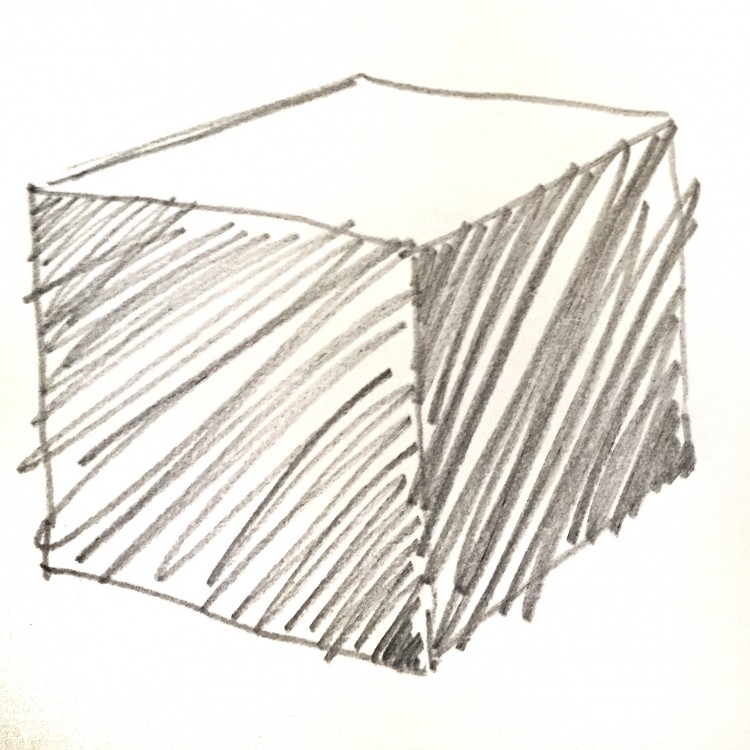
Place the cube print with the bold lines underneath the sketch paper. It will show through enough to trace it lightly in pencil. Use the shaded cube as a visual reference guide for shading the cube.
1st Cube – Leave top blank. Fill in 2 sides: medium shading on the left, and dark shading on the right, using your natural shading technique. Do not tell your students a technique to shade this first cube.
2nd Cube – Leave top blank. Fill in 2 sides the same, but use tiny scribbles to make your shading. Decide yourself what tiny scibbles should look like for shading.
3rd Cube – Leave top blank. Shade the 2 sides going back and forth in a zig-zag shading technique with the pencil from edge to edge. Begin in one corner of the side you’re shading, and move towards the opposite corner as you shade. Your zig-zag shading lines will get larger and larger as you move, so that they touch each edge. See the sample image below:
Use this button to jump down to the preparation section.
LEARNING TARGETS
Students know how to shade in pencil using the hatch-shading technique
M A T E R I A L S
- 14″ x 17″ Sketch Paper
- 2B Pencil
- 4B Pencil
- White Eraser
4.1 gather
Gather students around in a group. For large classes, use a lower table or stool and have students make a wide circle around it. Demonstrate hatch shading techniques, beginning with this teacher talk.
Use the cake photos to display on a screen as you talk.
Layer Cake Examples

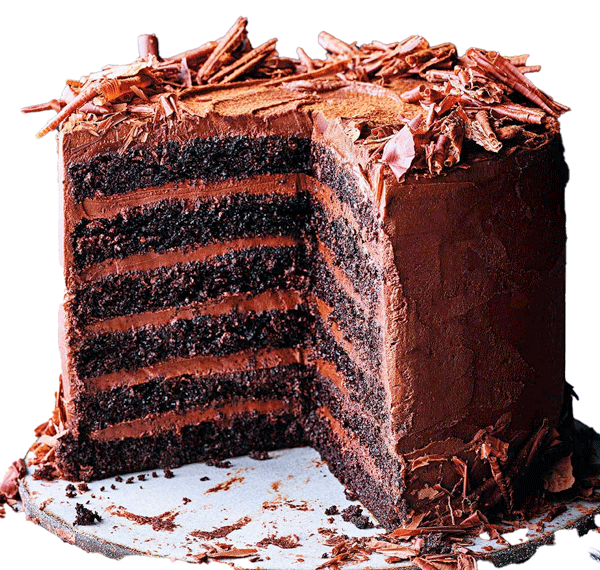
“Cakes can’t be baked tall. The batter doesn’t hold up if you make them too thick. They don’t get cooked in the middle so they’re full of goop instead of spongey cake. They would fall over, and make a big sloppy mess. So bakers make lots of thin cakes and stack them in layers.
They know you just can’t make one big cake all at once.
Shading is like a cake. You can’t do it well all at once. But if you make a lot of thin layers, it works great! Making several layers of light shading makes a much smoother, and more realistic dark area.
If you make an area really dark all at once, you will always have several problems:
- Damaged paper with grooves. It also damages the pages underneath!
- Shiny graphite that doesn’t match the rest of the drawing
- Obvious strokes and inconsistency, making your work look less realistic.
Each layer should be made with short-stroke hatch shading. When you layer several on top of each other together in each shading area, it gets smoother and smoother!
Let me show you how this works…”
4.2 DEMO
Tap the 4 arrows icon to enlarge the video to full screen.
Review the demo video and demonstrate to your students, or you can simply display the video on a larger screen for them to watch.
- A zig-zag line, like a little cartoon tornado
- Pencil tip gets worn down & that makes shading smoother.
- Do a bit of drawing off to the side to get that nice tip.
- Layer the shading up instead of pressing hard to get a dark area all at once.
- Large shading strokes makes it look haphazard and not smooth (smooth is good for realism).
- Place smaller shading areas next to each other to fill large areas.
Use this button to jump down to the preparation section.
LEARNING TARGETS
Students know how to shade a cube.
M A T E R I A L S
- 14″ x 17″ Sketch Paper
- 2B Pencil
- 4B Pencil
- White Eraser
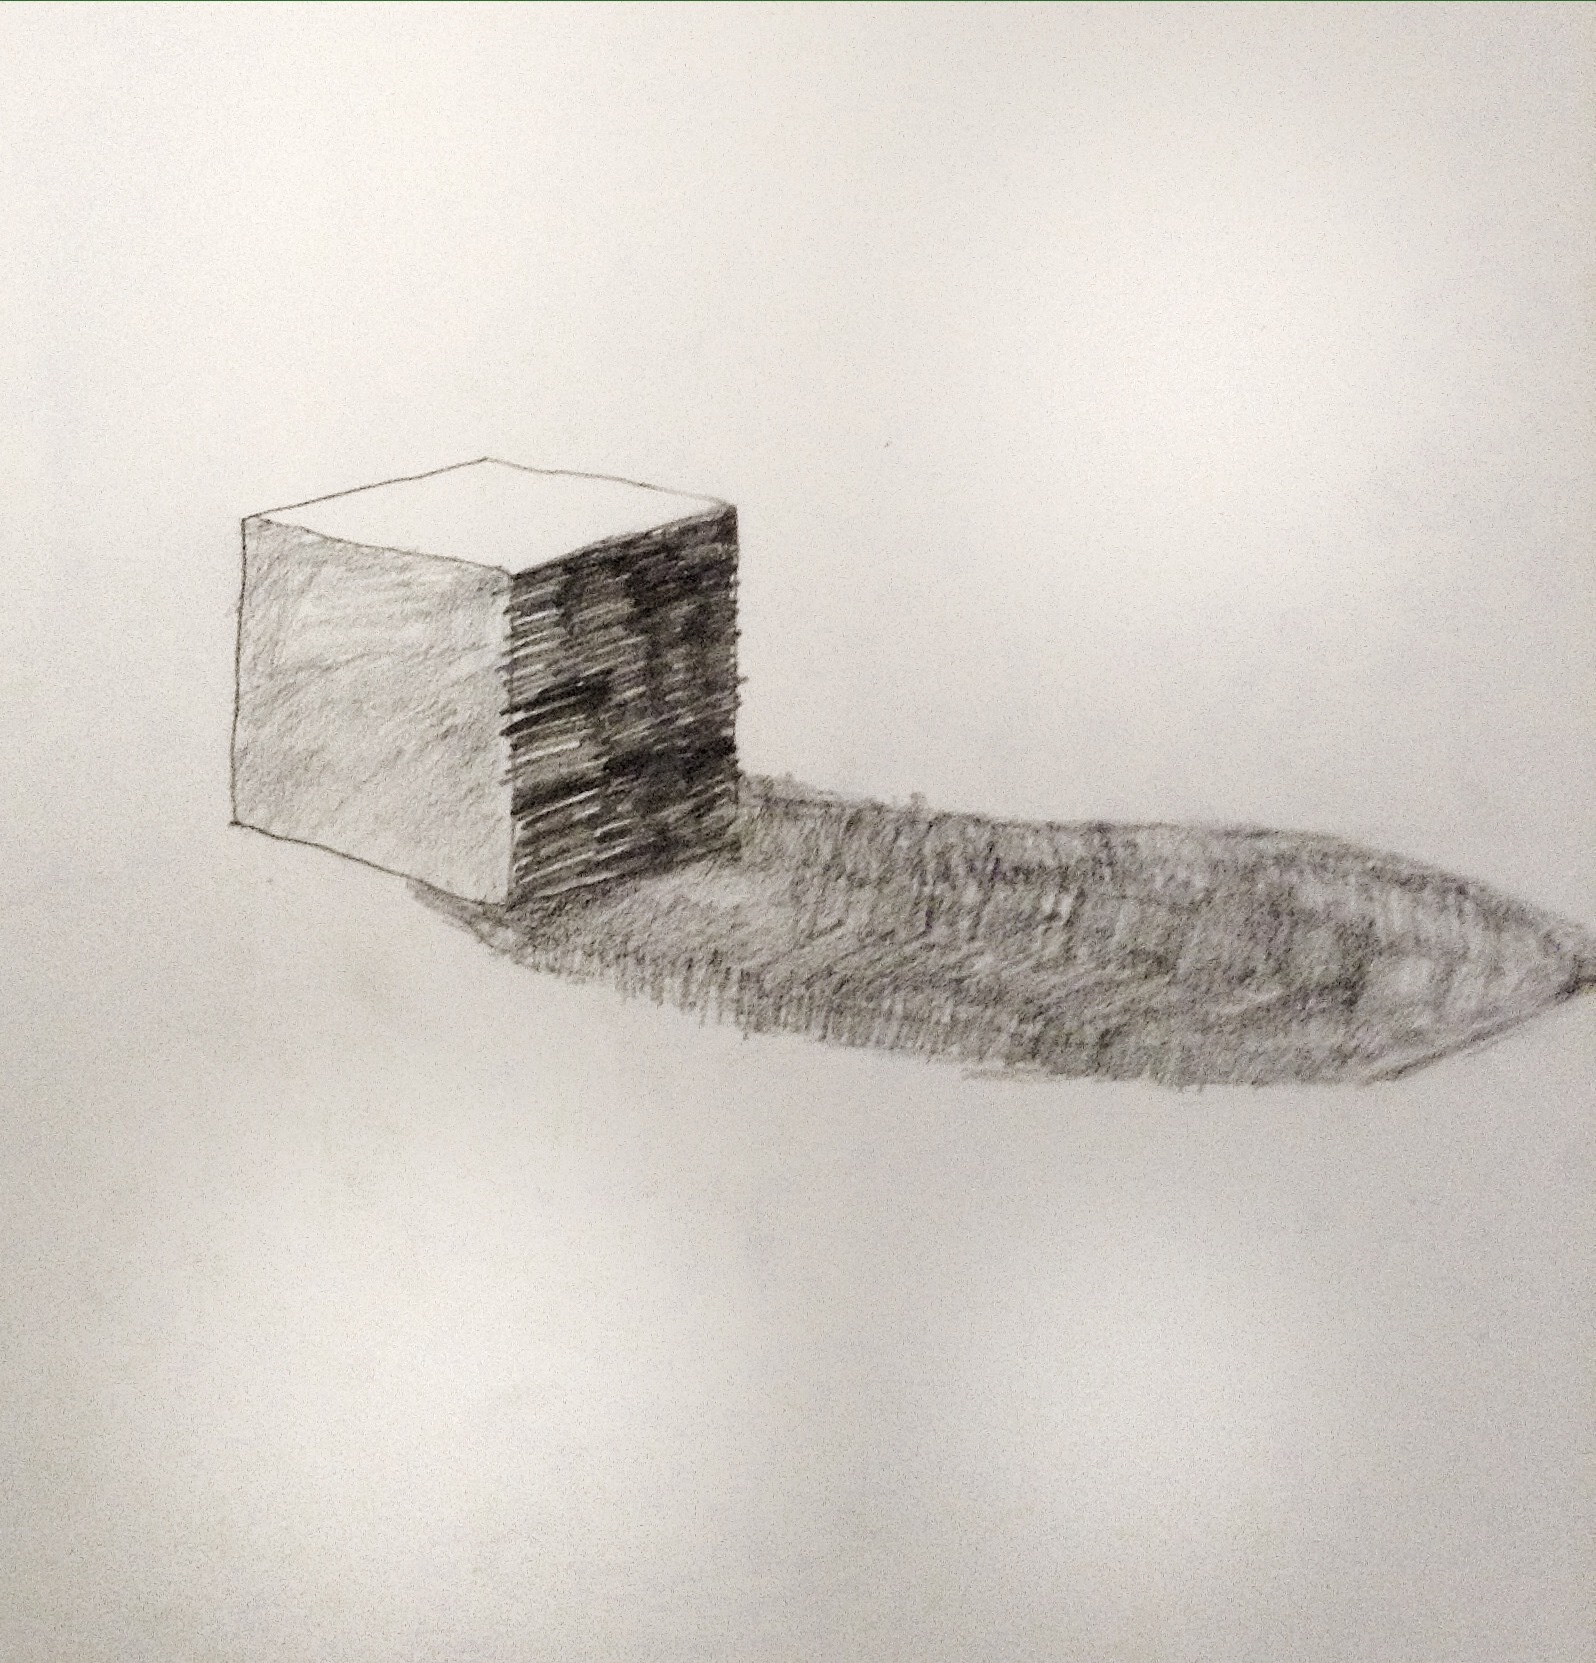
5.1 Draw
Students draw a new practice cube. If they run out of room on their last sketch pad page, they can move on to the next blank page.
Have students trace another cube.
Practice shading the cube lightly with a 4B or Ebony pencil.
Steps to follow:
- No shading on top, or 1 very light layer after they’re finished.
- 2 layers on one side.
- 3 layers on the other. Start lightly and build shadow.
- Early finishers can add the “off” shadow that is to the side of the cube on the surface it sits on.
Use this button to jump down to the preparation section.
LEARNING TARGETS
Students know how to identify the 3 basic shapes.
M A T E R I A L S
- Basic shapes game PDF
- Markers
- Card or Paper for nametag
6.1 Prints
game
3 Basic Shapes
Print enough for each student or each team.
You can laminate them to prevent this.
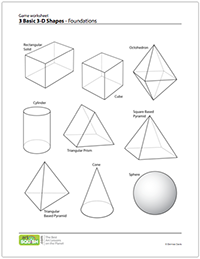
1 Page – Opens in new window
6.2 game
“If you can learn to draw and shade each of these 3 forms, then you can draw and paint almost anything.
The 3 basic forms:
Cube – the simplest flat-sided form has all flat sides, all the same angles and all the same length of edges.
Sphere – the simplest curved-sided form has all curved sides with same curve at every point on the surface.
Cylinder – has the simplest curve and simplest flat sides in the simplest combination.”
Use this button to jump down to the preparation section.
LEARNING TARGETS
Students know how to draw and shade a cube.
M A T E R I A L S
- 14″ x 17″ Sketch Paper
- 2B Pencil
- 4B Pencil
- White Eraser
7.1 final
Note how on the shading example, each side has a darker area and a lighter area. This is how light behaves on a cube shape, so see if you can make these soft gradients. Don’t let the shading have any sudden changes within one side. To do this effectively, you will have to go very slowly, and build up layers gradually. We have a lot of time so that you can do this in slow-motion. Go veeerrrry sloooowwwwly.
- 1 layer on top. Very light. Continue this light shading as the first layers on each side.
- 3 to 4 layers on left front side. Let last layers only cover the darker area.
- 5 or more layers on right side.
- Try creating the OFF shadow by layering too. See if you can make it fade away at the edge.
Use this button to jump down to the preparation section.
LEARNING TARGETS
Students know how to shade a drawing of their choice.
M A T E R I A L S
- 14″ x 17″ Sketch Paper
- 2B Pencil
- 4B Pencil
- White Eraser
8.1 extra
On a blank page in the students’ sketch pad, draw a cartoon or a small 3D object of their choice, and use hatch shading to shade and change areas into different shades of grey. They can use a real object or make something up. The idea is to enjoy the drawing while practicing the shading technique.
8.2 Print
Reference
Shading images
Cartoons and cake images. Cut images apart and print enough for each student to choose from several.

2 Pages – Opens in new window
Use this button to jump down to the preparation section.
LEARNING TARGETS
Students know the importance of cleaning up.
M A T E R I A L S
- Paper Towels
- Cleaning wipes
- Sink
- Waste baskets
- Well-lit spot for photos
- Camera or phone-camera
9.1 Clean
- Wash hands
- Put art supplies away
- Wipe tables & toss trash
- Remove any smocks (last)
- Check for items on floors and tables
9.2 Photo
OBJECTIVES
- Practice and improvement using pencils to shade
- Understanding how realistic shading looks
- Accomplishment in making cubes look realistic
- Fulfillment in the fun of playing a game and being on a team
TROUBLESPOTS
Too speedy – You can’t shade realistically by going fast. Slow-motion is the only way.
Wandering shading – Moving around as you hatch shade, destroys the pattern and prevents your hand from making the same movements over and over. This results in an un-realistic and more expressive look, which is not what our goal is today.
Halo edges – Many young artists do not shade to the edges of their areas, making the edges look like they glow. Also, this makes OFF shadows (cast shadows) look like their not from any particular object. Shadows must touch the object they are made from.
Shading too hard – It’s especially difficult for grades 3-5 to shade lightly. To help with this, have them practice by shading the top of any cube as light as they can. Then in the final shading exercises, have them shade the top lightly, and continue with that light shading over the entire 3 sides before adding layers.
ART WORDS
• Hatch mark – a short stroke made with any drawing medium, such as pencil or charcoal.
• Hatch Shading – Many hatch marks made together in a smooth and consistent pattern.
• Gradient – When your shaded or painted area changes gradually, and does not show a distinct point where the change occurs.
• Cube – One of the 3 basic forms, and the simplest 3D shape that has flat sides.
CLASSROOM
PREP
Print all of your PDFs from the lesson plan and cut any references apart as needed.
What your room needs
Here are your printable lists and room prep instructions.
Opens in new window
CLASSROOM
MATERIALS
- Lamp or Flashlight
- Simple cube objects
- Markers
- Basic shapes game PDF
- Card of Paper for name tags
STUDENT’S
MATERIALS
- 14” x 17” Sketch Paper
- 2B Pencil
- 4B Pencil
- White eraser
- Ebony Pencil
PREVIEW
Week 10: Artists’ Perspective
Students will use the simple form of a cube to learn the basics of artists’ perspective. Any artwork that includes a man-made object will be improved after understanding how to translate what you see into what you draw. Several handouts and analogies help the lesson be informative, understandable, and interesting.
Week 11: Birdhouse Drawings
Students will create a detailed drawing of an old weathered birdhouse. If possible, the birdhouses used should be real-life objects, but photos are provided. Steps for preparing, using the 3 steps to accuracy, making guide-lines, and pencil techniques are all practiced to create a finished work. A few fun short projects for early finishers are also included.