
OVERVIEW
Using some simple big shapes and line, artists will draw and paint a bird. There is a background done with streaked colors and then the bird is drawn, glued to the background, and painted to match. During part of the lesson, we discuss and learn about different viewpoints, showing a bird’s eye viewpoint, of course!Grades K – 2
Week of January 19 – 23
1 Hour & 30 Minutes


Lesson At A Glance
A brief overview of each step. Buttons jump to each section for detailed information.
5 Min – Set Up for tempera paint
5 Min – Clean up paint
10 Min – Practice drawing big shapes of bird
10 Min – Medium sized bird drawing
5 Min – Discuss birds eye view
5 Min – Paint the lightest spots
22 Min – Glue bird to paper, paint
3 Min – Everyone helps
SCROLL & TEACH
LESSONPLAN
Each section is a different color. Read over once and then you can SCROLL & TEACH using any device you like. It’s designed to work best with your phone.
LEARNING TARGETS

Students learn to express themselves through creating from their imagination.
M A T E R I A L S
- 11″ x 17″ Copy Paper
- 4B pencil
- Eraser
- Markers and/or oil pastels
- Blenders (stumps)
- Paper Towels
1.1 Greet
Kneel down so that you are on their level. Bending over emphasizes the differences in your height, while kneeling makes them feel more important.
1.2 Choose
Everyone should take their time with the work and make a finished piece of art. Limiting the paper can also help kids focus on the work. If someone finishes in super-fast time, ask them what more they can do to the existing paper. Ask again several times – unless they appear overly frustrated; then you can allow them to move on to a new work.
LEARNING TARGETS
Students know how to set up their work area for painting with tempera.
M A T E R I A L S
- Tempera paints
- Brushes
- Mixing trays
- Water containers
- Paper towels
- Smocks
Brushes should be nylon for springiness and durability. Round brushes are the most versatile.
2.1 prepare
Have 7 bottles of paint ready, using 3 alike colors of cool and 3 alike of warm, and white. Students will choose either warm or cool colors. Explain that you can’t mix the two or it will turn into browns or grays.
Let students help if you can. Set out paper towels, a brush and water container for each student. Put smocks on.
LEARNING TARGETS
Students know how to paint a background
M A T E R I A L S
- Tempera paints
- Brushes
- Water containers
- Paper towels
- Smocks
- 11″ x 15″ watercolor paper
3.1 paint

This is something you might want to practice once on your own before class, so you get a feel for how much paint to use and where to place it on the paper.
You’re going to have students make 3 areas of streaky color, not mixing much. There will be a top color, middle color, and bottom color. It can be arranged differently, but we want variety and streaks if possible.
Have your artists choose either warm or cool colors for their background. Then go around with the first color bottle and a bottle of white. Place a small blob of each in the middle top of the page close to each other. Change to the other group’s first color (warm if you began with cool) so those artists can get started too. have them wipe their brush all way back and forth from side to side just up at the top of the page, but only a few times so as not to blend too much.
Then change bottles for the second colors and go around again placing a blob of it and white in the center, and then the third color with white in the bottom area of the paper.
Students should only use about 4 back and forth strokes of their brush for each color. They may do a bit more to finish and that’s ok as long as they don’t blend the colors all into one flat tone.
Fill the paper with color but keep it as thin as possible. If you have ridges and globs on the paper, you can get paper towels out and let students do a couple of sweeps to wipe off excess paint (not too much or it will blend more).
That means you have to stop brushing after only a few strokes! You have to just brush a few times or you’ll mush it all together and it will look like you only had one color.
I want you to only paint with 4 big long strokes for each color, all the way from one side of your paper to the other side. That way it will not mix completely and look streaked like we want.
After, we might need a couple of extra strokes to cover the whole paper, but not much!”
LEARNING TARGETS
Students know how to clean up.
M A T E R I A L S
- Sink
- Waste baskets
- Well-lit spot for photos
- Camera or phone-camera
- Paper towels
- Cleaning wipes
4.1 Clean
- Set paintings aside to dry
- Double-check for names
- Empty water containers and get clean water
- Super-wash brushes if used
- Wipe tables & toss trash
LEARNING TARGETS
Students know how to identify big shapes in references
M A T E R I A L S
- Drawing a Bird handout
- 11″ x 17″ Copy Paper
- Pencils
- White Eraser
5.1 print
Reference
Bird Big Shapes
Print one for each student to have one.

1 Page – Opens in new window
5.2 Draw
Some students may say they already know how to draw a bird. That’s great, and they can draw it the way they know how, but then encourage them to look at the handout and learn a NEW way to do it. Everyone should draw each part of the bird using the examples of wing shapes, head shapes, and body shapes from the print.
LEARNING TARGETS
Students know how to draw an image from a reference
M A T E R I A L S
- Pencil
- White eraser
- Black marker
- 11″ x 17″ copy paper
6.1 draw
Now everyone can use the large paper to draw their own bird however they want.
When they finish the drawing, they can go over it with a black marker.
6.2 cut
Help the students cut their bird out and set it aside to use later. If the cutting is not super close or accurate, that’s ok. It will be glued, and painted on the background.
LEARNING TARGETS
Students know that there are different points of view.
M A T E R I A L S
- Paint bottles or water bottles
7.1 teach
Read the teacher talk to walk kids through visualizing. You might have them practice covering one eye first. Have students look at the pictures below if they’re having trouble understanding this.
Tap a picture to open a larger viewer.
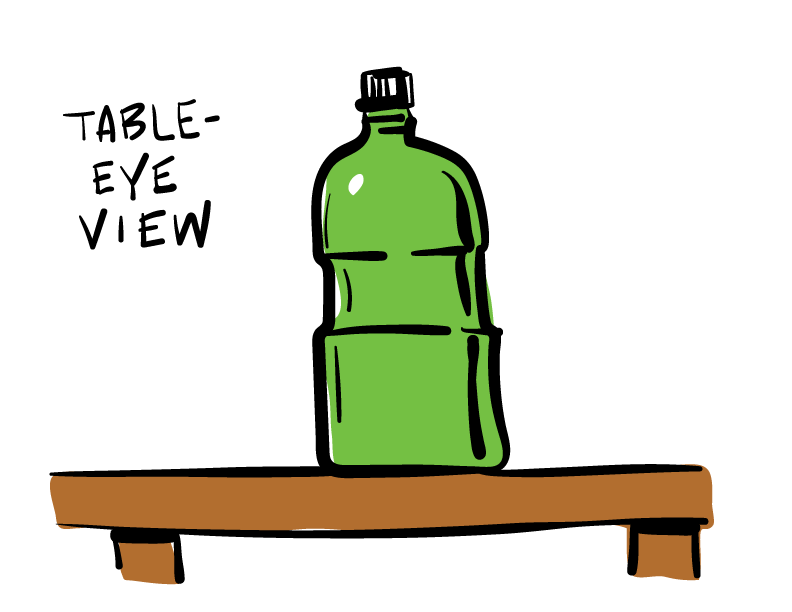
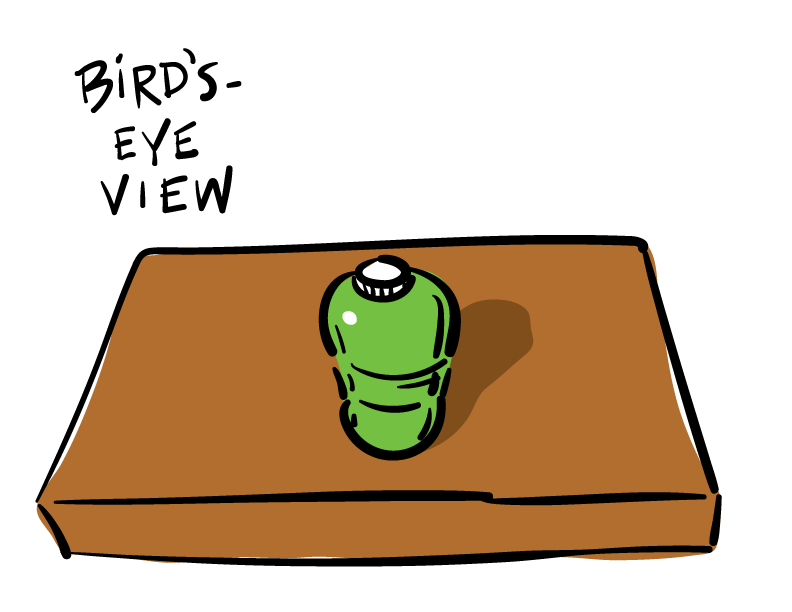
Now stand up and look down at the bottle again, and with one eye covered. See how the table is a big rectangle now? The bottle is somewhere in the middle of the rectangle, and the top of the bottle is completely inside the table rectangle edges! You can also see that circle on the bottle top. Things look different from different viewpoints.”
Show second slide. “This is called a bird’s eye view, because we’re looking down at things, like a bird does.”
LEARNING TARGETS
Students know how to set up their work area for painting with tempera.
M A T E R I A L S
- Tempera paints
- Brushes
- Mixing trays
- Water containers
- Paper towels
- Smocks
8.1 prepare
Students should already have their smocks on. Give everyone a small paint brush, new water container, paper towel, their cut out bird drawing, and their painted backgrounds from earlier.

LEARNING TARGETS
Students know how to create a finished painting
M A T E R I A L S
- Glue sticks or white glue in bowls with brushes
- Tempera paints
- Brushes
- Mixing trays
- Water containers
- Paper towels
- Smocks
9.1 Glue
Before painting their birds, students will need a glue stick to attach their paper birds to the background painting. If the background is not quite dry in places, that’s ok. Paint is like glue too.
9.2 paint
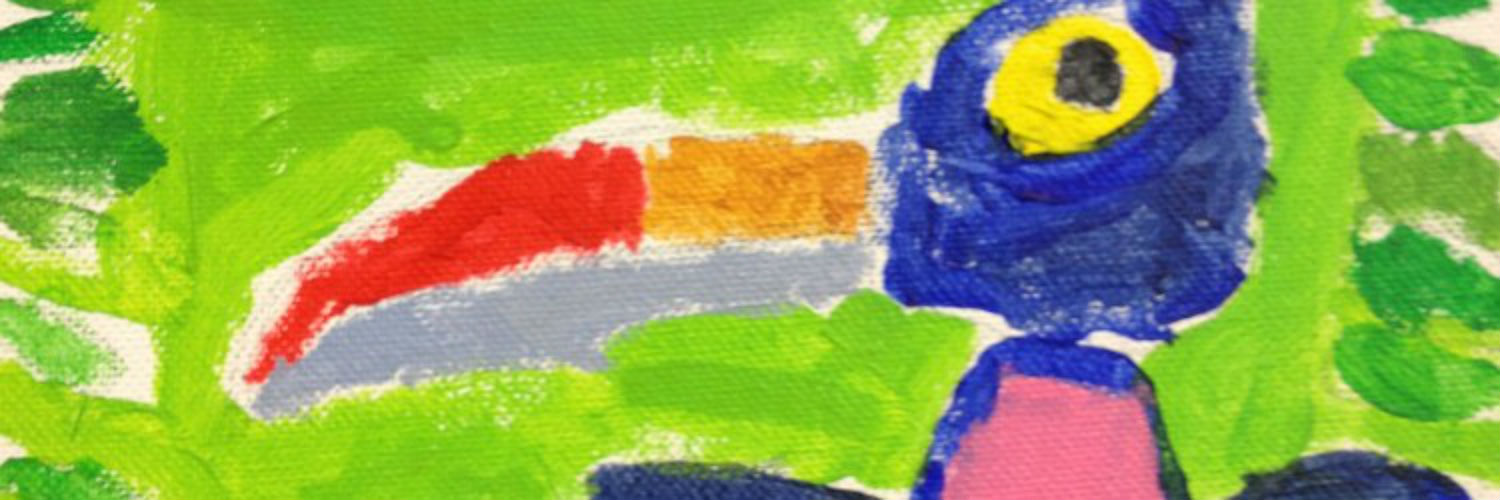
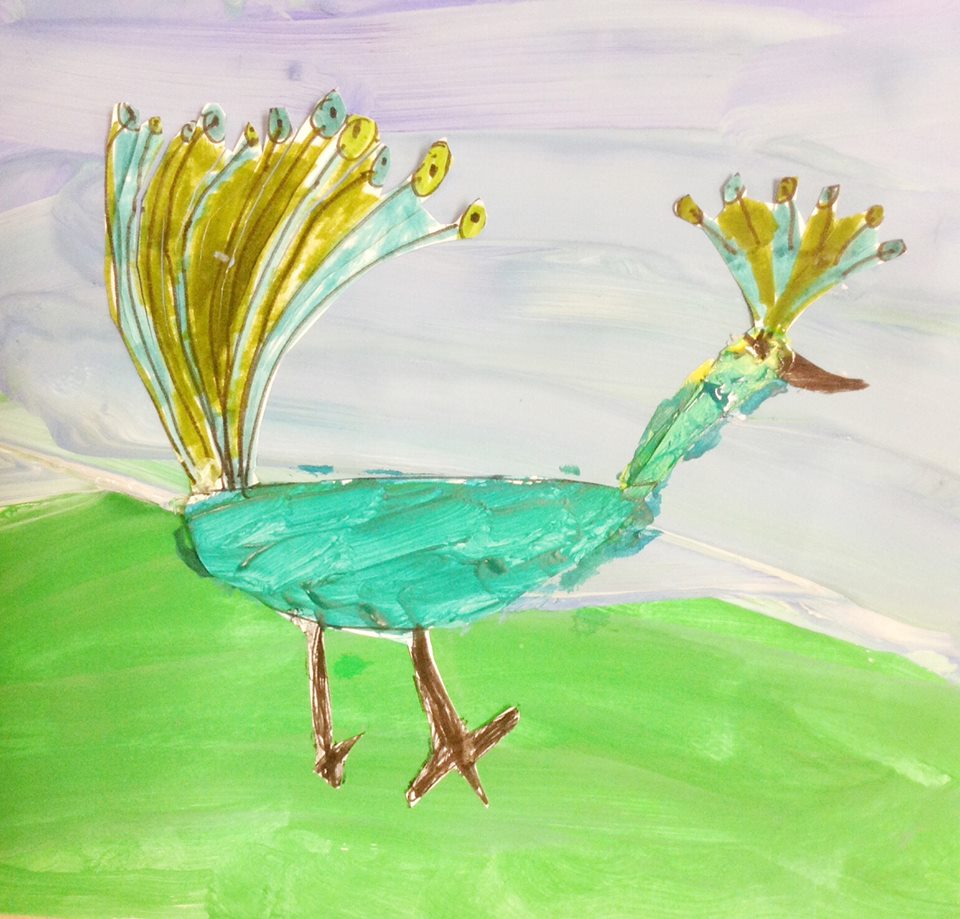
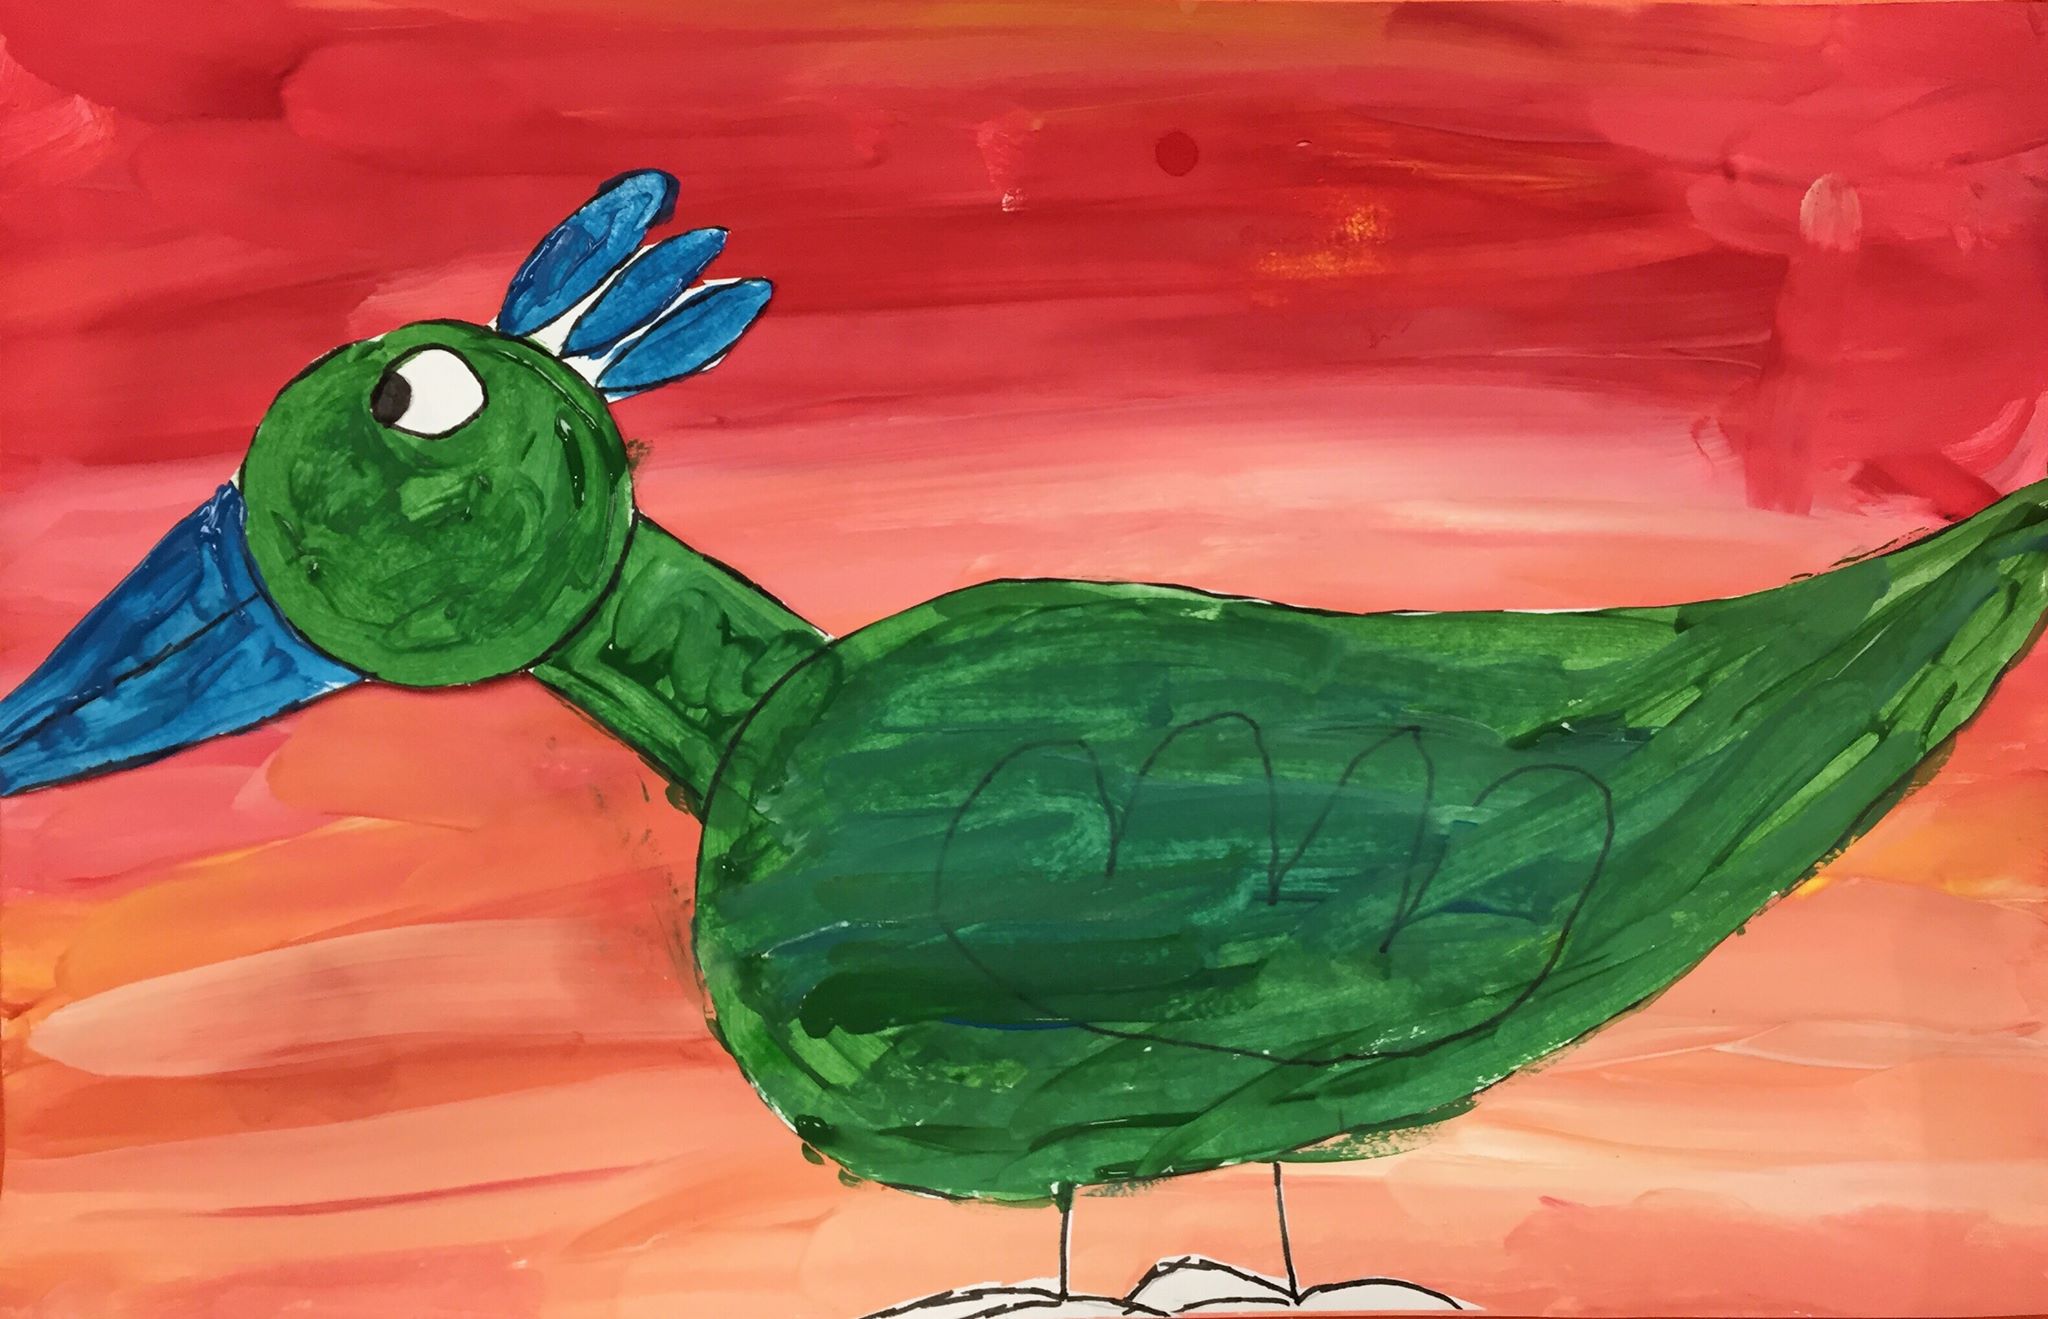
Once the birds are glued down, the artists can begin painting the bird in bright colors with opposites – using warm colors if they have a cool background, or cool colors if the background is warm.
LEARNING TARGETS
Students know the importance of cleaning up.
M A T E R I A L S
- Paper Towels
- Cleaning wipes
- Sink
- Waste baskets
- Well-lit spot for photos
- Camera or phone-camera
10.1 Clean
- Wash hands
- Super-wash brushes if used
- Put art supplies away
- Wipe tables & toss trash
- Remove any smocks (last)
- Check for items on floors and tables
10.2 photo
OBJECTIVES
- Practice and improvement drawing big shapes and using paint
- Understanding how practice is good for artists
- Accomplishment in finishing a complex multi-media painting
- Fulfillment by choosing colors and shapes
TROUBLESPOTS
Cutting out anxiety – Students may be troubled if they cut too loose or into their bird drawing. It’s ok, because it will be glued down so pieces will be able to be rejoined, and if there is extra around the bird, that just adds to the collage effect. They can also paint more and integrate into the background.
Not getting the view thing – Kids may not see the bird’s eye view differences because of brain development. Just say it’s ok to do things they way you see them and the way you like – and move on.
Can’t. Stop. Blending! – The motions of painting are fun. It feels good to spread paint around. That’s why we have a specific number of strokes for the background painting part. We need a way to stop artists from blending too much so we can see the streaks.
ART WORDS
Viewpoint – You can look at things from more than one spot. That spot is called your viewpoint. Most things look different from different viewpoints.
Bird’s Eye View – When your viewpoint is look down from above an object, like a bird does.
CLASSROOM
PREP
Print all of your PDFs from the lesson plan and cut any references apart as needed.
What your room needs
Here are your printable lists and room prep instructions.
Opens in new window
CLASSROOM
MATERIALS
- 11×17” Copy Paper
- 11 x 15” Watercolor paper
- 4B pencils
- Erasers
- Markers
- Oil pastels
- Blender sticks (stumps)
- Clipboards
- Paper towels
- Tempera paint
- Brushes
- Mixing trays
- Water containers
- Glue sticks or white glue
- Smocks
PREVIEW
Week 20: Balance
Balance in real life is understandable, but what about visual balance? Students learn that people like to see things that look balanced so they don’t feel like they might fall over if they were real. Several exercises, a slideshow, and projects help with understanding and practice using balance in artwork.
Week 21: Shapes & Harmony
A color wheel flower for warmup opens the class. Then students will find shapes in reference photos and collect as many shapes as they can match. Finally, they’ll learn how art needs harmony just like music does, using repetition as a method as well as reviewing the Most Important Spot (emphasis).