
OVERVIEW
An entire class devoted to learning the basics of cartooning. Students develop a character and learn how to make different facial expressions using symbols that convey extra meaning or action. A finished ink and watercolor cartoon is created in the second half of the session.Grades 6 – 12
Week of May 28 – June 1
1 Hour & 45 Minutes, or two 52-minute sessions
STANDARDS For This Lesson
SUBMIT YOUR SUMMARY
Copy and paste the text below to send your abbreviated lesson plan with national standards and learning targets to your supervisors and colleagues. Or access the WORD doc by using the blue button below.
– – – – – – – – – – – – – – – – –
Week of May 28 – June 1
OVERVIEW:
An entire class devoted to learning the basics of cartooning. Students develop a character and learn how to make different facial expressions using symbols that convey extra meaning or action. A finished ink and watercolor cartoon is created in the second half of the session.
NATIONAL STANDARDS:
Grade 6
VA.CR.2.6 – Demonstrate openness in trying new ideas, materials, methods, and approaches in making works of art and design.
Grade7
VA.CR.2.7 – Demonstrate persistence in developing skills with various materials, methods, and approaches in creating works of art or design.
Grade 8
VA.CR.2.8 – Demonstrate willingness to experiment, innovate, and take risks to pursue ideas, forms, and meanings that emerge in the process of art-making or designing.
Grade Hs proficient
VA.CR.1.HSI – Use multiple approaches to begin creative endeavors.
VA.CR.2.HSI – Engage in making a work of art or design without having a preconceived plan.
Grade Hs accomplished
VA.RE.7.HSII – Evaluate the effectiveness of an image or images to influence ideas, feelings, and behaviors of specific audiences.
LEARNING TARGETS:
Students know how to how to develop a cartoon illustration using simplification and exaggeration
Students know how to make a final drawing after sketching
LESSON PLAN:
1. Warmup (5 minutes)-Draw your favorite cartoon in pencil
2. Practice (10 min) – draw a realistic character from reference
3. Stylize (17) – Stylize in 3 steps, Show PDF examples
4. Expressions (15) – Use PDFs to look at expressions
5. Rough Sketch (15) – Draw final sketch of character using expression of choice
– – – – – –
Break – end of part one if dividing into 2 sessions
6. Redraw (10) – Draw final character on new sheet of paper
7. Transfer (15) – Transfer drawing to watercolor paper
8. Ink (10) – Ink Drawing, work from top down
9. Watercolor (15) – Add color using markers or watercolor
10. Hoppin’ Crazy! (extra) – Draw character jumping with a crazy expression
11. Clean Up (2) – Everyone helps
Tap the Plus Icon (above right) to open STANDARDS information, including an Overview, Learning Targets and a Syllabus. Copy and paste to send to your Administrators or use the button below to download a Word document with the same information that you can add your info to and email to them as an attachment.
SCROLL & TEACH LESSON PLAN
Don’t worry about rewriting anything. Just spend a few minutes reading the lesson plan and printing out your PDFs. Then check out the READY, SET, GO! section and print your prep-page, which includes checklists and an “at a glance” outline of the lesson so you can stay on track when you’re teaching. Set out the materials from the list on your prep page and you’re ready.
That’s all you need to know. Use your smartphone to Scroll & Teach!
Lesson At A Glance
A brief overview of each step. Buttons jump to each section for detailed information.
10 Min – draw a realistic character from reference
5 Min – Use PDFs to look at expressions
15 Min – Draw final sketch of character using expression of choice
10 Min – Draw final character on new sheet of paper
15 Min – Transfer drawing to watercolor paper
10 Min – Ink drawing. Work from top down.
15 Min – Add color using markers or watercolor
Extra – Draw character jumping with a crazy expression!
2 Min – Everyone helps
SCROLL & TEACH
LESSONPLAN
Each section is a different color. Read over once and then you can SCROLL & TEACH using any device you like. It’s designed to work best with your phone.
LEARNING TARGETS

Students attempt a cartoon drawing as a base to learn from – having some struggle in the first step leads to better learning later
M A T E R I A L S
- 14″ x 17″ Sketch Paper
- 4B pencil
- White Eraser
1.1 draw
It can be student’s own character, or from another source such as a tv show, but it must be made from memory and/or imagination. If they’re having trouble with ideas, use one of the following…
- Dog
- Fish
- Old wise man
- Crazy scientist
CREATIONS - tap here to open
Use the Student Instructions printout below to distribute to your Creations students. Tap the image to open the PDF in a new window.
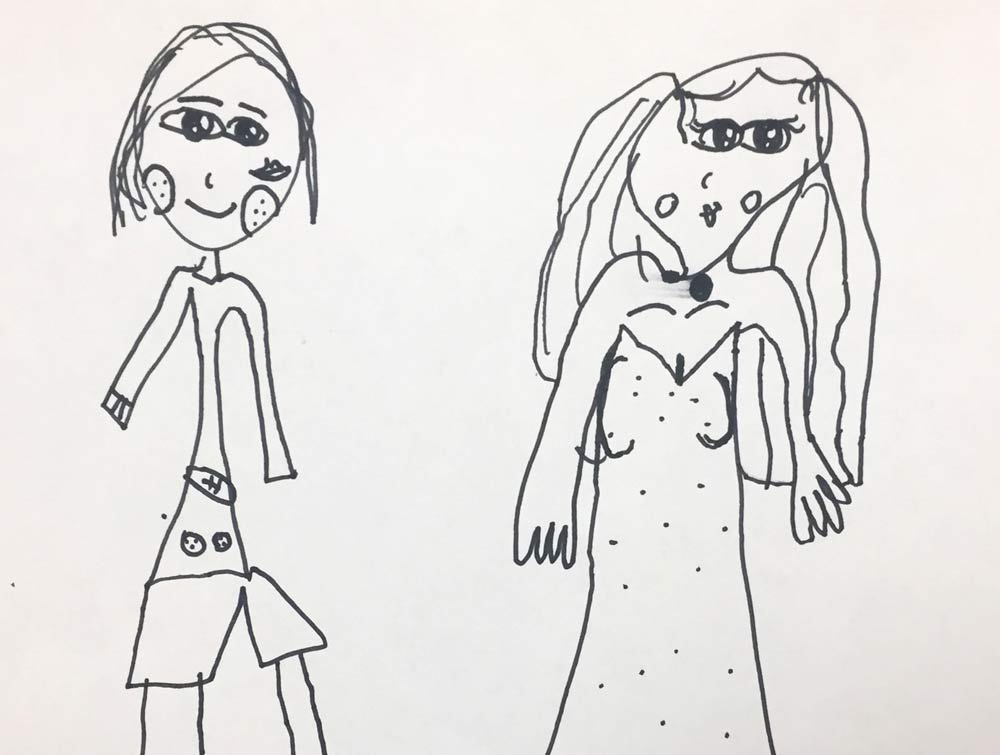
Cartoons or Artists’ Choice
Overview: Students can choose between creating their own cartoon or artists’ choice using dry media or ink.
Cartoon Scene
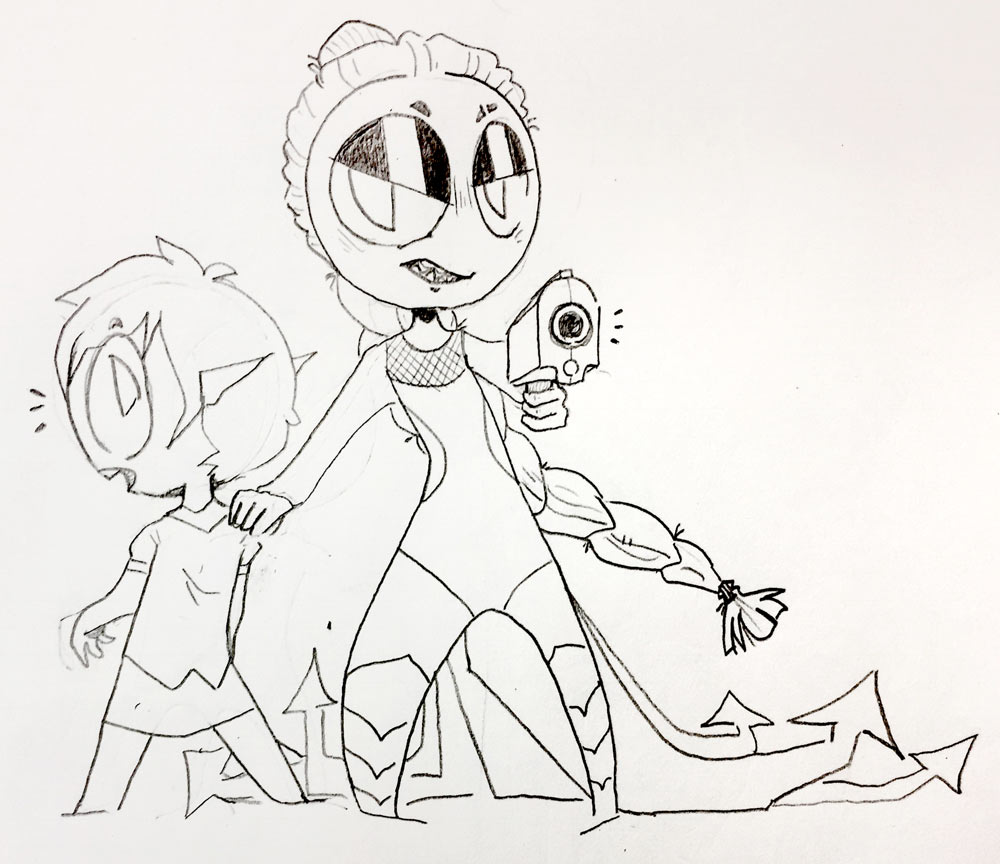
Develop 2 or 3 characters who are talking, with one showing an extreme expression. Props can be used to make the scene more interesting. Some suggestions to get them started are below. Captions can be added by the artist, or the advanced students can work on them together after creating the drawings.
- Dog and owner holding leash or other object
- Horse behind a cart with owner arguing with it
- Two birds and a worm between them
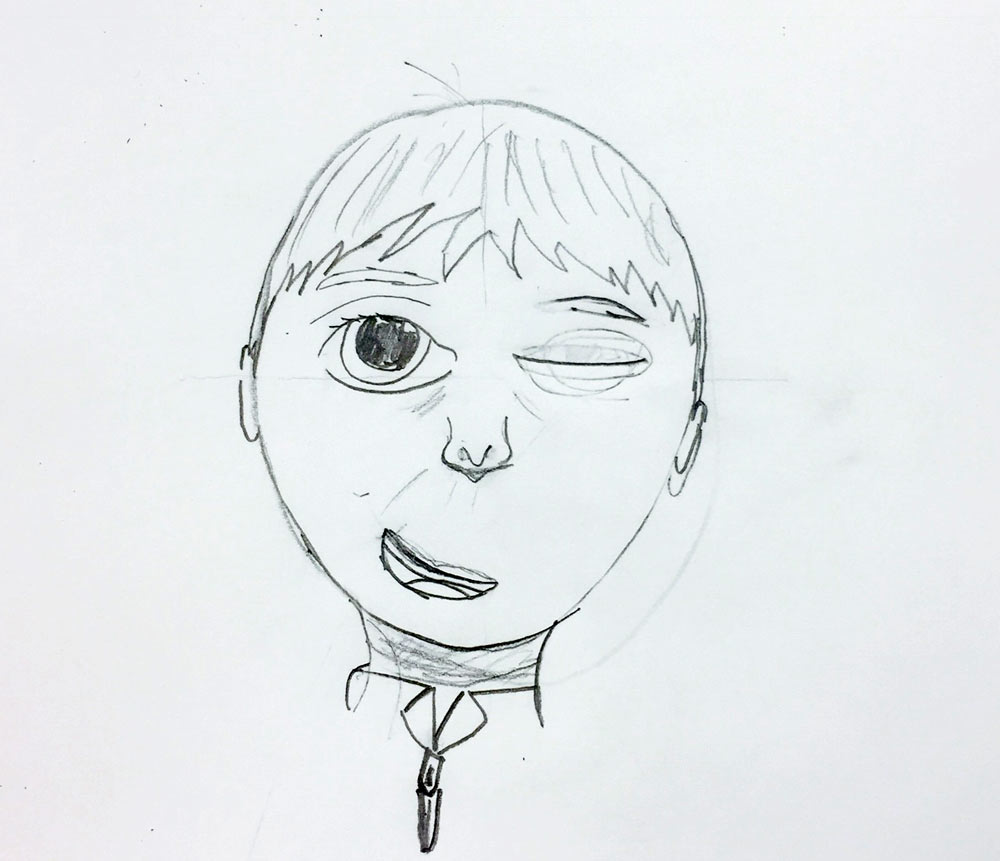
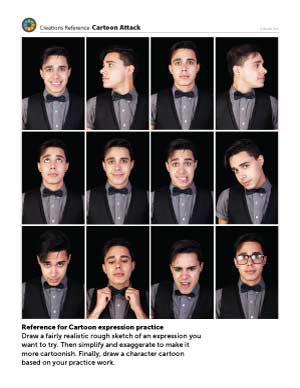
Cartoon Expression Practice
Or create sketches of a man with several expressions. First draw one fairly realistically, then simplify and exaggerate. Finally, draw a character based on the practice sketches.
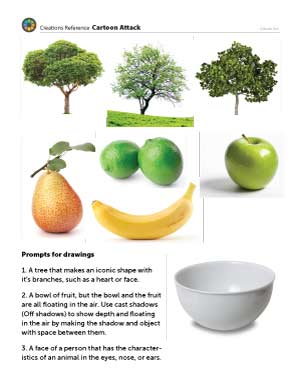
Artists’ Choice
Create a drawing of one of the following ideas in pencil, oil pastel, or ink.
- A tree that makes an iconic shape with it’s branches, such as a heart or face.
- A bowl of fruit, but the bowl and the fruit are all floating in the air. Use cast shadows (Off shadows) to show depth and floating in the air by making the shadow and object with space between them.
- A face of a person that has the characteristics of an animal in the eyes, nose, or ears.
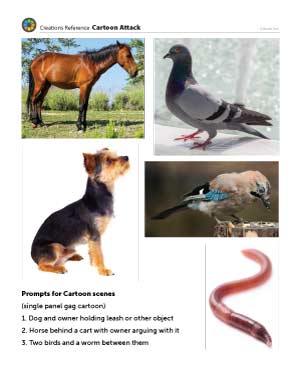
Tap images to open Creations Student Instructions and Reference Materials in new windows. There are 3 reference sets.
1. Cartoon photo reference of animals
2. Expression photo reference
3. Two-page drawing references
1
Cartoon Animal Reference One-Page

2
Expression Reference
One-Page
3
Drawing Photo Reference Two-Pages
Use this button to jump down to the preparation section.
LEARNING TARGETS
Students know how to extrapolate ideas from photo reference
M A T E R I A L S
- 14″ x 17″ Sketch Paper
- 4B Pencil
- White Eraser
2.1 Print
Reference
Toon Photos
Cut images apart and print enough for each student to choose from several.

3 Pages – Opens in new window
2.2 draw
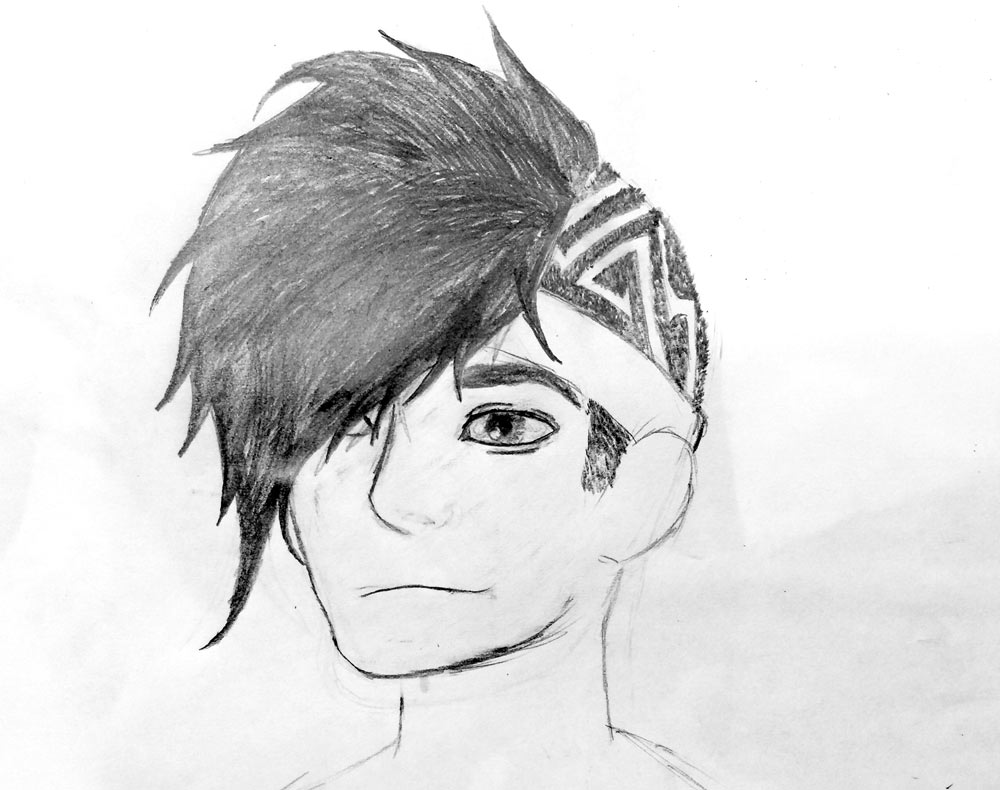
Choose from these 4 different types of characters:
- Space Animal – photo: Rat
- Anime Hybrid Girl – photo: girl
- Cute Animal – photo: panda
- Brainy Teen Guy – photo: boy
Allow students to interpret these ideas and create their own cartoon drawing, but emphasize that the reference photo is very important. Explain how professional cartoon artists usually erase and redraw often, or begin completely over to redraw. Only by re-drawing can a character be developed.
Use this button to jump down to the preparation section.
LEARNING TARGETS
Students know how to how to develop a cartoon illustration using simplification and exaggeration
M A T E R I A L S
- 14″ x 17″ Sketch Paper
- 4B pencil
- White Eraser
3.1 Print
Reference
Toon Examples
Either let students share around or you can cut images apart in the matching sets.
2 Pages – Opens in new window
3.2 Draw
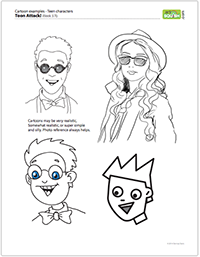
Explain to your students how to apply the 2 basic cartoon methods of simplification and exaggeration. You can do this in 3 steps:
- Step 1: simplify the biggest shapes and remove unnecessary features.
- Step 2: exaggerate and simplify some more
- Step 3: refine the shapes, simplification, and exaggerationAs your class works, you can show them some of the Pinterest examples of cartoons if you like. For the examples they’re working on, though, hold off on the PDF we have provided. Allow your artists to try on their own instead of simply copying other artists’ work.Provide the examples PDF pages of cartoons, after your students have made their own attempts. It’s ok to compare your work, if you realize that a professional cartoonist created these examples from the same references. Naturally, student work is going to look different. Make sure your student’s realize this and encourage them to work hard and learn by practice. The cartoonist who did all of these created some very horrible cartoons for many years before becoming a professional!

Pinterest Gallery – Cartoon Animals
Tap the icon to the left to open our special Pinboard showing examples of artwork to display to your class. See our Article for making Pinterest work on larger displays. You can also use a laptop or large tablet and gather everyone around like you’re using a book.
Explain the important concept of re-drawing. This is essential to good cartooning. To simplify and exaggerate, you have to look at what you’ve done, and then redraw it. professionals tend to redraw using tracings and starting over, but also using colored pencils first, and/or erasing old work to redraw new versions. Students will want to erase to redraw, and that’s ok.
Use this button to jump down to the preparation section.
STEP 4. Expressions
Students will create moods with different expressions in their drawings 5 MinutesLEARNING TARGETS
Students know how to add expression to their cartoon drawings
M A T E R I A L S
- 14″ x 17″ Sketch Paper
- 4B pencil
- White Eraser
4.1 print
Reference
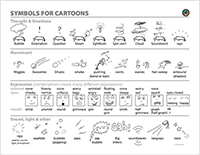
Symbols
Various symbols used in cartooning to convey action and emotions.
These were also used in Foundations 2B, so some students should still have them.
1 Page – Opens in new window
4.2 print
reference
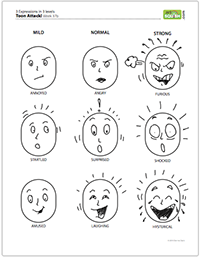
Three Expressions
Examples of 3 expressions, each ranging from mild to extreme.
3 Pages – Opens in new window
4.3 learn
Symbols are important for cartoons, to convey action and mood.
Provide the 2 PDFs and have students look them over. These are handy references for cartoonists to have! The 3 expressions shows how to use symbols to create 3 versions of each expression: mild, normal, and strong. If you have time, talk about what makes each expression more extreme. Emojis use some of these keysigns too.
- Annoyed – Angry – Furious (mouth, eyes and brows all become larger and more exaggerated)
- Startled – Surprised – Shocked (mouth and eyes become taller or more open. Pupils get smaller and brows higher)
- Amused – Laughing – Hillarious (mouth gets larger. eyes curve up and become closed, crying)
Use this button to jump down to the preparation section.
STEP 5. Rough Sketch
Students will create a rough sketch of their character using expressions 15 MinutesLEARNING TARGETS
Students know how to draw rough ideas before final work
M A T E R I A L S
- 14″ x 17″ Sketch Paper
- 4B Pencil
- White Eraser
5.1 sketch
Use this button to jump down to the preparation section.
LEARNING TARGETS
Students know how to make a final drawing after sketching
M A T E R I A L S
- 14″ x 17″ Sketch Paper
- 4B Pencil
- White Eraser
6.1 draw
Encourage erasing and correcting to make a finished drawing as good as they can make it.
Use this button to jump down to the preparation section.
LEARNING TARGETS
Students know how to transfer a drawing
M A T E R I A L S
- Cartoon drawing on sketch paper
- Ebony pencil
- White Eraser
- Watercolor Paper
- Blue Painter’s Tape
7.1 trace
If you coat the back of the drawing with graphite, the paper can be taped to a piece of watercolor paper and transferred by tracing over the original lines again. Here’s how.
1. Turn the drawing upside down, and place on a scrap sheet of paper or the back of a drawing pad.
2. Coat the back with graphite. Hold a soft-lead pencil (4B, or Ebony), sideways, so that the graphite tip is resting on the side instead of the tip. Rubbing over the back of the cartoon drawing, you can quickly coat it with a layer of graphite. Take care to make sure every area of the drawing has the graphite under it. MAKE SURE no one is covering the front of their drawing or the drawing will be lost!
3. Turn the paper right-side up again.
4. Tape the drawing on top of watercolor paper. Make sure the drawing is showing, with the graphite coating facing down. Use a few bits of painters’ tape on each corner. If the drawing paper is too large for the watercolor paper, tape the watercolor paper down first, to the table.
5. Trace over the cartoon drawing lines. Make sure you don’t miss any areas!
6. Remove the original drawing and tape.
Use this button to jump down to the preparation section.
LEARNING TARGETS
Students know how to ink over a final drawing
M A T E R I A L S
- Drawing on watercolor paper
- fine-tipped waterproof marker OR
- dip pen with waterproof India Ink
8.1 ink
Use a fine-tipped marker pen (waterproof!) or a dip pen with waterproof india ink, and work from the top down so you don’t smear the ink. Allow it to dry for a couple of moments while you get out watercolors or acrylics to make watercolors. If you have markers, these can also be used.
If students want to erase the graphite, it will come up easily with a kneaded eraser. However, you must be 100% sure it is dry or the eraser will smear the ink.
Redrawing
This is the final art. Instead of tracing and blindly following the lines, an artist should approach this version as if it were a fresh new drawing. Every line should be drawn with the idea that it can be improved, as opposed to simply copied (traced).
Use this button to jump down to the preparation section.
LEARNING TARGETS
Students know how to watercolor a cartoon
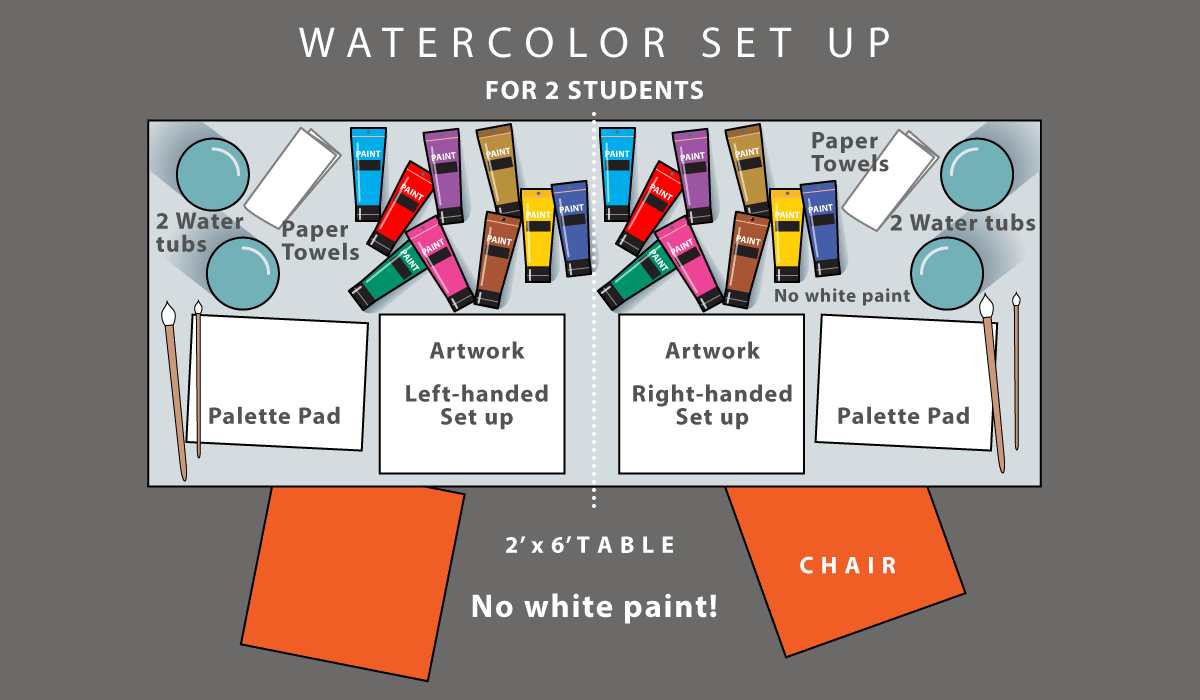
M A T E R I A L S
- Inked drawing
- Watercolors
- Markers
- Paper towels
- Water containers
- Brushes – Small
Paint pigment list:
- Napthol or Pyrrol Red
- Hansa or Light Yellow
- Pthalo Green (blue shade)
- Cyan or Cerulean Blue
- Ultramarine Blue
- Dioxazine Purple
- Magenta
- Burnt Umber
- Raw Sienna
9.1 paint
Keep the colors very simple, with only 4 or 5 main colors.
After drying, more layers can be added to create brighter colors and to add shading on the edges.
Use this button to jump down to the preparation section.
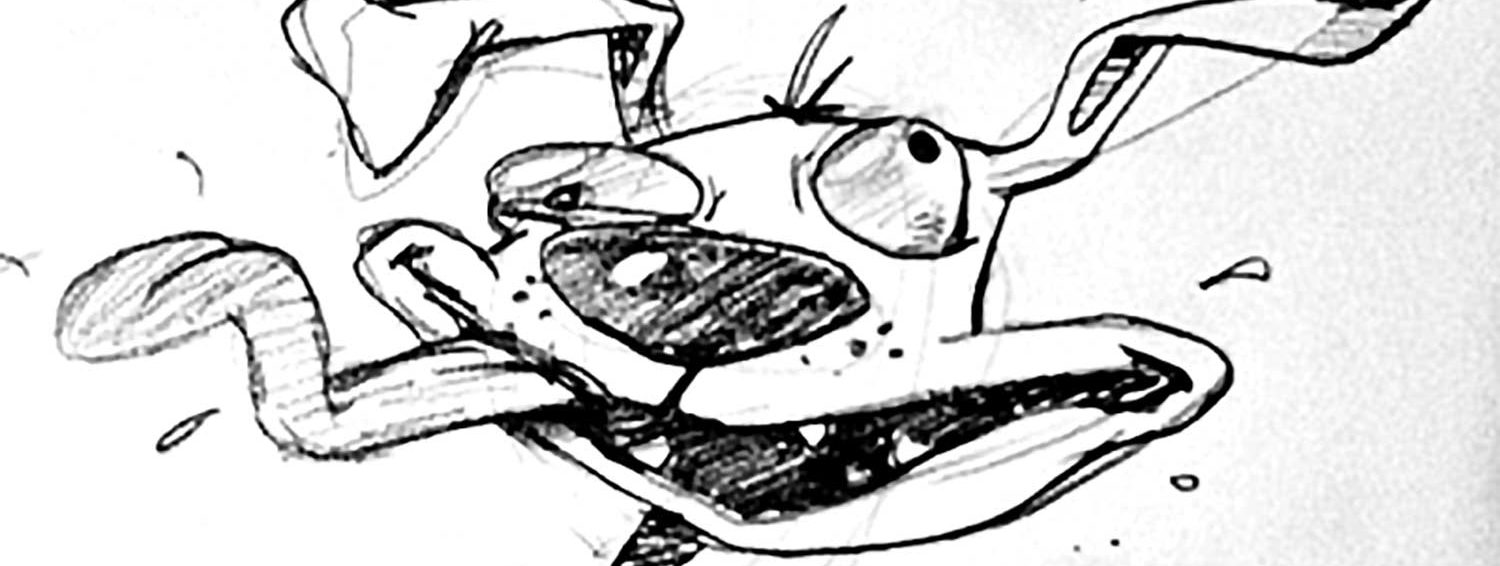
STEP 10. Hoppin' Crazy!
Extra for early finishers. Students will draw their characters with loads of expression! If TimeLEARNING TARGETS
Students know how to draw cartoons with a lot of expression
M A T E R I A L S
- 14″ x 17″ Sketch Paper
- 4B Pencil
- White Eraser
10.1 draw
Think of the keysigns and how they can be used. Also consider the action of the body.
Use this button to jump down to the preparation section.
LEARNING TARGETS
Students know the importance of cleaning up.
M A T E R I A L S
- Paper Towels
- Cleaning wipes
- Sink
- Waste baskets
- Well-lit spot for photos
- Camera or phone-camera
11.1 CLEAN
- Wash hands
- Super-wash brushes if used
- Put art supplies away
- Wipe tables & toss trash
- Remove any smocks (last)
- Check for items on floors and tables
11.2 PHOTO
11.3 CONNECT
%
Insights
This lesson provides understanding
%
Technique
This lesson shows application and movement
%
Self Expression
This lesson allows personal freedom
OBJECTIVES
- Practice and improvement drawing cartoon characters
- Understanding how simplifying and exaggerating helps a cartoon
- Accomplishment in making a finished ink and watercolor cartoon
- Fulfillment by creating the character from start to finish
TROUBLESPOTS
Negative self-talk – “I’m horrible at this” is something you never want to hear your students say to themselves, but it is all too common. If you see frustration and defeat in a student, ask what’s going on and try to help. If they say things about themselves that are false declarations of their value and abilities, there are several things you can and should do.
- Add the word, “yet” when hearing something like, “I’m not good”.
- Ask your student “would you say that to your friend sitting right next to you? No! of course not. You are not mean, and it’s not true. So why are you being mean and untruthful to yourself?” AND “Do you hold yourself to a standard that no one else can live up to?”
- Another statement: “It is impossible for you to be the artist you want to be by time-traveling to your own future. You have to learn to be that artist, and that means creating work that is called a ‘LEARNER’. You can’t time travel. It takes work. You must create art that you do not like.”
- “Artists are never born masters. Otherwise we would see museum pieces by baby Michelangelo, or baby Da Vinci.”
ART WORDS
Keysigns – This is an ArtSquish term we use to describe all the little cartoon elements that are used as symbols of extra meaning or actions, such as an exclamation point floating over a head to show surprise.
Stylize – When you take a realistic drawing and simplify it, and exaggerate elements such as size or outlines, this becomes a stylized work. If the work is also funny or shows people in a story-telling fashion, it is also called a cartoon.
Transfer – Any time that you move the art from one surface to another. Today we are using graphite on the back of a drawing to transfer it to new paper.
CLASSROOM
PREP
Print all of your PDFs from the lesson plan and cut any references apart as needed.
What your room needs
Here are your printable lists and room prep instructions.
Opens in new window
CLASSROOM
MATERIALS
- Markers
- Paper towels
- Water containers
- Camera or phone-camera
STUDENT’S
MATERIALS
- 14” x 17” sketch paper
- 4B Pencil
- White Eraser
- Ebony Pencil
- Watercolor Paper
- Blue Painter’s Tape
- Fine-tipped waterproof marker OR
- Dip pen with waterproof India ink
- Watercolors
- Brushes- small