

OVERVIEW
This is a great lesson for learning a basic concept for drawing accurately, but without the students getting bogged down in lesson concepts. When drawing it helps artists to be able to draw the air shapes (negative shapes) that are in-between other things. It doubles the information available for accurate drawing. A fence is used to plant the seed of this concept, and to make a striped colorful painting. Then we use it as a background for another project: a unique-looking black-line painting over it that looks like ink line art.– – –
Grades 1 & 2
September 9 – 13
1 Hour & 30 Minutes
Lesson At A Glance
A brief overview of each step. Buttons jump to each section for detailed information.
15 Min – follow the slideshow to create pencil guidelines.
5 Min – Students choose and mix paint colors
15 Min – Artists paint the air shapes around their fence
15 Min – Everyone paints their fence with a new color.
10 Min – Let students choose a still life to draw
15 Min – Paint the still life on top of the stripe painting.
5 Min – Everyone helps
Extra – If there is time
SCROLL & TEACH
LESSONPLAN
Each section is a different color. Read over once and then you can SCROLL & TEACH using any device you like. It’s designed to work best with your phone.
LEARNING TARGETS

Students know how to use their imagination to make art
M A T E R I A L S
- 11″ x 17″ Copy Paper
- 4B Pencil
- White Eraser
- Markers
- Oil Pastels
1.1 greet
1.2 draw
Ask them to work with one piece of paper for a while. If someone uses the phrase, “free draw”, explain that artists’ choice is something only artists can do, while free-draw is something anyone can do. You want to use the phrase to elevate the students’ expectations of their work.
Everyone should take their time with the work and make a finished piece of art. Limiting the paper can also help kids focus on the work. If someone finishes in super-fast time, ask them what more they can do to the existing paper. Ask again several times – unless they appear overly frustrated; then you can allow them to move on to a new work.
Use this button to jump down to the preparation section.
LEARNING TARGETS
Students know how to make guidelines using a straight edge
M A T E R I A L S
- 11″ x 15″ Watercolor Paper
- 2B Pencil
- White Eraser
- Wooden or plastic school rulers

airshapefence0
airshapefence1
airshapefence2
airshapefence3
airshapefence4
airshapefence5
2.1 draw
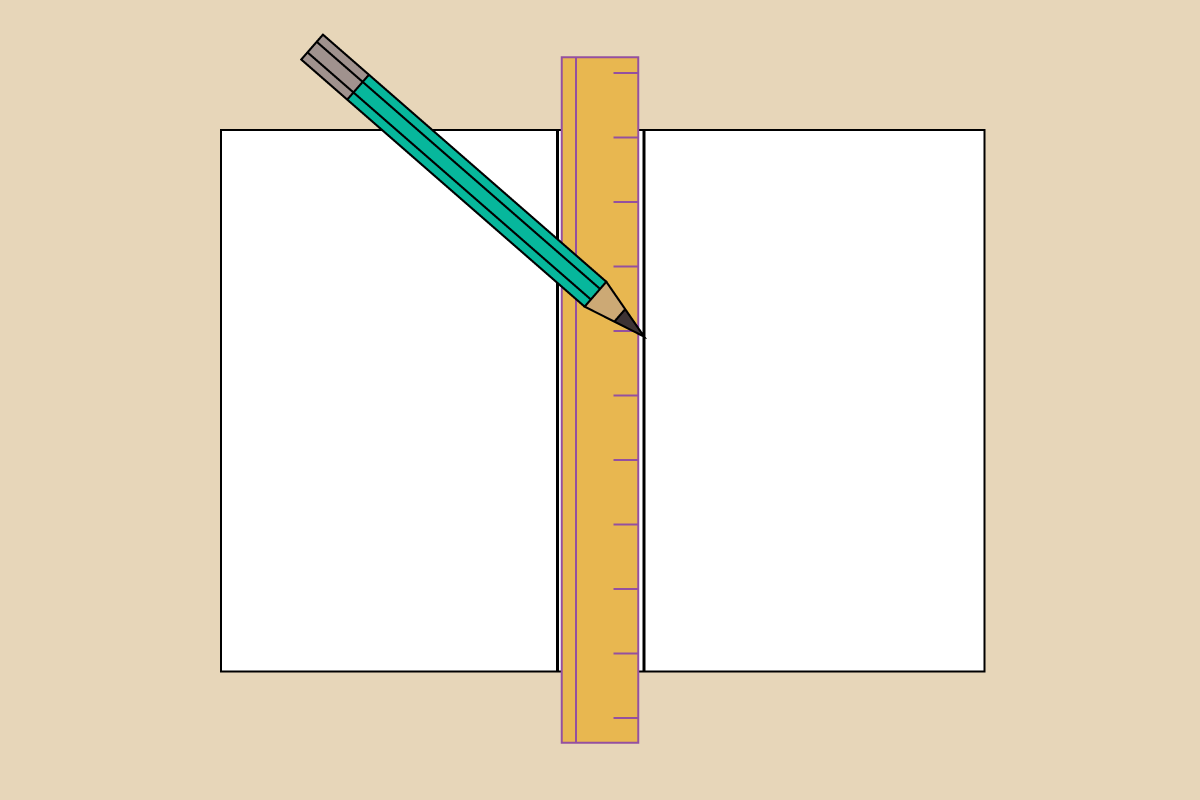
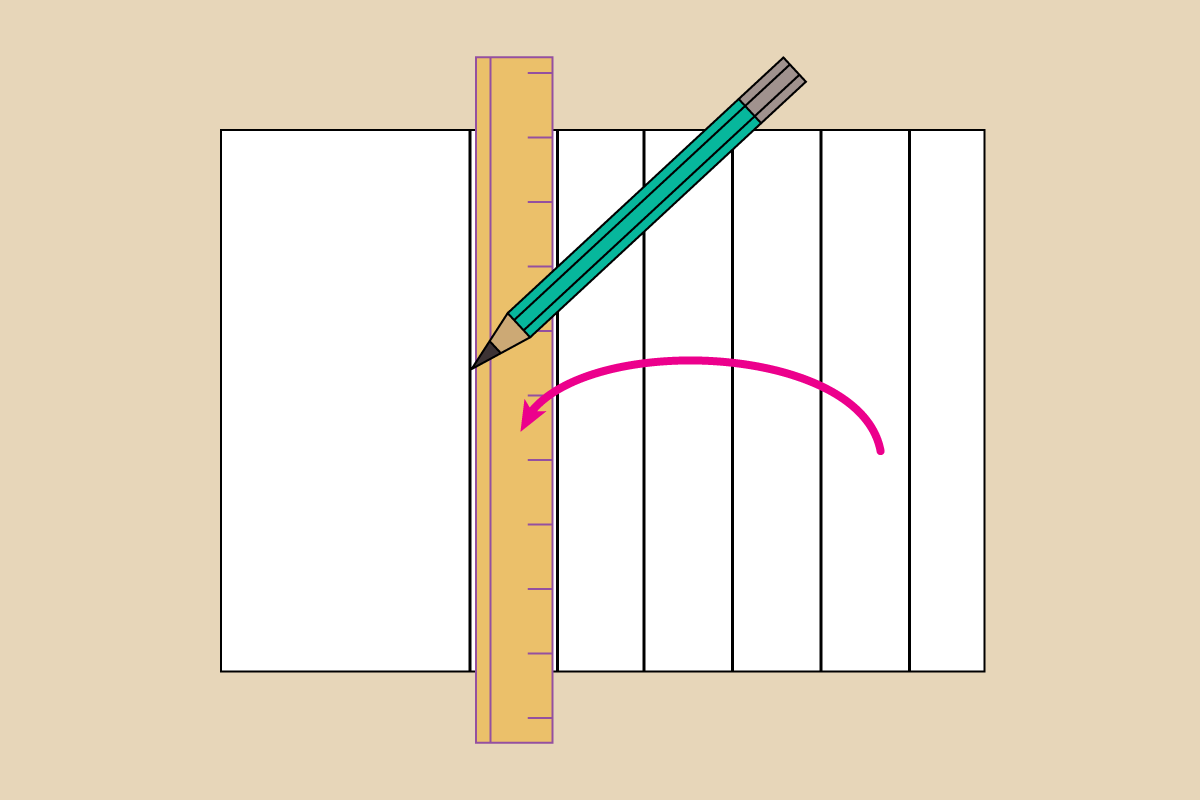
- Set ruler in center of page, in a vertical (up and down) position. It should go off the top and the bottom of the paper. Just try for the center, but be careful to make it straight up and down. (help kids get it straight)
- Hold the ruler down with one hand, and not letting it slide, trace a line from the top edge of the paper to the bottom, on each side of the ruler.
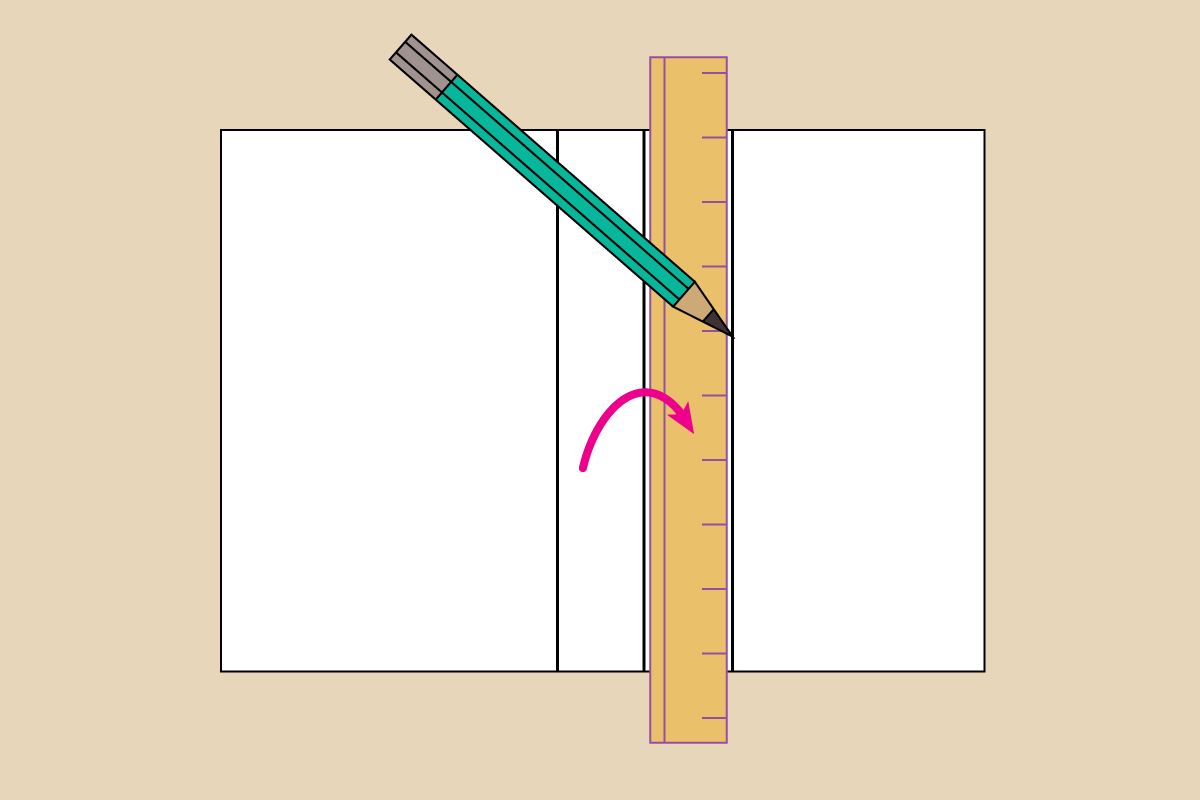
- Move the ruler to the right, and line up the left edge with the line you drew on the right side. Then draw a new line on the right side of the ruler.
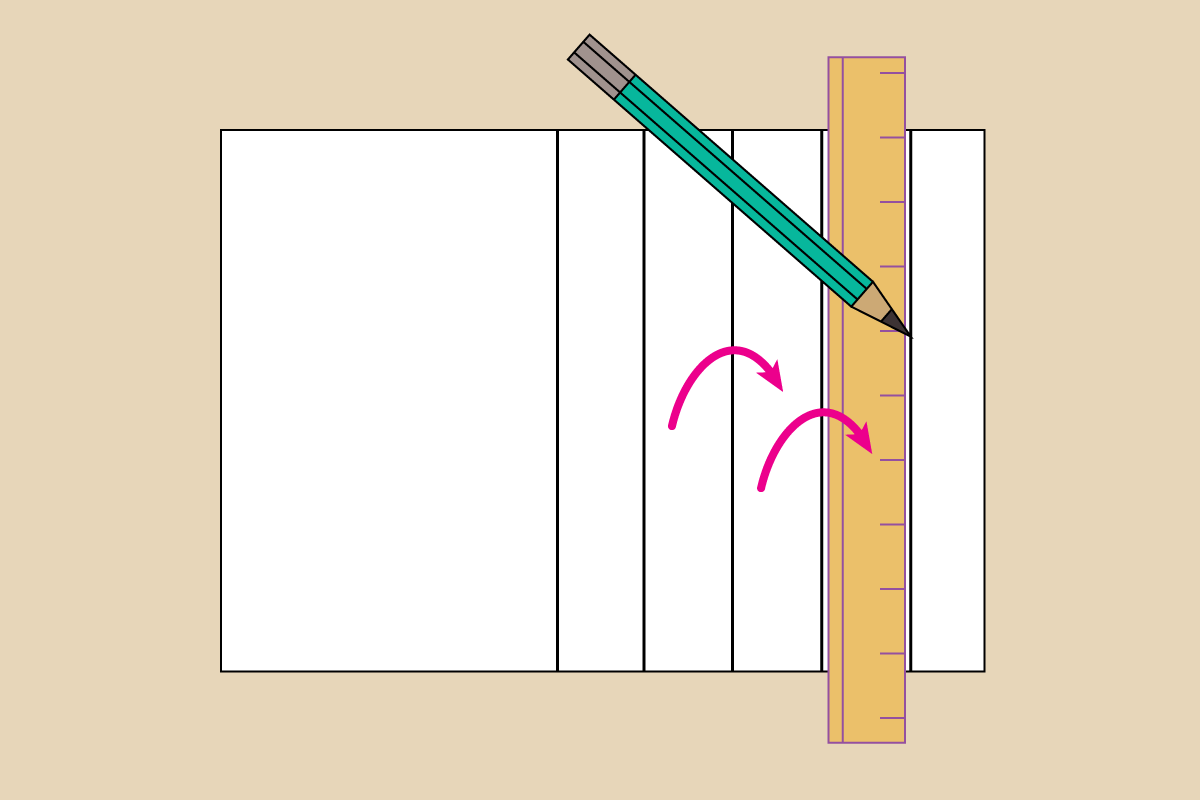
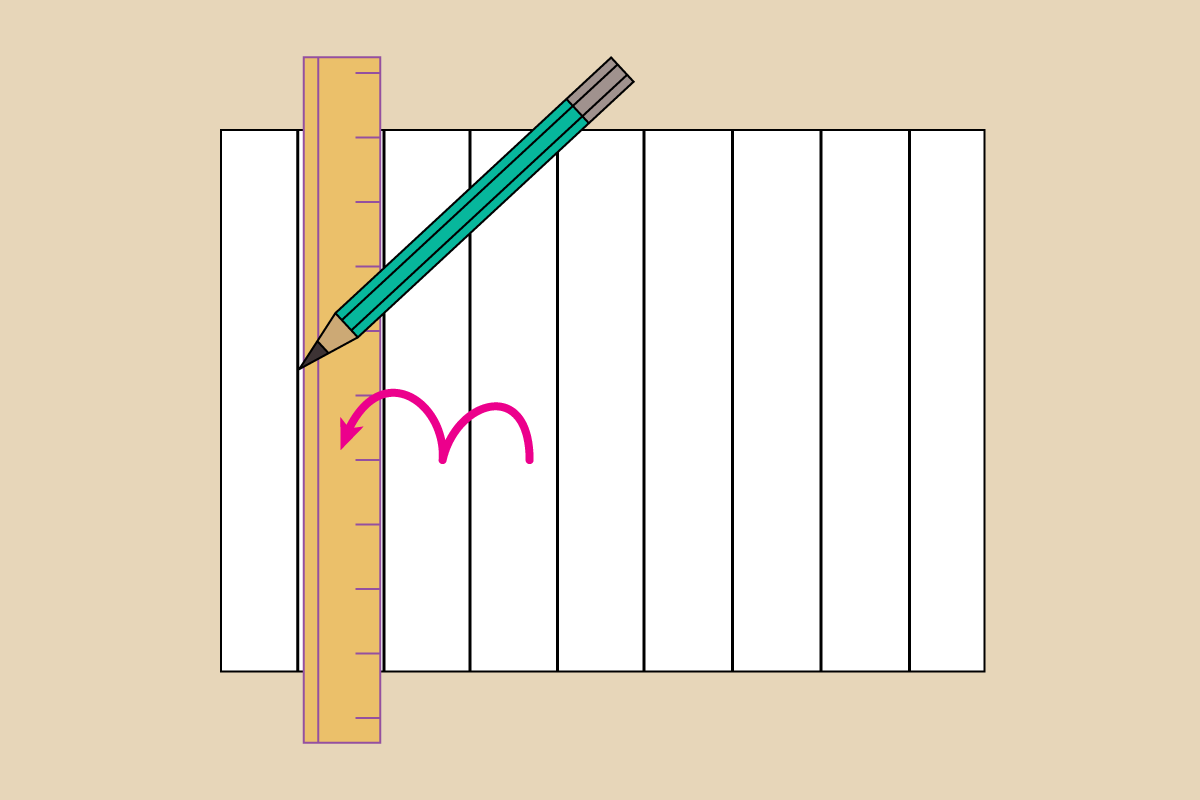
- Keep moving and drawing parallel lines until you run out of room.
- Place the ruler’s right edge on the line farthest to the left, and draw a line on the left.
- Keep moving the ruler to the left, and adding lines until you run out of room.
Use this button to jump down to the preparation section.
LEARNING TARGETS
Students know how to imagine “air shapes”
M A T E R I A L S
- 14″ x 17″ Sketch Paper
aircolor1
aircolor2
aircolor3
fencewood
fenceyellow
Sometimes the sky is blue, and sometimes it’s pink, orange, or grey. The sky changes to lots of colors at different times. What color do you want your sky to be?
aircolor4
aircolor5
3.1 ACTION
Do not let students use a nighttime sky color. We need bright daytime colors for this project to work. Every student is likely to choose blue. Don’t worry about it if they do. At this age they want their work to be predictable, not unusual.
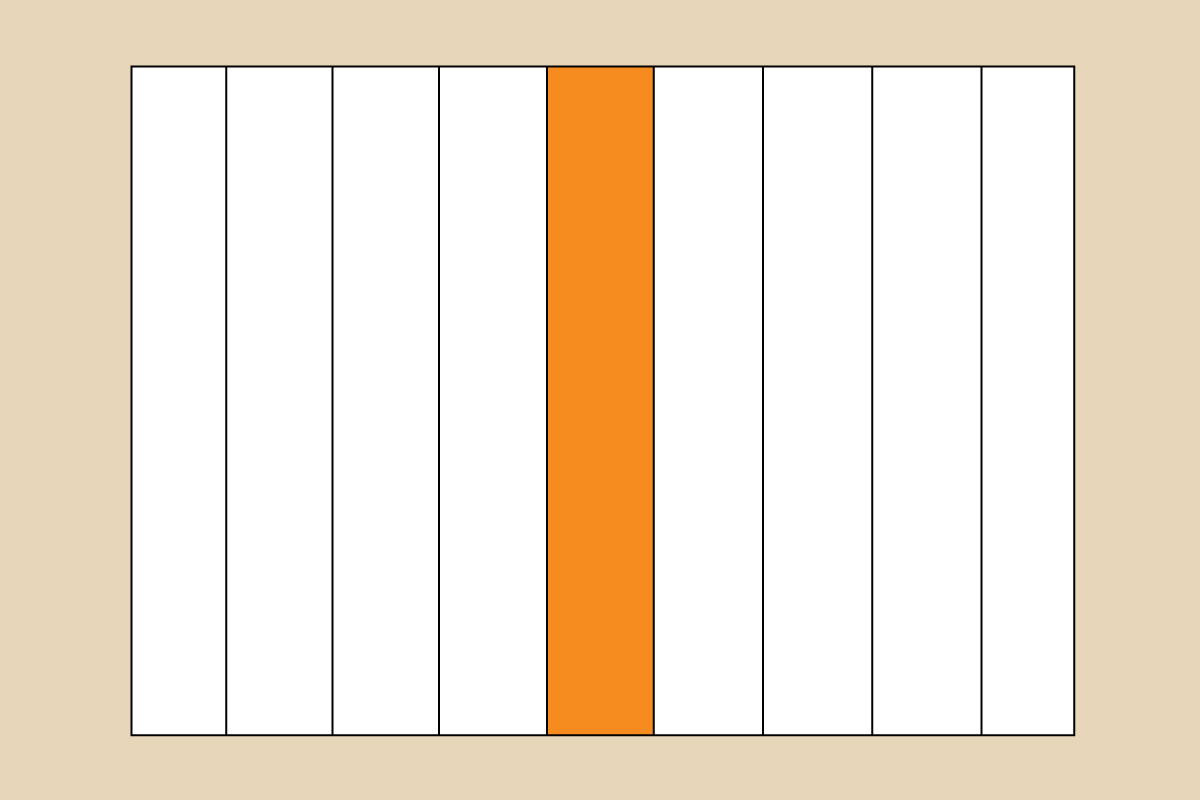
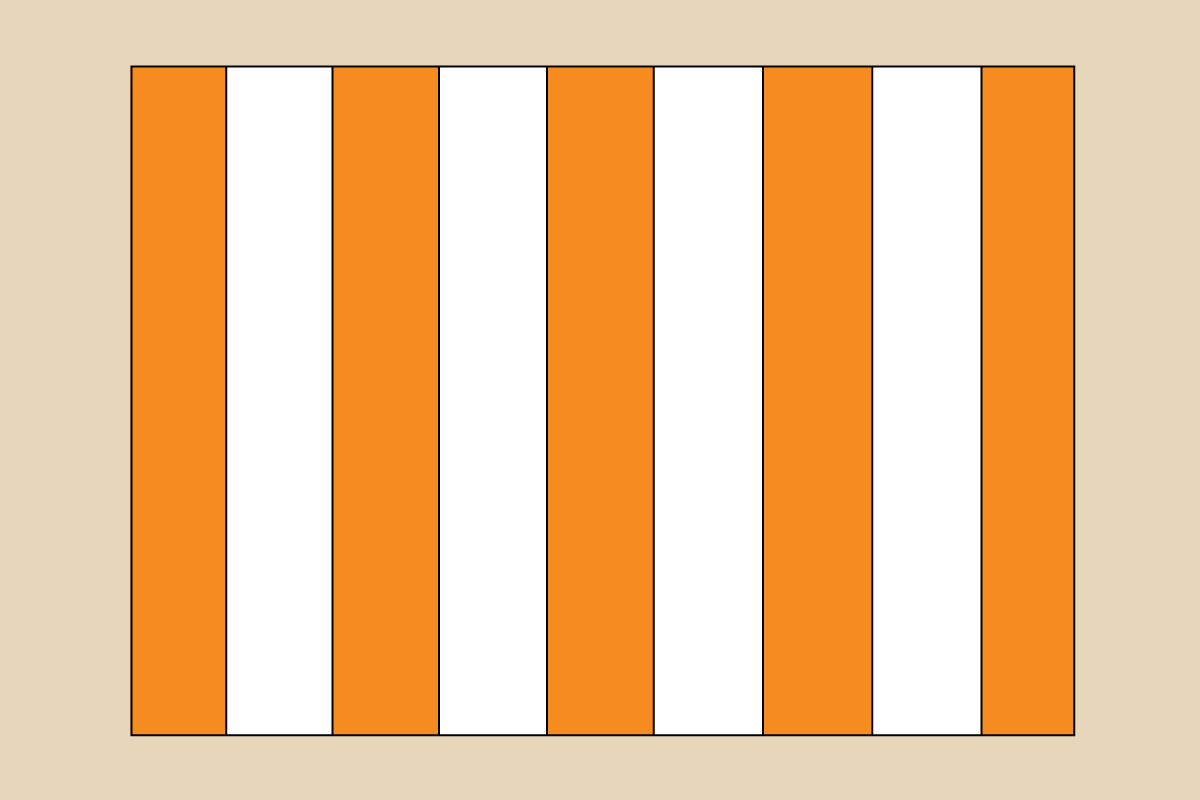
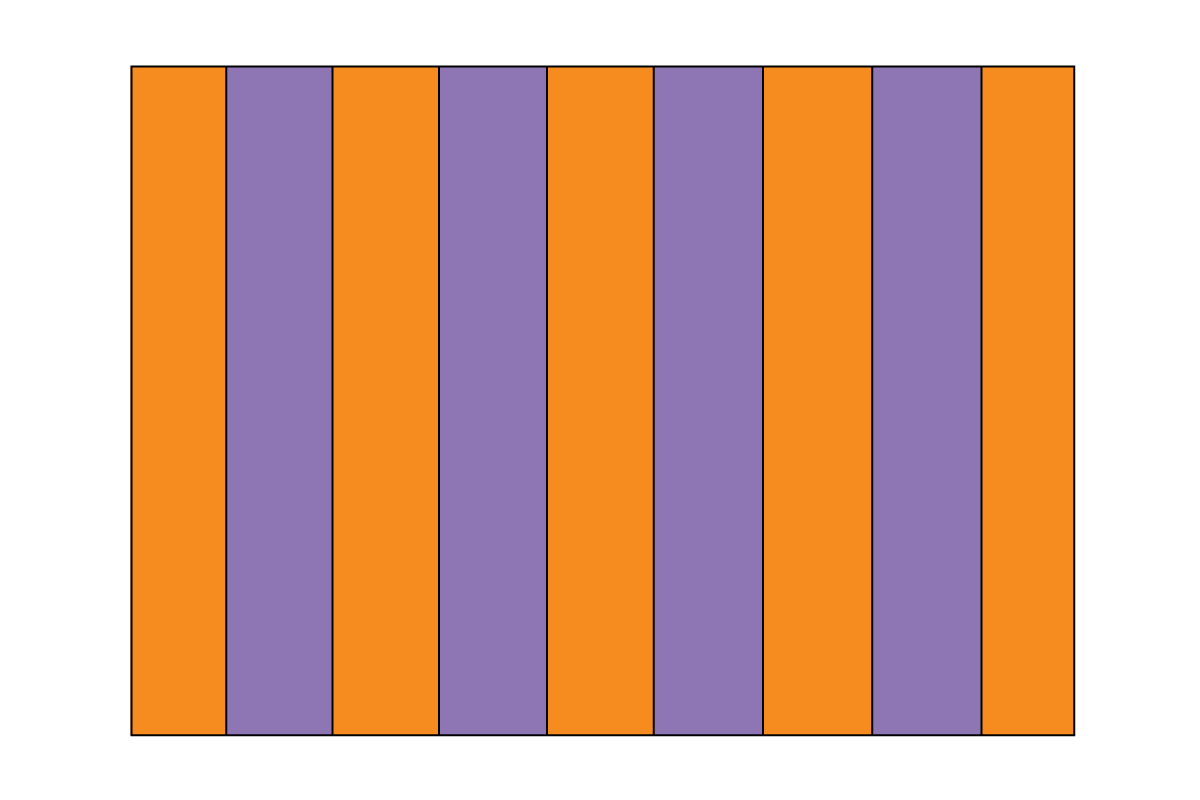
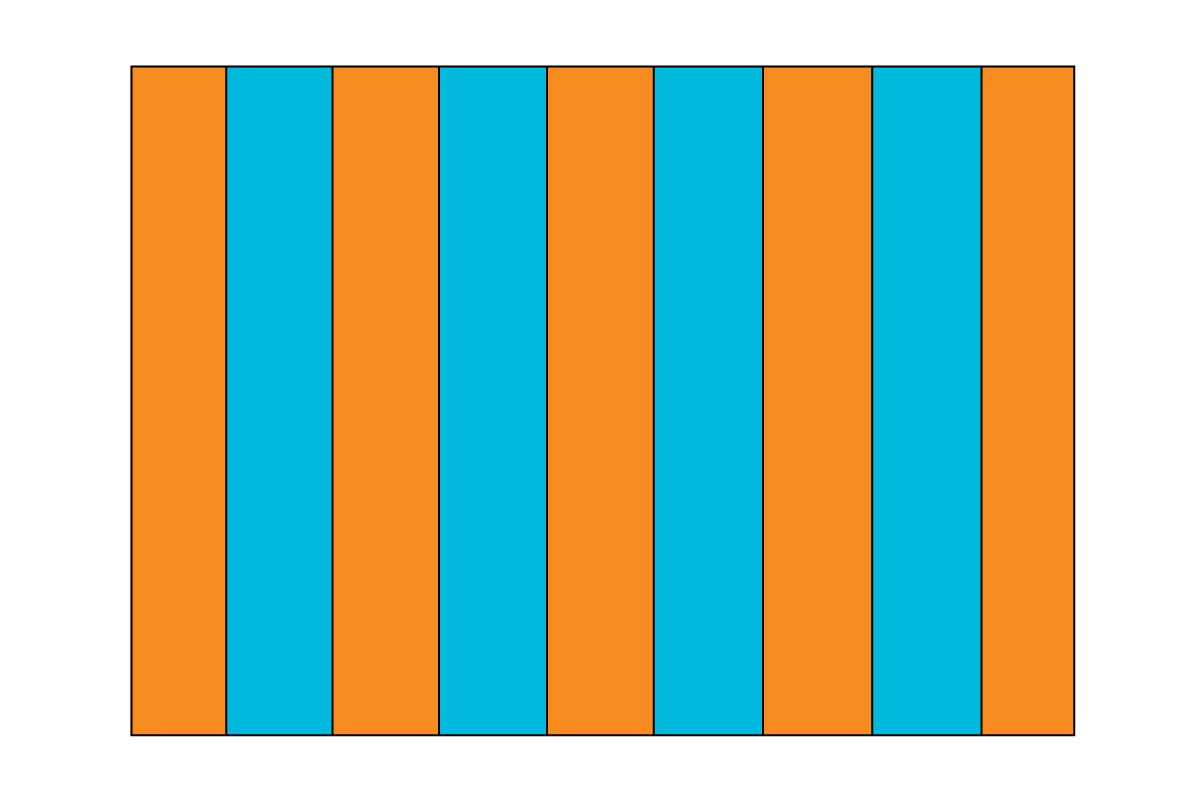
If you then skipped over a space and left it white, and painted the next area orange, you would have two orange stripes. They would be on a white background.
So what if you were painting a picture of an orange fence really close up? That would look like your orange stripes! Stripes and fences look a lot alike.
Now I want you to think about the spaces in between the stripes. If you have a fence, the spaces in-between are air. What color is air? Well, there is air between you and me, but can you see air? Nope, air is totally see-through, so you can’t draw or paint it. But what if you saw something else through the fence?
Like if you saw blue sky through the fence, the air in-between the fence pieces would be that blue color. So you CAN see air shapes and air colors. They are just a little harder to think about.
Sometimes the sky is blue, and sometimes it’s pink, orange, or grey. The sky changes to lots of colors at different times. What color do you want your sky to be?
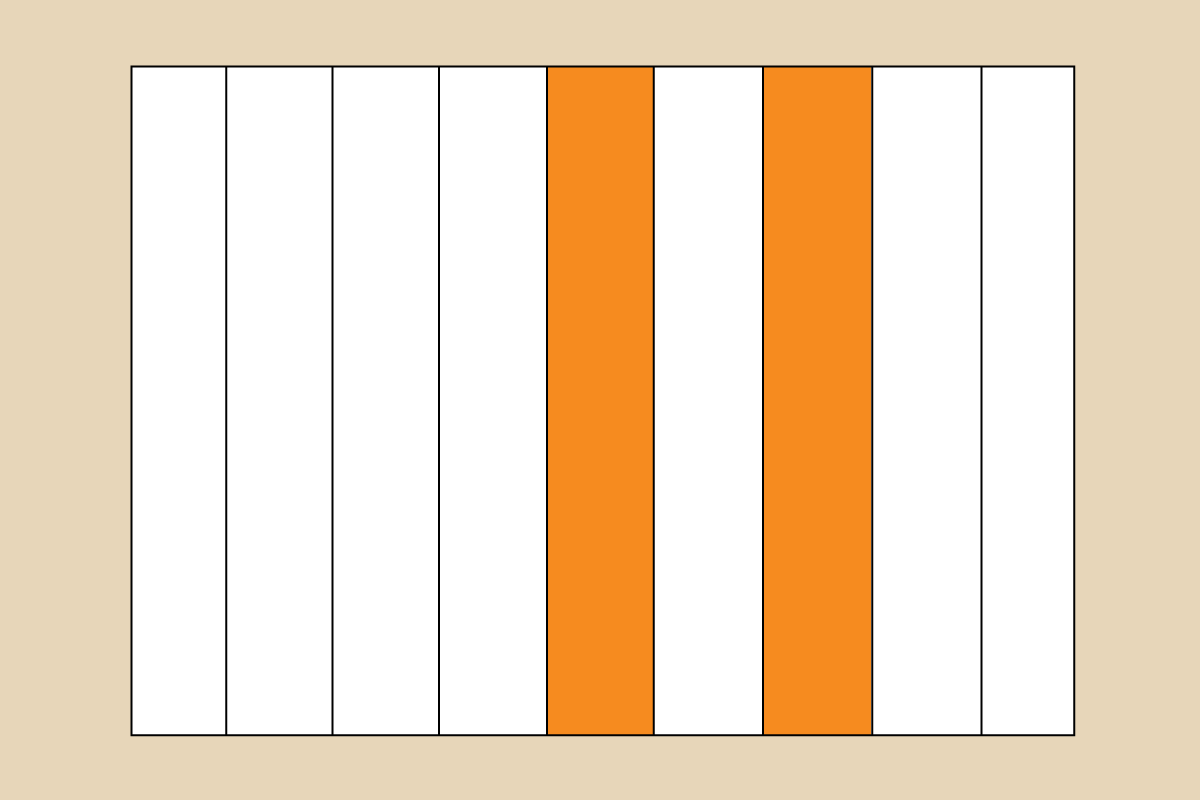
If your fence was orange, and the sky was purple, you would see orange stripes on a purple background, right?
If you could see the sky, and it was blue, you would have orange and blue stripes.
Now I want you to decide your own colors. Think about the sky, or your air shapes first. What color do you want to paint your air shapes, where the sky color shows through? You will also paint your fence later, and it can be any color you like too.”
Use this button to jump down to the preparation section.
LEARNING TARGETS
Students know how to set up their work area for painting.
M A T E R I A L S
- Tempera Paint
- Medium/Large brushes
- Paper towels
- Water tubs
- Smocks
Brushes should be nylon for springiness and durability. Round brushes are the most versatile.
Paint pigment list:
- Napthol or Pyrrol Red
- Hansa or Light Yellow
- Pthalo Green (blue shade)
- Cyan or Cerulean Blue
- Ultramarine Blue
- Dioxazine Purple
- Magenta
- Burnt Umber
- Raw Sienna
- Titanium White
4.1 setup
Mixing
As students ask for colors, you can place the paints in their tray so they can mix it. Sky blue would be a blob of light blue, and a small dab of white, for instance. Orange would be yellow, a small bit of red, and a small bit of white. Mix a small amount of white into your colors so they are lighter, yet still bright.
Make sure you don’t put too much paint out. You want the stripes to dry fast, so the paint needs to be spread out evenly and without globs. If your paints are thick, you might add just a small touch of water.
Do not set out the water until students are finished with a color, so they don’t water down the paints by accident.
Use this button to jump down to the preparation section.
LEARNING TARGETS
Students know how to paint with tempera
M A T E R I A L S
- Tempera Paint
- Medium/Large brushes
- Paper towels
- Water tubs
- Smocks
5.1 paint
Students paint every-other stripe as the air between the fence slats. Reinforce the idea that this is the sky color they chose. Keep a blow dryer handy and help students spread their paint thin enough so that it dries fast for continuing with the fence color in the next step.
Wash and dry brushes at the end. Clean up if you’re dividing the lesson into two parts. Save the plates/trays for Step 6 and 8.
Use this button to jump down to the preparation section.
LEARNING TARGETS
Students know how to paint with tempra
M A T E R I A L S
- Tempera Paint
- Medium/Large brushes
- Paper towels
- Water tubs
- Smocks
6.1 paint
Everyone can paint their fence to finish the painting. As they work, reinforce the idea that now they are painting a solid object, where before, they were painting the air.
When they are all close or finished, go around and ask individuals what their painting would look like if it was reversed. Such as a blue fence in front of a sunset yellow sky (instead of yellow fence on a blue sky), or if they painted their fence red, a blue fence in front of a red house. If this doesn’t work, that’s ok. The goal is to get them thinking a little bit.
You’re just planting seeds today, worry about making sure they understand the concept because it can be hard for them.
Clean up all the paints, but make sure to save the plates or trays for use in Step 8.
Use this button to jump down to the preparation section.
LEARNING TARGETS
Students know how to draw from still life
M A T E R I A L S
- 14″ x 17″ Sketch Paper
- 2B Pencil
- White Eraser
7.1 Print
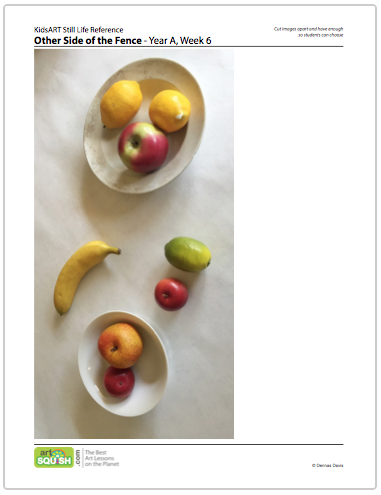
Reference
Still Life Reference
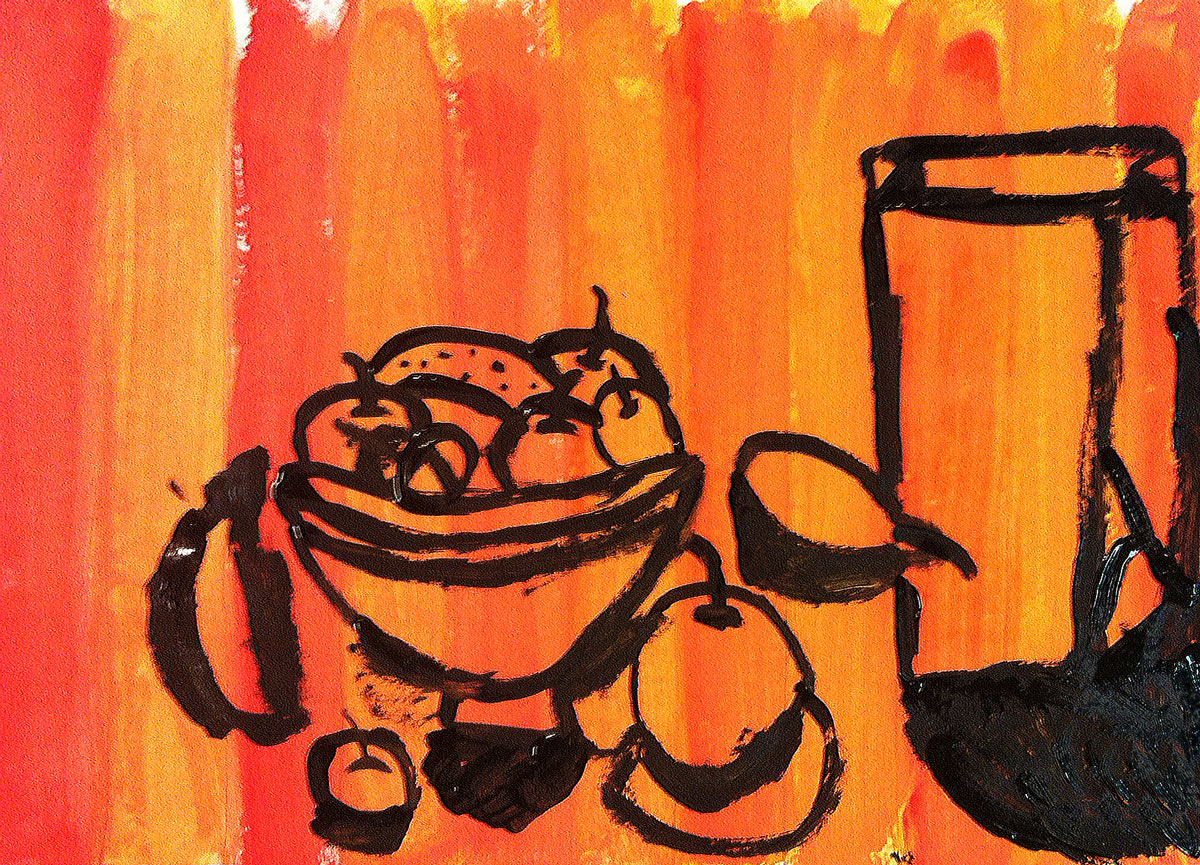
Two pictures of bowls and fruit, looking down so they are simple shapes.
2 Pages – Opens in new window
7.1 draw
It is great to have real fruit and bowls if you can set these up. Kids like drawing the round shapes from life. If you can set up a still life that looks like the photo, or even take some photos of your own set up and then print them, it can really help a student see the realistic shapes better. They can look at the real life, and then compare to the photo. There are many different views from places around a table, so you may want to have enough objects so that everyone can see something similar to what their photo shows.
Even having one apple or banana to compare, will help.
Explain that you will work on a drawing while the paint dries. Have them draw their still life nice and big on the paper, and not to shade. Just draw the lines as shown on the reference pages. This is only a quick practice. Help students notice how you can see the tops of the fruit and bowls.
Make sure you point out how the stems overlap into the top of the fruit shapes. Then there is a dot or line to show the little hole.
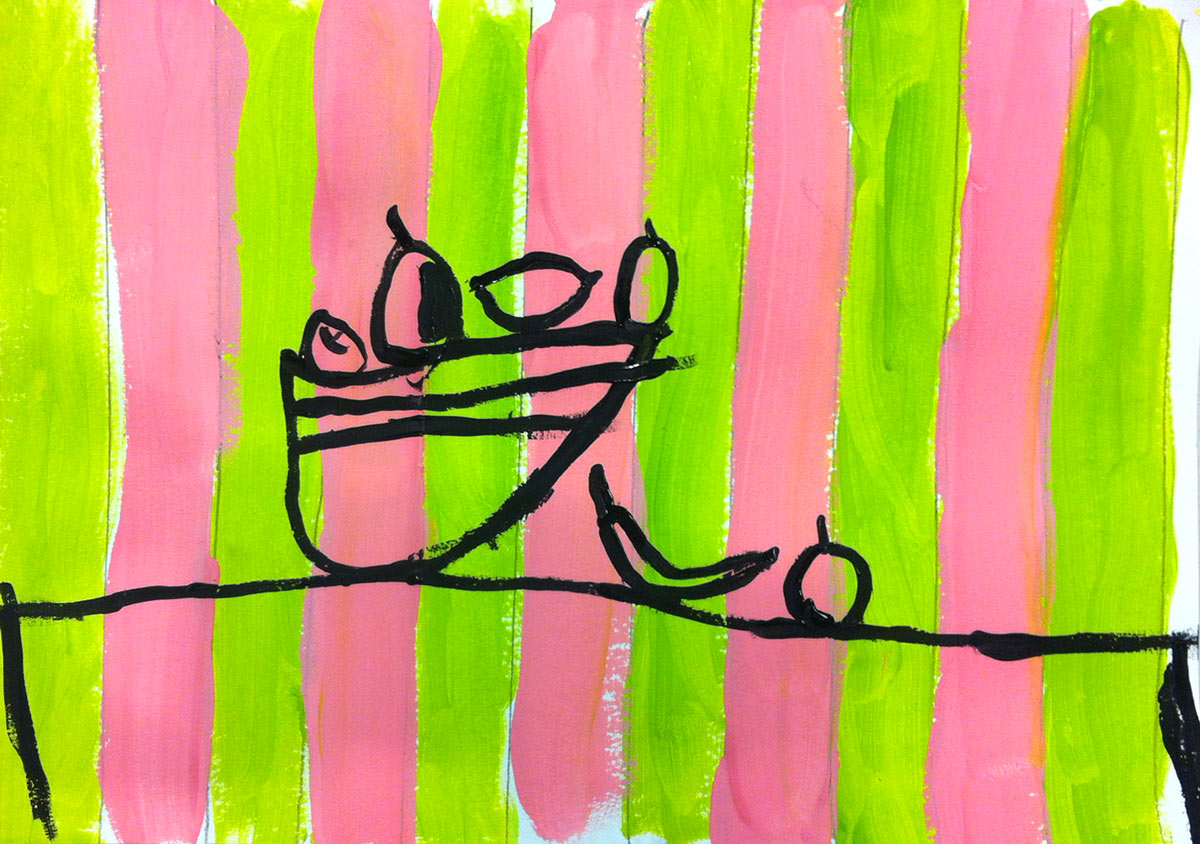
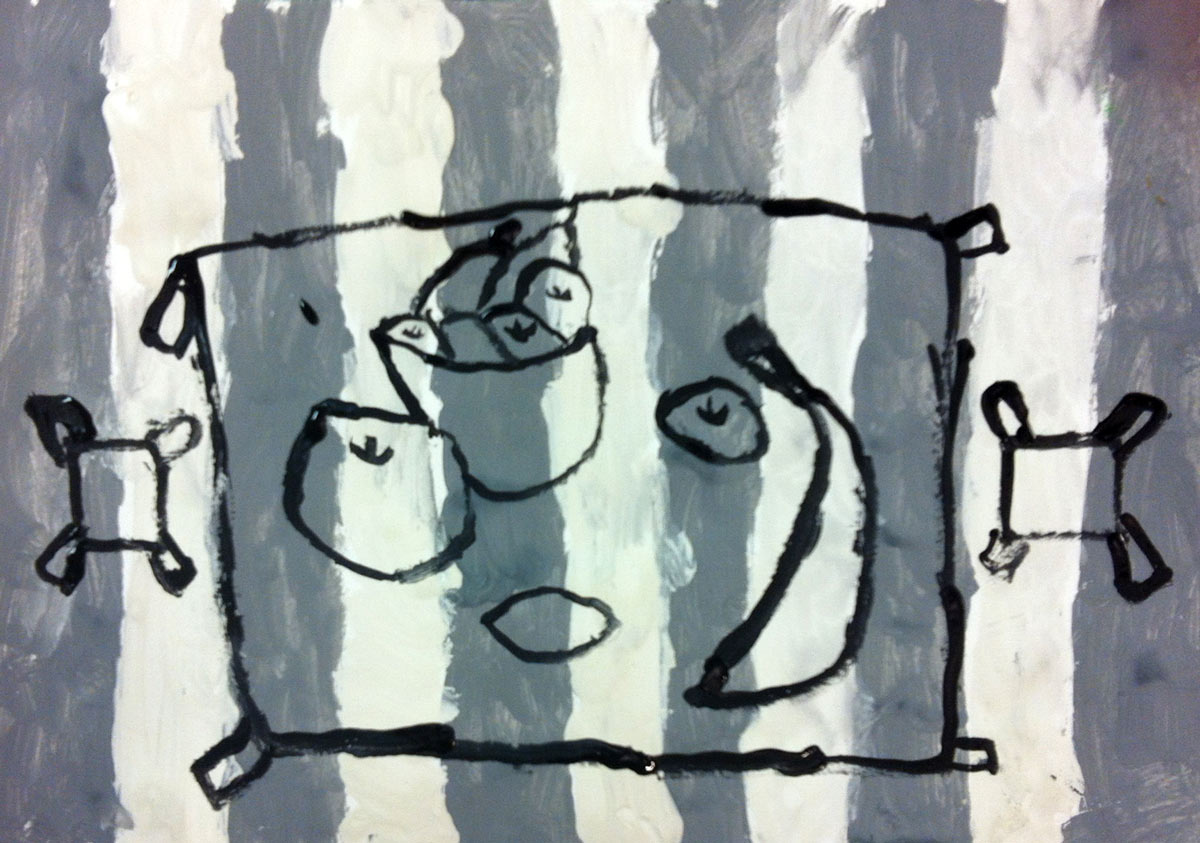
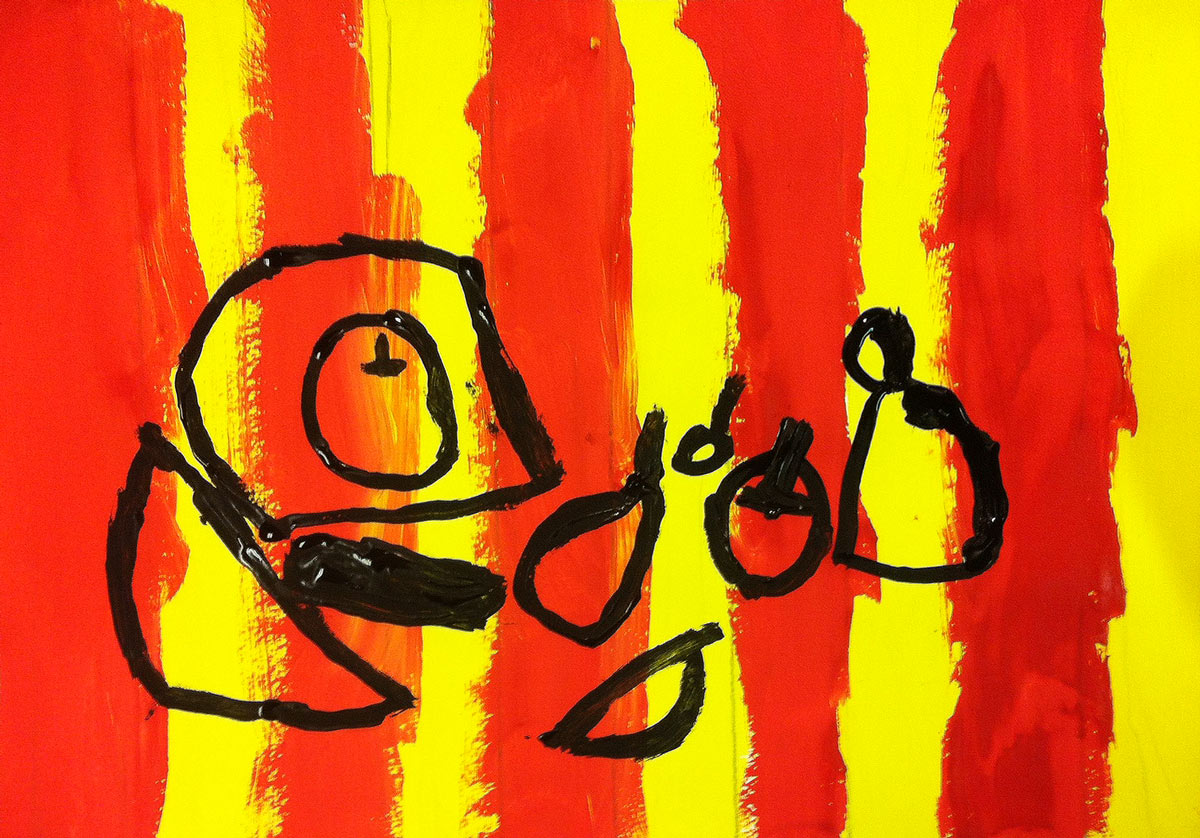
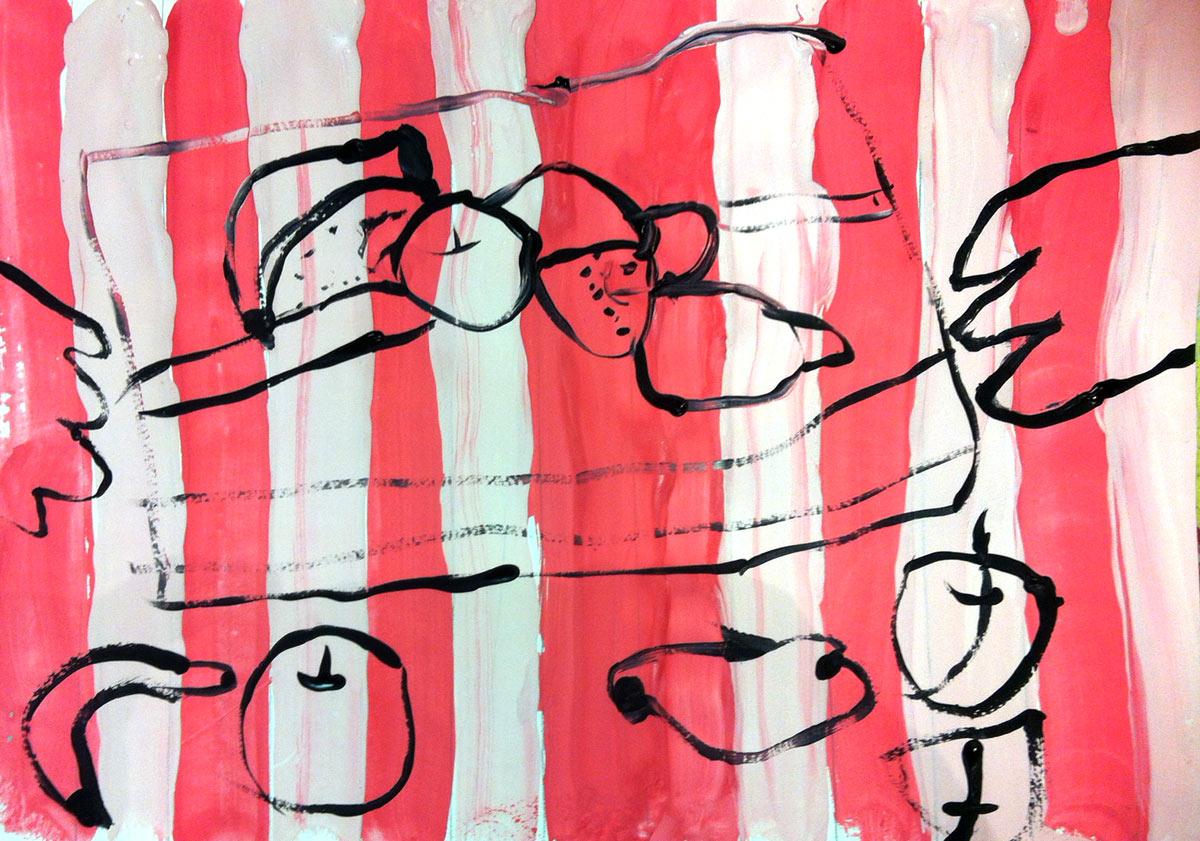
As they work, explain how the fence painting is going to be magically changed! We’ll use it as a striped background for a still life painted drawing on top of it. Show the example below.
Use this button to jump down to the preparation section.
LEARNING TARGETS
Students know how to create details with paint
M A T E R I A L S
- Black Paint
- Small brushes
- Paper towels
- Smocks
- Water tubs
8.1 paint
Use this button to jump down to the preparation section.
OBJECTIVES
- Practice and improvement using visual observation
- Understanding that the air around an object also has a shape
- Accomplishment in creating a finished graphic-style painting
- Fulfillment by choosing a color scheme and design elements
TROUBLESPOTS
“I can’t see that” – It’s ok if your student says they don’t see something that is very obvious to you, and maybe even to others in the class. Explain that it’s hard to see at first, but after you practice looking, you’ll see these things for sure later on. Try to prevent anxiety over not being able to see things. You can call them a “trick on the eyes”.
ART WORDS
Air Shapes – The shape that a space makes, such as a hole in a donut, which is roundish but may be lopsided. Artists can draw more realistic if they draw the donut, but look at the shape of the air, or the hole in the middle of the donut. You can draw a cup by looking at the shape of the opening at the top, and the shape of the hole in the handle. These are both air shapes.
Classic art curriculum calls these “negative shapes”, but young people cannot quite grasp that very abstract concept. It is much easier to understand if you do not use the term negative space.
In today’s lesson, we use the idea of drawing what’s on the other side of the line, or the other side of the fence in this case, to get kids thinking about air shapes for the first time.
CLASSROOM
PREP
Print all of your PDFs from the lesson plan and cut any references apart as needed.
What your room needs
Here are your printable lists and room prep instructions.
Opens in new window
CLASSROOM
MATERIALS
- 11×17” Copy Paper
- 11” x 15” Watercolor Paper
- 2B Pencil
- 4B Pencil
- White Eraser
- Markers
- Oil Pastels
- Wooden or plastic school rulers
- Tempera Paint
- Medium/Large brushes
- Paper towels
- Water tubs
- Smocks
- Cleaning Wipes
- Sink
- Waste Baskets
- Camera or Camera-phone
PREVIEW
Week 5: Chicken Day
Students have fun with a playful subject, underscoring the fact that “the joy of an artist will be evident in their finished art”. The concept of negative space is revisited (this abstract term is replaced with concrete language). Students learn to draw on “both sides of the line“, and draw the air inside a vase handle.
Week 6: Cut Flowers
Students use drawing skills to create a large vase and flower collage with mixed media: Oil pastels, kraft paper, cutting, and glueing. Strong composition is taught as they apply the shapes they’ve drawn and cut.