
OVERVIEW
Students will learn (or review) symmetry and how it relates to balance. They’ll stand on one leg to experience balance, and then create two artworks; one with vertical symmetry and one that’s horizontal. First they’ll draw and color an animal face using a step-by-step guide, and then a boat with a reflection. The reflected part is smeared with a white pastel to make a watery effect.– – –
Grades k – 2
January 13 – 17
1 Hour & 30 Minutes
Student Work
HOW TO USE THE LESSON PLAN
This is going to be easy. Just spend a few minutes reading the lesson plan and printing out any of the PDFs that are included. Then check out the READY, SET, GO! section for specific instruction. You can print your prep-page, which includes checklists and an “at a glance” outline of the lesson so you can stay on track when you’re teaching. Set out the materials (from the list) and you’re ready for class.
Every section is a color, so you can easily stay in place and move through the lesson at your own pace.
That’s all you need to know. Use your smartphone to Scroll & Teach!
Lesson At A Glance
Here’s a brief overview of the complete lesson. It’s also on your prep page in the Ready, Set, Go! section (below the lesson).
Colored buttons jump to each section in the full lesson plan below.
15 Minutes – Artists’ Choice
7 min – Review & balancing objects
15 min – Step-by-step drawing
8 min – Students stand in positions
15 min – Fill Antelope with expressive color
15 min – Draw & color boat – top half
15 min – Draw & color reflections
3 min – Smear reflection colors
2 Min – Everyone helps
Use this button to jump down to the preparation section.
SCROLL & TEACH
LESSONPLAN
Each section is a different color. Read over once and then you can SCROLL & TEACH using any device you like. It’s designed to work well with your phone.
LEARNING TARGETS

Students know how to use their imagination
M A T E R I A L S
- 8.5″ x 11″ copy paper
- 2B Pencil
- White Eraser
All materials are suggestions and may be modified as you see fit. We have tried many items, and these seem to allow the most versatility for the cost.
1.1 Greet
Greet students as they come in and help them choose a chair.
Kneel down so that you are on their level. Bending over emphasizes the differences in your height, while kneeling makes them feel more important. Have tape and marker ready so you can stick some tape on the table by each student and write their name on it as they sit down.
1.2 Choice
Encourage students to work with one piece of paper for a while. If someone uses the phrase, “free draw”, explain that artists’ choice is something only artists can do, while free-draw is something anyone can do. You want to use the phrase to elevate the students’ expectations of their work.
Everyone should take their time with the work and make a finished piece of art. Limiting the paper can also help kids focus on the work. If someone finishes in super-fast time, ask them what more they can do to the existing paper. Ask again several times – unless they appear overly frustrated; then you can allow them to move on to a new work.
Use this button to jump down to the preparation section.
LEARNING TARGETS
Students know how to identify symmetrical balance
M A T E R I A L S
- Ruler
- 2 objects that are the same (like juggling balls, small books, or small paint bottles)
- Large paint bottle
“If you think back, a week (or a few weeks) ago, we looked at artwork using a mirror. Do you remember that? Does anyone remember the word we use for mirror images? (wait and see)… “symmetry!” Things that are the same on both sides, like a reflection, is called symmetry.
It seemed to look perfectly balanced too. We call that symmetrical balance.”
2.2 teach
“This ruler is balanced on the bottle top. Is this symmetrical balance? Yes! it is.
If I put an object like this small (book) on one side of the ruler, it is no longer symmetrical. What do you think will happen when I let go? You’re right, it falls over, taking the ruler with it!
That means it is not balanced. If I balance it, it won’t fall over. I can put another (book) on the other side, and look, because of the symmetry, it’s also balanced. When you draw or paint something, it looks a little weird if you don’t show things that appear to be balanced. If it would fall over in real life, than people are alarmed if it’s painted that way. One of the biggest things that artists use to make artwork look good to people, is to have balance. There are other ways to balance, but the simplest way is to have symmetry. Symmetry is always balanced.”
Use this button to jump down to the preparation section.
LEARNING TARGETS
Students know how to analyze and simplify visual shapes.
M A T E R I A L S
- 8.5″ x 11″ card stock paper
- Antelope Face PDFs
- Reference stand (see picture following)
- 2B pencil
- Eraser
Reference Stand
Make inexpensive stands by attaching cardboard easel-backs to leftover cardboard like the backs of used-up art pads. Use clothespins or art clips to attach reference. The button links to some cheap easel-backs on Amazon. (Opens in new window.)

3.1 Print
Reference
Antelope Face
Print enough for each student to use as a guide.
Hand out reference prints.
Attach them to stands for easy viewing if possible.
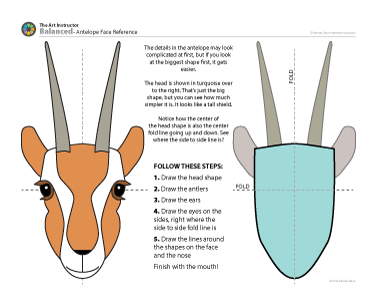
1 Page – Opens in new window
3.2 prep
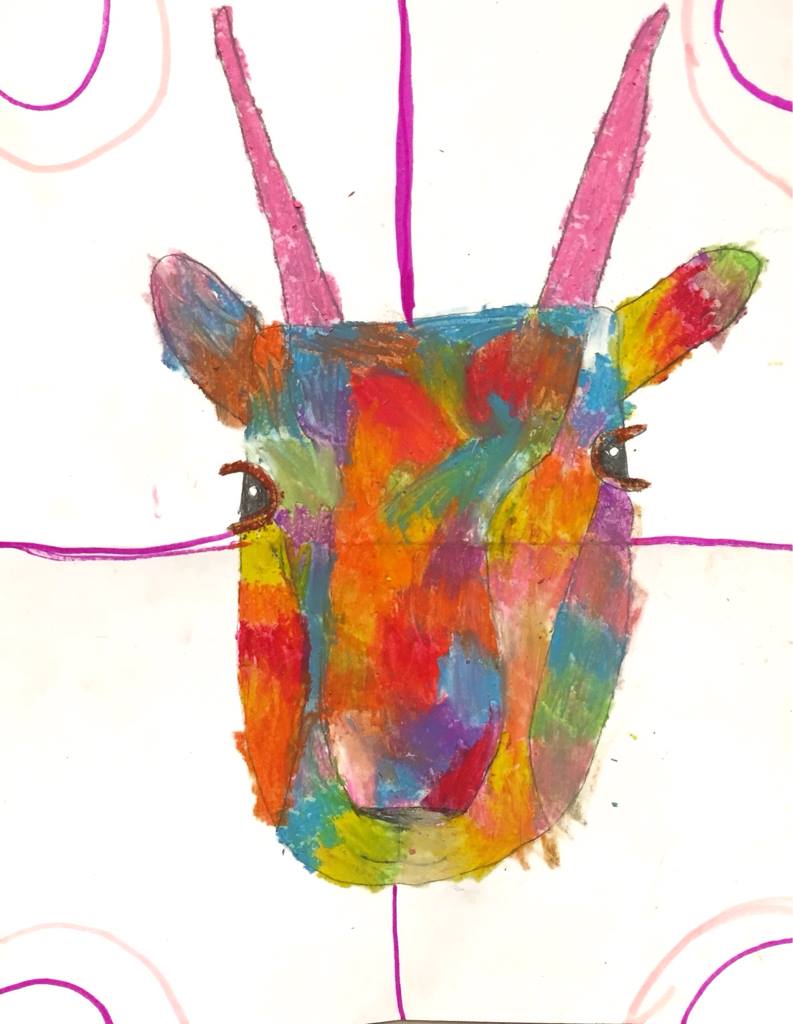
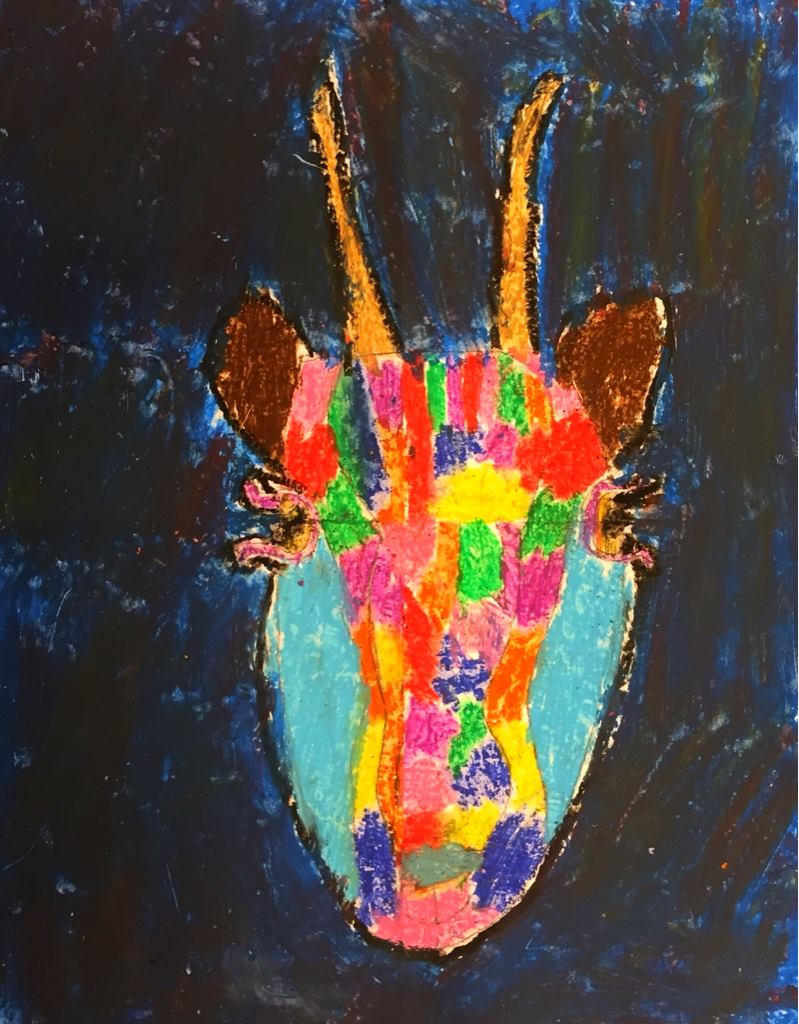
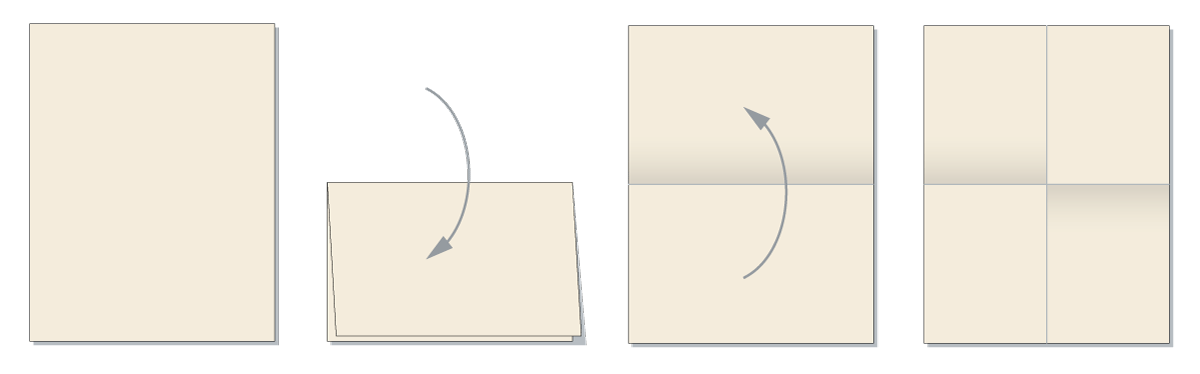
Animal faces reference – Students will draw it using the handouts. Fold paper in half, and in half again, to get 2 center guidelines – vertical and horizontal. Eyes are on the horizontal lines and on the sides of the head. Artists can choose if they would rather use a light marker or a pencil for the big shapes.
Use your copy to explain the instructions and take it slowly, step-by-step
3.3 prep
Have everyone place their paper in the shower position (vertical), and fold their paper in half. Open it back up. Turn it sideways to bathtub (horizontal), and fold it in half again, so that you get a cross fold. It will look like a window pane with 4 equal sections.
You can turn it back to shower position now, so that it works with the tall antelope face image.
3.4 draw
Make sure no one does shading or black areas with the pencil. We’re going to fill these in with oil pastels later. Tell students they will draw lines only, and it should look like a coloring page does before you do any coloring.
Steps:
- Draw the biggest shape of the head using the up and down fold line as the center
- Draw the medium shapes of the ears and the antlers
- Draw the eyes on sides of the face where the fold line that goes side to side
- Draw the rest of the outlines of details like the nose and mouth
If students are having trouble breaking down the smaller details such as the white lines or the eyes, try to simplify them. For example, the air space of the orange on the forehead looks like a number 8 or a vase. Picturing those shapes will help students draw accurate lines.
Use this button to jump down to the preparation section.
LEARNING TARGETS
Students know how to understand balance
4.1 stand
Have students stand up, behind their chair or along the wall. Because arms will be held out, students will need to make sure they have room around them. Have every other student (count off if you need to) take a step back or forwards, depending on what works best. Then they’re all staggered and have room to each side.
Explain that shifting weight will balance, but for symmetrical balance, everything is always the same on both sides.
“I’m going to have you stand in different positions and check your balance.
Remember that pictures need to feel balanced. You’ll know when you feel balanced standing in different positions, and you can usually feel if something looks balanced too when you look at it. Ok. Let’s try these positions…
- Stand up straight, arms down to sides. Feel balanced? Of course.
- Hold arms straight out. Feel balanced? You should, because you have been symmetrical for both of these positions.
- Move one arm over to the other side, still up and lean over that way a little. You should feel less balanced and you can’t lean too far or you’ll fall.
- Hold both arms out to each side like before and on leg way out. Now you feel a little unbalanced again. Most of you wobbled and had to lean over a bit. If you lean towards your outstretched leg, you get more unbalanced, but if you lean away from it it balances you out again.
- Now go back to being symmetrical. That’s relaxing because it’s balanced!
Symmetry is the simplest and easiest way to have balance in your artwork, but there are other ways too.”
Use this button to jump down to the preparation section.
STEP 5. Pastel Colors
Students will return to their animal drawings, using oil pastels to blend expressive colors into each area. 10 MinutesLEARNING TARGETS
Students know how to draw and color expressively
M A T E R I A L S
- Paper with animal face drawing
- Reference photo on stand
- Oil pastels
- Blending sticks (stumps)
- Paper towels
- Cotton tipped swabs
- Linseed oil (very small amounts)
- bottle caps or small mixing cups to hold a few drops of oil
- Smocks
5.1 teach
“Using bright colors that we don’t normally see in these animals make them really fun to paint and look at. When an artist does something that looks different than real life, we say the artist is expressing themselves. Some artists are called expressionists because they do this a lot. Let’s try being expressionists now! Use bright colors and blend several together.
Make sure that you never mix a warm color with a cool color, or they will cancel out and become a dark or dull color. To keep it bright, blend warm colors in one place and cool colors in a different place.”
5.2 color
“Here’s a fun way to blend your oil pastels! Make sure you have 2 or 3 colors in an area, and that you fill in the whole area. Then dab your cotton swab ONCE in the oil and use it to smear the colors around and together.
Please use the smallest amount of oil possible, or you’ll make your paper messy with oil. The trick is to use as little as possible so only dip your swab once at a time and not too often.”
TIP
Have extra swabs so students can use one for cool colors and a clean one for warm colors.
Use this button to jump down to the preparation section.
LEARNING TARGETS
Students know how to draw and color a landscape
M A T E R I A L S
- 8.5″ x 11″ card stock
- Oil pastels
- Blending sticks (stumps)
- Reference photo PDF prints
- Smocks
- Paper towels
6.1 Print
Reference
Sailboat Reflection
Have enough for each student
Hand out reference prints.
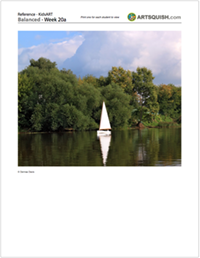
1 Page – Opens in new window
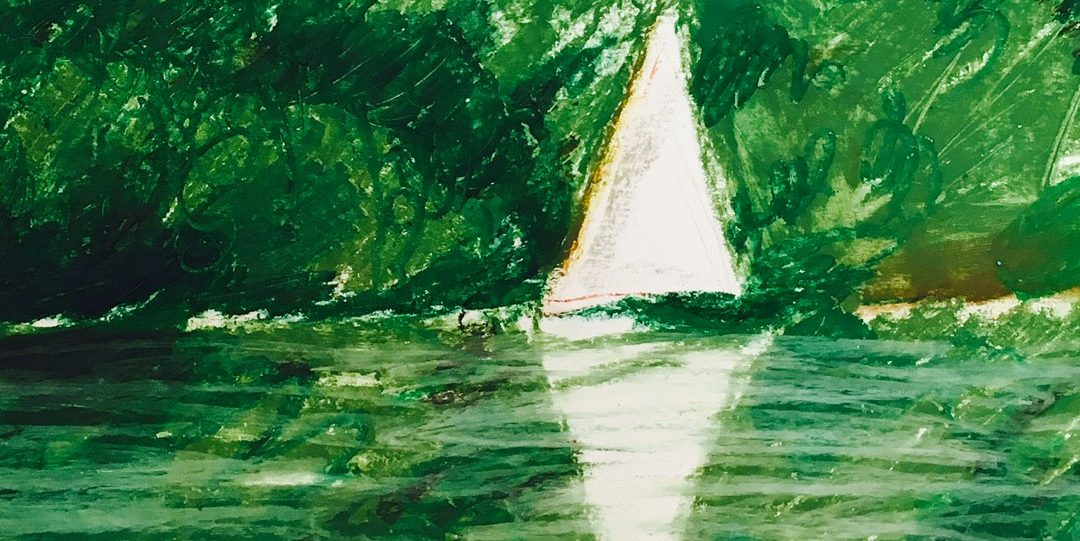
“The boat’s reflection is a mirror image, just like the tiger’s shadow if you were here a few weeks back. This is symmetry but it’s up and down instead of side to side. The water is like a mirror. The only difference is the waves make the reflection look wavy, so the symmetry is not exactly the same.
It’s the big shapes of the boat that are symmetrical!”
6.3 draw
6.4 draw
Have students find a half-way point between the top and the bottom of the sail on the boat and draw a water edge line using these steps:
- Using your non drawing hand, put a finger on the bottom part of the sail.
- That’s the place where the water line is. Look at the picture and you can see it comes out from behind the sail right there.
- Draw a line for the water edge on the right: start at the right edge of the sail – at the same height where your finger is, and draw the line out to the right edge of the paper.
- Draw another line on the other side of the sail, going left all the way over to the left edge of the paper.
Help students figure this out but be careful to not stress anyone out. Some will not understand where the line is even though they have their finger there and the picture to show them. Their brain is telling them that boats sit on the water so the line must be at the bottom of the boat. It’s totally ok if they need to draw the line at the bottom of the boat!
Younger students especially, are still drawing symbolically. That means they don’t SEE what they’re drawing like older students do. They are diagramming and explaining how the world works with their pictures.
6.6 color
6.7 teach
Point out things you especially like in their work. You can do this for everyone so no one gets a sudden exclamation on how awesome their work is. It may be true, but it can make others feel like they’re not artists if they don’t get the same reaction. Always give special praise to individuals as privately as possible, and hopefully with parents present.
Use this button to jump down to the preparation section.
STEP 7. Boat 2
Students will draw the symmetrical upside down reflection of the boat and background. 15 MinutesLEARNING TARGETS
Students know how to identify symmetry
M A T E R I A L S
- Lightest gray or blue oil pastel
“The reflection is just a mirror image, so when you turn the paper upside down, it looks like the same picture, only backwards. The boat is facing the other direction.”
7.2 draw
Use this button to jump down to the preparation section.
STEP 8. Water Reflections
Using a white oil pastel, artists will add horizontal lines to the water in their picture. 3 MinutesLEARNING TARGETS
Students know how to color a reflection
M A T E R I A L S
- White oil pastel
- Blender sticks
- Paper towels
“Be careful to not go over the boat, just the reflection of the boat!
Some lines can be short, and some can be long. Look at the water in the picture.”
8.2 blend
Use this button to jump down to the preparation section.
LEARNING TARGETS
Students know the importance of cleaning up.
M A T E R I A L S
- Paper Towels
- Cleaning wipes
- Sink
- Waste baskets
- Well-lit spot for photos
- Camera or phone-camera
9.1 CLEAN
Students set up their work area.
- Wash hands
- Super-wash brushes if used
- Put art supplies away
- Wipe tables & toss trash
- Remove any smocks (last)
- Check for items on floors and tables
9.2 PHOTO
Try to get photos of your student’s artwork. Find a good spot for quick lighting without highlights or shadows from your hands and device. Ideally in-between two strong lights on each side.

Hand-crafted by the folks at The Art Instructor
Like a three-legged stool, our art room curriculum has been built as a complete foundation for students, using three deeply connected principles.
OBJECTIVES
- Practice and improvement in drawing by observation
- Understanding what symmetry is and how it’s used in reflections
- Accomplishment in creating 2 finished oil pastels
- Fulfillment from expressive color blending and learning techniques
TROUBLESPOTS
drawing symbolically – Some students may have trouble following the reference with visually accuracy, because they are still drawing many things as if they are descriptions or symbols for objects. A sail is a great object since it looks almost the same visually as it does symbolically. A boat may need to be drawn on the top edge of the water instead of in the middle of a surface with overlapping. The latter is accurate visually, but the former is accurate symbolically. Be sensitive to this, because a child may have a difficult time drawing visually before they have gone through certain developmental stages. If so, pressure can cause stress without any benefits for the artist.
ART WORDS
Symmetry – A mirror image or one that is the same on one side as the other, has symmetry. A great example is a butterfly with wings open and flat. Another example is a heart.
Balance – When things look like they won’t fall over, we think of it as balance, even if it’s a drawing or painting.
Reflection – The backwards image of something in a mirror or a shiny object such as a lake surface.
CLASSROOM
PREP
Print all of your PDFs from the lesson plan and cut any references apart as needed.
Make copy stands for your classroom using cardboard and inexpensive easel backs.
Reference Stand
Make inexpensive stands by attaching cardboard easel-backs to leftover cardboard like the backs of used-up art pads. Use clothespins or art clips to attach reference. The button links to some cheap easel-backs on Amazon. (Opens in new window.)
What your room needs
Here are your printable lists and room prep instructions.
Opens in new window
CLASSROOM
MATERIALS
- 8.5 x 11” Copy paper
- 4B pencils
- Erasers
- Ruler
- Large Paint bottle
- 8.5” x 11” card stock paper
- Antelope face PDFs
- Reference Stand (see picture following)
- Reference photo with stand
- Oil Pastels
- Blending sticks (stumps)
- Paper towels
- Cotton swabs
- Linseed Oil (very small amount)
- Bottle caps or mixing cups
- Smocks
- Paper towels
- Cleaning wipes
- Waste Baskets
- Camera or camera-phone
PREVIEW
Week 21: Color Day – Green
Students will have fun mixing up lots of different green colors and using them to make a fun geometric painting.
Week 22: Faces, Fish & Fun
We start out with looking at the symmetry of a human face from the front. Then we move into a fun project where students all make a hangable painted fish to turn the room into a giant aquarium.