
Style
Each lesson Plan focuses primarily on one of the 4 Cornerstones of Art:
Drawing | Painting | Color | Style
OVERVIEW
Artists get to create a face sculpture out of air-dry clay or salt dough that will be painted next week. They’re free to have fun with ideas to make the face anything, even an animal face. Before they work on the sculptures, young artist create a fun face warmup and then make practice faces in modeling clay. Older students finish their portrait and then move to the sculpture.– – –
Grades 6 – 12
Week of March 6 – 10
1 Hour & 45 Minutes
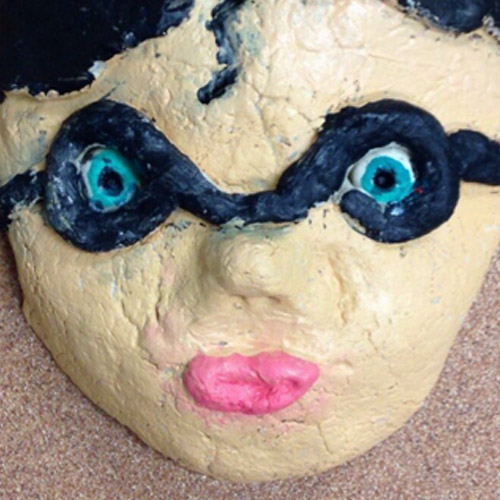
Student Work


Lesson At A Glance
Here’s a brief overview of the complete lesson. It’s also on your prep page in the Ready, Set, Go! section (below the lesson).
Colored buttons jump to each section in the full lesson plan below.
15 Minutes – expressive oil pastel portrait & intro
10 Min – sketch face sculpture ideas.
25 Min – modeling clay face
2 Min – Everyone helps
3 Min – Air dry clay methods
45 Min – Build clay sculpture
Early finishers – Artists choice in modeling clay or 2D
4 Min – Everyone helps
Use this button to jump down to the preparation section.
SCROLL & TEACH
LESSONPLAN
Each section is a different color. Read over once and then you can SCROLL & TEACH using any device you like. It’s designed to work well with your phone.
LEARNING TARGETS

Students know how to make an expressive piece of art
M A T E R I A L S
- 14″ x 17″ sketch pad
- Oil pastels
All materials are suggestions and may be modified as you see fit. We have tried many items, and these seem to allow the most versatility for the cost.
“Get your sketchbook out and open to a clean page. We’re going to warm up today with a crazy and colorful portrait. This should be as wild and surprisingly different as you can make it, yet still be recognizable as a human face.
Do not create anything that seems violent, crude or otherwise would make a parent unhappy. This is about art, not playtime. You are artists, not preschoolers.
The idea is to stretch your ideas beyond what you would normally do, and have a lot of artistic fun too. What can you do that is surprising and unusual?”
Advanced Student Lesson
CREATIONS - tap here to open
Our Creations lessons are for students who have completed the two years of Foundations and are ready to begin using all that they have learned to create new work. These more challenging versions of the same concepts and techniques are easily taught along-side students in the Foundations course. This allows for excellent review, and is encouraging for students to see progress from each viewpoint.
Use the Student Instructions printout below to distribute to your Creations students. Tap the image to open the PDF in a new window.
3-Week Project: Professional Portrait Painting
Overview: Students will work on a self portrait in the same manner that professional painters do.
Step 1. (10 minutes) Set up for your portrait with a mirror at a good height for you to work, and a light for good shadows. Try moving the items around to look at your face from several angles and lighting effects. Don’t just settle for the first thing that happens. Make the world conform to your own viewpoint.
Step 2. (20 min) Warm up loose sketches. Create 10 different charcoal sketches on 4 sheets of 14″ x 17″ paper. Make 4 per page for the first eight sketches, and then make larger sketches with one per page. Use these sketches to specifically LEARN about the proportions of your face and how the shadows work.
Step 3. (22) Make two pencil sketches, beginning with big shapes and proportions before practicing some of the details. Take your time. One of the sketches should be small and have no shading because you’ll add oil pastels to it. the other sketch will become your final portrait, so make sure it is big enough to cover the canvas, and that you like the way it looks, getting everything as accurate as you desire. If you want to be more expressive, and less accurate, that is fine.
End of Part 1 (if dividing into two sessions)
Step 4. (5) Set up for acrylic painting. Tape a sheet of canvas to a board or use a stretched canvas.
Step 5. (15) Use your largest brush to cover the canvas with a thin coating of a warm color of your choice. Orange works well, but you can also try red or brown colors. Do NOT use any white, but add a little water to the paint to make it spread easily and cover well. Set aside to dry and put away acrylics.
TIP: If you want to get more creative with your colors, try using a cool color instead.
Step 6. (10) Use oil pastels to create a color practice version of your portrait over the pencil sketch you made in STEP 3.
Step 7. (20) If you can make a copy of your good sketch from STEP 3, that is helpful. Otherwise make a tracing of the outline and main features. You can tape the sketch and a new piece of paper on a window so you can see to trace it easily. Then cut out the copy or outline you’ve made so you can place it on the dry canvas (use a blow dryer if needed).
Trace the outline of your copy using your canvas pencil. You can then coat the back of your copy or tracing with some graphite (rub the side of the pencil lead over it – making sure it’s the back and not the actual drawing side). Re-position the cutout face on the canvas, lining it up with your outline, and then draw over the lines of the main features so you transfer the graphite, making guidelines for the bottom of the nose, eyes, and mouth.
TIP: place a book underneath a stretched canvas so you have a surface to press against.
Step 8. (5) Clean up your area and save your materials for next week.
Tap images to open Creations Student Instructions and Reference Materials in new windows

Use this button to jump down to the preparation section.
LEARNING TARGETS
Students know how to plan an artistic idea
M A T E R I A L S
- 14″ x 17″ sketch pad
- 2B pencil
- White and kneaded erasers
- Cheasel stand & clip with Face Facts PDF
2.1 Print
Reference
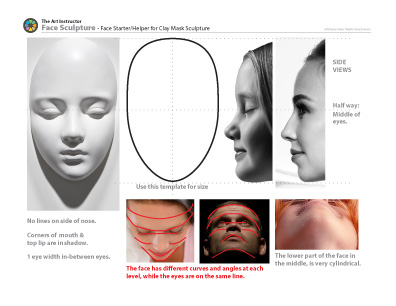
Face Facts
Print enough for each student to view or for two students to share.
Hand out reference prints.
Note that this print is from a recent lesson and you may already have them.

1 Page – Opens in new window
“Today we’re going to make clay sculptures of faces. You are encouraged to create a human face. That’s why I’ve given you the reference; to remind you about the proportions of the human face.
However, you are welcome to try other ideas. Even if you create a realistic human face, you can add things to it and make it special in any way you like. You remember how we changed your self portrait into a hero? You can do things like that. Have some fun with it!
The first step is to come up with a couple of ideas to choose from. Draw at least 2 or 3 ideas in your sketch book.”
Use this button to jump down to the preparation section.
LEARNING TARGETS
Students know how to practice before making a final piece of art
M A T E R I A L S
- Modeling clay – about 1/3 lb per student
- Sheet of 11″ x 17″ copy paper as a protective placemat to keep extra clay off the table
- 2B pencil
- Eraser
- Clay working tools or:
- Palette knife
- Toothpicks or wooden kebab skewers
- Smocks
- Paper towels to clean hands afterwards
3.1 Print
Guide
Clay Face Size Starter/Helper
Print enough for each student to use one. They can work right on these prints, or you can have them trace the oval template onto another paper.
Hand out reference prints.
1 Page – Opens in new window
3.2 Make
Use this button to jump down to the preparation section.
LEARNING TARGETS
Students know how to clean up
M A T E R I A L S
- Paper towels
4.1 clean
4.2 Cleanup
Use this button to jump down to the preparation section.
LEARNING TARGETS
Students know how to use air dry clay
M A T E R I A L S
- A bit of air dry clay
- Bowl or cup of water
5.1 teach
This clay feels a lot like the modeling clay, and seems like it’s about the same. There are some big differences though, because it’s water-based instead of oil based.
- Dries out fast – DO NOT leave small bits lying around. They will dry immediately. Keep in round lumps.
- Leaves a dry residue on fingers – washes off easily though
- Easier to mold than modeling clay
- Dries hard – but is brittle
- Breaks easily – don’t make small or thin parts!
- Hard to stick – use water to stick pieces together
5.2 demo
Quick demo:
Put two pieces together. They stick ok now, but when it dries, they will separate as the clay shrinks. Take the pieces apart. To prevent this happening, use water. Dip a finger in water and rub a bit of water into each piece where you want them to join. It will make a slimy surface, like mud. Then the two pieces will stay when joined. Make sure you press and slide the pieces around a bit to get a strong connection.
Use this button to jump down to the preparation section.
LEARNING TARGETS
Students know how to sculpt a face
M A T E R I A L S
- Air-dry clay – about 1/3 lb to 1/2 lb per student
- Salt dough can be a cost-effective substitute but it will yield mushier shapes and needs to be baked to become really hard.
- Palette pad to use as a protective placemat to work on
- New clay working tools or:
- Palette knife
- Toothpicks or wooden kebab skewers
- Smocks
- Paper towels
Air-dry Clay
Crayola makes a good, fairly inexpensive version of this clay. It dries fairly sturdy for a solid low structure like this face we’re doing today.
Use this button to jump down to the preparation section.
STEP 7. Extra
Early finishers have artists choice using their regular 2D media or going back to modeling clay for fun. Extra, if timeLEARNING TARGETS
Students know how to create artwork independetly
M A T E R I A L S
- Modeling Clay
- Sketchbook
- 2B Pencil
- White Eraser
7.1 create
Students finish up the class with Artists’ Choice with clay or drawing.
Use this button to jump down to the preparation section.
LEARNING TARGETS
Students know the importance of cleaning up.
M A T E R I A L S
- Paper Towels
- Cleaning wipes
- Sink
- Waste baskets
- Well-lit spot for photos
- Camera or phone-camera
8.1 clean
Students clean up their work area and put away any unused clay.
- Wash hands
- Super-wash brushes if used
- Put art supplies away
- Wipe tables & toss trash
- Remove any smocks (last)
- Check for items on floors and tables
- Put clay in a safe place to dry
8.2 photo
Try to get photos of your student’s artwork. Find a good spot for quick lighting without highlights or shadows from your hands and device. Ideally in-between two strong lights on each side.
OBJECTIVES
- Practice and improvement in planning and using clay for 3D modeling
- Understanding how to work with air-dry clay
- Accomplishment from creating a finished sculpture of a face
- Fulfillment in having freedom of expression with the face project
TROUBLESPOTS
drawing with clay – Sometimes students will treat clay like a thick piece of paper instead of truly 3D. If their face is flat, or if the nose is drawn onto the surface, you need to help them realize the clay should look like real life instead of a drawing. Be patient. The easiest way is to make a small flat face and etch an L shape for a nose. Explain that this is a drawing in the clay. Then make a 3D egg shape, and add a triangular nose sticking out of it. This is 3D. Like a toy figurine.
ART WORDS
3D – Something that has 3 dimensions: It has width; it has height, and it has depth. A square and a circle are 2D shapes. A cube and a sphere are 3D
CLASSROOM
PREP
It’s a good idea to go ahead and do the two faces out of each kind of clay if you haven’t before.
Print all of your PDFs from the lesson plan and cut any references apart as needed.
What your room needs
Here are your printable lists and room prep instructions.
Opens in new window
CLASSROOM
MATERIALS
- 8.5″ x 11″ copy paper
- 8.5″ x 11″ card stock
- Water containers
- Water droppers
- Paper towels
- Smocks
- Modeling clay (oil based)
- Air dry clay
STUDENT’S
MATERIALS
- 14″ x 17″ Sketch Paper
- 2B Pencil
- White erasers
- Paper palette pad
PREVIEW
Week 30: Paint Sculptures
Last week’s face sculptures have been drying all week. The first half of the lesson this week, is painting the sculptures with acrylic paints. The second half is artists’ choice with dreams: using the acrylics in an expressive painting of a happy dream.
Week 31: Color Journal – Skintones
Students will warm up with face sketches and create a flesh tone Color Journal of 25 colors (only 16 for younger grades). Then there is a slideshow about the different color areas of the face and some exercises to practice making flesh tones work together. Young grades have some fun with alien faces too.