

OVERVIEW
After starting with a fun name guessing game, students adopt their color name for the day. Then there are 3 games. The first is a puzzle that reinforces looking for big shapes. Next is a color mixing challenge using paints. Finally, there is a creative crazy creature where artists invent a new creature from cartoon creature parts.– – –
Grades 1 – 2
Week of April 24 – 28
1 Hour & 30 Minutes
Lesson At A Glance
Here’s a brief overview of the complete lesson. It’s also on your prep page in the Ready, Set, Go! section (below the lesson).
Colored buttons jump to each section in the full lesson plan below.
15 Min – Artists’ choice and color name game.
20 Min – Students will color and put together a puzzle
10 Min – Students create a paper pouch to hold their puzzle.
20 Min – Students will mix paints to match color swatches.
10 Min – Students will create their own crazy creature from PDF.
13 Min – Students will color and outline their creature
2 Min – Everyone helps
Use this button to jump down to the preparation section.
SCROLL & TEACH
LESSONPLAN
Each section is a different color. Read over once and then you can SCROLL & TEACH using any device you like. It’s designed to work well with your phone.
LEARNING TARGETS

Students know how to draw from imagination
M A T E R I A L S
- 11″ x 17″ copy paper
- 4B pencil
- Eraser
- Markers and/or oil pastels
- Blenders (stumps)
- Paper towels
All materials are suggestions and may be modified as you see fit. We have tried many items, and these seem to allow the most versatility for the cost.
1.1 Print
Reference
Name Game
Cut color names apart so that there is one for every student.
Tape names to students’ backs.
Don’t let them see what their own “name” is.

1 Page – Opens in new window
1.2 play
Begin with a fun guessing color name game. The new color name will be their name for the day! Cut out the color name tags and without letting kids see them, tape one to everyone’s back as they enter. Explain right away that no one should tell their friends what their new color name is. Everyone must guess! Don’t let students pull their shirt around to peek.
Kids can ask only yes or no questions, but they can also give each other hints as much as they want. Teacher needs to help with hints so no one gets really frustrated.
Always try to greet students as they come in and kneel down when you can, so that you are on their level.
1.2 play
Encourage students to work with one piece of paper for a while. If someone uses the phrase, “free draw”, explain that artists’ choice is something only artists can do, while free-draw is something anyone can do. You want to use the phrase to elevate the students’ expectations of their work.
Everyone should take their time with the work and make a finished piece of art. Limiting the paper can also help kids focus on the work. If someone finishes in super-fast time, ask them what more they can do to the existing paper. Ask again several times – unless they appear overly frustrated; then you can allow them to move on to a new work.
Use this button to jump down to the preparation section.
STEP 2. Puzzle Color
Printed puzzle PDF on Cardstock Oil Pastels Blender stumps Kids’ scissors 20 MinutesLEARNING TARGETS
Students know how to make a puzzle
M A T E R I A L S
- Printed puzzle PDF on Cardstock
- Oil Pastels
- Blender stumps
- Kids’ scissors
2.1 Print
Reference
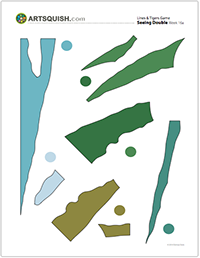
Artists’ Puzzle
Print a set of both pages for each student – on Card Stock
2 Pages – Opens in new window
2.2 print
A jumbled puzzle PDF must be colored with either markers (faster and easier) or with oil pastels. Then the pieces cut out and put together to finish the puzzle. Make sure to use card stock.
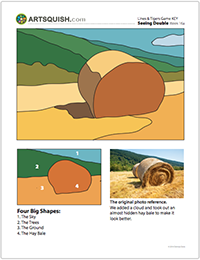
Talk about how the picture is made up of just a few really Big Shapes if you look at the same color pieces as if they are one shape.
“Look at the blue sky shape and the cloud together. They make one Big Shape.
Then all the green shapes fit together and create another Big Shape of trees.
There are two more Big Shapes made up of the same color shapes as well.”
Encourage students to make each color a little different. The final work looks better with different types of greens, and different types of browns, like you see in the Key picture.
2.3 follow
The puzzle pages have the 3 steps:
- Use 2 or 3 pastels to blend colors in each outlined puzzle piece. Try to get something similar to the dot near each piece as indicated with an arrow.
- Cut (rough cut out) along the dashed lines.
- Finally, cut each piece out as carefully as you can.
You may need to help cut some of the details.
2.4 Print
Reference
Puzzle KEY
Print enough for each student to see one.
Hand out reference prints.
1 Page – Opens in new window
2.6 teach
Use this button to jump down to the preparation section.
LEARNING TARGETS
Students know how to craft
M A T E R I A L S
- Stapler & Staples
- Cardstock paper
- Markers
- Oil Pastels
- Blender stumps
3.1 craft
Use this button to jump down to the preparation section.
LEARNING TARGETS
Students know how to mix colors
M A T E R I A L S
- Tempera Paints
- Paper towels
- Paintbrushes
- Palette or trays
- Smocks
- Water containers
Brushes should be nylon for springiness and durability. Round brushes are the most versatile.
Paint pigment list:
- Napthol or Pyrrol Red
- Hansa or Light Yellow
- Pthalo Green (blue shade)
- Cyan or Cerulean Blue
- Ultramarine Blue
- Dioxazine Purple
- Magenta
- Burnt Umber
- Raw Sienna
- Titanium White (professional grade only)
4.1 print
iNFORMATION
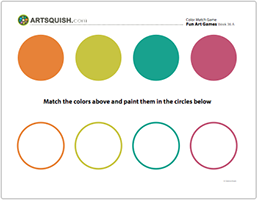
Color Match
Print on card stock for each student
1 Page – Opens in new window
4.2 Prep
Use this button to jump down to the preparation section.
LEARNING TARGETS
Students know how to play a fun art game
M A T E R I A L S
- Crazy Creature PDF
- Pencils
- Erasers
5.1 print
Reference
Crazy Creature Parts
Print enough for each student
Hand out reference prints.

1 Page – Opens in new window
5.2 create
Use this button to jump down to the preparation section.
LEARNING TARGETS
Students know how to color their crazy creature
M A T E R I A L S
- Crazy Creature PDF
- Pencils
- Erasers
- Colored markers
- Black markers
Use this button to jump down to the preparation section.
LEARNING TARGETS
Students know the importance of cleaning up
M A T E R I A L S
- Paper Towels
- Cleaning wipes
- Sink
- Waste baskets
- Well-lit spot for photos
- Camera or phone-camera
7.1 clean
Students clean up their work area.
- Wash hands
- Super-wash brushes if used
- Put art supplies away
- Wipe tables & toss trash
- Remove any smocks (last)
- Check for items on floors and tables
7.2 photos
Try to get photos of your student’s artwork. Find a good spot for quick lighting without highlights or shadows from your hands and device. Ideally in-between two strong lights on each side
OBJECTIVES
- Practice and improvement using shading
- Understanding how shadows are formed and used in artwork
- Accomplishment in drawing an animal with shading
- Fulfillment by choosing the animal they want to draw & paint
TROUBLESPOTS
There are many objectives that can be stated here for the purpose of stating objectives that need to be puposely objectified.
ART WORDS
Paper – That stuff you draw on.
Pencil – That thing you draw with
Paint – Messy stuff
CLASSROOM
PREP
Print all of your PDFs from the lesson plan and cut any references apart as needed.
What your room needs
Here are your printable lists and room prep instructions.
Opens in new window
CLASSROOM
MATERIALS
- 11×17” Copy Paper
- 8.5 x 11” Copy paper
- 4B pencils
- Erasers
- Markers
- Oil pastels
- Blender sticks (stumps)
- Clipboards
- Paper towels
- Kids’ Scissors
- Stapler & Staples
- Cardstock paper
- Tempera paints
- Paint brushes
- Smocks
- Water containers
- Sink
- Camera or phone-camera
PREVIEW
Week 37: Still Life Slide
Students draw 3 still life objects and color them with oil pastels. They’re cut out and the children have fun sliding them up, down, right and left until they find a good spot for each of them, one at a time. All are glued into place for a nice still life artwork. Then the objects are turned into silly cartoons and colored with markers for a fun finish to the lesson.
Week 38: Party Bus!
For our final lesson of Year A, we’ll be making and decorating a big box party bus! It’s great fun and students learn to work together. Then everyone gets to redesign their school bus, and invent a mobile house bus for the summer.