
OVERVIEW
Continuing with painting, students will learn how to use the palette knife technique before working on a landscape. There are specific colors that must be mixed and used side by side. This helps artists see how expanding your colors to several variations enhances the final painting.– – –
Grades 3 – 5
1 Hour & 45 Minutes, or two 52-minute sessions
STANDARDS For This Lesson
SUBMIT YOUR SUMMARY
Copy and paste the text below to send your abbreviated lesson plan with national standards and learning targets to your supervisors and colleagues. Or access the WORD doc by using the blue button below.
– – – – – – – – – – – – – – – – –
Week of March 23 – 27
OVERVIEW:
Continuing with painting, students will learn how to use the palette knife technique before working on a landscape. There are specific colors that must be mixed and used side by side. This helps artists see how expanding your colors to several variations enhances the final painting.
NATIONAL STANDARDS:
Grade 3
VA:Re7.1.3 – Speculate about processes an artist uses to create a work of art
Grade 4
VA:Cr2.1.4 – Explore and invent art-making techniques and approaches.
Grade 5
VA:Cr1.2.5 – Identify and demonstrate diverse methods of artistic investigation to choose an approach for beginning a work of art.
LEARNING TARGETS:
Students know how to use a palette knife
Students know how to split their paint colors.
LESSON PLAN:
1. Warm Up (10 minutes)- Charcoal sketches on large paper of chosen reference photo.
2. Prepare(5 min) -Setup for acrylic painting
3. Guidelines (5 min) – Use the canvas pencil to create guidelines
4. Air Knife (2 min)- Practice palette knife painting
5. Slideshows(10 min) – Color Splitting 6. Split Colors (5 min) – Make own sky
colors
7. Paint the Sky (10 min) – Patches of Colors
8. Scumble (5 min) – Use Palette Knife to mix colors
BREAK
9. Continue Art (40) – Continue creating colors
10. Final Scumbling (7) – Use palette knife, make more harmony
11. Clean Up (5) – Everyone helps!
Tap the Plus Icon (above right) to open STANDARDS information, including an Overview, Learning Targets and a Syllabus. Copy and paste to send to your Administrators or use the button below to download a Word document with the same information that you can add your info to and email to them as an attachment.


SCROLL & TEACH LESSON PLAN
Don’t worry about rewriting anything. Just spend a few minutes reading the lesson plan and printing out your PDFs. Then check out the READY, SET, GO! section and print your prep-page, which includes checklists and an “at a glance” outline of the lesson so you can stay on track when you’re teaching. Set out the materials from the list on your prep page and you’re ready.
That’s all you need to know. Use your smartphone to Scroll & Teach!
Lesson At A Glance
A brief overview of each step. Buttons jump to each section for detailed information.
5 Min – Setup for acrylic painting
2 Min – Practice palette knife with imaginary paint
10 Min – Color Splitting
5 Min – Make own sky colors
10 Min – Patches of Colors
5 Min – Use palette knife to mix colors
40 Min – Continue creating colors
7 Min – Use palette knife, make more harmony
5 Min – Everyone helps
SCROLL & TEACH
LESSONPLAN
Each section is a different color. Read over once and then you can SCROLL & TEACH using any device you like. It’s designed to work best with your phone.
LEARNING TARGETS

Students know how to sketch a reference before painting
M A T E R I A L S
- 14″ x 17″ Sketch Paper
- Charcoal
- Ebony Pencil
- Color Knife Reference Photos PDF (below)
1.1 Print
Reference
Color Knife Reference Photos
Cut images apart and print enough for each student to choose from several.

1 Page – Opens in new window
1.2 sketch
Students should use an entire sheet of 14″ x 17″ sketch paper for each warmup, and do 2 or 3 large sketches. The frame and composition have already been optimized for a good design, so they should use the entire image. Everyone should stand to do these warmups.
CREATIONS - tap here to open
Use the Student Instructions printout below to distribute to your Creations students. Tap the image to open the PDF in a new window.
Palette Painting OR Ink Drawing – 3 Week Project
Overview: Students can choose an advanced photo reference for creating an exciting palette knife painting, or they can create a detailed ink drawing or series of more expressive ink drawings. There are 6 photos in the reference print below.
Large Palette Knife Painting
1. Practice sketch – create 5 to 10 sketches of your subject using pencil and charcoal. Use the 3 steps to accuracy: Frame, Big Shapes, Details.
2. Set up for painting – Create a neat work space for your acrylics and get a smock.
3. Guidelines – Use the largest canvas you have access to, up to 16″ x 20″. Draw simple guidelines with a canvas pencil.
4. Make sure you use the color splitting technique to create 6 to 9 colors for every area.
5. Apply paint using the light touch method and/or scraping into dryer paint areas for texture.
Make sure your name is on your work and it is securely placed for finding next time. Tape or clip your reference photo to your artwork or board.
Large Ink Drawing or Series
1. Practice sketch – create 4 to 8 sketches of your subject using pencil and charcoal. use the 3 steps to accuracy: Frame, Big Shapes, Details.
2. Set up for ink – Secure the ink bottle to a wide base with tape or a piece of modeling clay. DO NOT OPEN INK YET.
3. Guidelines – use your 2B pencil to draw the LIGHTEST lines imaginable. Begin with the BIG SHAPES! Erase and modify as needed. Add just enough simple details as you need to get started.
4. Ink – Use your pen nib holder and nib, dipping into the ink bottle (which you may now open). Always tap the ink nib inside the edge of the bottle before moving over to your work. Begin at the top, on the side opposite from the hand you work with. Work from the top down so you don’t smear ink under your hand. Be careful to not drip on your work! You can cover the parts you’re not working on with copy paper to catch any drips and keep your hand from smearing into the pencil guidelines.
For expressive ink you can use all types of tools: brushes, twigs, ink pen & nib, toothbrush, water to make grays, cotton balls, cotton swabs, etc. Try some work without making guidelines too.
Tap images to open Creations Student Instructions and Reference Materials in new windows


LEARNING TARGETS
Students know how to set up their work area for painting with acrylics.
M A T E R I A L S
- Acrylic paints
- Brushes
- Palette pad
- Water container
- Smocks
- Paper towels
- Palette Knife
Paint pigment list:
- Napthol or Pyrrol Red
- Hansa or Light Yellow
- Pthalo Green (blue shade)
- Cyan or Cerulean Blue
- Ultramarine Blue
- Dioxazine Purple
- Magenta
- Burnt Umber
- Raw Sienna
- Titanium White (professional grade only)
2.1 setup
Create a neat work area.
- Water should be near the palette
- Tubes should not be standing up because they fall into your work or palette
- Palette, brushes, water, and paper towel should be on the right if you are right handed.
- Set up your reference so you can see it easily without having to turn your head or stand up.
- Tape your canvas to a board
- Smocks
- A table or floor easel may be used if available

LEARNING TARGETS
Students know how to draw guidelines for their artwork
M A T E R I A L S
- 11″ x 14″ Canvas board
- Canvas Pencil
- Eraser

The wax-based pencil mimics the color of graphite, but is waterproof and won’t mix into the acrylic colors.
3.1 draw
Everyone should study their reference and look at the FRAME first. Then find the biggest shapes to draw as guidelines.
3.2 review
1. FRAME – Get the proportions on the frame shape accurate first. It only takes a moment.
2. BIG SHAPES – Find the 3 to 5 biggest shapes next. Work for 2 or 3 minutes to get these as accurate as possible.
3. DETAILS – Most of the details are done with paint, but for the guidelines, you can add the most important details so you can see where you will paint them.
LEARNING TARGETS
Students know how to use a palette knife
M A T E R I A L S
- Palette knife
4.1 imagine
Don’t let the palette knife touch the canvas, but see how close you can get to it without actually touching. Let the knife hover over the surface like a hoverboard in Back to the Future. Don’t use the tip of the knife at all, just the flat bottom and the side edge.
To do this technique, it is very important that you mix up a lot more paint than you would normally make when using a brush.
The challenge is to not get a huge amount of one single color and have your painting look too simple. I have another really cool advanced artists’ technique to show you how to counteract this problem, which I’ll explain in a minute.
Once you’ve mastered the light touch, you can also try some gentle scraping here and there to get texture, but for this painting, we are going to use the light touch ‘air’ technique.
You can think of the palette knife as a snowboard when scraping, and a hoverboard when using thick layers.”

LEARNING TARGETS
Students know how to create a palette knife painting
M A T E R I A L S
- Screen to display slideshow
5.1 view
How to mix and split a color into 6 variations.
Mix up enough of the first color to cover your area with a thick layer of paint, like icing a cake, but not quite that thick.
- Mix up the main color you need, but make it just a little tiny bit darker than you think it is.
- Split your paint into 3 blobs. (Pull some to the right, and some to the left).
- In the pile on the left, add some color to shift the color towards one direction on the color star.
- In the pile on the right, add some color to shift the color towards the other direction on the color star.
Now you have 3 colors. They are a bit too dark, but that’s good. It’s time to split the colors again. Pull about half of each blob downward to make 3 new blobs below the original ones. You should have 6 blobs of paint and each one is used to create the color you see. none of them are exactly the color you see. When they are scumbled around together, they will look awesome, and much more accurate than you realize. The real world has far more variations of colors than we notice.
This is how master painters work all the time, and it’s what makes their paintings look like the real world instead of flat, over-simplified areas.
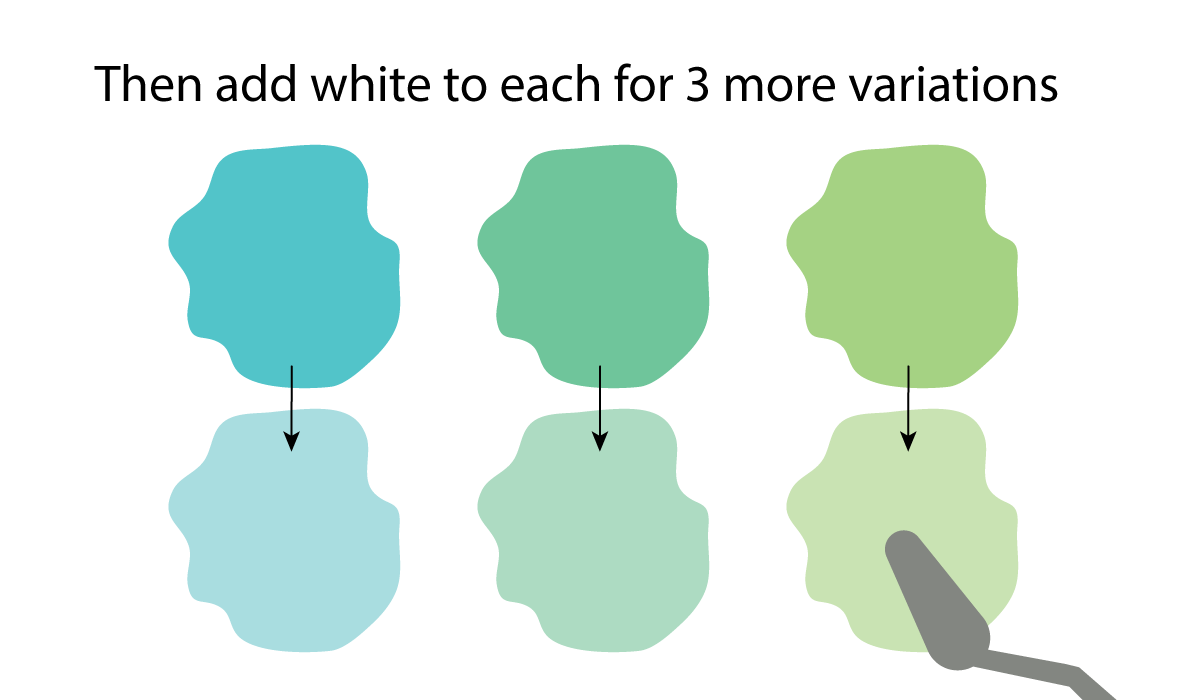
For a more advanced student
Add white to part of the new blobs, so that you have 3 more colors that are a little bit light. Now you have 9 colors!

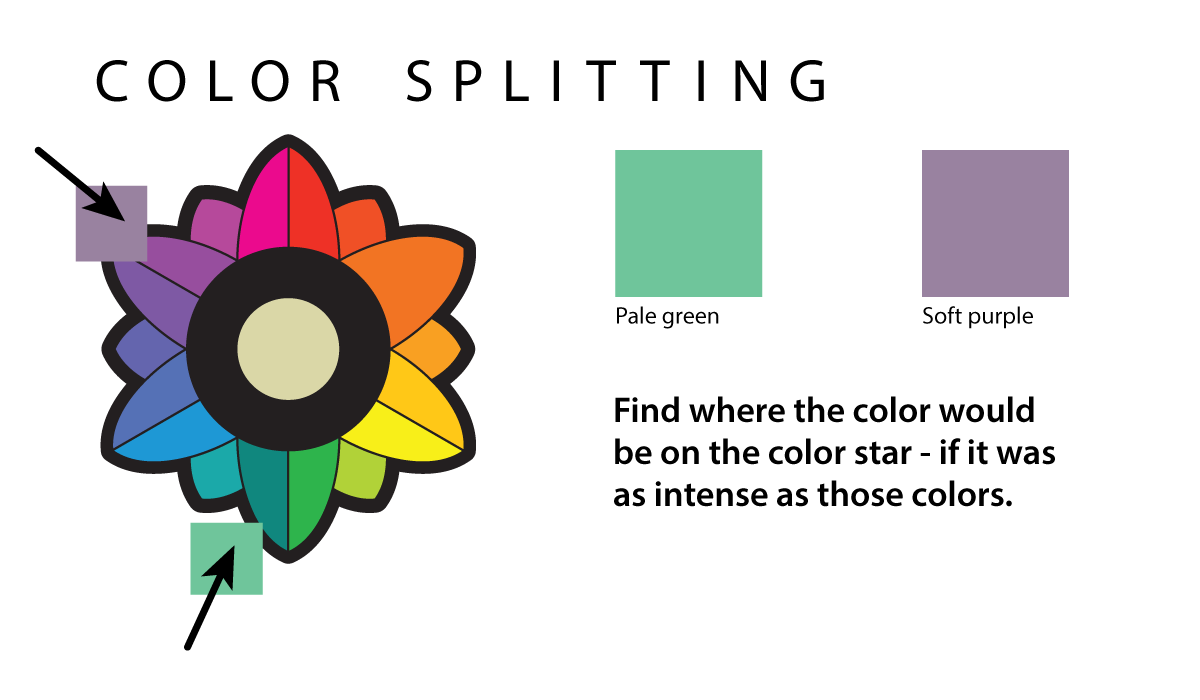
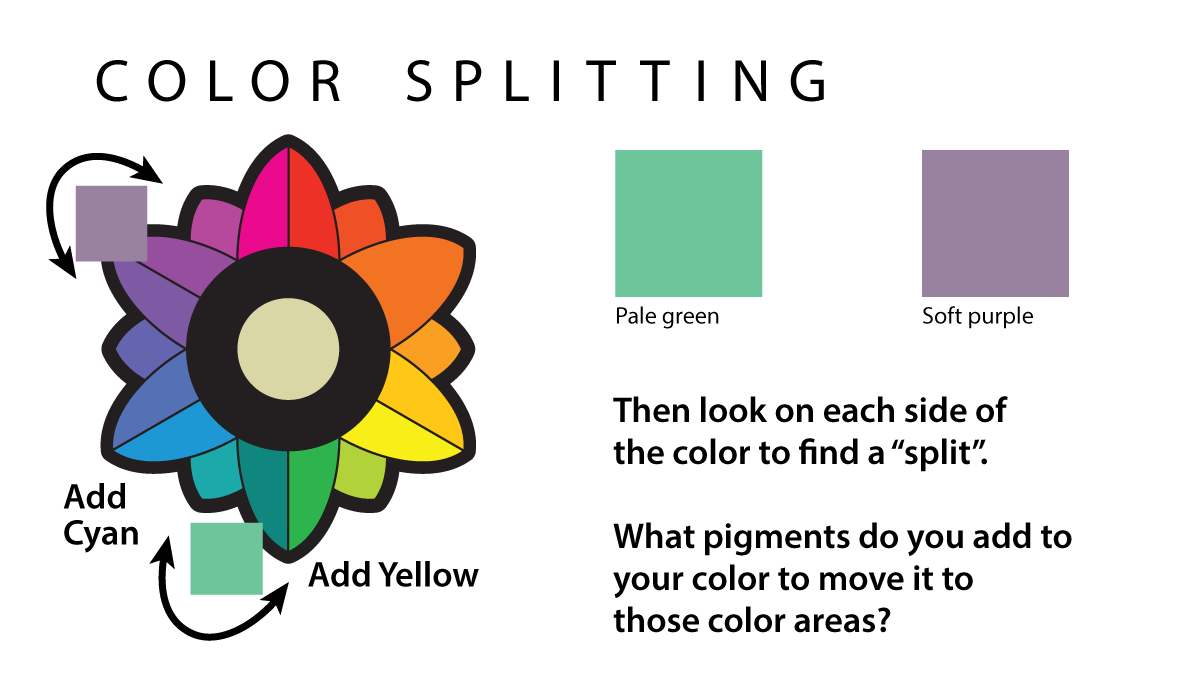
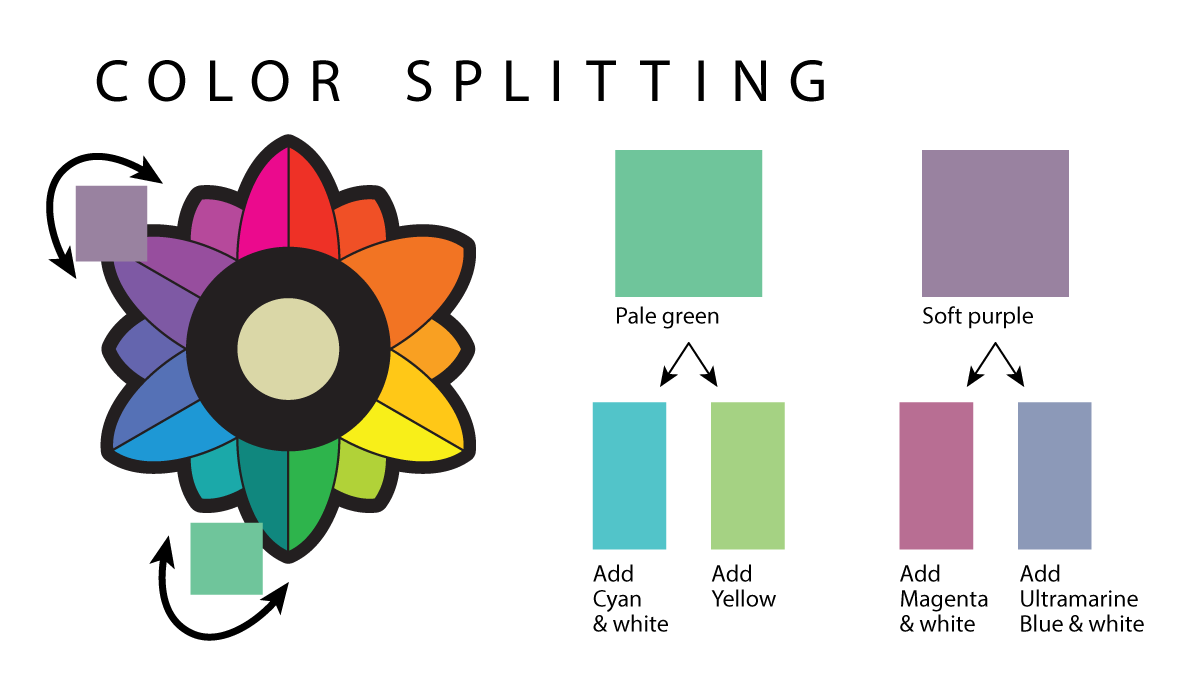
Here you can see how the original pale green is split so that there are 3 variations of the green.
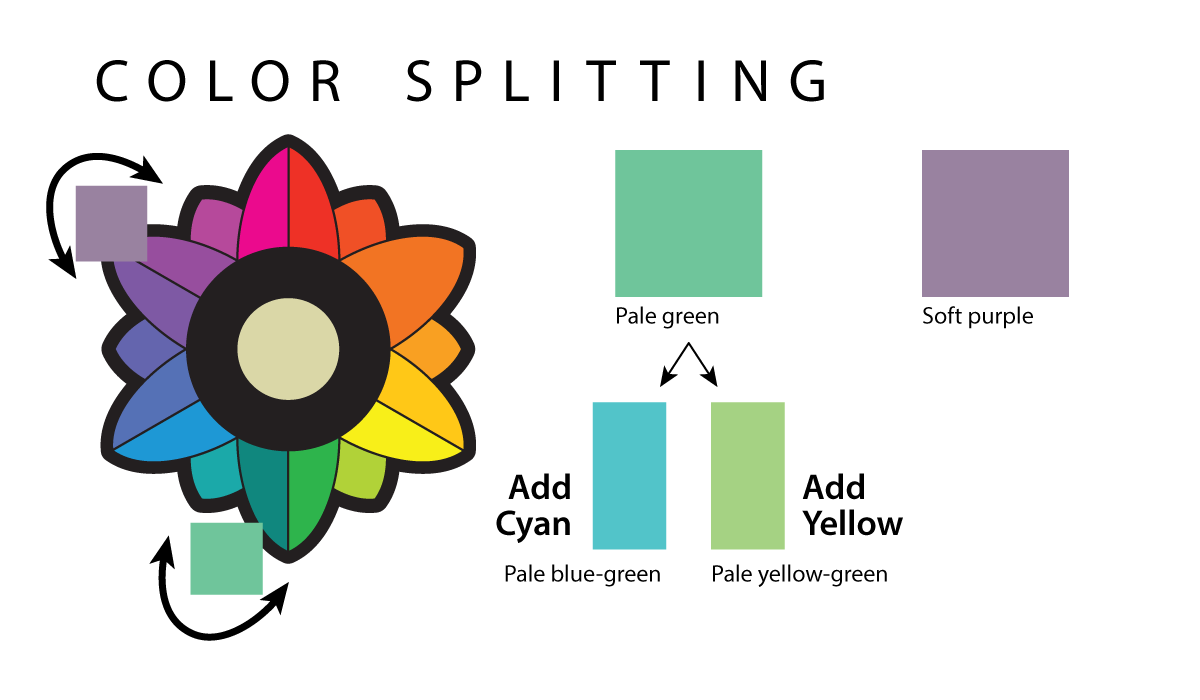
The purple is split too, by adding Magenta for one split color, and Ultramarine Blue for the other. Note that white must also be added to stay in the same value range.

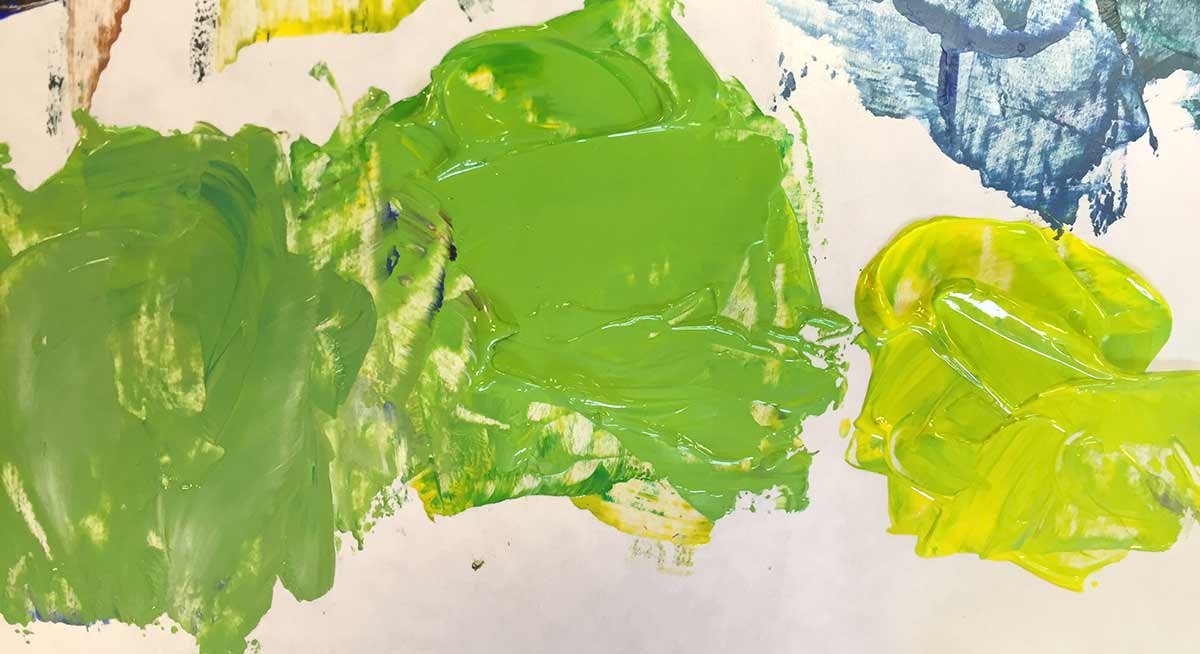
This is how it looks on your palette.
Now you have 6 colors to work with!

A few light guidelines are all we need to make – using the canvas pencil

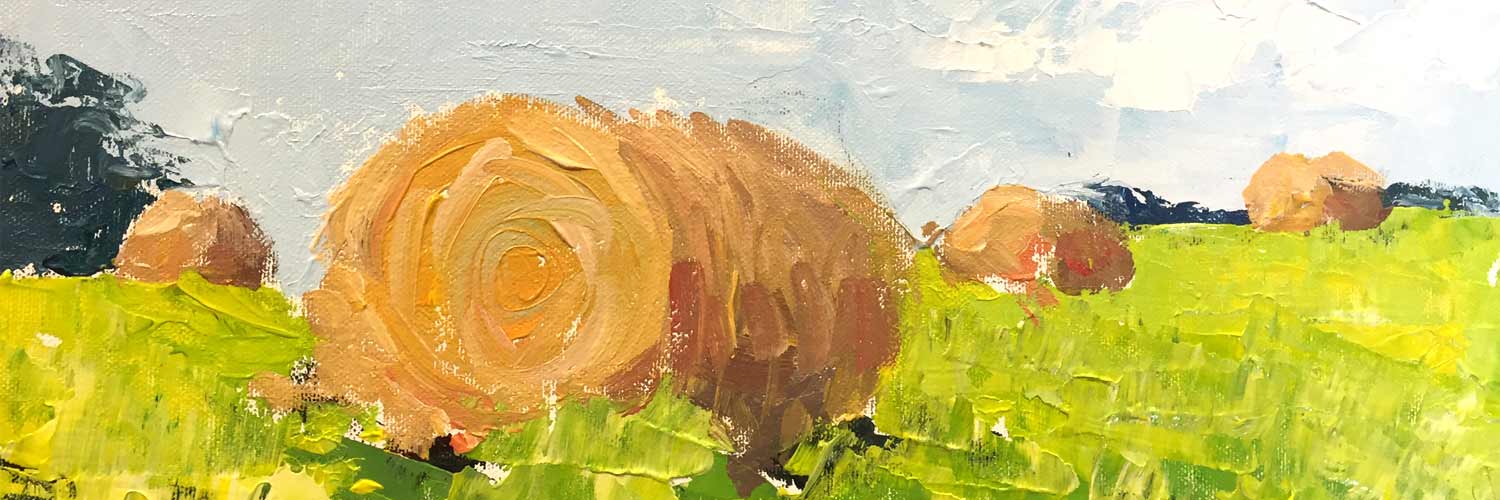
It may be hard to see, but this is 6 color variations and we’re ready to begin painting the sky

The colors should NOT be too mixed or blended. It is so tempting to smudge out that little triangle!

The finished sky. Look at all the different colors.

Clouds are chunks of white with the edges smudged around. The trick here, is to stop way before you think you are finished,

The distant tree color, split into a bluer version, and a yellower version

Here you see how chunky it is on the canvas in this close up. You can play a game with yourself, to see how few knife-strokes you can get away with. Can you do it with 4 strokes? Maybe 6?

The trees on the left. We left the edge very broken up, so it looks like foliage with sky showing around it.
Split greens for the grass

Just spread a few chunks of each color. It doesn’t really matter where. The shadows are placed accurately though, and are mostly horizontal chunks.

Close up of how chunky and varied the colors are. Notice that I held the knife horizontal, or sideways, and used short up and down movements to spread it. Make sure to have a very light touch!

Mess up the colors so that the mingle a bit. Make sure to leave streaks and not do too much or you’ll just have one big color and a flat painting. Again, the chunks are in horizontal shapes, but the movement of the knife is made with short, up and down strokes so that the streaks look like grass.

You may switch to a brush when you need more detail, but use the brush like it was a palette knife – don’t touch the canvas much. Just add chunks of your colors, not mixing them at all.
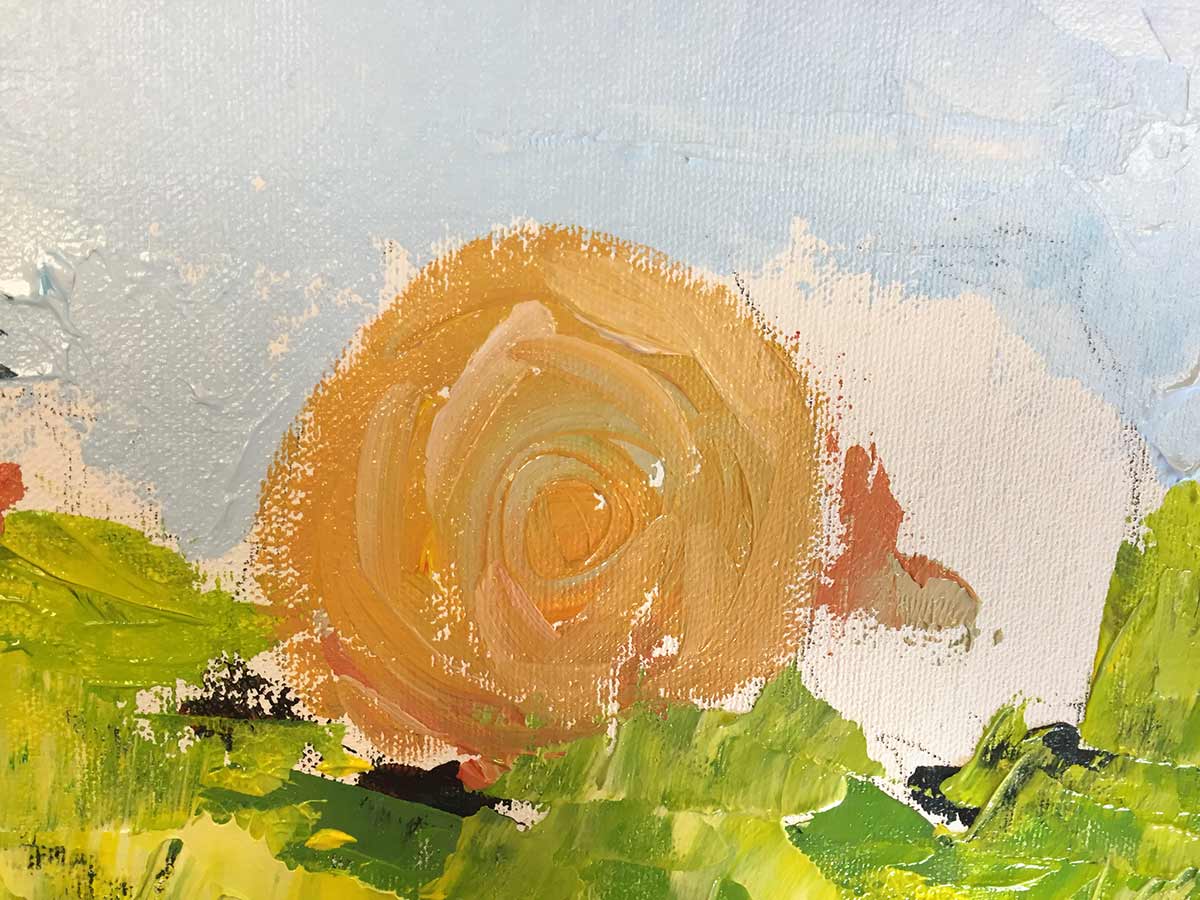
Twirl the haystack end, with a few short circular strokes. Count them and do as few as you can.

Don’t work on it any more! Make yourself stop early. If you want to add a few more colors to places, you can try that to finish.
LEARNING TARGETS
Students know how to split their paint colors.
M A T E R I A L S
- Acrylic paints
- Brushes
- Palette pad
- Water container
- Smocks
- Paper towels
- Palette Knife
6.1 mix
Students can make their own sky colors. Remember that they should end up with 6 variations of their color.
- Make one main color.
- Split to the left – add the next pigment on that side of the color star.
- Split to the right – add the next pigment from the other side.
- Split all 3 down by adding white to each one.
LEARNING TARGETS
Students know how to paint a sky with a palette knife
M A T E R I A L S
- Acrylic paints
- Brushes
- Palette pad
- Water container
- Smocks
- Paper towels
- Palette Knife
7.1 paint
Use each of the variations of your colors, but make patches of each one. Some patches can be small or large, on an angle or horizontal. Look at your reference for some clues, but you mainly want chunks of different colors.
This is called ‘finishing’ or simplifying your technique. We’ll use this in the next step.
LEARNING TARGETS
Students know how to use a scumbling method with their palette knife
M A T E R I A L S
- Acrylic paints
- Brushes
- Palette pad
- Water container
- Smocks
- Paper towels
- Palette Knife
8.1 paint
Have a paper towel in one hand, and a clean palette knife in the other. Your palette knife gets too messy with other colors quickly, so you can clean it with your towel after a few strokes. Use the knife to slide the paints around and blend them up just a tiny bit here and there. This is the finishing touch for each area, and you can blend again at the end of the painting. Look at your work and you decide how much or how little blending you want to do.
BREAK
This is the end of part one if you are dividing into two, 52-minute sessions.
LEARNING TARGETS
Students know how to use a palette knife
M A T E R I A L S
- Acrylic paints
- Brushes
- Palette pad
- Water container
- Smocks
- Paper towels
- Palette Knife
9.1 paint
Students will continue creating colors, splitting them into 3 colors and value variations (lighter tones).
Once an artist is finished with the sky, choose the next area to paint. Only paint one area at a time, and use up most of the paints before moving on to the next area. It’s good to scumble up your next area’s colors with the colors from other areas (just a tiny bit), as this makes your painting look more together, with harmony.
Work across and down the canvas until finished. Be careful since the surface is full of thick paint!
- Use a lot of paint
- Split your colors
- Make lighter colors
- Don’t touch the canvas, just the paint
- Keep the colors separate in chunks
- Scumble them at the end
Show our Pinterest board examples of palette knife paintings if you like, using the link above.
Pinterest Gallery – Palette Knife Paintings
Tap the icon to the left to open our special Pinboard showing examples of artwork to display to your class. See our Article for making Pinterest work on larger displays. You can also use a laptop or large tablet and gather everyone around like you’re using a book.
LEARNING TARGETS
Students know how to finish a palette knife painting
M A T E R I A L S
- Acrylic paints
- Brushes
- Palette pad
- Water container
- Smocks
- Paper towels
- Palette Knife
10.1 paint
Use the palette knife to blend your colors and make more harmony if you like.
LEARNING TARGETS
Students know the importance of cleaning up.
M A T E R I A L S
- Paper Towels
- Cleaning wipes
- Sink
- Waste baskets
- Well-lit spot for photos
- Camera or phone-camera
9.1 CLEAN
- Wash hands
- Super-wash brushes if used
- Put art supplies away
- Wipe tables & toss trash
- Remove any smocks (last)
- Check for items on floors and tables
9.2 PHOTO
9.3 CONNECT
%
Insights
This lesson provides understanding
%
Technique
This lesson shows application and movement
%
Self Expression
This lesson allows personal freedom
OBJECTIVES
- Practice and improvement using a palette knife with acrylics
- Understanding how colors look best when there are variations
- Accomplishment in creating a loose painting technique
- Fulfillment by choice of subject
TROUBLESPOTS
The right amount of paint – A palette knife painting cannot be effective if you don’t have plenty of paint – most people will not use enough at first. This is true of any painting technique that looks loose and sketchy. However, some young artists may run with the idea of lots of paint and squeeze out gigantic blobs and play in the paint like it’s liquid play dough. It is a balance so you’ll need to be clear about it before you begin, and also keep an eye out for too much or too little.
ART WORDS
Harmony – When a work of art has different areas that still look like they go together, it looks like it has visual harmony. One way to make this work is to use some of the same colors in all the areas.
Split color – When a color is split, you choose the colors on either side of it on a color star or color wheel. Red is split to Red-orange and Magenta. Yellow-green becomes Yellow and Green.
Scumble – Any technique that uses a layer of opaque paint over other paint, that is broken up in bits and pieces so that the under layer shows through. Using a very light touch is essential for a scumbled look.
CLASSROOM
PREP
all materials.
What your room needs
Here are your printable lists and room prep instructions.
Opens in new window
CLASSROOM
MATERIALS
- Water container
- Smocks
- Paper towels
STUDENT’S
MATERIALS
- 14″ x 17″ Sketch Paper
- 11 x 14″ Canvas Board
- Charcoal
- Ebony Pencil
- Color Knife Reference Photos PDF
- Acrylic paints
- Brushes
- Palette Pad
- Palette Knife
- Canvas Pencil
- Eraser
PREVIEW
Week 31: Artists’ Choice
March 30 – April 3
Everyone gets a chance to use learned skills and freedom to choose what to do. It’s also a great day for finishing existing works such as the complemented animals or palette knife paintings.
Week 32: Robots & Skeletons
April 6 – 10
Artists learn proportions of the body and how the skeletal system affects the way we look. Understanding what the bones are doing inside the body helps us draw more accurately.