
OVERVIEW
Students will learn about shapes that are made up of air, and are in-between other shapes, and how it helps to draw things if you look at these shapes in addition to solid shapes.– – –
Grades 1 – 2
1 Hour & 30 Minutes


SCROLL & TEACH LESSON PLAN
Don’t worry about anything. Just spend a few minutes reading the lesson plan and printing out your PDFs. Then check out the READY, SET, GO! section and print your prep-page, which includes checklists and an “at a glance” outline of the lesson so you can stay on track when you’re teaching. Set out the materials from the list on your prep page and you’re ready.
That’s all you need to know. Every Step is a different color. Just use your device to Scroll & Teach!
Art Supplies Are Needed
Our lessons are designed to work with very specific supplies (see our supplies page using the button below). We recommend ordering what you need for home delivery. However, you can try and make do with what you have on hand during the health crisis.
Lesson At A Glance
A brief overview of each step. Buttons jump to each section for detailed information.
Optional – Greetings and artists’ choice with markers
15 Min – Divide page, draw a donut and a surprise
10 Min – Learn about Air Shapes
10 Min – Draw 2 pictures with air shapes
8 Min – Cut shapes with colorful paper.
17 Min – Glue shapes on paper
5 Min – Everybody helps
SCROLL & TEACH
LESSONPLAN
Each section is a different color. Read over once and then you can SCROLL & TEACH using any device you like. It’s designed to work best with your phone.
STEP 1. Warm Up - Optional
A quick drawing can help students move into a lesson in a relaxing wayTap the button below to start a timer in a new tab/window.
draw
M A T E R I A L S
- 14″ x 17″ Sketch Paper
- Ebony Pencil OR
- Compressed Charcoal
- Stretchy Eraser OR
- White Eraser
Encourage students to work with one piece of paper for a while. If someone uses the phrase, “free draw”, explain that artists’ choice is something only artists can do, while free-draw is something anyone can do. You want to use the phrase to elevate the students’ expectations of their work.
Everyone should take their time with the work and make a finished piece of art. Limiting the paper can also help kids focus on the work. If someone finishes in super-fast time, ask them what more they can do to the existing paper. Ask again several times – unless they appear overly frustrated; then you can allow them to move on to a new work.
explain
M A T E R I A L S
- 2B Pencils
- White Erasers
- Washable markers
- 11″ x 17″ copy paper
- A round object that can be drawn around as a template for about a 4″ to 6″ circle:
- Roll of masking tape
- Paper saucer or bowl
- Templates you cut from heavy paper
Give each student a piece of 11X17 paper, pencil, and eraser.
Have the students lay their paper bath tub orientation (also landscape or horizontal). They should follow along as you talk them through the guidelines.
“Follow along and I’ll tell you how to draw the guidelines. Then you’ll turn them into special fun drawings in a minute.
We’re not drawing yet. Try to make very light lines as a guide for your drawing. You’ll trace over them with markers. So try to use the tickle technique and tickle your paper instead of pressing hard.
- Divide the page into 2 sides (1 vertical line down the center). It is ok if it’s not perfectly in the center.
- Use the round object to trace a circle in each section.
- Draw a smaller circle in the center of the large ones to make each one look like a donut. Like this:”
Draw
Switch to using markers. Have everyone make one of their guideline circles into a donut. Add some sprinkles and icing!
As they work, explain that drawing the hole is actually drawing an air shape.
“You drew a hole in the center of your donut. What did you draw when you drew the hole? It wasn’t the donut. What is a hole?
The hole is air. You drew an air-shape. Artists draw air shapes a lot. It really helps to know how to draw the air shapes inside and around objects.
If you drew a tiny hole it would not look much like a donut. If you drew the hole almost as big as the outside circle, it would look more like a bicycle tire than a donut.
So that means drawing air shapes a certain size can make a big difference.”
Draw
(Draw a smiley face into the middle of the circle, and a body underneath that attaches to the edge of the bigger circle.)
Ask them what could this one be that is very different than the first one. After a minute of ideas, show them this picture, and explain how this time, it’s the big circle that is the air shape. It’s a circular window!
Let them draw and color this one too if you have time.
Prepare
M A T E R I A L S
- Digital display and connection with device.
Have students draw in the air with their fingers, and then show our slide show of air shapes, talking about them and having a lot of fun with them (see slide show below).
“Everyone draw in the air in front of them using your finger. Draw a circle. Now draw a square. Try a triangle. These are air shapes, and the circle you drew in the air is just like the circle inside your donut. It’s a donut hole! Let’s look at some pictures of air shapes. Artists look at these often to help them draw.”
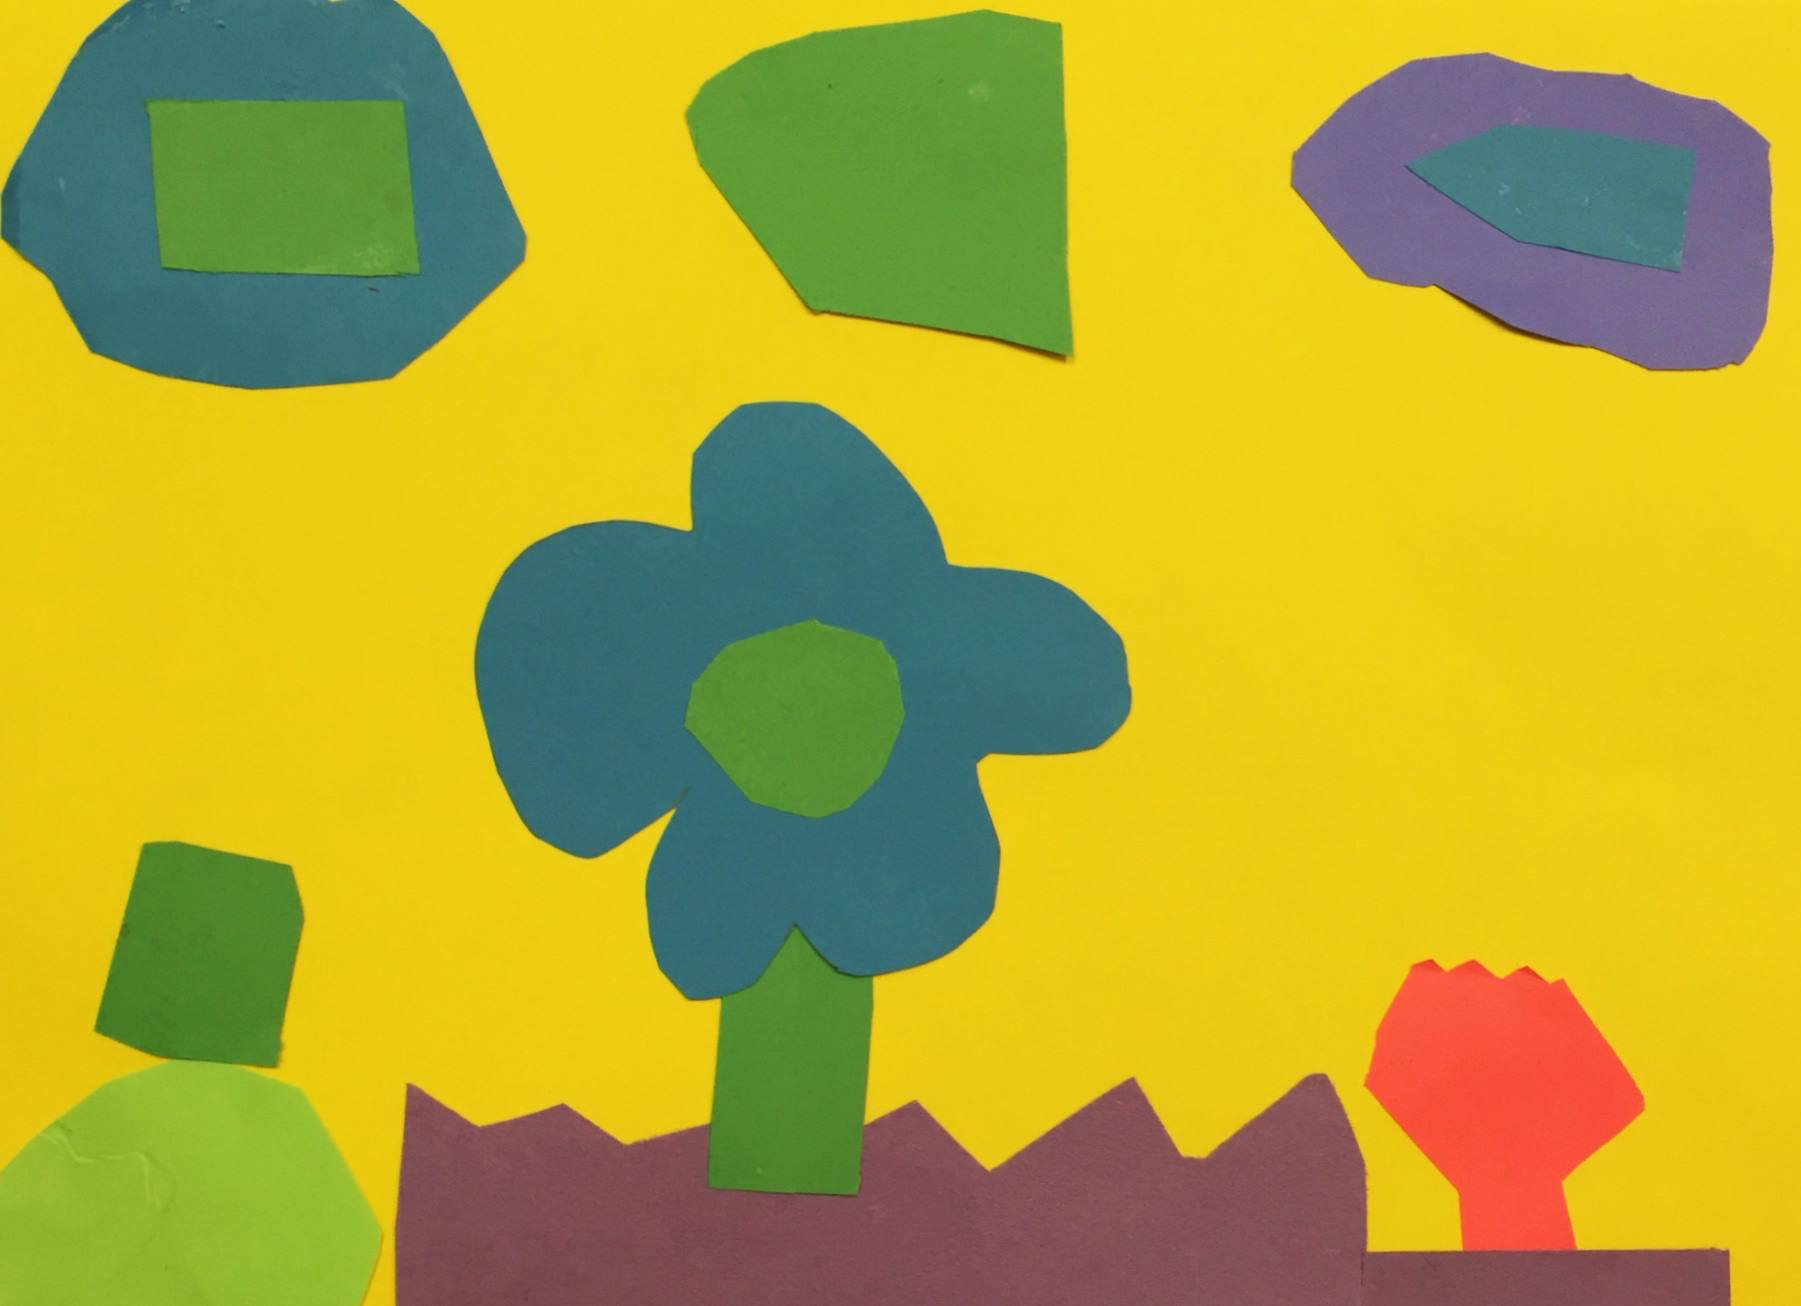
Air Shapes (tap any image to open viewer)

3 holes
Are they all round? Two are squished.

Chair
What shapes are the holes?

Old Tire
The hole is larger than the donut.
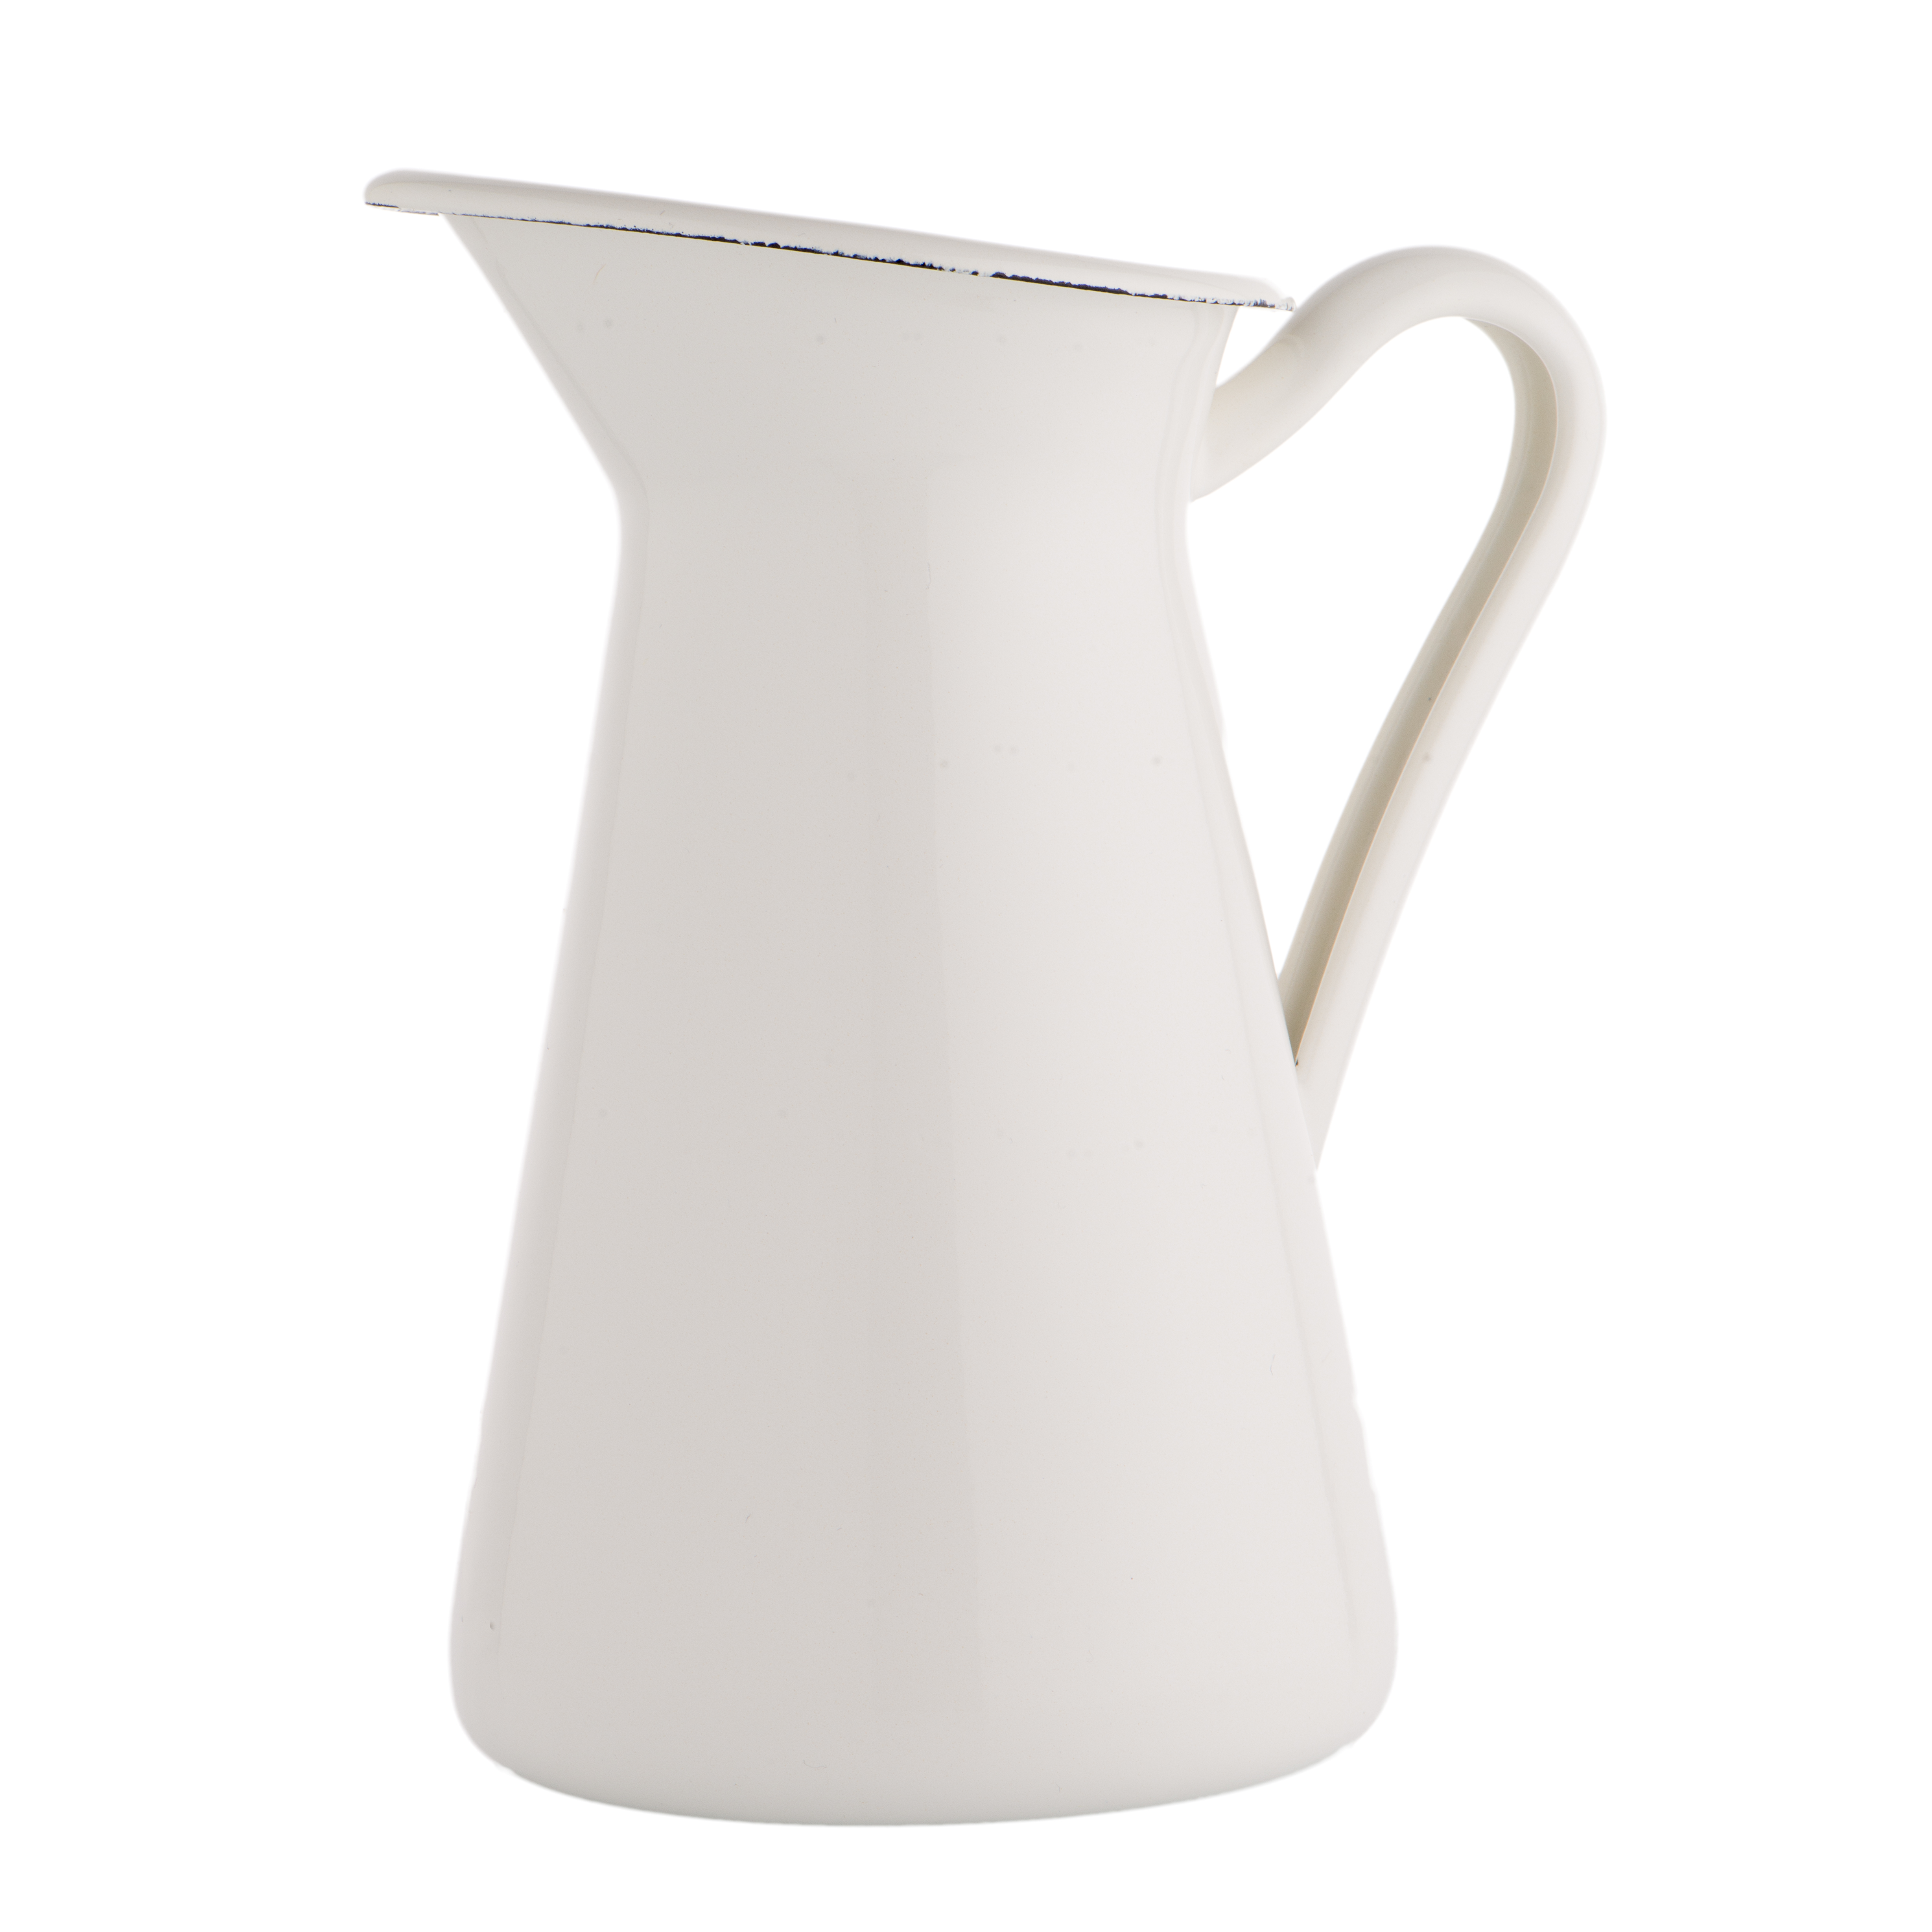
Pitcher
Look at the air shape inside the handle. It looks like the thumb on an oven mitten
M A T E R I A L S
- 11″ x 17″ copy paper
- 2B Pencil
- Eraser
prints
iNFORMATION
Air Shapes
Several photos of objects that have good air shapes to find and draw.
Hand out prints. Make sure each student can see one. Placing the reference sheet between two students on a stand works well.
Alternatively: Allow students to trace right on the images with a marker. Cut each image apart if you want to try it this way

1 Page – Opens in new window
Practice
“This piece of paper will not be artwork. It will only be used for practice.
- Choose one item.
- Look at it for a moment and find the air shape. Draw just the air shape.
- See if you can find an air shape on another picture and draw it too!
- Try drawing the object shapes around the air shape if you want.”
M A T E R I A L S
- Colorful bright copy paper (copy paper lasts much longer than construction paper, but it can be used too)
- Kids’ safety scissors
- Box for scraps
cut
Hand out the scissors and practice a time or two.
Lay out colorful paper and pencils. Have the students cut out (or draw and cut) fun and wavy shapes. Remind them that they can keep the shape OR the air shape piece. Be sure to watch the students as they cut, keeping their fingers away from the blades.
“We’re about to use scissors, and that means you have to be extra careful. Anyone who does not keep their scissors right over the table, and right in front of them, will not get to use them. If you need to raise your hand or point to something, you MUST PUT YOUR SCISSORS DOWN on the table first.
Let’s all try practicing setting our scissors down and then raising hands a time or two before we begin cutting…”
M A T E R I A L S
- Colorful paper cutouts
- Scrap sheets of paper for a gluing mat
- Kids’ safety scissors
- glue sticks OR liquid glue
glue
Give a glue stick and paper for a gluing mat to each student.
Have the students pick out their favorite cut out pieces. Then have them find a background sheet of paper to use for their cut paper artwork. It can be colored, or white. Move the cut shapes around on the background paper until you find a design you like. Carefully glue down the pieces one at a time, pressing firmly.
While students are working, you can walk around and ask them to point out the air shapes in their picture. These will most likely be the holes and the background paper showing through, but see if you can point out a paper shape that fits into another one. Which one is the air shape?
- Use lots of glue if you’re using glue sticks – covering edges AND the middle of your pieces.
- Use less glue but cover all areas if you’re using liquid white glue.
- White glue works well by placing into bowls and applying with a brush. Clean brushes well afterwards.
- Apply glue working on a piece of scrap paper like a place mat to keep glue neat and off your table.
M A T E R I A L S
- Paper Towels
- Cleaning wipes
- Sink
- Waste baskets
CLEAN
- Wash hands
- Super-wash brushes if used
- Put art supplies away
- Wipe tables & toss trash
- Remove any smocks (last)
- Check for items on floors and tables
Students clean up their work area.
%
Insights
This lesson provides understanding
%
Technique
This lesson shows application and movement
%
Self Expression
This lesson allows personal freedom
OBJECTIVES
- Practice and improvement using observation to make drawings look more like real life.
- Understanding how there are shapes outside and around objects called air shapes.
- Accomplishment in drawing more realistically
- Fulfillment by creating a colorful cut paper collage of their own design
Saying “Negative shapes” as you instruct – Try to never use this traditional phrase with this age group. It’s just too abstract of an idea, and will confuse them. Abstract concepts that are not noun-based will not be understood by young student at all, and harder for older kids too. Even adults grasp noun-based – or concrete – ideas, easier than abstract concepts. We wanted to use a concrete idea, so for The Art Instructor we came up with the term Air Shapes to replace Negative Shapes.
Not wanting to draw from reference – Kids don’t actually look very close at things they’re drawing until they’re around the age of 8. This lesson prepares them for seeing shapes more easily when they begin looking later on. Because they like to draw using symbols (symbolic drawing), your students may not want to use the pictures. This is ok! Kids are not always comfortable drawing by observation yet. However, to prepare them for better habits in the near future, you should tell them that artists do look at pictures and real life to make their drawings look realistic. Encourage kids who are reluctant, to try practicing just today, and then they can go back to drawing the way they usually do. You can even ask them to draw by observation as a favor to you, which sometimes gets at least one drawing out of the most fearful student. Keep in mind that the goal of practicing the air shapes is to have some fun, and introduce the idea of it, not to become proficient at it or even to enjoy it.
Not willing to rough cut – cutting out roughly around your shape first, makes it WAAAAY easier to manipulate scissors and paper because the paper is much smaller. If kids won’t do it, help them by cutting away the larger portions of the paper yourself so they don’t struggle with it. They will realize that it’s important, even if they aren’t willing to take the time right now to do themselves.
Scissor safety – Explain before you hand out scissors, that anyone who does not keep them right over the table in front of them, will not get to use them. If you need to raise your hand or point to something, you MUST PUT SCISSORS DOWN on the table first. Try practicing setting scissors down and then raising hands a time or two before you begin cutting.
The right amount of glue – Too much is easy with liquid white glue, but not enough is even worse. Especially with glue sticks, if you don’t use enough, the work will fall apart. Have scrap paper ready to use as glueing mats.
ART WORDS
Air Shape – an artist can look at the holes in and around objects to see shapes. It helps to draw these shapes as well as the object shapes.
Collage – when cut papers are glued to another surface or sheet of paper to create a work of art.
ROOMPREP
Have a bunch of amazing supplies ready, and cut a few things apart before-hand in a way that make you look amazing.
Print all of your PDFs from the lesson plan and cut any references apart as needed.
What your room needs
Here are your printable lists and room prep instructions.

Opens in new window
CLASSROOM
MATERIALS
- 11″ x 17″ copy paper
- 4B pencils
- Markers
- Oil Pastels
- Blender sticks
- Paper towels
- Smocks
- Kids’ Scissors
- Box for paper scraps
- Glue stick or liquid glue
- Brushes (optional for glue)
-
Colorful copy paper