
OVERVIEW
Students will learn how to create ink work with a dipping ink pen & metal nib. Animal photos are provided for reference, and the interior will be filled with expressive patterns, commonly called zen tangles. Creations students (advanced) will move more quickly into choosing subjects and doing special artwork. Classroom rules are introduced.– – –
Grades 3 – 5
1 Hour & 45 Minutes, or two 52-minute sessions
STANDARDS For This Lesson
SUBMIT YOUR SUMMARY
Copy and paste the text below to send your abbreviated lesson plan with national standards and learning targets to your supervisors and colleagues. Or access the WORD doc by using the blue button below.
– – – – – – – – – – – – – – – – –
Week of AUGUST 20 – 24
COMING SOON!
OVERVIEW:
copy_and_paste_overview_here
NATIONAL STANDARDS:
Grade XX
Identification_number – Description_of_standard
Grade XX
Identification_number – Description_of_standard
Grade XX
Identification_number – Description_of_standard
LEARNING TARGETS:
Target_one
Target_two
LESSON PLAN:
copy_and_paste_glance_lesson_from_prep_page
Tap the Plus Icon (above right) to open STANDARDS information, including an Overview, Learning Targets and a Syllabus. Copy and paste to send to your Administrators or use the button below to download a Word document with the same information that you can add your info to and email to them as an attachment.

SCROLL & TEACH LESSON PLAN
Don’t worry about rewriting anything. Just spend a few minutes reading the lesson plan and printing out your PDFs. Then check out the READY, SET, GO! section and print your prep-page, which includes checklists and an “at a glance” outline of the lesson so you can stay on track when you’re teaching. Set out the materials from the list on your prep page and you’re ready.
That’s all you need to know. Use your smartphone to Scroll & Teach!
Lesson At A Glance
A brief overview of each step. Buttons jump to each section for detailed information.
(during warmup) – Introduce the rules. Display the printed poster.
10 Min -Slideshow & explanation of zen tangles/doodles.
17 Min – practice drawings and then a pencil guideline drawing
5 Min – Practice using the dip pen and making patterns.
45 Min – Students enjoy music while they create ink art
2 Min – Everyone helps
SCROLL & TEACH
LESSONPLAN
Each section is a different color. Read over once and then you can SCROLL & TEACH using any device you like. It’s designed to work best with your phone.
LEARNING TARGETS

Students know how to express themselves through drawing
M A T E R I A L S
- 14″ x 17″ Sketch Paper
- 2B & 4B Pencils
- Eraser
- Paper towels
- 12″ circle template*
*Make a circle template. Use a compass set to 6″, or a string on a push pin. If you have a plate that is big enough, you can trace it. Make one or two circles out of poster board or cardboard for your advanced students.

Pinterest Gallery – M. C. Escher
Tap the icon to the left to open our special Pinboard showing examples of artwork to display to your class. See our Article for making Pinterest work on larger displays. You can also use a laptop or large tablet and gather everyone around like you’re using a book.
1.1 greet
Greet students as they come in.
Get each student started with a choice of using oil pastels or pencils in their sketch pads. Artists should draw their favorite thing they enjoy drawing. If someone doesn’t have a favorite thing to draw, try these Brain Boosters:
- Your pet as a star wars character
- Some art supplies nearby
- Flowers with faces
- A clock tower on another world
Note – if you see some students drawing popular cartoons, don’t discourage this today, but do make mention of our original-work policy below:
Afterwords, display the Pinboard of M. C. Escher ink work then discuss the rules (see Step 2.)
CREATIONS - tap here to open
Use the Student Instructions printout below to distribute to your Creations students. Tap the image to open the PDF in a new window.
Show the Mandala Inspiration Pinterest Board to your Creations students. Link is just below.
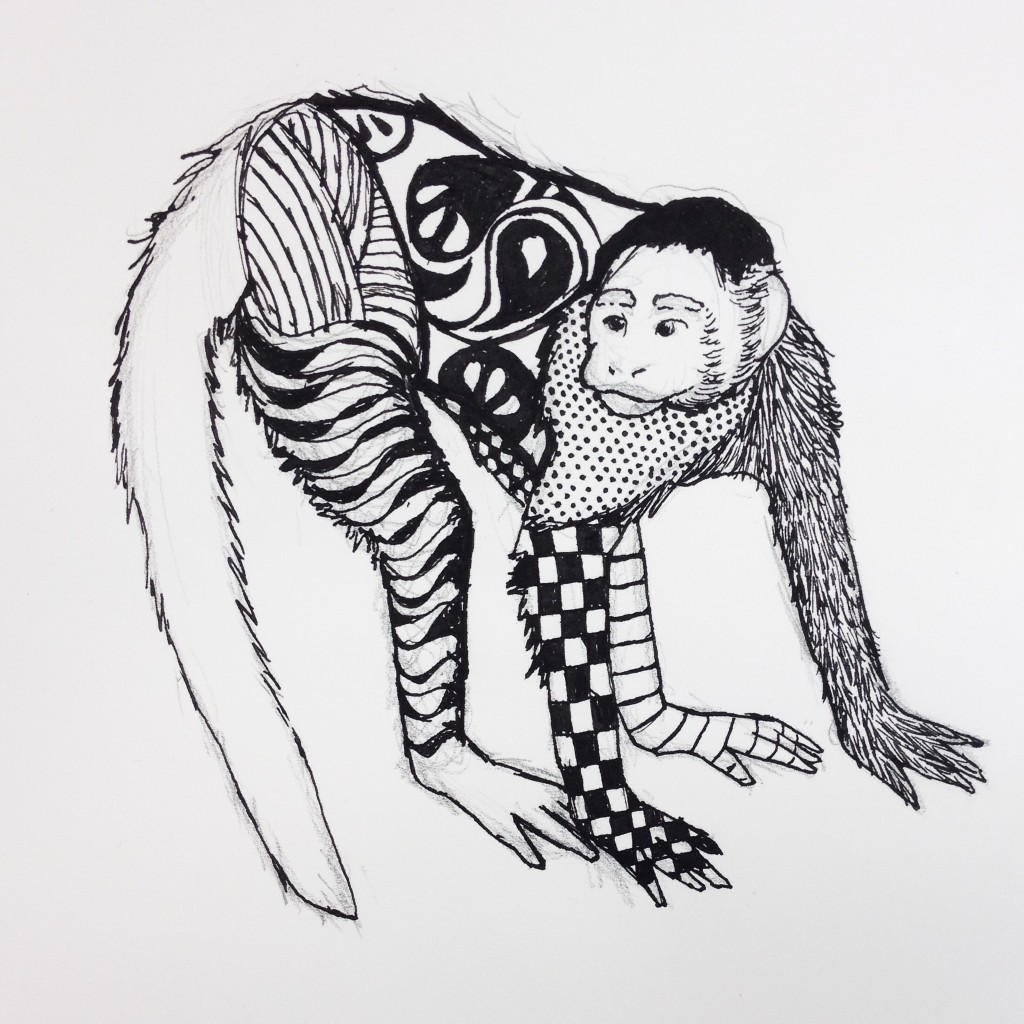
Zentangle Animal Mandala Design
Overview: Students will choose an animal or two and create a circular design with them. Flattening out and stylizing the reference may make this easier but the student can choose how they want to use the reference.
Step 1. Brainstorm sketching (15 minutes) Draw two kinds of sketches to get your ideas figured out. First, draw simple rough ideas for the entire mandala design. These should be small (thumbnails are about 2 inches maximum) so you can draw several ideas quickly. Second, make a sketch of you animal(s) in the position for your mandala design so you can work out how it fits. Use the M.C. Escher reference for ideas but you can do it your own way.
Step 2. Guideline Drawing (20 min) Using a circle template or compass, draw a large circle on your sketch pad using your pencil, but draw extremely light lines, barely touching the pencil to the paper. This will allow the lines to disappear when you erase them after inking. You can make smaller interior circle guidelines using a roll of tape or other circular objects.
Then create your artwork, making the lines as light as you can. Remember that you’ll be inking the real artwork, so the pencil lines are only temporary. You don’t have to make any patterns at all, just do the Big Shapes and important outlines so you can begin inking.
Step 3. Inking (The rest of the class time) Be careful to keep your ink secure, and tap the tip so you don’t drip! Work from the top and move downward, so you don’t smear wet ink.
Fill your drawing with awesome lines, textures, and patterns. You an also try making some lines thicker than others. Enjoy creating!
Tap images to open Creations Student Instructions and Reference Materials in new windows


Pinterest Gallery – Mandala Inspiration
For CREATIONS Students.
Tap the icon to the left to open our special Pinboard showing examples of artwork to display to your class. See our Article for making Pinterest work on larger displays. You can also use a laptop or large tablet and gather everyone around like you’re using a book.
Use this button to jump down to the preparation section.
LEARNING TARGETS
Students know how to what is expected of them and how to work with others.
M A T E R I A L S
- Rules Printout
2.1 Print
Reference
RULES
Print and display on your wall as a reminder

1 Page – Opens in new window
2.2 Teach
The Rules!
Because our rules are special, and a big deal, use this handy guide like a teacher talk. It’s always a great idea to ask your returning students if they remember any of the rules, and allow them to participate in the explanations.
2. Be nice. Everyone knows this rule. But did you know we have 3 ways this rule works? – – – The first is to be nice to others, like your friends and the teacher. – – – The second way is to also be nice to yourself! You should take care to not put art tools in your mouth, for instance, to hold them. The paint is not good for you to eat – at all. Another way to be nice to yourself is to say nice things about yourself. You wouldn’t say to the person next to you, “wow! what an awful painting! You’re not much of an artist.” That would be so bad, and rude, and mean! However, I hear artists say that to themselves often. Don’t be bad and rude and mean to yourself. – – – The last way to be nice is to be nice to your materials. If you don’t wash your brushes the way we show you, they will be useless in no time. There are lots of ways we’ll show you how to be nice to your stuff
One very important way to be nice to your art school, is to never leave our classroom without letting me know. That means that if you see your mom outside and run out to meet her and leave, but I didn’t see you, I will get in trouble. I’ll have to call your mom or dad, which is not good for you or me. It’s very important that you never, ever disappear from art class without me seeing you connect with your parent. Thank you for helping keep that rule.
3. No mistakes allowed Oooh. This sounds scary. However, we are not saying you have to be perfect, but the complete opposite! No famous artist who has ever lived, was born creating the beautiful work they’re known for. Nope, there is no baby-art anywhere that is valuable. Rembrandt’s baby art? Nope. Picasso’s baby art? Nope. Everyone had to practice! And when you practice, you will make what we call, “Learners”. There are un-informed people who have been known to refer to such artwork as mistakes. These people are mistaken. There is no such thing as a mistake in art. Let me repeat that: There Is No Such Thing As A Mistake In Art. But why? What about those times you make something you hate; something you don’t want anyone else to even see? That is normal. It even important to do. I mean, it’s even necessary! You won’t ever get to be the artist you want to be until you make tons of those Learners. When you do, it feels bad, but just remember that all the famous men and women did that too. We don’t see them because they threw them away. You can throw your learners away too, but sometimes you’ll want to keep them because they’re kind of like notes on how you learned something cool. It’s also good to let your parents see a few of them so they understand what’s going on in that art class you’re taking.
After you’ve made some Learners, you will begin making some Keepers. Those are the ones you save and show everyone. The more you practice, the more Keepers you’ll make. But you’ll always want to make some Learners so you are improving as an artist.
4. You Must Mix You see these tubes of paint? These are not paint colors. They may look a lot like paint colors, and they may act like paint colors, but they are not. These are ingredients and they’re called pigment colors. They are too strong and dark for painting. You will use these tubes of pigment colors to invent and create paint colors on your palette. This is only 10 tubes of paint. If I said you could only use 10 colors to paint with this entire year you’d be upset. There are millions and millions of colors all around us. You need more than 10.
So, these ingredients are so intense and dark so that they can be mixed together in millions of combinations to create millions and millions of colors. You have all those millions of colors in your box, because this is the best set of 10 pigments on the planet. They make pretty much everything. You get ALL the colors.
Think of these like kitchen ingredients. You wouldn’t eat a bowl of flour or drink some oil. Here, have a nice glass of vinegar! Ew. But when you mix up things in your kitchen, you can make cakes and biscuits and all kinds of yummy things. Your palette is your kitchen. You can make ALL the colors there.
One exception is that the bright red pigment is also one of the nicest of the millions of colors you’ll use, so occasionally you may use that one right out of the tube.
Use this button to jump down to the preparation section.
LEARNING TARGETS
Students know how to use ink and a dipping pen with a nib
M A T E R I A L S
- 14″ x 17″ Sketch Paper
- dip pen with waterproof India Ink
- Trays, lids, or paper plates, to secure Ink bottles on
- Tape or clay
- Smocks
3.1 demo
Draw a few lines on the sketch paper. There is nothing better than seeing someone use a medium right before you try it for the first time.
Read the captions on the slides or use the following Teacher Talk.
Keep your bottle cap on until right before you’re ready to use the ink.
The base also helps keep the cap from rolling away. Do not use the dropper to draw with.
Many ink bottles are bigger at the bottom, and are designed so you can dip your pen all the way to the bottom without submerging the handle.
Tap the nib against the bottle edge to remove some excess ink so you don’t get drips. Remember,
‘Tap The Tip, So You Don’t Drip!‘
The nib has a rounded top and should be held like a helmet, not like a cup. Because it’s metal and fairly thin, the nib can be accidentally bent. That will ruin it, so be gentle. If you notice a split in the nib, that’s normal! It’s how the ink travels to the tip.
When replacing the bottle cap, make sure it’s snug, but don’t tighten super hard, because the plastic cap or bottle will warp and allow a leak.”

Taping your ink bottle to a base stops most spills before they happen! We use modeling clay to stick our bottles onto a plastic plate.

The base also helps keep the cap from rolling away. Do not use the dropper to draw with.
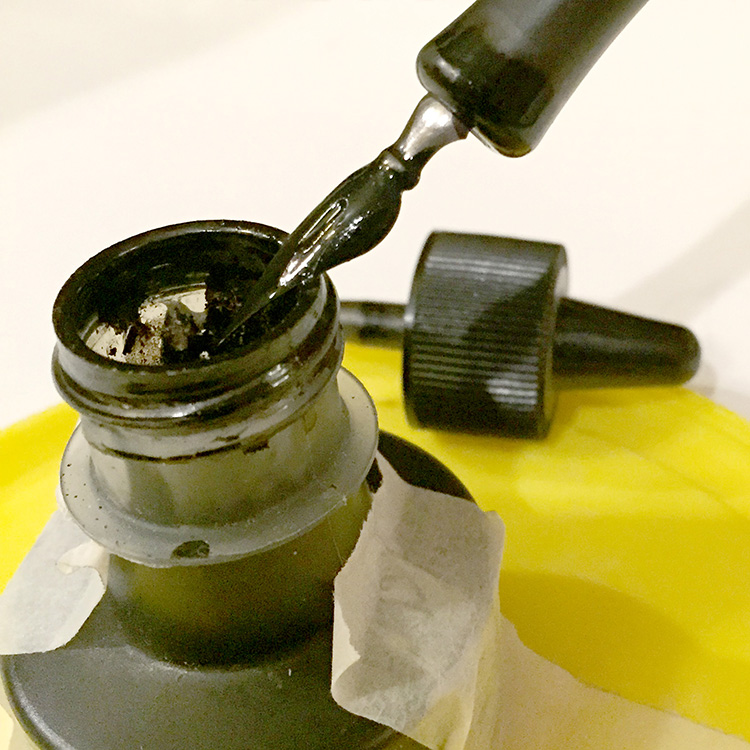
Tap the nib against the bottle to remove some excess ink.
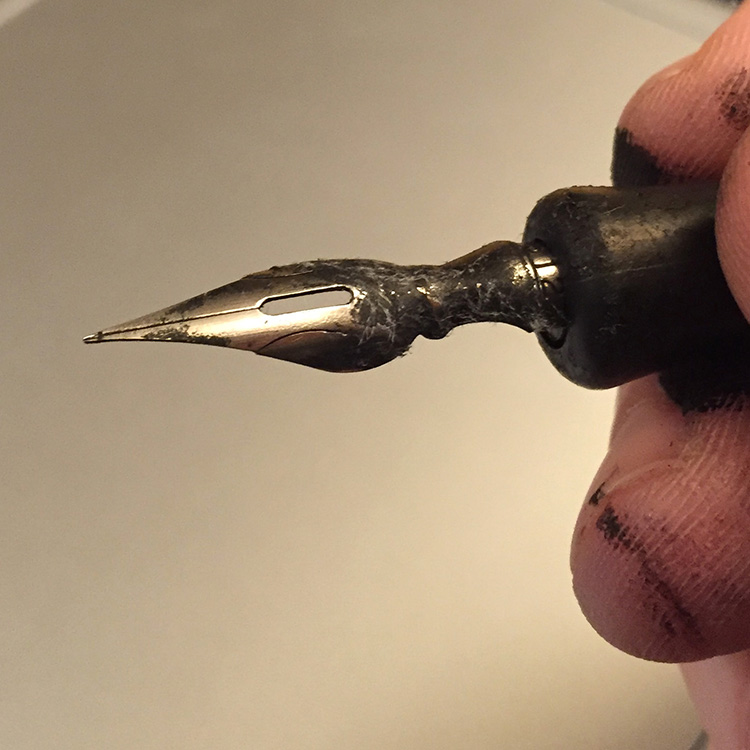
The nib has a rounded top and should be held like this. It can be bent, and that ruins it, so be gentle. If you notice a split in the nib, that is how the ink travels to the tip, and all nibs are split like this.
Use this button to jump down to the preparation section.
STEP 4. Animals Intro
Students will choose reference and view other students' work for inspiration 10 MinutesLEARNING TARGETS
Students know how to get inspiration through viewing other’s artwork
M A T E R I A L S
- Reference photos
4.1 print
Reference
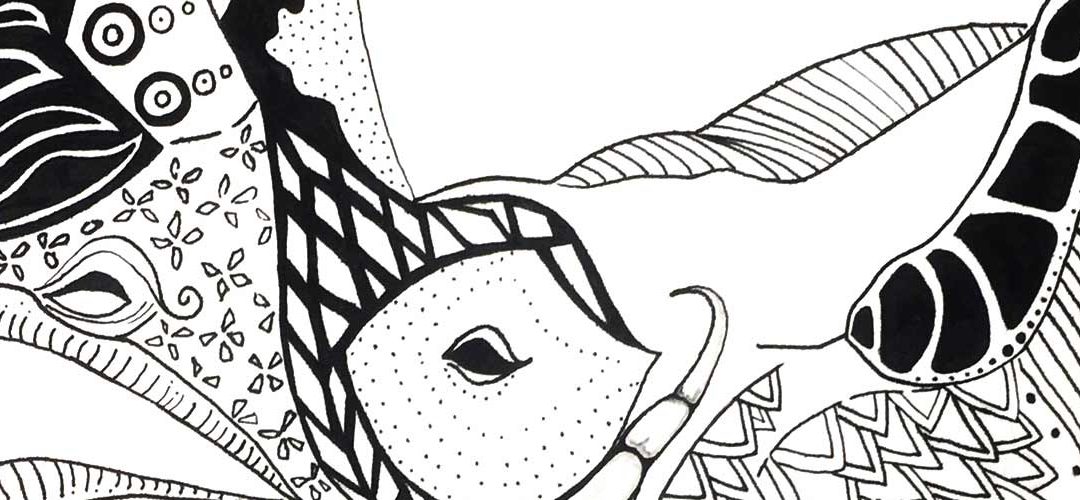
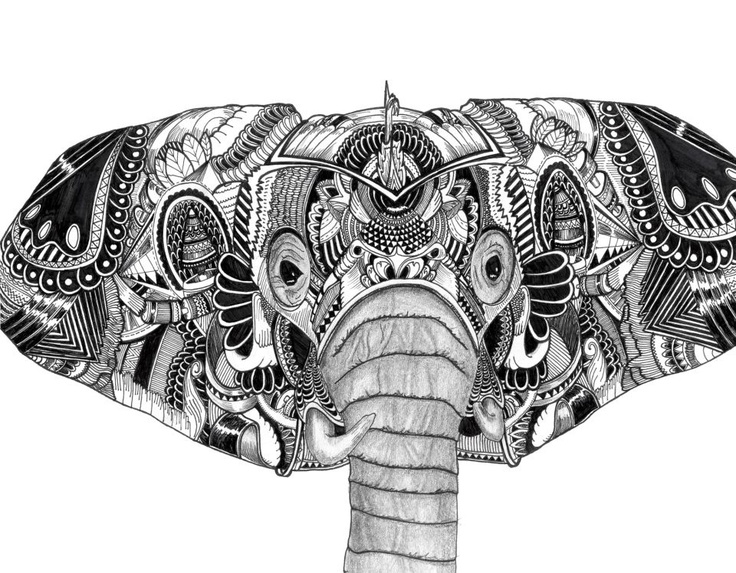
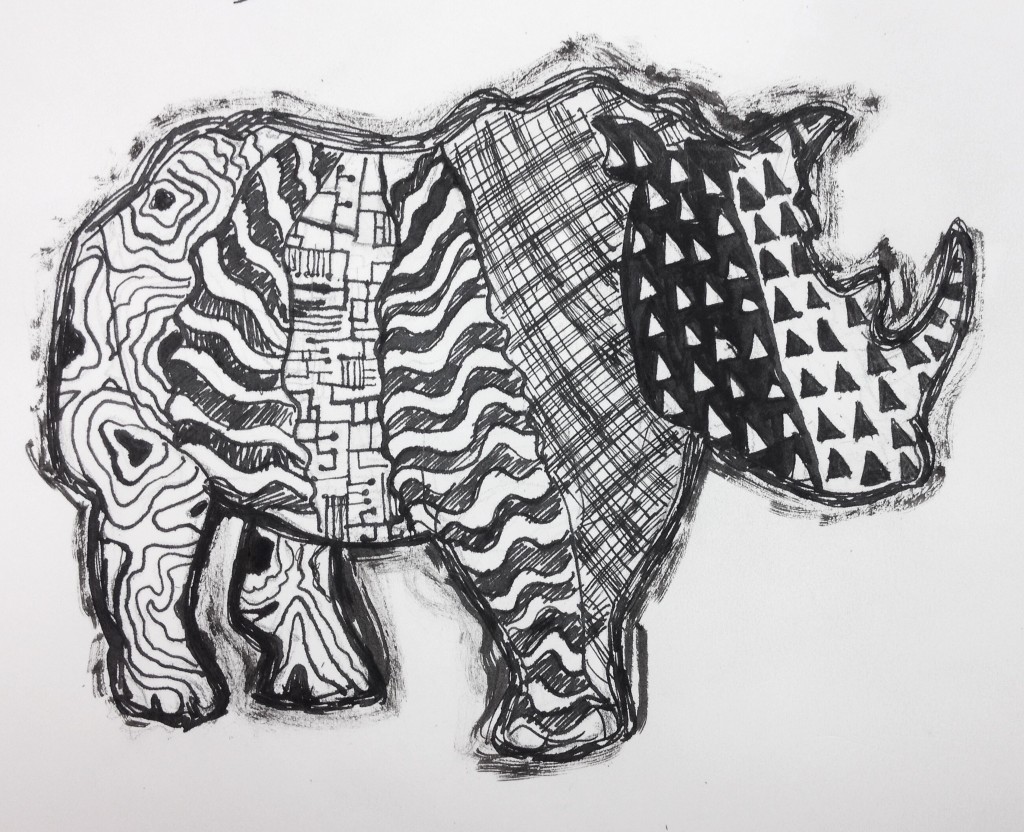
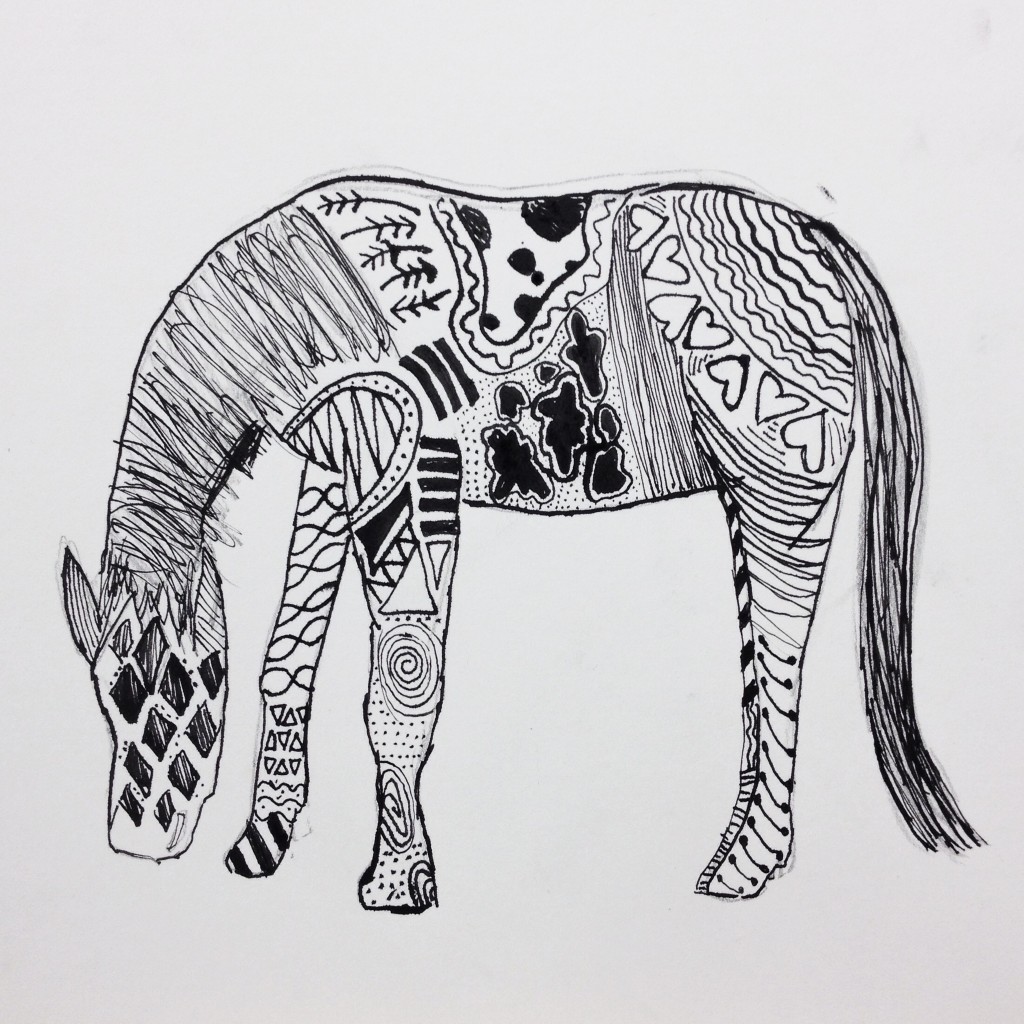
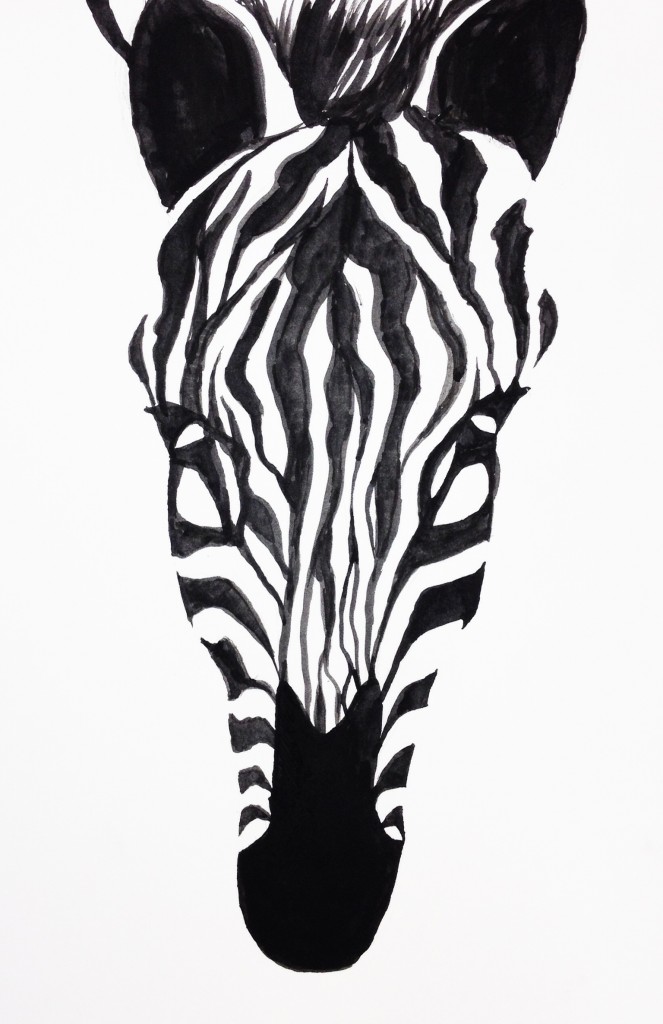
Ink Animals
8 animal photos for zed doodle ink animals.
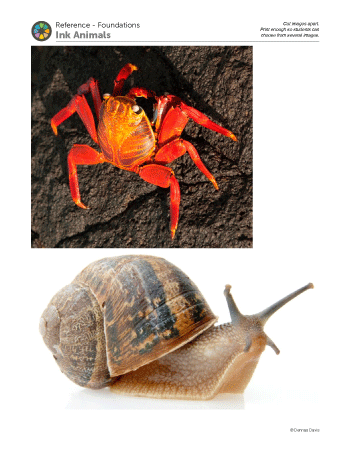
4 Pages – Opens in new window
4.2 inspire
Talk about all the different patterns as you show the ink work. Let students have a moment to view them so they’ll be inspired, and be able to remember several pattern ideas.
Provide the PDF reference photos and let each student choose one they like.
Use this button to jump down to the preparation section.
LEARNING TARGETS
Students know how to practice their artwork before making a final version
M A T E R I A L S
- 14″ x 17″ Sketch Paper
- dip pen with waterproof India Ink
- Trays to hold Ink
- 2B Pencil
- White Eraser
- Smock
5.1 draw
At least 2 sketches are required, and 3 is even better if a student can tolerate redrawing that much.
After the sketches, have each artist create a guideline drawing, which has no shading or patterns. A guide line drawing is NOT the artwork, but a very, very light sketch that helps you with the final ink, and which can be erased after the ink is completely dry (not today!).
BREAK
This is the end of part one if you are dividing into two, 52-minute sessions.
Use this button to jump down to the preparation section.
LEARNING TARGETS
Students know how to practice before they make their final artwork
M A T E R I A L S
- 14″ x 17″ Sketch Paper
- dip pen with waterproof India Ink
- Trays to hold Ink
- Smock
6.1 draw
CAUTION: Do not practice ink on a page that is on top of the guide line drawing! Sometimes ink can come through and bleed to the page underneath, ruining it.
Use this button to jump down to the preparation section.
LEARNING TARGETS
Students know how to use India Ink and a metal-nibbed ink pen
M A T E R I A L S
- 14″ x 17″ Sketch Paper
- dip pen with waterproof India Ink
- Trays to hold Ink
- Smock
7.1 ink
Go around the classroom, encouraging students and asking questions. Help individual students as needed. Give your honest response, and only offer suggestions after you’ve asked, and they clearly want help.
Use this button to jump down to the preparation section.
LEARNING TARGETS
Students know the importance of cleaning up.
M A T E R I A L S
- Paper Towels
- Cleaning wipes
- Sink
- Waste baskets
- Well-lit spot for photos
- Camera or phone-camera
8.1 clean
Students clean up their work area.
- Wash hands
- Super-wash ink nibs and dry with paper towels
- Put art supplies away
- Wipe tables & toss trash
- Remove any smocks (last)
- Check for items on floors and tables
8.2 photo
8.3 connect
%
Insights
This lesson provides understanding
%
Technique
This lesson shows application and movement
%
Self Expression
This lesson allows personal freedom
OBJECTIVES
- Practice and improvement in drawing lines and patterns
- Understanding ink techniques, drips, and other dangers!
- Accomplishment in creating a finished black & white work
- Fulfillment by creating original patterns and choosing subject matter
TROUBLESPOTS
Ink Spills – Nothing is quite as messy, insidious, or staining as india ink. Have paper towel rolls all over the place ready to cleanup.
Drips and spots – most students will have a drip or two at some point, and it will ruin a drawing in their mind. Counter this by showing how splatters and drops can look cool, or how creating new patterns and black areas can hide things you don’t want..
Not holding the pen correctly – see the teacher talk below for how to instruct, and be on the lookout for upside-down pens..
ART WORDS
India Ink – a very black thin liquid that is much runnier than paint, but also much darker, and waterproof..
Ink pen – a plastic stick that holds an ink nib.
Nib – the metal tip that is used to hold ink and to draw with.
CLASSROOM
PREP
Find an average sized cardboard box to hold the cow print for the extra game.
Print all of your PDFs from the lesson plan and cut any references apart as needed. You can tape the rules to a wall if you want. You might practice speaking through all the rules and working on making them fun and interesting.
Gather enough trays/plates/lids to secure the ink bottles. Practice the inking demo and think through how you’ll attach the bottles to the trays.
What your room needs
Here are your printable lists and room prep instructions.
Opens in new window
CLASSROOM
MATERIALS
- 8.5″ x 11″ copy paper
- Scissors
- 12″ circle template
- Tray, plate, or lids for securing ink bottles
- Tape for securing ink bottles to trays
- Water containers (optional)
- Water eye-dropper
- Paper towels
- Smocks
STUDENT’S
MATERIALS
- 14″ x 17″ Sketch Paper
- 2B Pencil
- 4B pencil
- India ink
- Ink dip pen with metal nib (not too sharp a point)
- White erasers
- Oil pastels
- Blender sticks (stumps)
- Sandpaper boards (to clean blenders)
PREVIEW
Week 4: Color Crazed Cutouts
August 27 – 31
Artists are introduced to the The Art Instructor Color palette and the basics of paint mixing. Then they begin the first stage of a fun color collage project using a 3-color scheme and cut shapes similar to Matisse cutouts. It’s a great way to get into paint for the first time or after a long break.
Week 5: Artists’ Choice & Drawings
September 3 – 7
Finishing up the color cutouts from week 4 is priority, and then artists will move into working with pencil drawings and artists’ choice.
Use this button to view our parent’s blog. Share the link: http://parentart.org, with your student’s parents so your they can read about the lesson each week.