
OVERVIEW
Students will learn about the skeletal system and how it affects the way an artist draws the human form. There is also a fun game as well as a robot project that helps them understand the proportions of the human figure.– – –
Grades 6 – 12
1 Hour & 30 Minutes to Two Hours


SCROLL & TEACH LESSON PLAN
Don’t worry about anything. Just spend a few minutes reading the lesson plan and printing out your PDFs. Then check out the READY, SET, GO! section and print your prep-page, which includes checklists and an “at a glance” outline of the lesson so you can stay on track when you’re teaching. Set out the materials from the list on your prep page and you’re ready.
That’s all you need to know. Every Step is a different color. Just use your device to Scroll & Teach!
Art Supplies Are Needed
Our lessons are designed to work with very specific supplies (see our supplies page using the button below). We recommend ordering what you need for home delivery. However, you can try and make do with what you have on hand during the health crisis.
Lesson At A Glance
A brief overview of each step. Buttons jump to each section for detailed information.
25 Minutes – Draw figures from life & photos (optional)
15 Min – Fun way to learn proportions with worksheet game
12 Min – Present bones slideshow and read captions
50 Min – Students draw realistic and simplified skeletons
5 Min – Trace around robot model and make it into a cartoon
2 Min – Everybody helps
Use this button to jump down to “READY, SET, GO!” – our preparation section at the bottom of each lesson. You’ll find information on what is being taught, a full list of supplies, room prep, and what to expect from your young artist(s).
LESSONPLAN
STEP 1. Warm Up - Optional
Students draw figures from life and photo referenceTap the button below to start a timer in a new tab/window.
draw
M A T E R I A L S
- 14″ x 17″ Sketch Paper
- Ebony Pencil OR
- Compressed Charcoal
- Stretchy Eraser OR
- White Eraser
Make quick sketches, not detailed drawings.
Using charcoal and standing up to draw, makes it difficult to work on fine details, and that’s good for this warmup project. Students should hold the charcoal like a stick instead of a pencil.
Tell everyone they have 1, 2 or 3 minutes per sketch. This may be stressful and you’ll get some complaints. Just calmly explain that while artists should be able to make detailed drawings, they also must be able to make very fast sketches. You can start with extremely short sketches, and then increase. This helps loosen students up.
Drawing with one long line, flowing from each part to the next, can also facilitate doing fast sketches. This figure sketching warmup is not to be accurate with details. Do not even try to draw things like features, hands, eyes, mouth, etc., but to work on large shapes, proportion, stance, and getting the feel (or gesture) of the figure.
Start with 2 sketches from the reference as students get settled. Then move into drawing from life for another 2 or 3 sketches.
Afterwards, students can sit and draw a somewhat more detailed sketch from one of the photo references using an Ebony Pencil.
1.1 Print
Reference
People Photos
Cut images apart and print enough for each student to choose from several.

1 Page – Opens in new window
For Students at the Art Scholar Level
CREATIONS LESSON - tap here to open
Foundations are actually what all artists do every single day. However, once you understand them, you can use them more confidently and with more self-expression. It’s like an athlete doing the same events, but better, faster, and stronger. We call the lessons, CREATIONS.
This advanced lesson is for our Art Scholar students who have completed the two years of Foundations and are ready to begin using all that they have learned to create new work. These more challenging versions of the same concepts and techniques are easily taught along-side students in the Foundations course. Even if you have only one student, we put the Creations and Foundations together on the same page for easy review.
Use the Student Instructions printout below for your Art Scholar student(s). Tap the image to open the PDF in a new window.
Figure and Skeletal Anatomy
Overview: Students will hone their skills with drawing the human figure in proportion, as well as reviewing and working on how the skeleton fits inside the body.
Today will be mostly using pencil on paper, and some charcoal for the warmups.
Step 1. (25 minutes) Follow the rest of the class in drawing fast sketches – working on proportion and big shape accuracy instead of details.
Step 2. (27 minutes) Choose two photos from the People Reference Print (STEP 1) OR the special CREATIONS print below, and draw the skeleton in those positions. Use the Skeleton reference print from STEP 4 as a guide. When slideshow is up, look at the pictures for review while you’re working.
Tip: you can trace the outline before adding the skeleton on your own. Use tracing paper or tape the photo and your drawing paper to a window so you can see through them.
BREAK
Step 3. (5) If you had to break, do a quick warm up in charcoal of a figure from life or photo.
Step 4. (45) Follow the instructions on the first page of the 2-page CREATIONS figure reference print below, to create a detailed and shaded pencil drawing.
When we provide advanced reference you’ll find it here. Tap images to open.

M A T E R I A L S
- 14″ x 17″ Sketch Paper
- Pipe Cleaners
- Aluminum Foil
- Scissors
- Reference PDF
Reference
Proportion Game
Print one for each student
Hand out reference prints.

1 Page – Opens in new window
draw
Follow the instructions on the printout for a fun drawing question & answer game!
Early finishers can draw a robot on the back.
Answers
1. There are 3 muscle bulges on the human arm: Shoulder, Upper muscles (biceps and triceps), and the lower muscles. There are no muscles around the wrist, and very few on the hand.
2. The adult man has the correct head proportion.
3. The fingers should be on the first hand. The second one is too long, and the third one is too short.
4. The eyes should be half-way between the chin and the top of the head.
Prepare
M A T E R I A L S
- Large classroom display
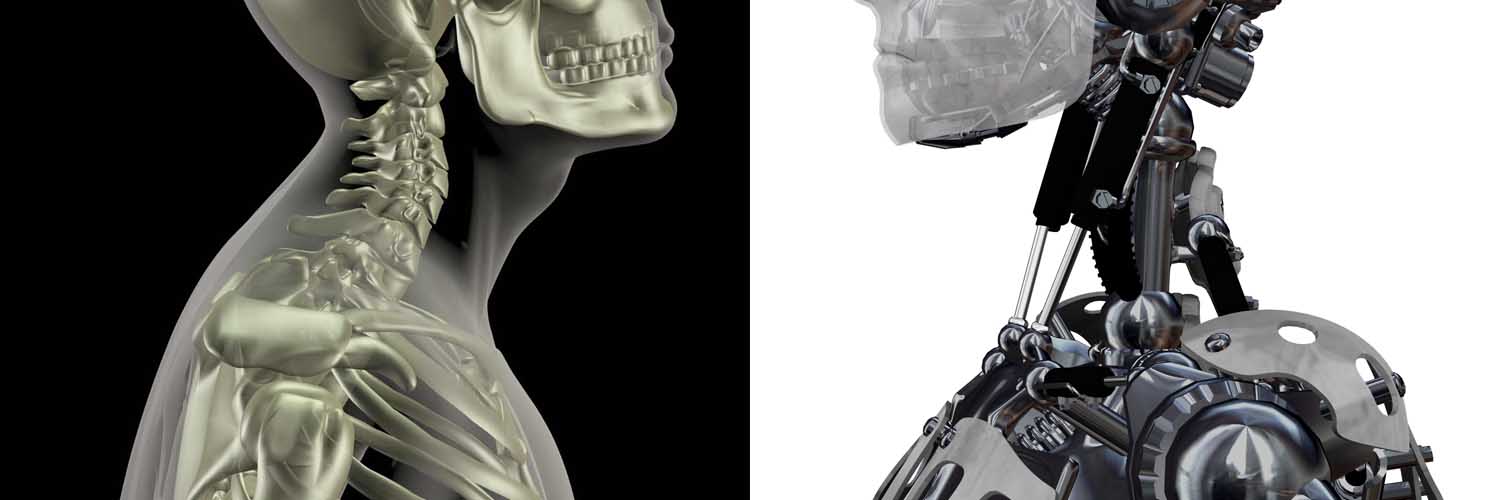
Use the slides to show how the skeletal system is important to understand as an artist. Read the captions in the slideshow as you go along.

Bones are inside all bodies, and their shapes are a big reason we look the way we do.

If an artist wants to know how to draw a human figure, it is important to understand the basic structure of the bones and skeleton.

We can only bend where bones are connected, called joints. The knee is a joint. Above the knee is straight and below the knee is straight, because the bones don’t bend.

The entire skeleton of bones can move into many positions.
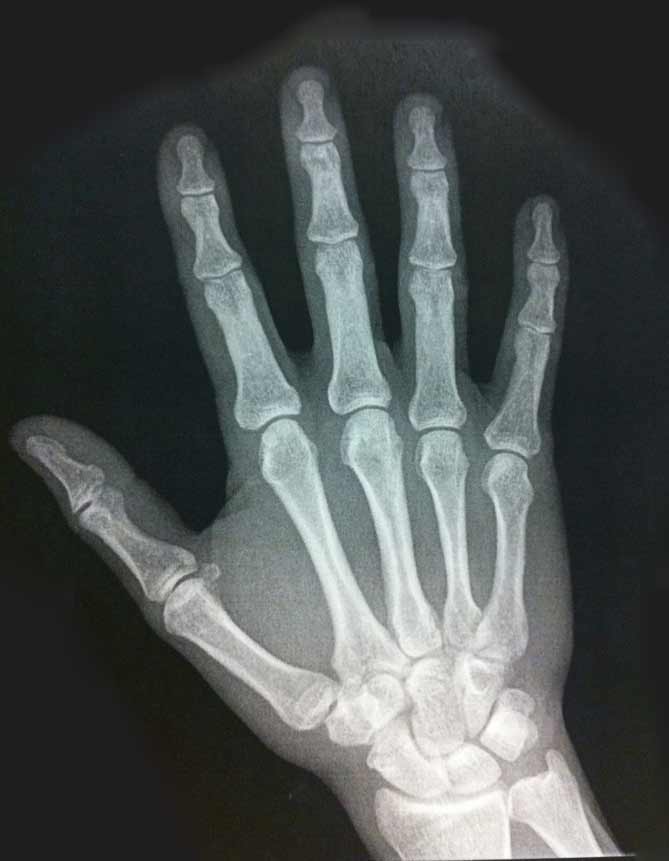
Here is an X-ray of of the bones inside a hand.

And here is a photo of the same hand, on top of the bones. We made the hand photo a little bit see through so you can see how they fit inside.
M A T E R I A L S
- 14″ x 17″ Sketch Paper
- Pencil
- White Eraser
Information
Bones 1

1 Page – Opens in new window
Draw
Have students draw the skeleton from reference.
Encourage everyone as you make the rounds, helping individuals as needed by asking questions and giving your honest responses.
The goal is to learn more about the skeleton by drawing it. Different students will draw at different levels of competence, so pointing out too many inaccuracies will be discouraging. Try to focus on the things students are doing well.
Ask for permission to give pointers for accuracy. The most common thing is to have the proportions off.
The number of ribs for instance, is not very important unless the student wants to reach that level of accuracy.
reference
Bones 2
Print enough for each student

1 Page – Opens in new window
Draw Again
Have artists draw figures following the instructions on the PDF reference.
First they choose one of the two positions, and draw a stick-skeleton guideline as shown. Then they will draw either a semi-realistic cartoon figure or a fun robot over the guidelines. Instructions are on the prints.
STEP 5. Clean Up
5 MinutesArtists Always Clean
Students clean up their work area.
- Wash hands
- Super-wash brushes if used. (Run under water for 1 full minute while gently spreading out the bristles).
- Put art supplies away
- Wipe tables & toss trash
- Remove any smocks (last)
- Check for items on floors and tables
%
Insights
This lesson provides understanding
%
Technique
This lesson shows application and movement
%
Self Expression
This lesson allows personal freedom
OBJECTIVES
- Practice and improvement using proportions of the body
- Understanding how the bones fit into and shape the body
- Accomplishment from drawing a skeleton and a robot
- Fulfillment by inventing a robot character form
TROUBLESPOTS
Destruction – Some young people enjoy destroying things they’ve made. Be aware that 8-10 year old boys especially, may suddenly want to take scissors and cut up their robots. We don’t know why.
ART WORDS
Proportion – This is how one part is either smaller or larger than another part of the same thing. Proportion is about exactly how MUCH different two parts always are. One example is that your legs are always going to be long enough to cross in front of you so you can sit cross-legged. If you had longer legs in proportion to the rest of you, they wouldn’t fit in front of you! Sometimes cartoons have exaggerated features, like a really large head, or large eyes. That means it is not in proportion realistically. Today we are using realistic proportions.
Redraw – when you trace, you just follow a line, and no matter how well you do, there will always be a difference. If you trace a trace of a trace, the effect will be a drawing that is mushy. It doesn’t look good. Redrawing is much better. When artists redraw, they don’t just follow lines, they draw them fresh. It’s much less important to follow closely than it is to draw well. You do that by thinking about what you are drawing. For instance, if you are drawing a foot, you think about the feel and shape of the whole foot, not just one small tiny bit of line, all by itself.
ROOMPREP
Have a bunch of amazing supplies ready, and cut a few things apart before-hand in a way that make you look amazing.
Print all of your PDFs from the lesson plan and cut any references apart as needed.
What your room needs
Here are your printable lists and room prep instructions.

Opens in new window
CLASSROOM
MATERIALS
- Proportion Game Print
- Pipe Cleaners
- Aluminum Foil
- Scissors
- Robot Reference Print
- Paper towels
- Cleaning wipes
- Sink
- Waste Baskets
- Camera or phone-camera
STUDENT’S
MATERIALS
- 14” x 17” Sketch paper
- 2B pencil
- White Eraser