
OVERVIEW
Students will have fun making bouncy spiral snakes with their own designs by drawing on our printed pdf snake templates. Then everyone is introduced to clay with playdough for a warmup, before moving into an 3D project of an animal that they’ll be able to take home next week.– – –
Grades K – 2
1 Hour & 30 Minutes, or two 45-minute sessions
STANDARDS For This Lesson
-SUBMIT YOUR SUMMARY
Copy and paste the text below to send your abbreviated lesson plan with national standards and learning targets to your supervisors and colleagues. Or access the WORD doc by using the blue button below.
– – – – – – – – – – – – – – – – –
Week of February 17 – 21
OVERVIEW:
Students will have fun making bouncy spiral snakes with their own designs by drawing on our printed pdf snake templates. Then everyone is introduced to clay with play-doh for a warmup, before moving into an 3D project of an animal that they’ll be able to take home next week.
NATIONAL STANDARDS:
Grade 1
VA.CR.1.1 Engage collaboratively in exploration and imaginative play with materials.
Grade 2
VA.CR.2.2 Experiment with various materials and tools to explore personal interests in a work of art or design.
LEARNING TARGETS:
Students know how to cut and assemble a 3D puppet
Students know how to construct a sculpture
LESSON PLAN:
1. Warmup (15 minutes)- Artists’ Choice
2. Design(15 min) – Provide snake printouts, color design
3. Cut & Tie (15) – Create bouncy snakes
4. Clay Practice (10) – Fun and easy warm up play
5. Teach (10) – How to use air-dry clay
6. Snake Make (10) – Help Make Snakes
7. Clay Art Choice (10) – Make sculpture
8. Clean Up ( 5) – everyone helps
Tap the Plus Icon (above right) to open STANDARDS information, including an Overview, Learning Targets and a Syllabus. Copy and paste to send to your Administrators or use the button below to download a Word document with the same information that you can add your info to and email to them as an attachment.


SCROLL & TEACH LESSON PLAN
Don’t worry about rewriting anything. Just spend a few minutes reading the lesson plan and printing out your PDFs. Then check out the READY, SET, GO! section and print your prep-page, which includes checklists and an “at a glance” outline of the lesson so you can stay on track when you’re teaching. Set out the materials from the list on your prep page and you’re ready.
That’s all you need to know. Use your smartphone to Scroll & Teach!
Lesson At A Glance
A brief overview of each step. Buttons jump to each section for detailed information.
15 Min – Provide snake printouts, color design
10 Min – Fun and easy warm up play
10 Min – How to work with air-dry clay
10 Min – Help make snakes
10 Min – Make sculpture
5 Min – Everyone helps
SCROLL & TEACH
LESSONPLAN
Each section is a different color. Read over once and then you can SCROLL & TEACH using any device you like. It’s designed to work best with your phone.
LEARNING TARGETS

Students learn to express themselves through creating from their imagination.
M A T E R I A L S
- 11″ x 17″ Copy Paper
- 4B pencil
- Eraser
- Markers and/or oil pastels
- Blenders (stumps)
- Paper Towels
1.1 greet
Kneel down so that you are on their level. Bending over emphasizes the differences in your height, while kneeling makes them feel more important.
1.2 create
Ask them to work with one piece of paper for a while. If someone uses the phrase, “free draw”, explain that artists’ choice is something only artists can do, while free-draw is something anyone can do. You want to use the phrase to elevate the students’ expectations of their work.
Everyone should take their time with the work and make a finished piece of art. Limiting the paper can also help kids focus on the work. If someone finishes in super-fast time, ask them what more they can do to the existing paper. Ask again several times – unless they appear overly frustrated; then you can allow them to move on to a new work.
Use this button to jump down to the preparation section.
LEARNING TARGETS
Students know how to create and brainstorm different designs
M A T E R I A L S
- Spiral Snake Handout
- Oil Pastels
- Black Marker
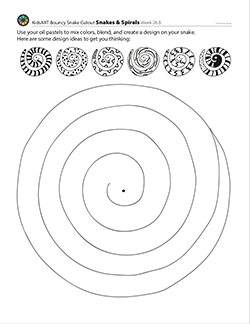
2.1 Print
Worksheet
Spiral Snake
Print enough for each student to have one for their project.
1 Page – Opens in new window
2.2 design
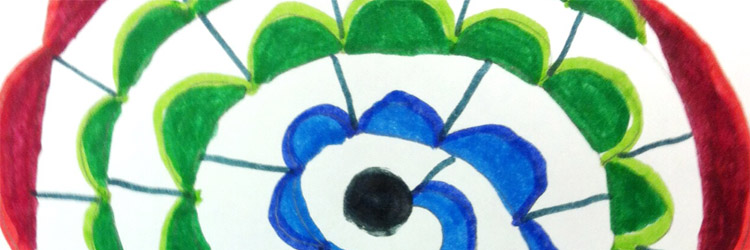
Have everyone draw patterns throughout the spiral snake. They can start with a pencil or a black marker. The snake is a spiral, and when cut, will create a 3D bouncy sculpture when dangled on a string. Decorate the snake with oil pastels and encourage kids to make them very artistic. Blend the colors and mix them.
As each student finishes, they can cut their snake spirals or you can do it for them, moving on towards the next step. Make sure cutting is done slowly and carefully. If it’s hard to see the cut line, just cut it out for them.
Use this button to jump down to the preparation section.
LEARNING TARGETS
Students know how to cut and assemble a 3D puppet
M A T E R I A L S
- Kids’ Scissors
- 18″ pieces of string
- Dowel stick, paint stir stick, or even a popsicle stick is great for a handle.
3.1 cut
Cut along the original printout lines to make a spiral that will uncoil when you hold it by the center head and lift it off the table. Discourage playing at this point so they don’t tear their snakes. Use a pencil to poke a small hole in the black dot at the center of the spiral/head. Push the string through, and secure a loop of the string to the underside of the snake head with a piece of clear plastic tape. Press the tape down well and cover the hole from the bottom. Finally, tie or tape the other end of the string to the end of the stick and let students make their creations bounce in the air! Help them understand that it is fragile and can tear easily.
3.2 Teach
Here is a link to a Lion King site. You can play a short video trailer at the top, which is a lot of fun, and there is also a GALLERY further down, that is essentially a slide show with photos of animal puppets. You can look at these with your students and talk about the difference between toys and art:
BREAK
This is the end of part one if you are dividing into two, 45-minute sessions.
Use this button to jump down to the preparation section.
LEARNING TARGETS
Students know how to practice before making their final design
M A T E R I A L S
- Play Dough
- Wax paper or other paper taped to table
4.1 sculpt
It is helpful to have a piece of wax paper or regular copy paper to work on.
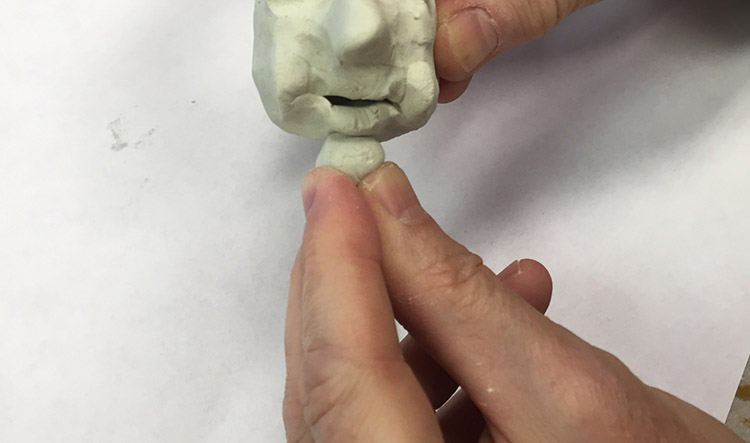
Clay modeling warmup using regular modeling clay (in very small amount so it’s not too hard to work with) or playdough. Show the slides and then everyone can make a little clay snake together following these steps:
- Pinch off a small piece of the clay and set it aside to create the head.
- Place hand on top of the ball of clay and start rolling the ball back and forth. It will start to flatten out like a snake body! Keep rolling until you have a snake body you like.
- Sculpt a football shape with the small piece of clay and attach it to the snake body for a head. Smooth the crease so it doesn’t fall off.
- Use the tip of a pencil to poke in the eyes of the snake
4.2 play
Let kids make other things for a few minutes and then put the practice clay away. If using oil-based modeling clay, wipe off hands with paper towels as much as possible, and then take a trip to the bathroom to wash hands thoroughly. Oil-based modeling clay won’t easily wash off until you’ve wiped with dry paper towels first.
Use this button to jump down to the preparation section.
LEARNING TARGETS
Students know how to handle clay
M A T E R I A L S
- Smocks
- Air-dry clay
- Water tubs
- Paper towels
- Kid-safe sculpting tools
5.1 build
Important technique: With air-dry water-based clay, it is very important to have some water on the table in cups or bowls. Dip your fingertip in the water and smear some onto each part where it needs to join together. It will make a little bit of gooey clay, like mud, which will become a much stronger bond when dry. If you just stick the dry pieces together, they will seemingly hold very firm. When it dries, however, the pieces will separate easily.
Remind students that only air-dry clay needs water. Modeling clay and playdough don’t.

Keep your clay on your placemat at all times.

It’s easier to twist off large pieces.

Several small presses work better than one gigantic press

Roll worm shapes.

Pinch off the make things smaller
ClayAddon
Press on new pieces, making sure to wet both sides with some water if this is air-dry clay. Do not use water for non-drying modeling clay.

Before washing your hands, wipe them off with a paper towel.
Use this button to jump down to the preparation section.
LEARNING TARGETS
Students know how to construct a sculpture
M A T E R I A L S
- Smocks
- Air-dry clay
- Water tubs
- Paper towels
- Kid-safe sculpting tools
6.1 build
The amount of clay for each student should be about the size of a golf ball (or a bit larger). Explain that this clay will dry soon, and that they need to finish pretty fast, but not so fast that they’re rushing. Just encourage them not to daydream or play aimlessly.
You can let them create an animal any way they like or to make a snake like they did in STEP 4.
Help students often with joining pieces and shaping. Set these aside to dry for next week. Placing them all on a piece of stiff cardboard or a drawing board, with names written next to each one, works well.
Next week they’ll paint their work. Make sure to attach separate pieces really well, with a very small dab of water on the tip of your finger to wet each side to be joined. If they make a snake, it must be coiled up and attached to itself with water or it will break easily when dry. The air-dry clay can be fragile if not supported, so short stout work is best. Discourage thin parts, long pieces, or parts that stick out too far.
Too much water can quickly turn into a mud bath, so only set out very small amounts that fingers cannot dip down into.
Use this button to jump down to the preparation section.
STEP 7. Clay Art Choice
Students will be creative with Artists' Choice with play dough or modeling clay. 10 MinutesLEARNING TARGETS
Students know how to imagine their ideas in 3D modeling clay
M A T E R I A L S
- Play Dough OR
- Modeling Clay
- Water tubs
- Paper towels
- Kid-safe sculpting tools
7.1 create
You can give your class play dough, modeling clay, or if you can afford it, more air dry clay. Be sure they keep the clay on wax paper or at least on regular copy paper, to protect both the clay, and the table.
Use this button to jump down to the preparation section.
LEARNING TARGETS
Students know the importance of cleaning up.
M A T E R I A L S
- Paper Towels
- Cleaning wipes
- Sink
- Waste baskets
- Well-lit spot for photos
- Camera or phone-camera
8.1 clean
- Wash hands (Wipe modeling clay off hands with paper towels before washing)
- Wash dried air-dry clay off tables if needed (water will soften it)
- Super-wash brushes if used
- Put art supplies away
- Wipe tables & toss trash
- Remove any smocks (last)
- Check for items on floors and tables
8.2 photo
8.3 connect
%
Insights
This lesson provides understanding
%
Technique
This lesson shows application and movement
%
Self Expression
This lesson allows personal freedom
OBJECTIVES
- Practice and improvement using oil pastels and clay
- Understanding how to work with clay
- Accomplishment in making a 3D interactive artwork
- Fulfillment by designing patterns and sculpting
TROUBLESPOTS
Scissors chopping through snake – Cutting should be done slowly. Keep an eye out especially for young students so they don’t cut their snake in two. Simply tape it back together though if that happens. Use a short strip of paper as a little splint, and tape it to the snake underneath the cut.
Smearing clay – Usually wiping things makes them smoother, but with clay of almost any kind, it will make a mess. Use lots of small gentle presses instead.
Weak joins – Air dry clay will seem to stick to itself, but later it will separate and fall apart. You need to make sure it stays together by rubbing a little water on each part so they are glued together.
ART WORDS
Modeling clay – A stiff oil-based clay that never dries out. It can be used over and over to create things that you can draw or study.
Air dry clay – A special clay that doesn’t need to be heated to become hard. It is more fragile than most other clays though, so you need to be gentle with it after drying.
Spiral – A design shape, that is like a circle, but is actually a long line that keeps going around and around getting smaller until reaching the center of the shape.
CLASSROOM
PREP

-Print all of your PDFs from the lesson plan and cut any references apart as needed. Cut or get some kind of sticks for the snake puppet handles.
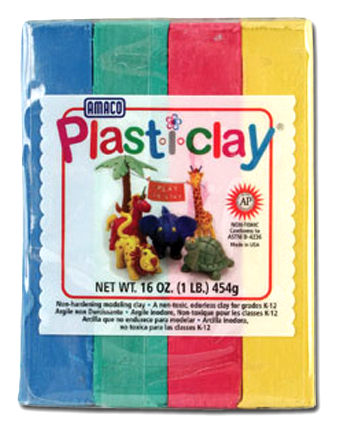
Purchase some Crayola Air-Dry clay and some oil-based modeling clay if not using play-doh:
Make play-doh if you want to. Here is our favorite recipe:
Play-doh recipe:
- 1 cup salt
- 2 cups of flour
- 2 Tbsp cream of tartar (or 4 Tbsp baking soda)
- 2 Tbsp vegetable oil
- 2 cups water
- food coloring as desired (neon colors work great – use plenty)
Add all the ingredients together in a large bowl and stir with a fork until blended well and smooth. Pour mixture into a large pan and bring to a boil or nearly so, over medium heat. Lower heat and stir until smooth and it forms a ball, which will take a few muscles towards the end. Let cool long enough to handle, and knead a few minutes until it is awesome.
Store in airtight container like a freezer zip bag or plastic container with a tight lid. It will keep for weeks this way.
What your room needs
Here are your printable lists and room prep instructions.
Opens in new window
CLASSROOM
MATERIALS
- 11×17” Copy Paper
- 4B Pencils
- Eraser
- Markers
- Oil Pastels
- Blenders
- Paper towels
- Spiral Snake Handout
- String or yarn
- Kids’ Scissors
- Dowel stick, paint stir stick, or even Popsicle sticks
- Play-Doh
- Air-dry clay
- Wax paper
- Water tubs
PREVIEW
Week 27: Artists’ Choice Day
Feb 24 – 28
Stations are set up around the room and young artists have lots of opportunities to create and explore new ideas. It’s a very fulfilling day of project fun!
Week 28: Freaky Flowers
March 2 – 6
In this lesson we’ll do several things backwards! Students begin by making their paper gray with charcoal, and then “drawing” light lines using a kneaded eraser. After a fun table-poster, they will draw flowers in pencil, and then use oil pastels – to do the background and leave the flowers white. Finally they’ll finish in the flowers too.