
OVERVIEW
Artists use warm & cool colored oil pastels in a fish drawing, working on movement and technique. The imagination is employed to invent a new idea - using household tools to create fish. They'll finish the work using watercolors, and then use oil pastels to finish another earlier drawing.– – –
Grades 1 – 2
1 Hour & 30 Minutes


SCROLL & TEACH LESSON PLAN
Don’t worry about anything. Just spend a few minutes reading the lesson plan and printing out your PDFs. Then check out the READY, SET, GO! section and print your prep-page, which includes checklists and an “at a glance” outline of the lesson so you can stay on track when you’re teaching. Set out the materials from the list on your prep page and you’re ready.
That’s all you need to know. Every Step is a different color. Just use your device to Scroll & Teach!
Art Supplies Are Needed
Our lessons are designed to work with very specific supplies (see our supplies page using the button below). We recommend ordering what you need for home delivery. However, you can try and make do with what you have on hand during the health crisis.
Lesson At A Glance
A brief overview of each step. Buttons jump to each section for detailed information.
15 Minutes – Students draw from life (optional)
25 Min – Color dance with fish & talk about tool shapes
20 Min – Draw tools and make a fish scene
20 Min – Set up for watercolors and paint!
10 Min –Everybody helps
Use this button to jump down to “READY, SET, GO!” – our preparation section at the bottom of each lesson. You’ll find information on what is being taught, a full list of supplies, room prep, and what to expect from your young artist(s).
LESSONPLAN
STEP 1. Warm Up - Optional
A quick drawing can help students move into a lesson in a relaxing wayTap the button below to start a timer in a new tab/window.
draw
M A T E R I A L S
- 14″ x 17″ Sketch Paper
- Ebony Pencil OR
- Compressed Charcoal
- Stretchy Eraser OR
- White Eraser
Have several large and medium sized objects set out and available to sketch. You can use items such as:
- A suitcase
- A chair or stool
- Basketballs
- A cooler
- Toys
- Kitchen items
Students should be standing and drawing in their large sketch pad (we use 14″ x 17″ ones). Remind them to use arm movements rather than just their wrist. Sketches should be fast, loose, and fun, but students should be observing carefully, and working towards accuracy, instead of just playing around.
explain
M A T E R I A L S
- Fish PDF
- Tools PDF – OR
- Real tools in interesting shapes
- 11″ x 17″ Card Stock Paper
- 2B Pencil
- Black Marker
- White Eraser
- Oil Pastels
- Blenders (stumps)
- Paper Towels (clean off the tips of pastels)
- Music to play – soft and flowing
Walk the students through steps of making a fish drawing. If it seems confusing, you can cut the steps apart so they only see the next steps one at a time.
Be sure to explain to the students that for the first drawing, they should try to make pencil “tickle lines” (very light). Don’t worry if the kids can’t do this yet, but it is good to hear it often so that they can begin practicing this technique early. Tell students it takes a lot of practice to be able to draw tickle lines.
Once the drawing is complete, students will redraw over the tickle lines with a black marker.
Use oil pastels to create color inside and outside of the fish. Use music for students to “color dance.”
Use 3 warm color pastels to color dance inside the fish.
Use 2 or 3 cool colors pastels and white to color dance outside of fish. We’re not drawing air shapes this time, we’re drawing water shapes!
Song recommendations: ENYA – Orinoco Flow, or CHRISTOPHER CROSS – Sailing
While your artist works, read the following Teacher Talk to help them notice shapes in their tools.
“Look at these tools! They have such interesting and sometimes very unusual shapes. You might notice the solid shapes first, but do you see some cool air shapes? I do too.
There are all kinds of lines in these shapes: straight lines, curved lines, zig-zag lines and sharp angles. I can also see texture. That’s what we call things that look or feel rough. Usually people mean how things feel when they say it has texture, but artists also use this word for areas of shading or paint that have the same look as things that feel rough. You can make things look rough by using your pencil or pastel on its side instead of using the tip.”
2.1 Print
Reference
Step by Step Fish
Hand out reference prints. Students can share prints as long as everybody can see it..

1 Page – Opens in new window
2.1 Print
Reference
Tool Photos
Cut images apart and print enough for each student to choose from several.

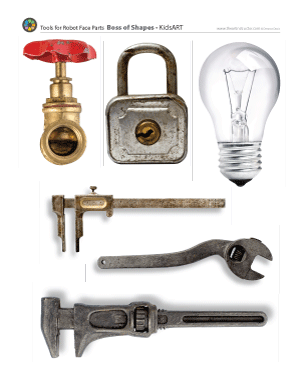

3 Pages – Opens in new window
Prepare
M A T E R I A L S
- Watercolor Paper
- Cheasels
- Pencils
- White Erasers
- Oil Pastels
- Tool PDF Prints
Have the tool reference PDF printed out and placed on cheasels with big shapes diagrams & silhouettes to go with them.
Have kids draw using the big shapes as guide lines (tickle lines), emphasizing that they need to be SUPER LIGHT. Then redraw the tool outline/edges over the tickle lines using a colored pastel. They can use any color except black. Erase any stray lines inside the tool.
Be sure all students have their names somewhere on the paper and set it aside for later.
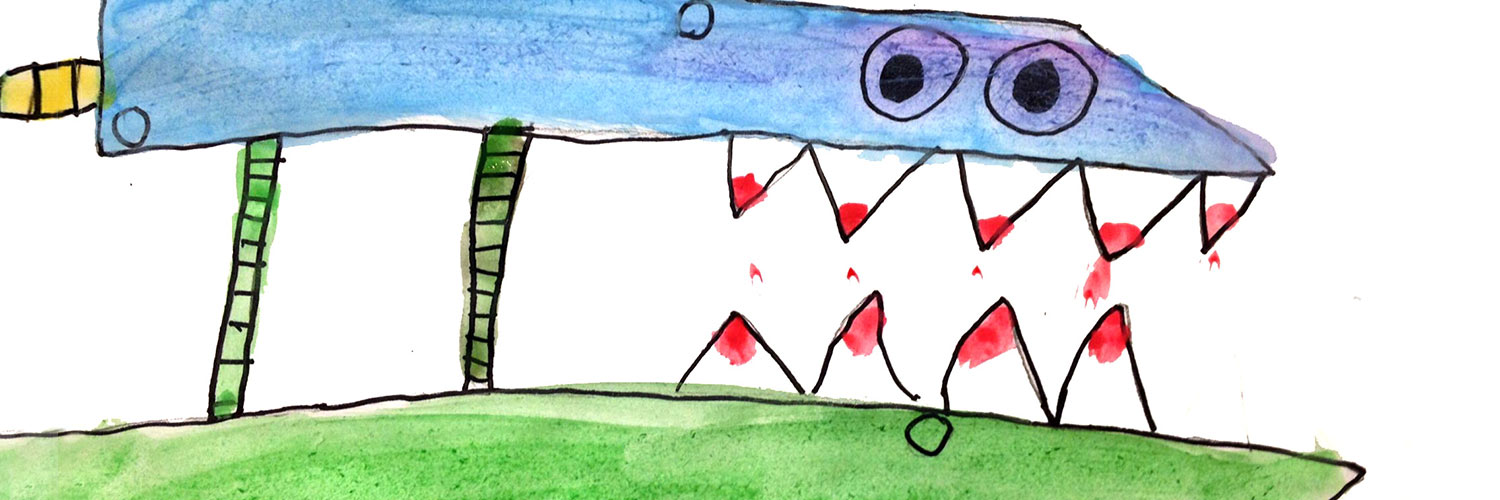
Then, students create an imaginary fish from the tool they just drew. Be sure students write their names in the corner of the watercolor paper.
As they work, “wake up” the watercolors by adding a few drops to each color cake in the pans.
As they’re finishing up, talk about how these could look like strange and weird fish.
“Use the tool you drew to inspire you to make an imaginary fish on watercolor paper. Invent a fish that looks both like a fish and your tool! It is a crazy tool… or a weird fish?”
M A T E R I A L S
- Smocks
- Paper towels
- Watercolors
- Brushes (small and medium)
- Water containers
Setup
Set out watercolor trays for students, have them get ready to paint by putting on smocks. Reward well-behaved students by letting them hand out brushes or even water tubs.
color
Students will paint their fish and the background (water, seaweed, etc.)
If they finish early, they can add texture to their fish using the side of a medium-colored oil pastel. Don’t use black or a dark color, and use a light tickle-drawing pressure. You may have to tear a bit more paper off of the pastel for them.
STEP 5. Clean Up
10 MinutesArtists Always Clean
Students clean up their work area.
- Wash hands
- Super-wash brushes if used. (Run under water for 1 full minute while gently spreading out the bristles).
- Put art supplies away
- Wipe tables & toss trash
- Remove any smocks (last)
- Check for items on floors and tables
%
Insights
This lesson provides understanding
%
Technique
This lesson shows application and movement
%
Self Expression
This lesson allows personal freedom
OBJECTIVES
- Practice and improvement using visual skills and artistic techniques
- Understanding how looking for shapes can help create a good drawing
- Accomplishment in finishing some creative & colorful artwork
- Fulfillment creating a new idea by putting two other ideas together
TROUBLESPOTS
Tool dangers – If you bring real tools, children should not be allowed to handle them since they can have sharp edges and pinch fingers. Be firm about this.
Tracing tools – If you have actual tools on the table, students will want to draw around them like they do with their hands. Encourage them to draw by looking instead, since this is a lesson about learning to… Look!
ART WORDS
Silhouette – The outline of an object – as if it were a puzzle piece and you took it out of the puzzle.
Watercolor paper – A special paper with a special coating that allows watercolor to work on it.
ROOMPREP
Today the students will be painting with watercolor and coloring with pastels. Have all PDFs printed and cut apart.
What your room needs
Here are your printable lists and room prep instructions.

Opens in new window
CLASSROOM MATERIALS
- 11×17” Copy Paper
- 4B Pencils
- Erasers
- Markers
- Oil pastels
- Blenders (stumps)
- Paper towels
- Music to play (soft and flowing)
- Tools PDF OR
- Real tools in interesting shapes
- Cheasels
- 10 x 14” or so watercolor Paper
- Watercolors
- Brushes (small and medium)
- Water containers
- Smocks
- Camera or phone camera
PREVIEW
Week 37: Big 3D Installations
May 11 – 15
A Bunch O’ Boxes project completes the school year program. Everyone must work together as a team and combine a few boxes into a 3D sculpture and/or installation that has a theme and incorporates everyone’s efforts and style into one final work. Classes are divided into teams of 5 or less so that everyone can work at once. Boxes are covered in white paper and painted for display all summer or for an art show. It’s also a fun day for an end of year party!