
Color
Each lesson Plan focuses primarily on one of the 4 Cornerstones of Art:
Drawing | Painting | Color | Style
OVERVIEW
Using color in shadows is essential to good artwork, and so is understanding how basic shapes like a cube are drawn. Since it’s the holiday season, we paint a red-wrapped, cube-shaped gift with a green ribbon and bow. Students learn the basics of cube shapes and accuracy, as well as mixing pigment opposites to create shadow colors.– – –
Grades 3 – 5
Week of December 2 – December 6
1 Hour & 45 Minutes
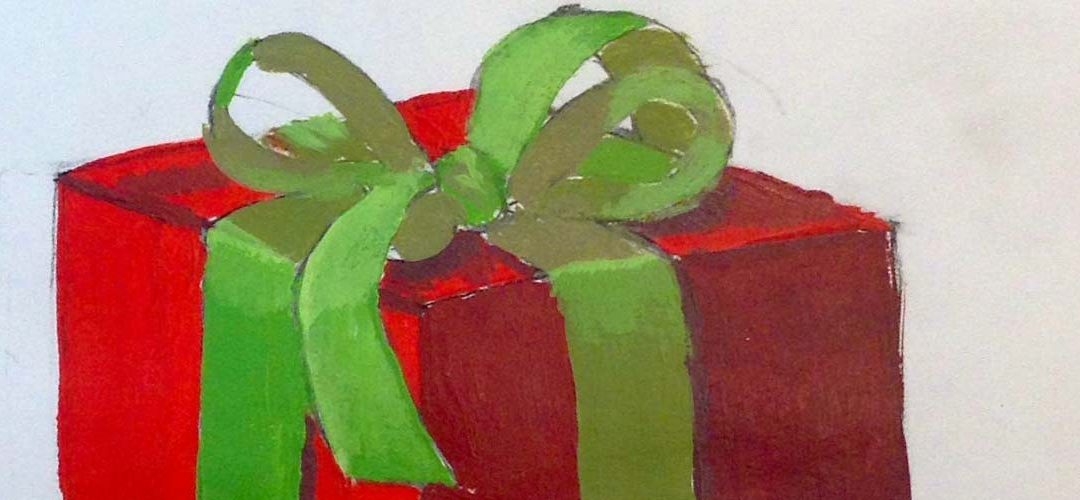
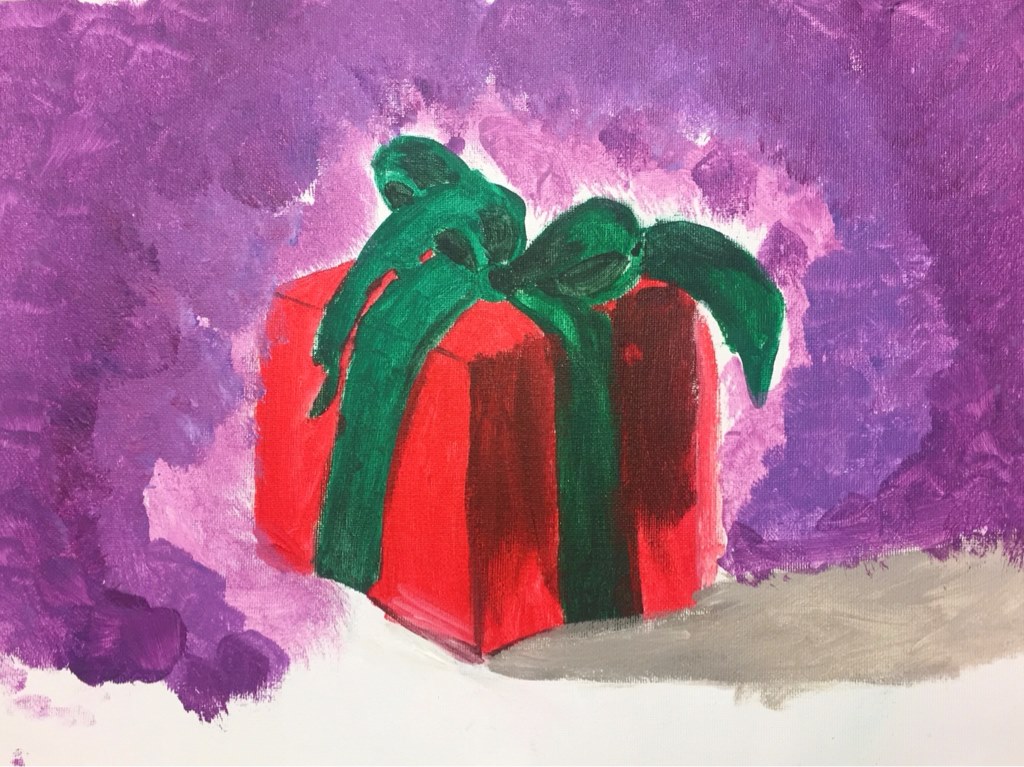
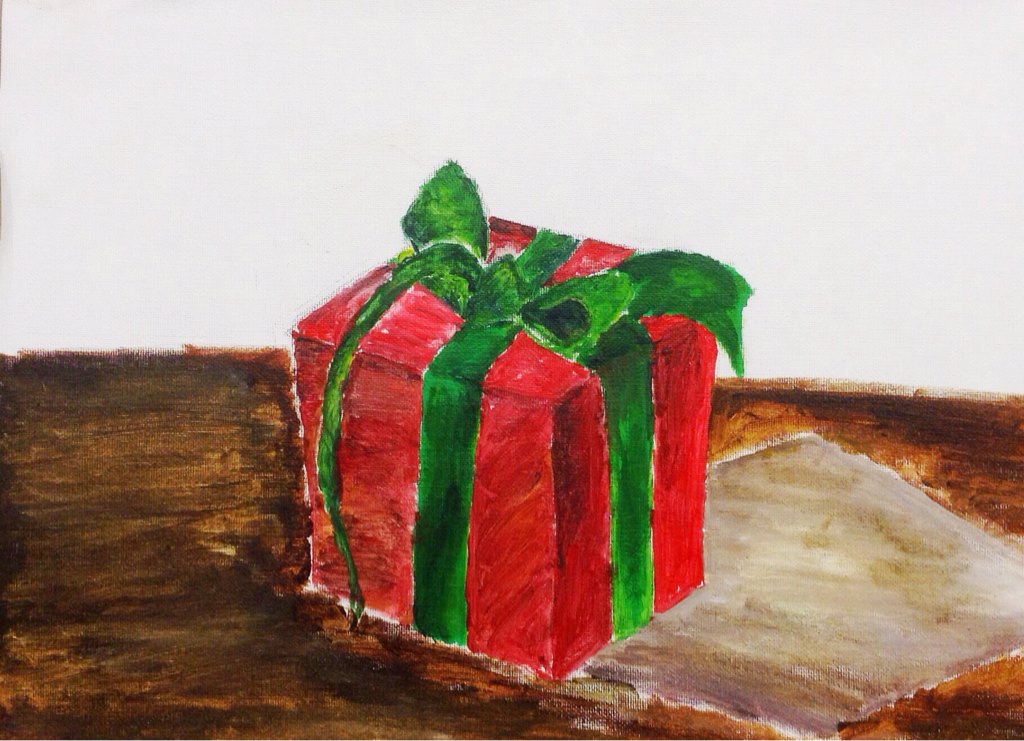
Student Work
Lesson At A Glance
Here’s a brief overview of the complete lesson. It’s also on your prep page in the Ready, Set, Go! section (below the lesson).
Colored buttons jump to each section in the full lesson plan below.
10 Min – Draw wrapped present
7 min – Use simple outline picture
10 min – Prepare for acrylic painting on canvas
10 min – Use canvas pencil – lightly
15 min – Use PDF to practice colors
35 min – Work on the gift picture
10 min – Add shadow and other background
5 min – Make wrapping paper
2 Min – Everyone helps
Use this button to jump down to the preparation section.
STEP 1. Warm Up
Students draw speed sketches using today’s project reference of a gift box. 10 MinutesLEARNING TARGETS

Students know how to draw to warmup
M A T E R I A L S
- 14″ x 17″ sketch pad
- Charcoal
- 4B pencil
- White and kneaded erasers
- Cheasles with clip or stand for photo reference
- Gift Box Reference PDF (below)
- It’s also helpful to create a real red and green gift box or two.
All materials are suggestions and may be modified as you see fit. We have tried many items, and these seem to allow the most versatility for the cost.
1.1 Print
Reference
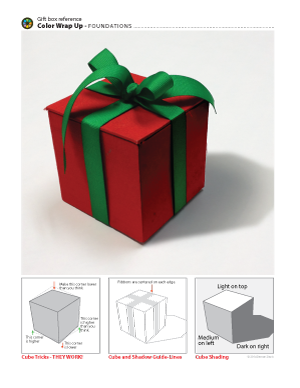
Gift Box
Photo reference of a cube-shaped gift in red and green colors, with some drawing guides at the bottom.
Hand out reference prints.
Print enough for each student to have one or for two students to share between them. Place on stands for reference.
1 Page – Opens in new window
1.2 sketch
Students will do two speed drawings, 30 seconds each.
Vertical Lines!
The lines on the sides of the box angle out at the top and in at the bottom, but this is hard for younger students. Instead, tell young students to make all of the up and down lines, STRAIGHT up and down, PARALLEL with the sides of the page. Young artists will often draw the sides of a cube shape with lines that lean in as they go up. They are trying to make the perspective look 3D and this is very common. Don’t chastise them for something that may look obviously wrong to you, and is actually the opposite of the reference. Simply point out that straight lines are good, and match the sides – parallel with the sides of the pad or paper. Some students will still not get it. Don’t worry, just let it go!
For students who are older, they may be able to see that the up and down lines actually converge towards the center at the bottom, so encourage trying to draw it that way. This shows 3-point perspective. However, this is hard for many, so don’t push it too much.
1.3 sketch
Have your artists switch to graphite pencils, and do a longer drawing using the same reference. Continue to point out the vertical lines.
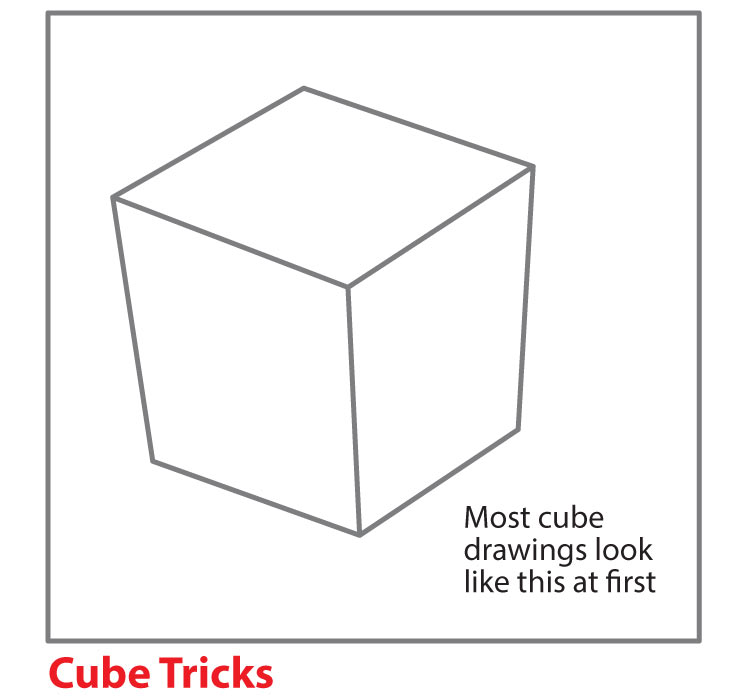
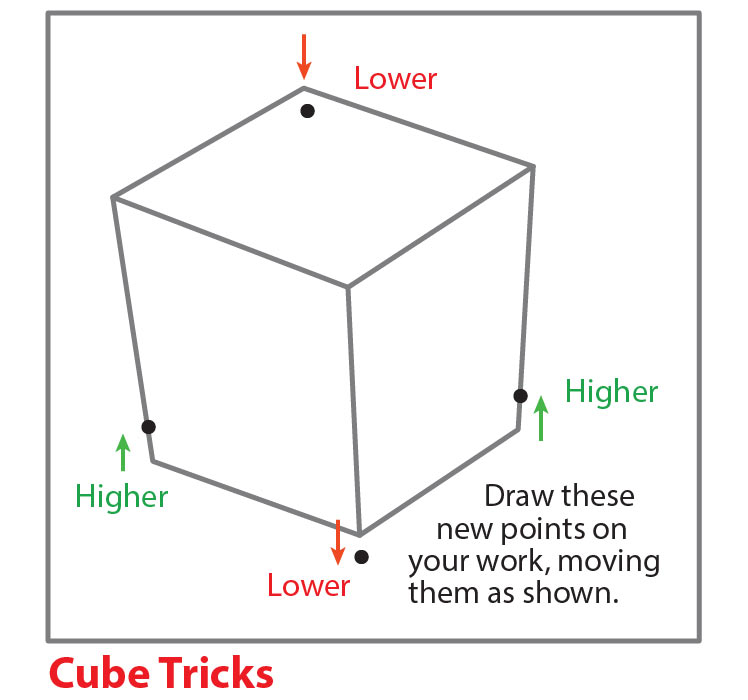
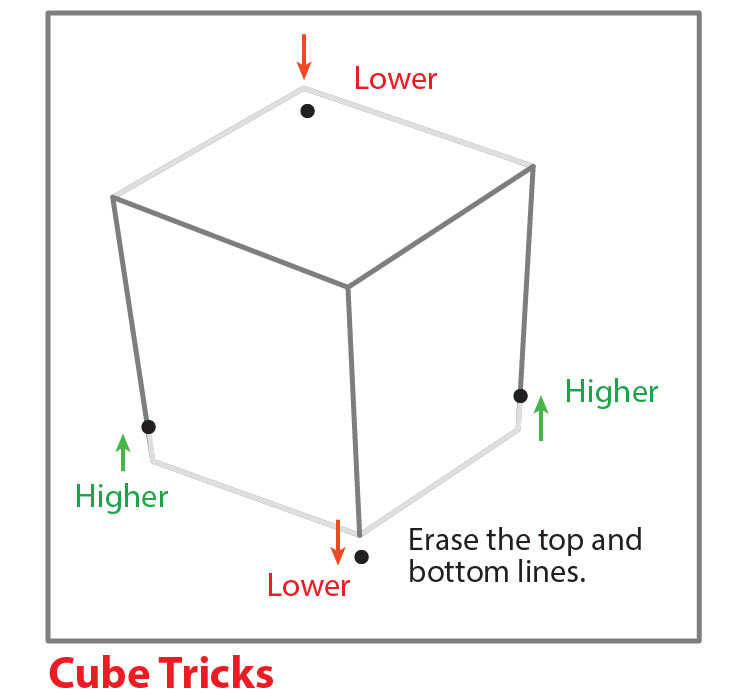
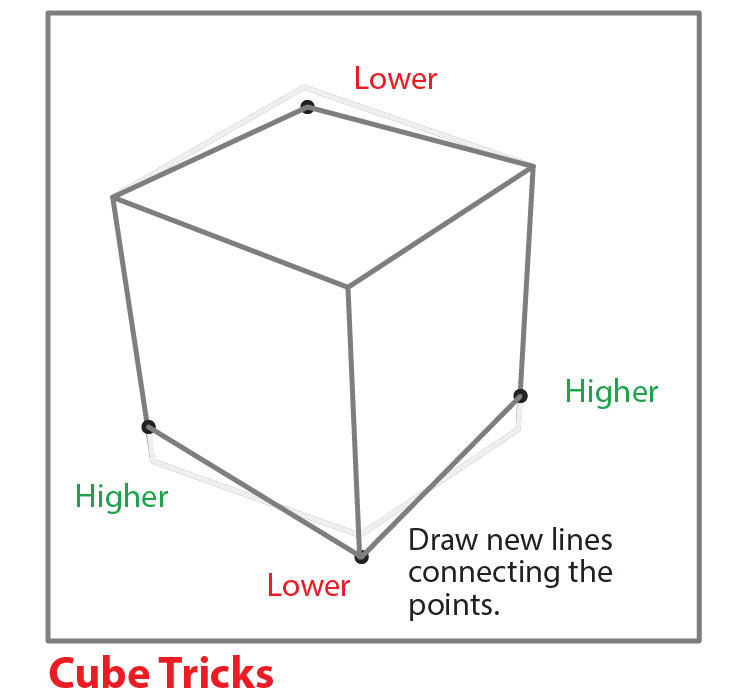
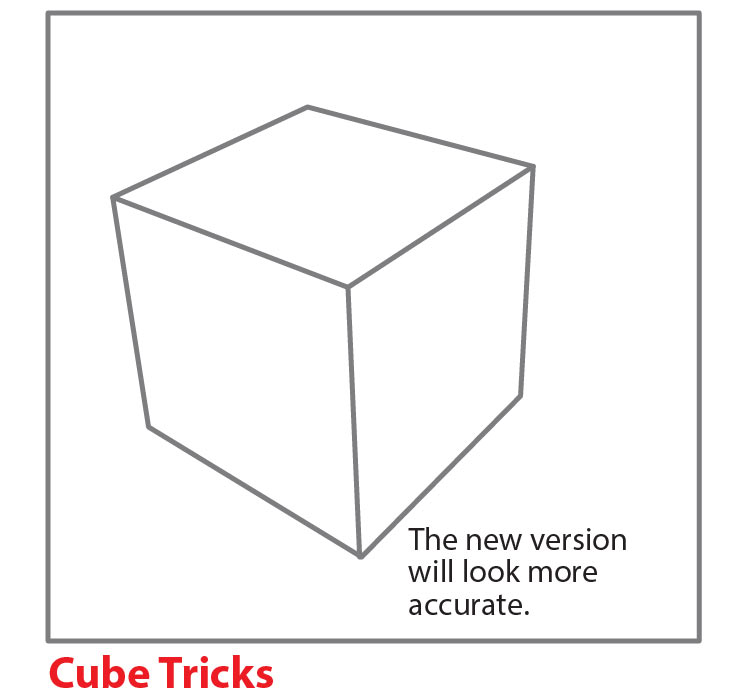
Go over the tricks in the box titled, “Cube Tricks”. There are 4 things that almost everyone needs to change.
- Both the top middle corner, and the bottom middle corner usually need to be lowered.
- The left and right bottom corners also need to be moved up a bit.
These changes are simple to understand and do, and almost always improve the look of the cube drawings. Don’t worry about why they work today; while we are drawing a cube-shaped gift, and it’s good practice, the main focus of today’s lesson is on the colors.
While students work, also show the Pinterest board for Cube Art.

Pinterest Gallery – Cube Shapes In Art
Tap the icon to the left to open our special Pinboard showing examples of artwork to display to your class. See our Article for making Pinterest work on larger displays. You can also use a laptop or large tablet and gather everyone around like you’re using a book.
“Cube-shapes are pretty hard to draw. At first glance this seems simple, but the lines and corners are sometimes very difficult to figure out. There are 3 boxes at the bottom of the page to help you see the shapes, and to draw them more accurately.”
Advanced Student Lesson
CREATIONS - tap here to open
Our Creations lessons are for students who have completed the two years of Foundations and are ready to begin using all that they have learned to create new work. These more challenging versions of the same concepts and techniques are easily taught along-side students in the Foundations course. This allows for excellent review, and is encouraging for students to see progress from each viewpoint.
Use the Student Instructions printout below to distribute to your Creations students. Tap the image to open the PDF in a new window.
Continue or Start:
Abstract – or Not – Painting or other media
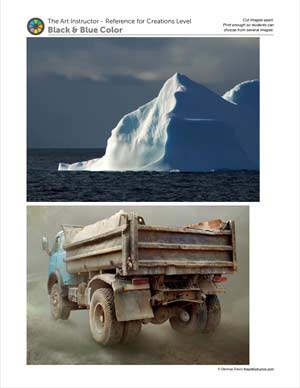
Overview: Students will create artwork based on blue and dark colors using the reference photos to create some level of stylization or abstraction.
Use a canvas board, a sheet of taped canvas, or a stretched canvas if available. Other mediums to use are oil pastels, colored pencils, or even graphite if a student is not interested in color at all.
Step 1. (15 minutes) Set up for the medium and tools of choice.
Step 2. (20 min) Choose a reference source from the provided PDF photographs below. Use a pencil and sketchpad to create several warm up sketches.
Step 3. (5) Try an abstract line drawing based on the photo. You can try to make it different enough so that it’s hard to recognize the subject, or just stylize it a little bit. You can also just go for a realistic version if you like.
Simplicity can make a composition very powerful but that takes working on it. Try several ideas by drawing small thumbnails, and then choose the one you like best.
Step 4. Begin drawing or painting, using a variety of Brushes for different effects. Clean edges and lines are much easier to create when the paint is a very fluid. Enjoy yourself and see what you can do.
Tap images to open Creations Student Instructions and Reference Materials in new windows

Use this button to jump down to the preparation section.
STEP 2. Compare & Adjust
Artists will use the simple outline to see how their drawings compare 7 MinutesLEARNING TARGETS
Students know how to draw a cube
M A T E R I A L S
- 14″ x 17″ sketch pad
- 4B pencil
- White and kneaded erasers
- Cheasel reference stand & clip
- PDF Printout
Adjusting Shapes (tap any image to open viewer)
cubetricks1
cubetricks2
cubetricks3
cubetricks4
cubetricks5
2.1 sketch
“Most people really have difficulty with perspective. We could teach it, but it would take a long time. It’s much easier to use the cube tricks. Move each of the 4 points like it says on your reference page.
I’ll come around and help.”
2.2 teach
Use this button to jump down to the preparation section.
LEARNING TARGETS
Students know how to set up their work area for painting with acrylics.
M A T E R I A L S
- Canvas
- Drawing board
- Painter’s tape
- Water tub
- Paints
- Palette pad
- Brushes
- Smocks
Brushes should be nylon for springiness and durability. Round brushes are the most versatile.
Paint pigment list:
- Napthol or Pyrrol Red
- Hansa or Light Yellow
- Pthalo Green (blue shade)
- Cyan or Cerulean Blue
- Ultramarine Blue
- Dioxazine Purple
- Magenta
- Burnt Umber
- Raw Sienna
- Titanium White (professional grade only)
3.1 SetUp
Students set up their work area.
Ask several people to go get water tubs filled, and others to find smocks. That way you have two or three groups in different areas so you don’t get backed up with lines.

3.2 Prep
Students set up their canvas.
Tape a sheet of canvas to a drawing board.
Canvas DEMO Steps – 6 images (tap any image to open viewer)

Canvas Pad
This is a pad of real canvas with gesso. Don’t use “canvas paper”, which is just paper with a textured surface.

Angle
Tear off sheets at a 45 degree angle, pulling from the outside corner.

Gesso
The back is not primed with gesso, and should be recognizable by specks of color, and a slightly off-white color that is not as shiny. Never try to paint on the back!

Measure
Use a long piece of tape and make sure it’s half on the canvas and half on the board.

Pinch
Pinch with both hands close together to tear the painter’s tape.

Done
Finished set up with 2 pieces of tape pressed securely.

Pencil
This is a canvas pencil. A colored pencil in dark brown/gray to mimic graphite.
Use this button to jump down to the preparation section.
LEARNING TARGETS
Students know how to draw a guideline
M A T E R I A L S
- Canvas taped to a drawing board
- Reference photo on stand
- Canvas pencil
- Kneaded or white eraser
4.1 draw
Use this button to jump down to the preparation section.
STEP 5. Color Challenge
Students will use a printed game page to find the colors needed for this painting. 15 MinutesLEARNING TARGETS
Students know how to mix paints
M A T E R I A L S
- Acrylic paints
- Palette pad
- Brushes
- Reference photo on stand
- PDF Challenge page
TIP
This Step can be skipped if you are running short on time.
5.1 print
game
Color Challenge
This is a fun way to practice mixing the shadow colors. Print these on card stock if you can.
Hand out reference prints. Set all of the images out on a table or counter, and let groups of students come choose what they want..

1 Page – Opens in new window
5.2 Mix
Use this button to jump down to the preparation section.
STEP 6. Paint
Artists paint their “giftwrapped” picture, using the colors they created in the color challenge. 35 MinutesLEARNING TARGETS
Students know how to paint with acrylics.
M A T E R I A L S
- Watercolor paper with drawing
- Reference on stand
- Water tubs (2 of them)
- Brushes – smaller, pointy
- Palette or plate
- Acrylic paints (no white), or watercolor paints
- Smocks
- Paper towels
6.1 paint
Use this button to jump down to the preparation section.
LEARNING TARGETS
Students know how to paint with acrylics
M A T E R I A L S
- Watercolor paper with drawing
- Reference on stand
- Water tubs (2 of them)
- Brushes – smaller, pointy
- Palette or plate
- Acrylic paints (no white), or watercolor paints
- Smocks
- Paper towels
7.1 paint
Mix up a blue/grey color using ultramarine and some burnt umber. Add white, and keep adding more white as you paint further away from the package, to lighten the shadow. Paint white all around the package.
The white gesso is not paint. It has a dim grayness to it and is a different shininess than good white paint. Add the white all around. Early finishers can add lettering to the top if they like, and a colored background at the top. Do not change the background around the shadow from white, because the shadow is a white surface shadow.
Move around the room, asking permission to help and encouraging your students.
Use this button to jump down to the preparation section.
LEARNING TARGETS
Students know how to make a painted pattern
M A T E R I A L S
- Butcher Paper
- Leftover paint
- Stamps
- Brushes
- Smocks
- Paper Towels
- Water tub
This is a great way to use paints up and make something fun and useful. However, make sure you have a place to dry large sheets of paper with paint all over them. If you have a wall that you can hang them where people won’t brush against them for an hour or so, that can work great.
8.1 paint
Use leftover acrylic paint colors to make a simple polka dot or similar design on brown kraft paper or white butcher block paper. Colors with white in them will cover the brown paper well.
Stars made with crossing lines are fun. So are spirals and Christmas tree shapes. Keep it simple with lots of white space and a loose and open pattern. Do not try to paint scenes on the paper. Think about wallpaper designs.
Use this button to jump down to the preparation section.
LEARNING TARGETS
Students know the importance of cleaning up.
M A T E R I A L S
- Paper Towels
- Cleaning wipes
- Sink
- Waste baskets
- Well-lit spot for photos
- Camera or phone-camera
9.1 CLEAN
Students set up their work area.
- Wash hands
- Super-wash brushes if used
- Put art supplies away
- Wipe tables & toss trash
- Remove any smocks (last)
- Check for items on floors and tables
9.2 PHOTO
Try to get photos of your student’s artwork. Find a good spot for quick lighting without highlights or shadows from your hands and device. Ideally in-between two strong lights on each side.
Use this button to jump down to the preparation section.
OBJECTIVES
- Practice and improvement in mixing darker colors
- Understanding how a cube shape is drawn
- Accomplishment in depicting a difficult object well
- Fulfillment in working with paint and color
TROUBLESPOTS
Painting the entire object one color. The shadows are sometimes difficult to see. Use the 3rd box on the bottom of the reference page to point out the deep shadows.
ART WORDS
Perspective – A system of rules to draw objects more accurately, to look like they are 3-dimensional. There are many very rigid rules that take time to learn, and are often difficult to understand.
With The Art Instructor Cube tricks, you can achieve a significant improvement quickly, without learning full-on perspective drawing techniques.
Shadow Colors – Darker versions of local colors (the basic color of an object). Shadow colors are best made by mixing opposites together.
CLASSROOM
PREP
Today’s lesson has two targets: learning the cube shape, and mixing shadow colors. Both are important, but the mixing colors component is more of the focus today.
Print all of your PDFs from the lesson plan and cut any references apart as needed.
What your room needs
Here are your printable lists and room prep instructions.
Opens in new window
CLASSROOM
MATERIALS
- Smocks
- Cheasels with clip
- Gift Box Reference PDF
- Drawing Board
- Water tub
- Butcher Paper
- Stamps
- Paper towels
STUDENT’S
MATERIALS
- 14” x 17” Sketch Pad
- Charcoal
- 4B Pencil
- White and kneaded erasers
- Canvas pad
- Painter’s tape
- Acrylic paints
- Palette pad
- Brushes
- Canvas pencil
PREVIEW
Week 18: Recycled Ornaments
Students enjoy a fun and artistic project along with a holiday party. Used plastic water bottles are re-used to create a unique, environmentally friendly, hand-painted Christmas tree ornament. The tops of two bottles are cut off and the artists paint the inside using acrylic paints. The exterior looks like beautifully colored glass, and when the two pieces are taped together, they make a nice classic ornament shape. Even the cap ring is used for a hanger. Ribbon is attached and used to hide the taped connection.
Week 19: Magazine Covers
Students have tons of fun creating, designing, and illustrating their own personalized magazine cover in any subject they want.
Use this button to view our parent’s blog. Share the link: http://parentart.org, with your student’s parents so your they can read about the lesson each week.