
Drawing
Each lesson Plan focuses primarily on one of the 4 Cornerstones of Art:
Drawing | Painting | Color | Style
OVERVIEW
In the first half of the lesson, students will finish the collage begun last week. They try several design ideas, which connects experimentation in composition with quick thumbnails using only big shapes. The second part is all about using Big Shapes and guidelines, but in the context of an artists' choice pencil drawing, working from specialized reference of animal photos.– – –
Grades 3 – 5
Week of September 2 – 6
1 Hour & 45 Minutes


Lesson At A Glance
A brief overview of each step. Buttons jump to each section for detailed information.
10 Min – Exercise to learn about guide lines
10 Min – pick a reference photo, visualize Frame and Big Shapes
10 Min -See who can draw the lightest lines!
30 Min – Artists complete their drawings
2 Min – Everyone helps
SCROLL & TEACH
LESSONPLAN
Each section is a different color. Read over once and then you can SCROLL & TEACH using any device you like. It’s designed to work best with your phone.
LEARNING TARGETS

Students know how to cut interesting shapes from paper
M A T E R I A L S
- Practice paper – copy paper is easy, or some scraps
- Painted watercolor paper from last week’s lesson
- White watercolor paper (for students who missed)
- Colored papers (for students who missed)
- Scissors
1.1 Demo
Use both hands to cut shapes, turning the paper with one hand, and cutting with the other. Try to learn the demo and do it yourself for the class instead of relying on the video.
1.2 Cut
Have students stop to think about a shape before cutting. Practice cutting shapes on scrap paper first.
Then cut the background apart and also the other two smaller colors from last week’s work. Everyone should have 3 colored papers with the 8.5″ x 11″ background, and the two smaller color shapes.
Use all the scraps!
Use all the pieces of your cutouts, including the air shapes you’re cutting away. These can be used as is, or cut into smaller shapes.
1.3 Review
Talk about the images and how the shapes are sometimes based on plants and objects, and sometimes just simple blocks of color.
Matisse Cutouts (tap any image to open viewer)


CREATIONS - tap here to open
Use the Student Instructions printout below to distribute to your Creations students. Tap the image to open the PDF in a new window.
Abstract Painting
Overview: Students will create a background using colors they choose, and then create an abstract line painting using photographic reference as their source.
Use a canvas board, a sheet of taped canvas, or a stretched canvas if available.
Step 1. (15 minutes) Set up for painting in acrylic, and cover the canvas with a thin coat of any colors of your choosing. Brilliant colors work well. Colors may be mixed with water instead of white, for a glaze effect, or white can be mixed in for opacity – colors that look more solid. Set aside to dry.
Step 2. (20 min) Choose a reference source from any book or use the provided PDF photographs below. Use a pencil and sketchpad to create an abstract line drawing based on the photo. You should try to make it different enough so that it’s hard to recognize the subject.
Step 3. (5) Write down some ideas for how color will be used as line and filling in areas. The original underpainting may be covered a lot, or it may show through and be an important element in the painting.
Note: colorful lines and pattern can add a lot of visual interest to this painting.
Step 4. Resume painting, using a variety of Brushes for different effects. Clean edges and lines are much easier to create when the paint is a very fluid.
Tap images to open Creations Student Instructions and Reference Materials in new windows


Use this button to jump down to the preparation section.
STEP 2. Finish Collage
Students will try several design ideas before assembling their collage 30 MinutesLEARNING TARGETS
Students know how to try several ideas, rearranging the largest shapes in their compositions
M A T E R I A L S
- Scissors
- Sketch paper
- 2B Pencil
- Camera is optional (phone or tablet quality is fine)
- Painted Watercolor Papers
- White Glue AND…
- Large flat Paint Brush OR
- Large permanent glue sticks
- Large scrap paper for glue mats (to keep glue off the tables and other items)
- Smock
- Wax paper (optional)
- Heavy books (opt)
Important:
Hold off on the glue materials until the students have completed at least 2 or 3 compositions.
2.1 design
Have everyone use their cutouts to make their design. Place each paper piece and move them around until satisfied.
2.2 sketch
This is called a Thumbnail sketch. It should be no more than an inch and a half on the longest side. Since shapes are simple, it should not take long to draw them out. Maybe 30 seconds to 1 minute.
2.3 Teach
Thumbnail sketches are very important. So important that most art schools now require students to submit a series of thumbnails with each and every project they do!
Does anyone know why they’re so important for artists?
I’ll give you a hint. It has to do with your brain…”
[allow discussion] Here is your answer:
“Your brain can make creative decisions in a few seconds. This is so fast, that your hands doing the drawing can’t keep up with your brain. But you only need the BIG SHAPES to make the core of your composition, and there are usually only 3 to 5 BIG SHAPES involved. That means by drawing tiny, and only drawing the few simple Big Shapes, you can keep up with your brain.
If you begin to draw the details, you brain switches off the design part, and starts enjoying the sketching process. It’s a completely different process, and results in accidental composition decisions – decisions that you don’t like but won’t notice until after you’re finished and can’t do anything about it.”
2.4 design
If you have a slow worker or someone who is worried about their work, take a picture of it so they can get it back just like they have it.
2.2 sketch
Students who are fast can make a 3rd design, using only a thumbnail sketch to “arrange” the pieces.
2.1 Glue
Place the papers again, and begin gluing the back of each piece before pressing it firmly into place. Use plenty of glue and have scrap paper to use for glue mats.
Make sure names are on the final work before setting aside to dry.
Use this button to jump down to the preparation section.
LEARNING TARGETS
Students know how make lines of various depth with graphite
M A T E R I A L S
- 14″ x 17″ Sketch Paper
- 2B Pencil
- White Eraser
3.1 draw
Explain guide lines that can be made when you only graze the paper instead of pressing. lines (you can call these “tickle” lines for younger kids – meaning you only tickle the surface). These are lines that are so light, that we can erase them completely. You can’t draw a line dark, and then erase on it to make it a guide line. It will be lighter, but you can’t erase it away any more than you already did.
Begin with one horizontal line in the middle of the last page of your pad (so it doesn’t destroy the pages underneath). Then have everyone make a slightly darker line about a half inch or so below it. Continue with 3 progressively darker lines below – one at a time. The bottom line should be as dark as possible. Take a minute and point out the dents in the paper and the cardboard underneath. Then begin a new set of lines above the first line. The one just above should be slightly lighter, and the next slightly lighter again. Make 2 more with the top line being the lightest line they can draw – and still actually see.
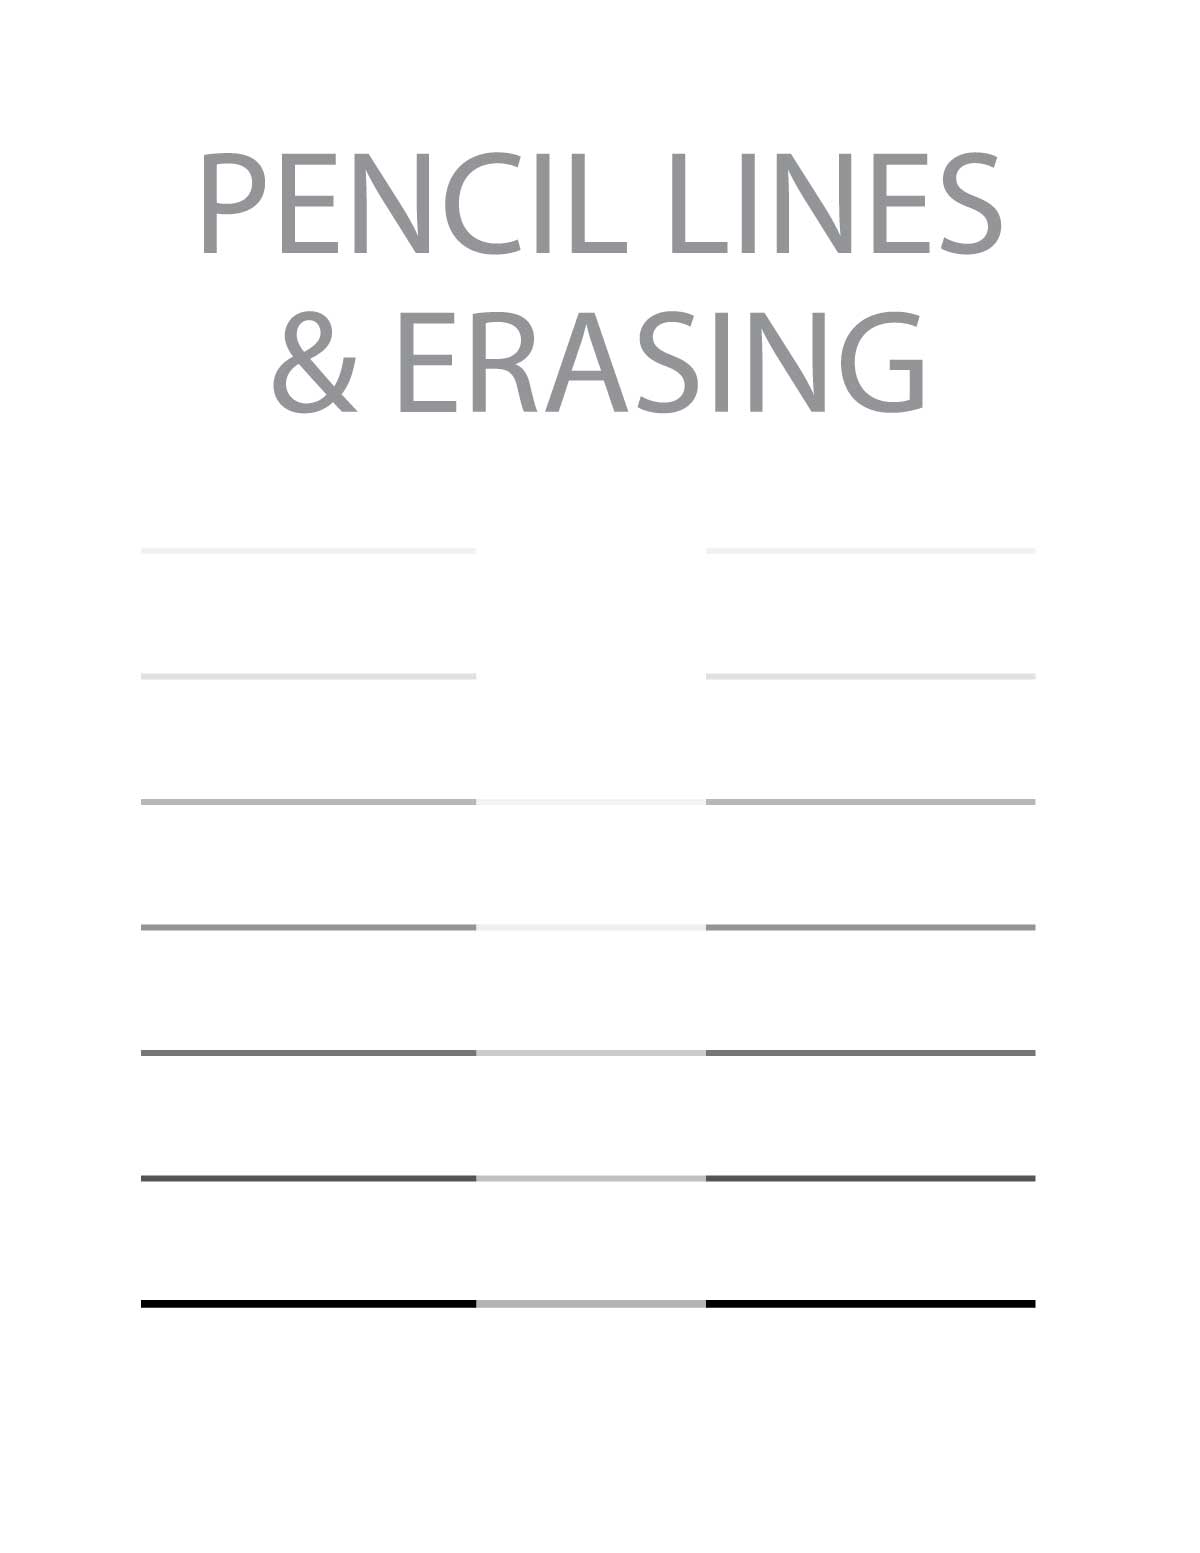
3.2 erase
Have them erase a small patch out of the middle of each line as shown above. Talk about erasing (Teacher Talk below). Draw a guideline smiley face at the top if you want to encourage some fun.
Find this perfect guideline and circle the line. Write ‘guideline’ next to it and see if you can draw that perfect line again somewhere on the paper.
Artists use guide lines to make a rough sketch. Then we re-draw over those lines with a better drawing or with ink, and erase the guide lines.”
Use this button to jump down to the preparation section.
LEARNING TARGETS
Students know how to identify big shapes in references
M A T E R I A L S
- 14″ x 17″ Sketch Paper
4.1 print
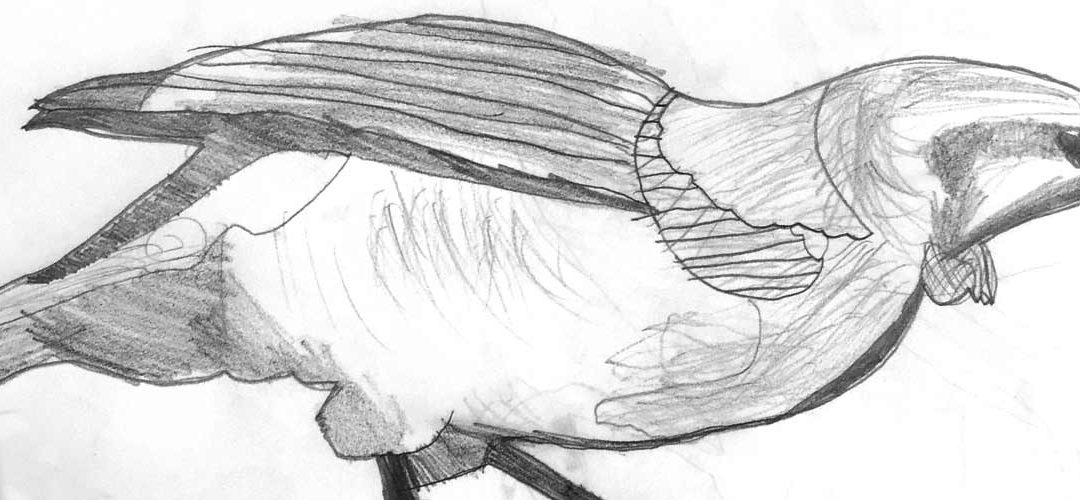
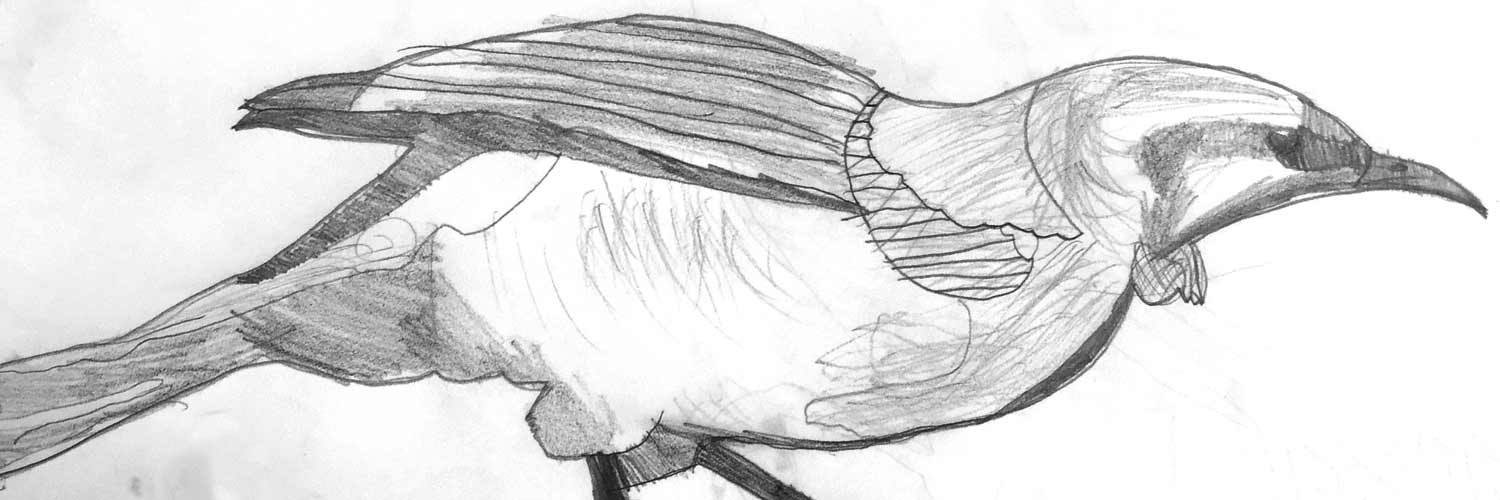
Reference
Drawing and Shapes
Special reference of animals and more, that includes 2 diagrams of each photo, helping students identify the big shapes.
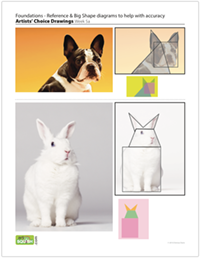
3 Pages – Opens in new window
4.2 CHOOSE
You’ll notice that the outside box for the picture’s shape is a little bit bolder. That’s because the first step is to create an accurate version of this shape on your paper. We call it the Frame. There are 3 steps to drawing accurately, and the first step is the frame. Try to get the frame proportionally accurate, meaning that the sides look the same in relation to each other. If your Frame is tall, then make sure you draw it THAT tall. If your Frame is wide, then draw it THAT wide.
Then you will draw these big simple shapes, inside your Frame, because that’s the second step, Big Shapes.
Before you draw, look at the blank paper in your sketch book. Try to visualize, or imagine, that the frame is drawn on your page. It should be bigger, like your page, but you don’t have to draw gigantic. Just do what is comfortable for you.
Do not use the edges of your paper for the Frame you draw. Draw your Frame inside the paper edges with a line for all 4 sides.”
Use this button to jump down to the preparation section.
LEARNING TARGETS
Students know how to draw big shapes
M A T E R I A L S
- 14″ x 17″ Sketch Paper
- 2B Pencil
- References PDF
5.1 draw
RULES: Once everyone has their references, have them draw the Frame and the big shapes in the lightest lines you can and try to be the lightest in the room, yet still be able to see the lines for redrawing over them.
Select the winner. You should have a tie between several students. You can have everyone clap for them, but then stop and announce that they’re all winners and are clapping for themselves too, because making a learner is absolutely just as important as making a keeper.
Use this button to jump down to the preparation section.
LEARNING TARGETS
Students know how to make a drawing with graphite
M A T E R I A L S
- 14″ x 17″ Sketch Paper
- 2B Pencil
- White Eraser
6.1 WORD
Because they’re only guides, they should be drawing only the big shapes with maybe a few important details.
When they’re ready, they can redraw over the guide lines and create their finished drawings. Encourage lots of details and shading to finish.
Use this button to jump down to the preparation section.
LEARNING TARGETS
Students know the importance of cleaning up
M A T E R I A L S
- Paper Towels
- Cleaning wipes
- Sink
- Waste baskets
- Well-lit spot for photos
- Camera or phone-camera
7.1 clean
- Wash hands
- Super-wash brushes if used
- Put art supplies away
- Wipe tables & toss trash
- Remove any smocks (last)
- Check for items on floors and tables
7.2 photos
OBJECTIVES
- Practice and improvement using color, and large shapes to create a composition
- Understanding how big shapes and light guide lines help artists draw accurately
- Accomplishment in finishing a colorful collage work like Matisse
- Fulfillment by creating original work in collage and pencil
TROUBLESPOTS
Not enough glue – With glue sticks, more is better. Getting the edges covered is hard, and it helps to have scrap paper for gluing on, like a placemat.
Fast and impatient Scribbling – Encourage students to slow down and carefully fill in areas with shading. Explain that they will like the look better when they are done if they go in slow-motion to shade.
ART WORDS
Accuracy – Making your drawing or painting look like we see it with our eyes, or what most people call realistic. It takes a lot of practice to draw accurately, because our minds try to tell us things we remember, or things we know about the object, not the way it actually looks from where we are viewing it.
Frame – A The Art Instructor term for the rectangular or square box that most flat artwork is contained in, usually by the edges of the media such as paper or canvas.
Big Shapes – Within a Frame, there are usually 3 to 5 very large shapes. Drawing these first in very light guidelines, helps artists know where to draw when filling in the details.
CLASSROOM
PREP
Print all of your PDFs from the lesson plan and cut the references apart as needed – making sure to keep the diagrams with the matching photos.
What your room needs
Here are your printable lists and room prep instructions.
Opens in new window
CLASSROOM
MATERIALS
- Practice paper – copy paper is easy, or some scraps
- White watercolor paper (for students who missed)
- Colored papers (for students who missed)
- Scissors
- Camera (optional)
- White Glue AND…
- Large flat Paint Brush OR
- Large permanent glue sticks
- Large scrap paper for glue mats (to keep glue off the tables and other items)
- Smock
- Wax paper (optional)
- Heavy books (opt)
STUDENT’S
MATERIALS
- 14″ x 17″ Sketch Paper
- Painted watercolor paper from last week’s lesson
- 2B Pencil
- 4B pencil
- Ebony pencil
- White erasers
- Kneaded erasers
PREVIEW
Week 4: Accuracy Puzzles
September 9 – 13
Students will work on deconstructing a diagram of an image, working on it like a puzzle. Beginning first with the Frame (the box that holds a picture), they learn how to work on the rectangular proportions, before moving to the second step, Big Shapes. Details are added last, completing the 3 Steps to Accuracy.
Week 5: Landscape & Distance
September 16 – 20
Students will choose from a set of landscape photo references, and paint in acrylics on canvas. Depth will be shown by using several techniques, but mainly atmospheric perspective.
Use this button to view our parent’s blog. Share the link: http://parentart.org, with your student’s parents so your they can read about the lesson each week.