

Color
Each lesson Plan focuses primarily on one of the 4 Cornerstones of Art:
Drawing | Painting | Color | Style
OVERVIEW
Students learn how pigments affect each other. There are 4 starting mixes, and they add to each mix 3 more times to make a page with 16 different variations of yellows and oranges. Specific pigments are used from the ART INSTRUCTOR model, which produce colors that artists most often need to know how to mix.– – –
Grades 3 – 5
Week of September 30 – October 4
1 Hour & 45 Minutes
Lesson At A Glance
A brief overview of each step. Buttons jump to each section for detailed information.
10 Min -Setup for painting
22 Min -Students begin the journal
15 Min – Finish Color Journal
20 Min – Use leftovers and mix more
12 Min – If students finish their journal pages
5 Min – Everyone helps
SCROLL & TEACH
LESSONPLAN
Each section is a different color. Read over once and then you can SCROLL & TEACH using any device you like. It’s designed to work best with your phone.
LEARNING TARGETS

Students know how to warm up first when creating art
M A T E R I A L S
- 14″ x 17″ sketch pad
- Drawing pencils & erasers
- 4″ x 4″ cardboard templates
- Still life objects for inspiration
Card Stock 4″ x 4″ Templates PDF opens in new window:
1.1 draw
Use only pencil on sketch paper, within a 4″ x 4″ square frame. Artists may draw anything they from imagination and/or observation, using the 4 x 4 square as a frame. Line, texture, and shading may be employed, but not blenders or smudging with eraser or fingers.
The work must convey some kind of emotion. Remind students to ake their time and see if they can create a keeper.
CREATIONS - tap here to open
Use the Student Instructions printout below to distribute to your Creations students. Tap the image to open the PDF in a new window.
Continue Painting
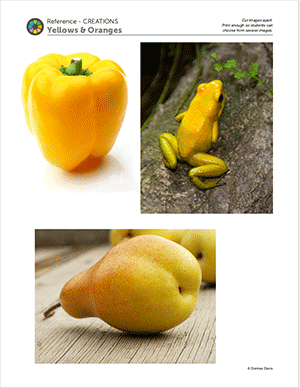
Overview: Students will continue to work on their 3-week landscape if they have not finished. If they have completed this, they should choose a yellows reference photo (PDF provided below) and create a small sized painting, practicing their mixing skills.
Use a canvas board, or a sheet of taped canvas. It works well to create a smaller frame so this painting doesn’t take as long. Try 8″ x 10″ or so.
Step 1. (10 minutes) Set up for painting in acrylic
Step 2. (10 min) Choose a reference source from the provided PDF photographs below. Use a pencil or charcoal and sketchpad to create a couple of quick study sketches.
Step 3. Begin painting. Practice using the color journal pigments to create your colors. Do NOT rely on browns to create shadow colors. There are very few browns used in the yellow and orange mixes in the color journals.
Alternative Drawing Choice
Students who are tired of painting can choose to draw one of the reference photos in pencil. Make sure to draw larger than the photo, but not more than 8 x 8 inches or so.
- Warm up with several practice drawings first.
- Create a guide line drawing with the big shapes
- Work from the top down
- Use a sheet of paper under your hand to prevent smearing while you work.
Tap images to open Creations Student Instructions and Reference Materials in new windows

LEARNING TARGETS
Students know how to set up their work area for painting with acrylics.
M A T E R I A L S
- Water tub
- Palette pad
- Paint tubes
- Brush (medium-small)
- Smock
Brushes should be nylon for springiness and durability. Round brushes are the most versatile.
The ART INSTRUCTOR Paint pigment list:
- Napthol or Pyrrol Red
- Hansa or Light Yellow
- Pthalo Green (blue shade)
- Cyan or Cerulean Blue
- Ultramarine Blue
- Dioxazine Purple
- Magenta
- Burnt Umber
- Raw Sienna
- Titanium White (professional grade only)
2.1 setup

“Take your time and make sure you set your area up neatly. Keep your water tub, palette, and brushes all on the same side as the hand you use to draw and paint with”
LEARNING TARGETS
Students know how to follow directions
M A T E R I A L S
- Acrylic paints
- Palette pad
- Brushes
- Water tub
- Paper towel
- Color Journal PDF (extra copy)
3.1 Print
Color Journal
Yellows & Orange
A comprehensive worksheet with instructions. Print on CARD STOCK.
Don’t hand out the journals until the next step so students don’t get distracted while you demonstrate how to use it.
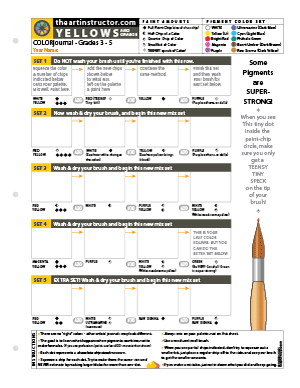
1 Page – Opens in new window
3.2 DEMO
Tap the 4 arrows icon to enlarge the video to full screen.
Review the demo video and demonstrate to your students, or you can simply display the video on a larger screen for them to watch.
3.3 teach
The first box has a complete formula to mix and fill in. The dots represent paint chips, the same size and shape as a chocolate chip. You’ll see some half-chips, and even smaller bits. Try the best you can to match the amounts of paint, because the whole journal won’t come together as well if you don’t.
Don’t make larger amounts because you don’t want to waste supplies. But don’t make smaller amounts, because then you won’t have enough paint to go all the way across.”
3.4 teach
“Always make individual chips! You simply cannot estimate the amounts by making blobs you think might be several chips big.
When you have a quarter or half chip, it’s hard to squeeze out that much and get it accurate, so instead, squeeze out a regular same size chip, and use your brush to get half, or a quarter of it, as needed. Sometimes you’ll see a tiny sliver, like the purple here. that means you should barely use any at all. Remember that you can always get more if it doesn’t change the color enough to notice. But you can never take it out. Always use less than what you think when you see a sliver or a speck. Especially with green!
Green is so strong, you can think of it as the Incredible Hulk of pigments.”
3.5 teach
Place the chips for the next square near by, but not touching the remaining mix you just made.
Mix the new chips into the original mix, being careful not to make too big of a blob.
“Now we look under the next square for the formula. There are new chips to add in. You’ll see how the new chips affect the existing color, which is very important, and the main goal of the journal. Don’t let your new chips touch the mix, but put them very close. If they touch, it can get paint inside your tube color.
3.6 teach
If you make a color that’s different from other artists, that’s fine, you are making a color journal of your own, and it’s not any particular color that we’re trying to achieve, but the affect that the colors have on each other. Even if you put the wrong chips in, just make a note that shows the different formula you used, so that your journal is accurate.”
LEARNING TARGETS
Students know how to mix acrylic paints
M A T E R I A L S
- Paint
- Palette pad
- Brushes
- Water tub
- Paper towels
- Smocks
- Journal printouts (one for each student on CARD stock)
4.1 paint
- Play music but not so loud that it discourages talking
- This should be a fun and social time, since it doesn’t use the creative mind.
Help students stay on track. Be on the lookout to make sure they’re using small bits of paint when indicated, so you can help them prevent overpowering a color. It’s easy to do with purple and green, and also red – by using too much. Encourage and help everyone by following the instructions.
If someone says their paint didn’t change, that means they’re being very careful adding colors. Just tell them to try a bit more until they see some change.
This can feel like a test, and it a student doesn’t like to mix colors, it’s no fun. If a student gets bogged down and bored, tempt them with the artists’ choice if they finish. If that doesn’t work, allow a 5-minute tour around the room to see how others are doing and talk a bit. You can also make it more game-like, by challenging them to see if they can do it accurately and/or within a time limit.
“You can talk all you want, as long as you can work at the same time. Practice doing both if you find that you often stop working when you talk. “
LEARNING TARGETS
Students know how to mix acrylic paints
M A T E R I A L S
- Paint
- Palette pad
- Brushes
- Water tub
- Paper towels
- Smocks
5.1 paint
LEARNING TARGETS
Students know how to create an acrylic painting
M A T E R I A L S
- Leftover paints
- Same paint set up
- Practice-page printout
6.1 Print
Worksheet
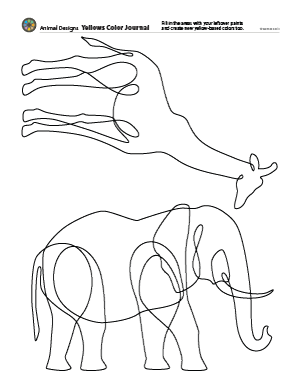
1. Animals Line art
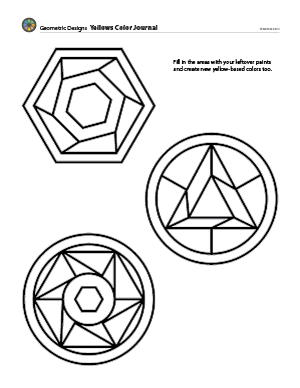
2. Geometric Line art
Let students choose between the two practice pages. Each one has areas to fill with paint colors.
Hand out reference prints. Set all of the images out on a table or counter, and let groups of students come choose what they want..
1 Page – Opens in new window
1 Page – Opens in new window
6.2 paint
Students should fill in areas with different yellow and orange colors from their journal painting, and make new versions of these colors as needed.
This is about using the paint, having fun, practicing brush work and mixing colors. However, the students just see it as a fun project. Let them do this however they want.
LEARNING TARGETS
Students know how to use their imagination when creating artwork
M A T E R I A L S
- Sketch pad or watercolor pad
- Any media except ink
- Oil pastel
- Pencil
- Charcoal
- Continue with paints
- Appropriate set-up for media
7.1 paint
If there is time and both handouts have been finished, students may continue with artists’ choice using their paints. They could also clean up the paints, super wash their brushes, and then move to a dry media for the remainder of the time.
Remind them to clean up well and not rush or do something silly, creating messes.
LEARNING TARGETS
Students know the importance of cleaning up.
M A T E R I A L S
- Paper Towels
- Cleaning wipes
- Sink
- Waste baskets
- Well-lit spot for photos
- Camera or phone-camera
8.1 clean
- Wash hands
- Super-wash brushes if used
- Put art supplies away
- Wipe tables & toss trash
- Remove any smocks (last)
- Check for items on floors and tables
8.2 photo
OBJECTIVES
- Practice and improvement in mixing pigments to create useable colors
- Understanding what happens when certain pigments mix into others
- Accomplishment in finishing a journal page and also an exercise using colors
- Fulfillment by having more confidence with color mixing
TROUBLESPOTS
Unequally sized paint chips which will create different colors than the journal is going for.
Washing brush between colors on the same row will waste paint and create different colors.
Small chips – Not making enough paint by having tiny chips
Huge mixing blobs – Making gigantic mixing swirls which will dry out paint
Dipping brush in water to extend paint.
ART WORDS
Journal – Any practice work that an artist does that can be saved and referenced later
Formula – An exact recipe for making a color. The first square on each row is a formula. The subsequent squares are not; they give pigments and amounts that affect the current color after mixing in, but not an actual formula.
Affect – What happens when something is mixed into something else. The goal of the color journal is to learn how certain pigments affect other colors when mixed into them.
CLASSROOM
PREP
Make 4″ square templates out of card stock or chip board. Here’s a PDF printout with two squares that you can print on card stock. Cut with a paper cutter, and x-knife and metal ruler, or just use scissors.
Print all of your PDFs from the lesson plan and cut any references apart as needed.
What your room needs
Here are your printable lists and room prep instructions.
Opens in new window
CLASSROOM
MATERIALS
- 4″ x 4″ templates
- Still life objects
- Water tubs
- Paper towels
- Smocks
STUDENT’S
MATERIALS
- 14″ x 17″ Sketch Paper
- 2B Pencil
- 4B pencil
- Soft compressed charcoal sticks (not pencils)
- Canvas pencil (dark gray colored pencil)
- White erasers
- Kneaded erasers
- Acrylic paints
- Oil pastels
- Blender sticks (stumps)
- Sandpaper boards (to clean blenders)
- Paper palette pad, or disposable trays/plates
- Brushes – All sizes
PREVIEW
Week 8: Many Minis
Students will work on a series of very small works each using different combinations of media. There is opportunity for lots of freedom and self-expression, and artists learn to focus on one work at a time while doing many. The small size and having several works in a row, takes the pressure off of each work, so students really enjoy themselves and create some fantastic work as a result.
Week 9: Watercolor Rodeo
Students will learn how to paint with watercolor, using the drop-in method and our 4 watercolor insights. First they draw some autumn leaves, and after a demo, they will paint leaves using watercolors they’ve made from acrylic paints. Emphasis is on letting the watercolor work by itself, as well as brush technique.