
Drawing
Each lesson Plan focuses primarily on one of the 4 Cornerstones of Art:
Drawing | Painting | Color | Style
OVERVIEW
Students will work on deconstructing a diagram of an image, working on it like a puzzle. Beginning with the Frame first, they learn how to work on the rectangular proportions, before moving to the second step, Big Shapes. Details are added last, completing the 3 Steps to Accuracy.– – –
Grades 3 – 5
Week of September 9 – 13
1 Hour & 45 Minutes

Lesson At A Glance
A brief overview of each step. Buttons jump to each section for detailed information.
20 Minutes -Students draw a diagram
22 Min -Slideshow about proportions
10 Min – Artists draw Frame & Guidelines.
30 Min -Finish art in dry media
15 Min -Early finishers do artists’ choice
7 Min – Everyone helps
SCROLL & TEACH
LESSONPLAN
Each section is a different color. Read over once and then you can SCROLL & TEACH using any device you like. It’s designed to work best with your phone.
LEARNING TARGETS

Students know how to draw big simple shapes
M A T E R I A L S
- 14″ x 17″ Sketch Paper
- 2B Pencil
- White Eraser
1.1 Print
Reference
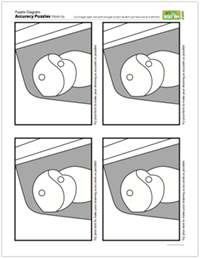
Puzzle Diagram
A set of 4 diagrams, that students try to draw accurately.
Print enough so every student can have one.
1 Page – Opens in new window
1.2 Print
Reference
3 Steps to Accuracy
A guide to drawing the puzzle diagram more accurately, incorporating the 3 Steps to Accuracy.
Print enough so every student can have one to keep. Punch holes for saving in binders if possible.
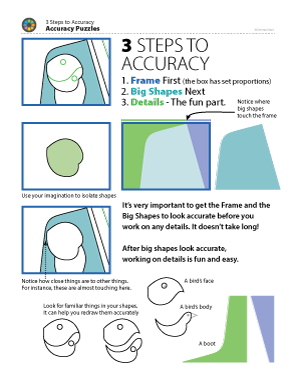
1 Page – Opens in new window
Make sure any advanced students keep the subject of the diagram a secret from the newer students. Be ready for advanced students and explain this to them as they enter the room.
1.3 teach
Have the first print, the accuracy diagrams, ready to go when students get there, on stands such as cheasels for reference. Everyone needs their own to look at so they can make visual measurements when needed.
The diagrams must be drawn larger than the print, but not so big that they are twice the original size.
It’s important to measure visually, neither one-to-one, at the exact same size, nor two-to-one, by doubling measurements. There should be no rulers available.
1.4 Sketch
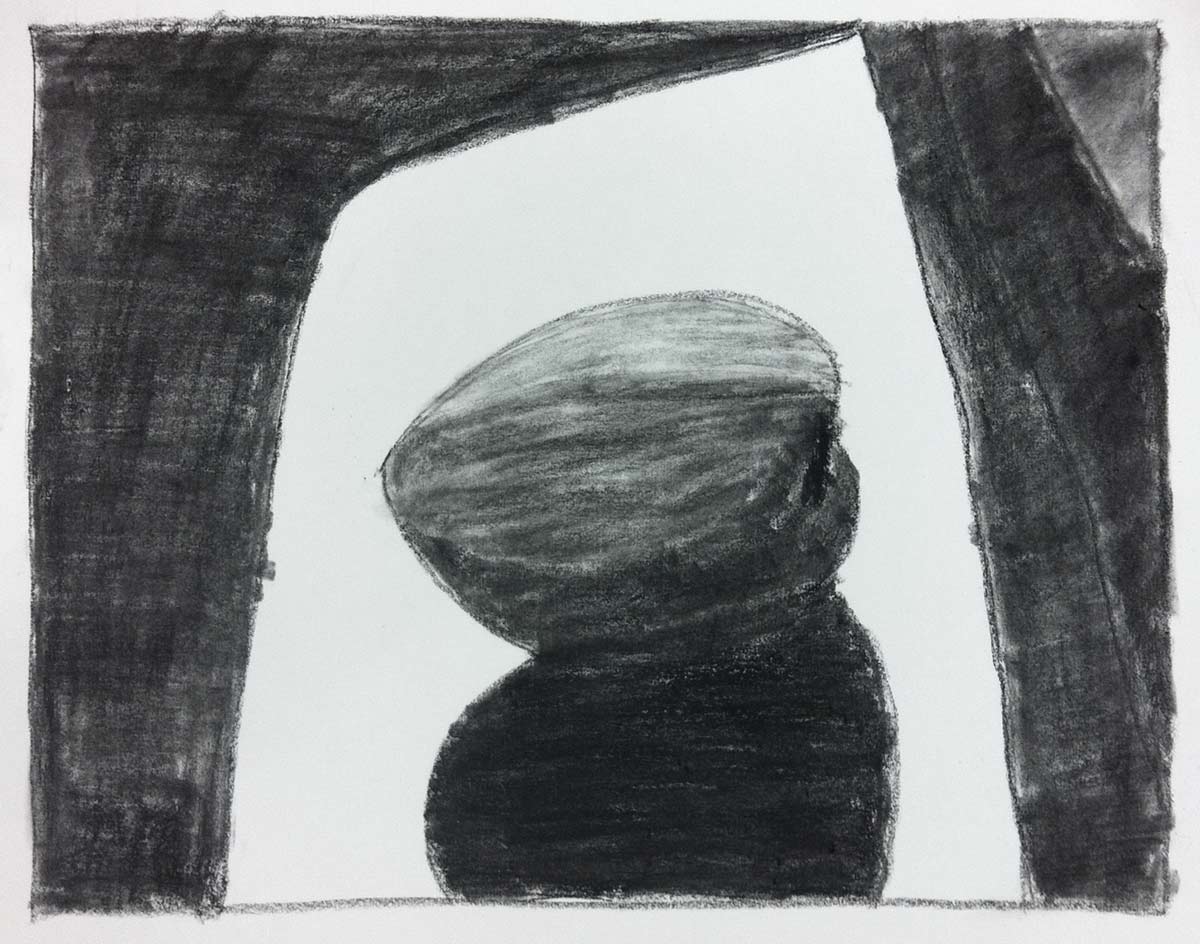
Using a pencil and their large sketch pad, students should open to a new page in the shower position (vertical). Have them divide the page in half by drawing a line across the middle from side to side. Warm up by drawing the print of the puzzle diagram in one of the sections, as accurately as they can, as best as they can – but not with a lot of pressure. Students should not be told what the subject is.
Walk around and encourage students as they work. Make the class as fun as you can. Play some popular music.
If you see anyone using the edge of their paper or the dividing line for one or two of the sides of their Frame (the box that contains an artwork), have them begin over and draw all 4 sides of the frame within the paper edges. When you have some of the 4 sides drawn, and some of the sides as paper edges, you cannot see the proportions as easily. Ease their mind about “not doing it right” by saying many people do that, but they just don’t realize that it creates an optical illusion problem.
This paper is not the artwork today. This is an exercise to get ready to make artwork. Remember, artists always warm up, and usually make several learners; attempts at accuracy, but not quite getting it. It takes some work to learn the subject.
It may not seem like the most creative thing to draw this puzzle, but by doing so, you get to know it better. You have to practice drawings at first, just a bit, because it is very important for achieving accuracy.”
1.5 Redraw
Have the students draw the puzzle a second time, again – not exactly the same size. The goal is to visually depict the diagram accurately, and there is no learning if you just measure everything exactly the same size.
Have some fun asking what they think the diagram is based on. You can tell them it’s from a photo, but don’t give any hints. It’s a secret you’ll reveal later on!
If we look at our work and say something like, “this doesn’t look right to me”, what we mean is that it doesn’t look accurate. It’s something that artists want to be able to do, and often struggle with. Vincent Van Gogh had a hard time with it too, and he was one of the greatest and most well-known of all artists. Van Gogh worked hard to practice and learn accuracy. He didn’t always worry about it, but when he wanted to, he could be more accurate by practicing several times with sketches before doing his final work, just like we did now.
After you’ve drawn the puzzle quickly, use this next handout to examine it, and then draw it again, erasing as needed to make it more accurate.
You can think of this like a wooden puzzle that children have. If you have the right puzzle frame, and right pieces, then they fit together perfectly. If you had the wooden frame for a different puzzle, then the pieces wouldn’t fit inside. So that’s why making the Frame, or rectangle of our work look proportional, is so important.”
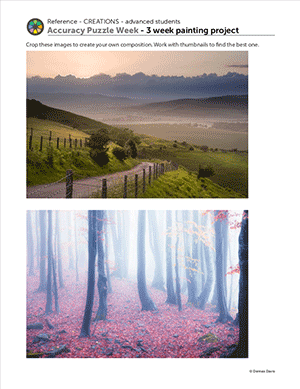
CREATIONS - tap here to open
Our Creations lessons are for students who have completed the two years of Foundations and are ready to begin using all that they have learned to create new work. These more challenging versions of the same concepts and techniques are easily taught along-side students in the Foundations course. This allows for excellent review, and is encouraging for students to see progress from each viewpoint.
Use the Student Instructions printout below to distribute to your Creations students. Tap the image to open the PDF in a new window.
3 Week Landscape Painting
Overview: Students will find reference, create sketches and compositions, set up a canvas, and paint a landscape using atmospheric perspective. Architectural elements can be involved as well.
STEPS 1 & 2 – Inspiration & Reference – Should take 10-20 minutes
Find a reference or use one from the provided printout. Make sure at least part of the image is something you are happy about working on.
STEP 3 – Practice drawings – Should take at least 30 minutes – up to an hour
There are 3 kinds of practice drawings. The first two are required. Detailed drawings are optional.
- Quick rough sketches – No more than a couple of minutes each. Charcoal is great for this.
- Thumbnail composition sketches – These should be very small, and only for quickly manipulating the Frame and Big Shapes to try different compositions quickly. Very much like moving cut paper or puzzle pieces around to experiment and see what works best.
- Detailed practice drawings (of important areas)
STEP 4 – Set up canvas – Should take 5 minutes
Use a canvas board, a stretched canvas, or tape a canvas sheet to a drawing board. Write your name on the back or on the tape using a bold marker.
STEP 5 – Guidelines – Can take 10 to 30 minutes
Use a canvas pencil (gray colored pencil – doesn’t mix into paints) and draw very lightly on your canvas. Make lines that will help you with accuracy, but defining the Big Shapes first, and then adding any details that you need to define where they will go.
STEP 6 – Set up paints – Should take 5 minutes
If you have time to paint at least an underpainting or the sky, you can go ahead and set up for this today (first week). If not, you should wait and find something simple and fun to sketch for the rest of this session today.
STEP 7 – Begin painting
Start with the sky (farthest away, and highest on the canvas) unless you’re doing an underpainting. You can underpaint for landscapes in two methods: 1. Put opposite colors under each area (orange under a blue sky, or purple under an orange sunset sky), or 2. change the color of your canvas from white to something warm such as red, orange, or brown. Underpainting colores should be thinned with a bit of water and they will normally be streaky, but it won’t show.
Tap images to open Creations Student Instructions and Reference Materials in new windows

Use this button to jump down to the preparation section.
LEARNING TARGETS
Students know how to draw accurately in 3 useful steps
M A T E R I A L S
- 14″ x 17″ Sketch Paper
2.1 explain
First, use a moment to explain proportions and this exercise.
Proportion is a very difficult thing to explain, because it’s so abstract. Young students need a concrete example, so using the hand works well. Take your time with this, and ask your class if they are understanding the concept.
Proportions (tap any image to open viewer)
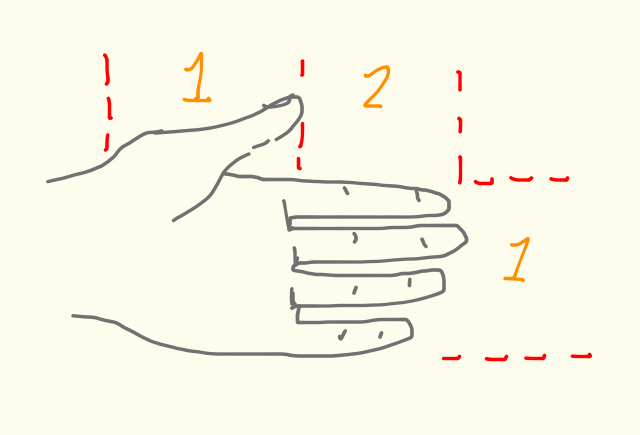
Hand Proportions are 2 to 1
The proportion of most hands is about 2 to 1, or twice a long as it is high.
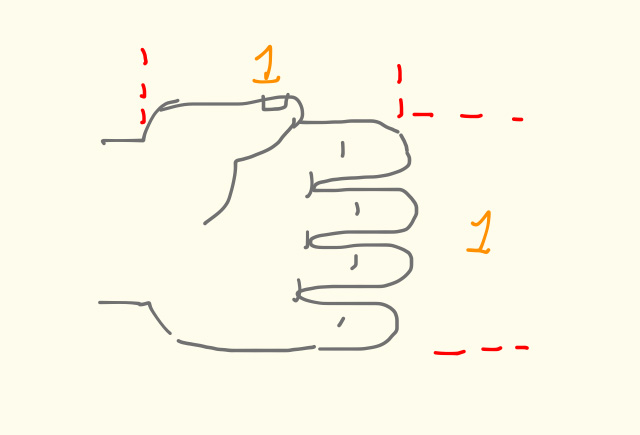
1 to 1 looks innaccurate
A 1 to 1 hand does not look accurate because it has the wrong proportions.
“The frame, or rectangle around our puzzle picture has proportions. You can see that it is wider than it is tall, but how much wider? That’s the trick that you need to know if you want your work to look more accurate. A square box has proportions too. What are they? They are exactly the same. The proportion is equal, or what we call, one to one. But in our diagram, we can see that the width is more than the height. But we need to know just how much wider it is, if we want to be accurate. You simply cannot fit your picture into a frame that isn’t accurate.
So, listen up. This is the thing that messes up most artists; using a frame that has different proportions than what our reference has.
Now I’m going to have you work on your frame and show you the professional artists’ method that helps you get your proportions very accurate.
Then we’ll keep going step by step. Wait for me though, because I have some awesome tips for how to make your work look better at every step.”
Teachers: Practice this next part so that you know it well. Students should follow along STEP BY STEP on a final version of the puzzle drawing while you talk them through it. The pauses are there to let them catch up and to not give away the surprise until they’re almost done.
2.2 teach
Go through the each section of the slideshow, pausing where indicated.
Use a long dowel or other non-ruled stick and place it right on your display screen, to show measuring visually.
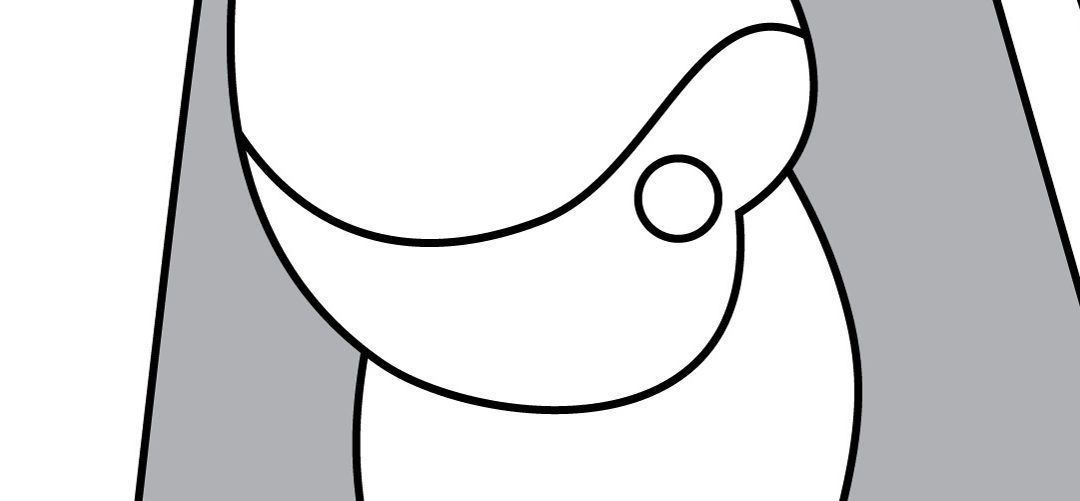
PART 1: How to draw accurately Step-by-Step (tap any image to open viewer)
The Frame
Here is the frame for our diagram. What are the proportions? To make it easier, they are 3 to 4. That means the height is 3/4 of the width.
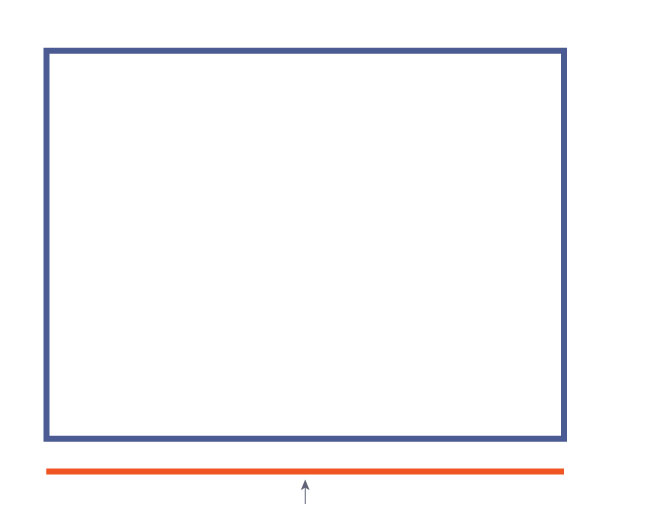
The width, using the bottom edge
You can always measure your frame to check the proportions and adjust – BEFORE moving on. For this frame, use your eyes to visually find the center of the bottom edge. It helps to pretend it’s only one line, instead of part of the entire frame.

Find the 3/4 point
Now pretend that you’re only looking at the right half of that bottom line, and you can find the center point of just that part. That is the 3/4ths point, and is the height of this frame.
Measure the height
Use a long thin object, like a brush handle, and mark the measurement by holding your thumbnail at the 3/4ths point. Use the brush to measure the right side. If it’s too high or low, erase the top line and move it up or down to match the measurement of 3/4ths high. You can make a measurement mark on each side of the Frame and then connect the two marks. You can also find your frame’s proportions by first measuring the shorter side, and then placing your stick on the longer side and seeing just how much shorter it is.
2.3 Pause
Wait before moving to the next set of images to display.
Have students let you know when they have gotten their Frame finished and think that the proportions are accurate. Tell them you need to check their work before they move on. Check for two things and have everyone correct them before beginning the next stage of the exercise.
- Height at 3/4 of the width
- Parallel sides with 90 degree corners
2.4 Draw
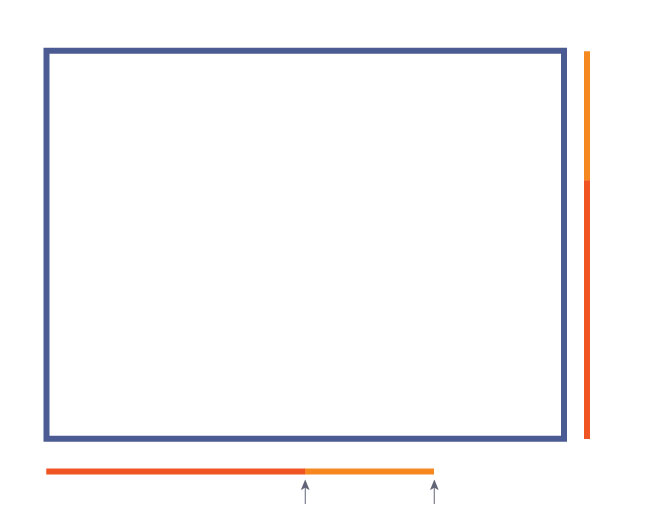
Students should draw the 4 biggest shapes and then continue.
Display the next image, read the caption, and encourage using the handout from the last step. Students should work from big shapes to smaller shapes, saving the smallest shapes for last.
PART 2: How to draw accurately Step-by-Step (tap the image to open viewer)

4 Biggest Shapes
You can also look at your 3 Steps handout to find the big shapes. Pretend the top edge is just a line. Then it’s easier to find where the big shapes touch it. You can judge how long the line is on each side of that point.
2.5 Pause II
Wait before moving to the next set of images to display.
As they get close to finishing, you can finally advance to the last set of slides and talk about the progression: from diagram, to picture, to photograph. At the final photo, make the main point, using the teacher talk below the slideshow.
PART 3: How to draw accurately Step-by-Step (tap any image to open viewer)

More shapes
Here is a strong hint at what this puzzle really is. Can you guess?

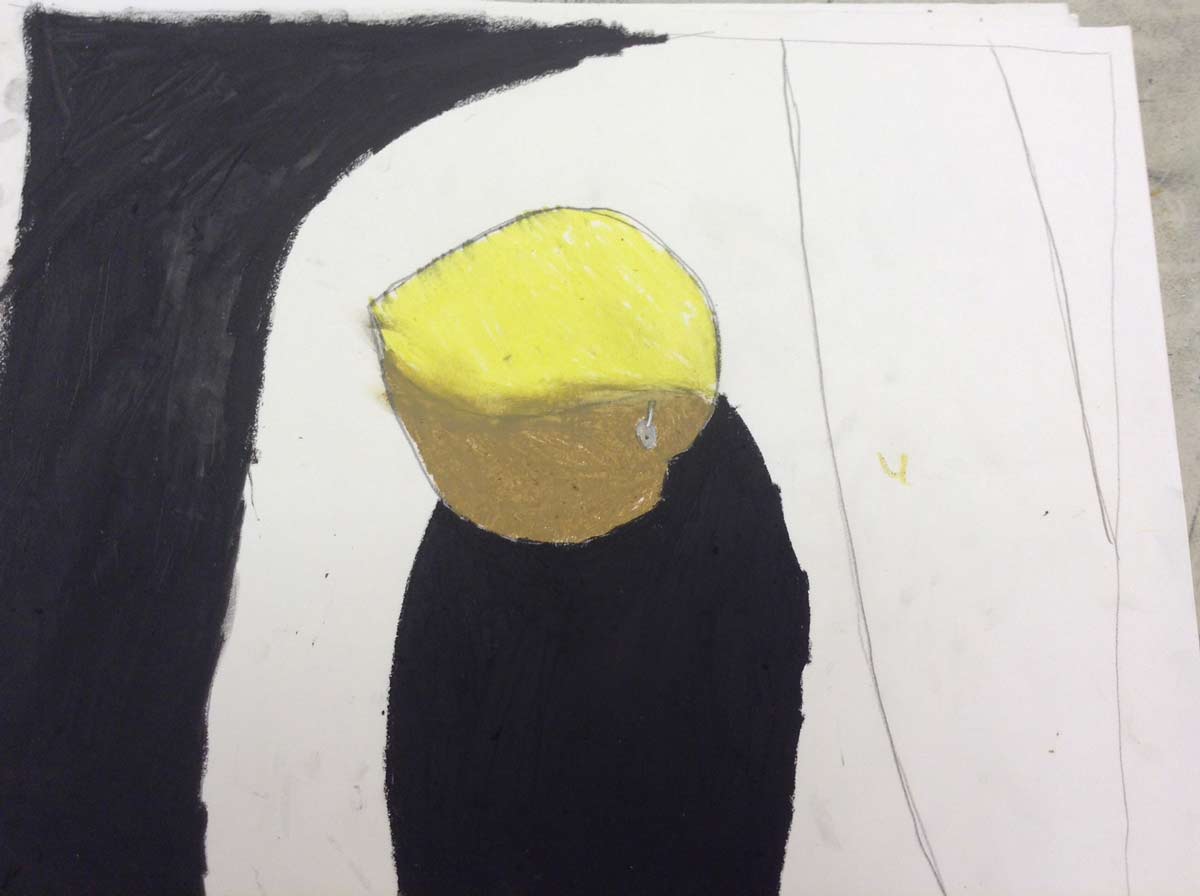
Details
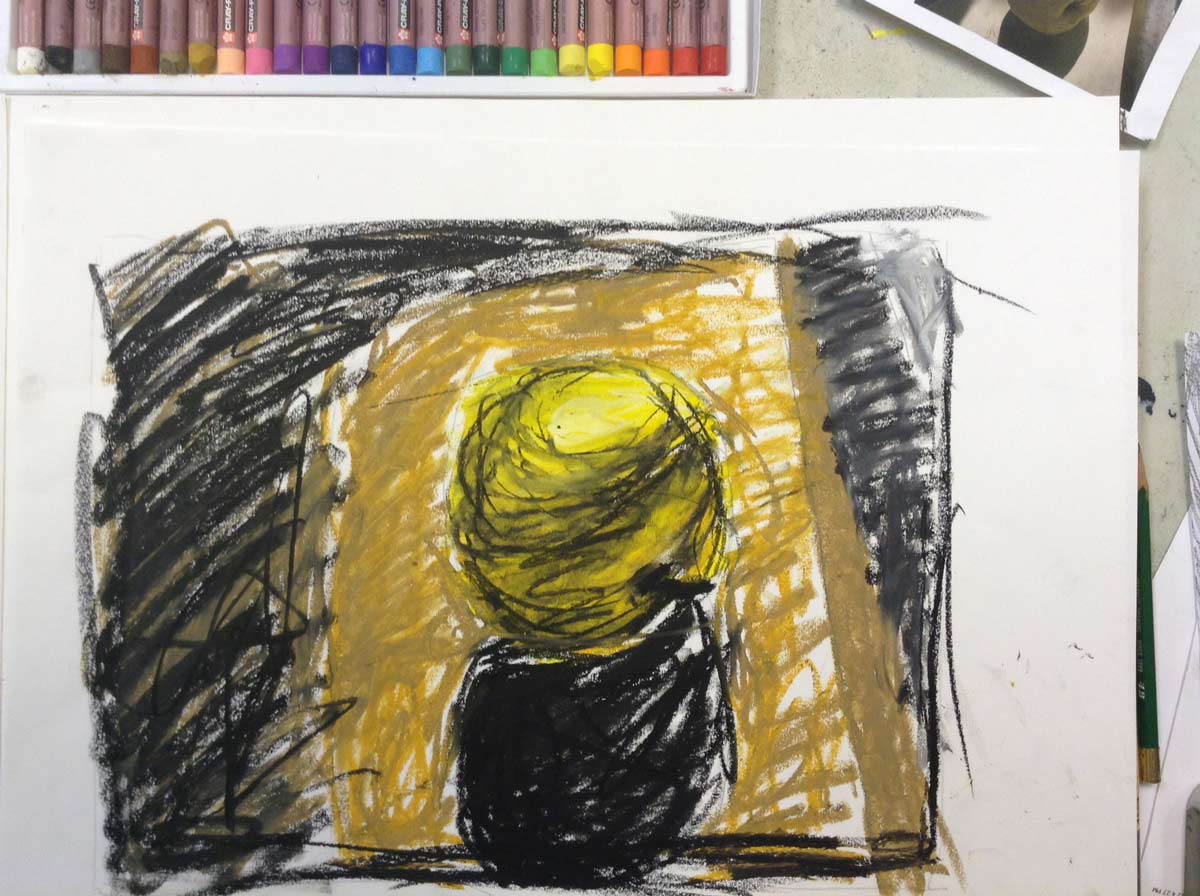
Here are all the details, but still in simple flat color instead of a photo. Now you can see that it’s fruit!

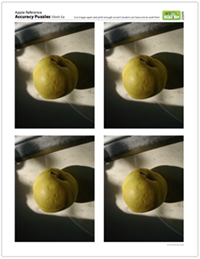
Photo
And here is the original photo. You can see the shapes, even though we made them look completely different than the subject. We did this so you could look at the shapes without thinking about the distractions, such as depth and shading. Artists need to practice looking at shapes this way.
“Here is the actual photo of an apple! Take a look at this for a moment. If I were to see this, the first things I would notice are all details. I see the wrinkles, the shapes in the shadow edges, this little hair, and the stem. But none of those things are very hard to figure out. They are the fun parts, and what most artists jump into before understanding where everything should be drawn. It’s hard to remember to make the Frame accurate and then look for the biggest shapes. That is the main point of our lesson today!
Once you learn how to stop and look at the frame first, the big shapes second, and save the details for the fun part, you’ll be able to draw things much more accurately!”
Use this button to jump down to the preparation section.
LEARNING TARGETS
Students know how to draw guidelines for their artwork
M A T E R I A L S
- 14″ x 17″ Sketch Paper
- 2B Pencil
- White Eraser
3.1 Print
ReferenceA
Apple Photo Reference
Cut images apart and print enough for each student to choose from several.
1 Page – Opens in new window
3.1 draw
Remind students about the very light lines and heavy lines they made last week. Which ones were they able to erase? (the lightest lines.)
Students should turn to a new clean page in their sketchbook and begin by making guide lines of the frame. Use measurements to adjust the height so that you have a 4 to 3 rectangle. Go around the room and help them with this. Then help them make the guide lines for the big shapes too, using the frame edges to find several reference points.
As they work, as them to decide what medium they would like to use for their final work. They can do any dry medium:
- Pencil
- Charcoal
- Oil pastels
Use this button to jump down to the preparation section.
LEARNING TARGETS
Students know that accurate guidelines can be used for expressive work.
- Oil pastels
- Blender stick (stumps)
- 2B Pencil
- Charcoal
- White Eraser
- Stretchy Eraser
Van Gogh (tap any image to open viewer)


4.1 draw
Depending on your student, this may take the whole 50 minutes that’s left, or you may need the extra artists choice in step 5.
Use this button to jump down to the preparation section.
LEARNING TARGETS
Students know how to plan a work on their own.
M A T E R I A L S
- 14″ x 17″ Sketch Paper
5.1 WORD
Use this button to jump down to the preparation section.
LEARNING TARGETS
Students know the importance of cleaning up.
M A T E R I A L S
- Paper Towels
- Cleaning wipes
- Sink
- Waste baskets
- Well-lit spot for photos
- Camera or phone-camera
6.1 CLEAN
- Wash hands
- Super-wash brushes if used
- Put art supplies away
- Wipe tables & toss trash
- Remove any smocks (last)
- Check for items on floors and tables
6.2 PHOTO
OBJECTIVES
- Practice and improvement in recreating an image accurately
- Understanding a simple and effective method, the 3 Steps to accuracy.
- Accomplishment by drawing shapes more accurately than before
- Fulfillment in finishing a sketch or painting of their accurate work.
TROUBLESPOTS
Drawing Frames against the edge of the page – This should be discouraged because it creates optical illusions and makes it more difficult to judge proportions.
Frustration – Try not to correct too much, but be on the lookout for students who can see that their work is not accurate. Encourage by pointing out that it looks inaccurate because they’re seeing it with their critical artist’s eye, and that it’s actually important to get frustrated or you would never learn accuracy. Then point out both accurate and inaccurate things, and also try to help them find and use Pictograms (which makes random shapes look like something more familiar.)
Impatience – Some artists do not believe that this lesson is important, because they’re not yet concerned about accuracy. If that’s the case, ask them if they trust you to teach good things that are useful. They should say, “yes” and then you can say…
ART WORDS
Frame – The shape of an artwork’s edges. Proportions are critical to ensure that all shapes will fit inside while trying to achieve accuracy. The first step in the 3 Steps to Accuracy.
Big Shapes – The 2nd step of the 3 Steps to Accuracy. 4-5 of the largest shapes are analyzed and drawn into the frame accurately before adding details. This step makes it easier to maintain accurate representations by not working on the details until the major shapes are defined.
Details – Small touches, shadows and highlights. These are fun, and are most of the creation process, which is why artists tend to do them first instead of last.
Proportions – The different parts of something, such as the body, or a building are related to each other in size. The length of one part will always be longer or shorter than the length of another part. For example, your hand is about twice as long as it is wide.
Visual Measuring – A ruler has numbers and many graduations. This logical instrument turns off the creative parts of the brain, allowing the logical analytical parts to completely take over and dictate every decision. It is a death knell for creativity. Therefore, we completely discourage use of rulers for creative measuring of Frame proportions and other connected measurements. If you use a pencil or a ruler, and hold the mark with your thumb, you have to rely on your eyes to make all your decisions. It keeps the creative part of the brain in control, and allows for much greater visual accuracy!
CLASSROOM
PREP
Have a bunch of amazing supplies ready, and cut a few things apart before-hand in a way that make you look amazing.
Print all of your PDFs from the lesson plan and cut any references apart as needed.
What your room needs
Here are your printable lists and room prep instructions.
Opens in new window
CLASSROOM
MATERIALS
- Cleaning Wipes
- Sink
- Waste Baskets
STUDENT’S
MATERIALS
- 14×17” Copy Paper
- 2B Pencil
- White Eraser
- Stretchy Eraser
- Charcoal
- Blender stick (stumps)
PREVIEW
Week 5: Landscape and Distance
Students will choose from a set of landscape photo references, and paint in acrylics on canvas. Depth will be shown by using several techniques, but mainly atmospheric perspective.
Week 6: Finish Landscapes
Students will finish painting their landscapes with atmospheric perspective (depth) by working their way down the canvas, top to bottom, which is also distant to close.