

OVERVIEW
We use the idea of seeing double to have fun, and reinforce several artistic insights. Students learn symmetry with a collage using double-cutting and a mono print fold-over. There’s a fun “lines and tigers” (get it?) game that morphs into a shadow lesson using a mirror image later one. A real mirror is also used to finish half a face.– – –
Grades K – 2
Week of December 2 – December 6
1 Hour & 30 Minutes, or two 45-minute sessions
STANDARDS For This Lesson
SUBMIT YOUR SUMMARY
Copy and paste the text below to send your abbreviated lesson plan with national standards and learning targets to your supervisors and colleagues. Or access the WORD doc by using the blue button below.
– – – – – – – – – – – – – – – – –
Week of November 26 – 30
OVERVIEW:
We use the idea of seeing double to have fun, and reinforce several artistic insights. Students learn symmetry with a collage using double-cutting and a mono print fold-over. There’s a fun “lines and tigers” (get it?) game that morphs into a shadow lesson using a mirror image later one. A real mirror is also used to finish half a face.
NATIONAL STANDARDS:
Grade K
VA:Cr1.1.K – Engage in exploration and imaginative play with materials.
Grade 1
VA:Cr1.1.1 –Engage collaboratively in exploration and imaginative play with materials.
Grade 2
VA.CR.2.2 Experiment with various materials and tools to explore personal interests in a work of art or design.
LEARNING TARGETS:
Students know how to create different types of lines
Students know how to mix and blend colors
LESSON PLAN:
1. Warmup (5 minutes)- Artists’ Choice
2. Lines & Tigers (10 min) – Invent different lines with a fun game
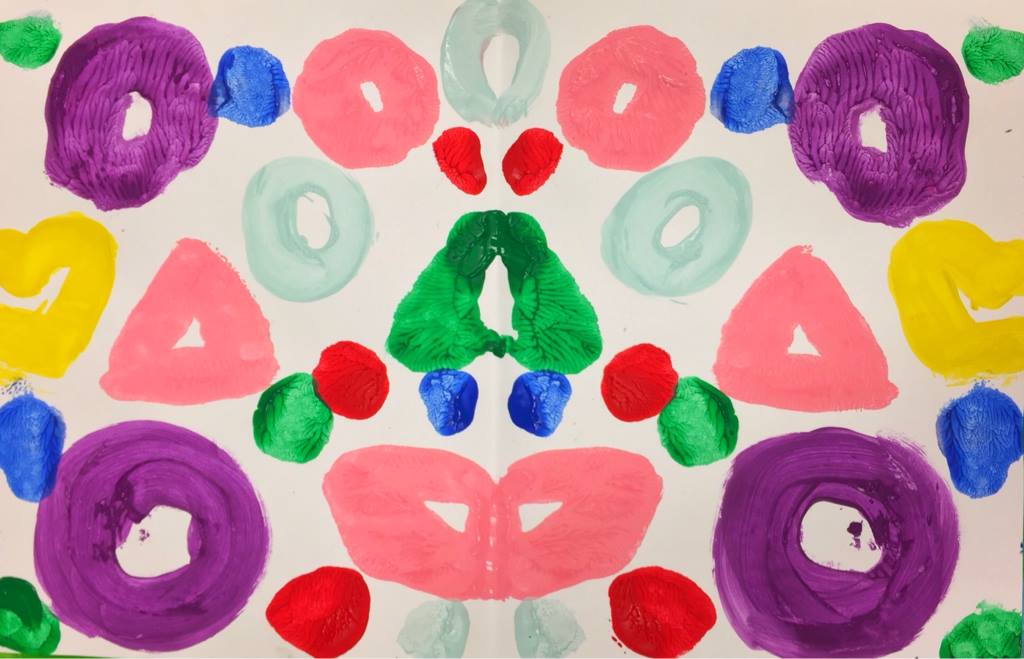
3. Color Doubles (10) – Learn about color mixing & blending
4. Paint Print (20) – Students will paint a design & make a mono-print
– – – – – –
Break – end of part one if dividing into 2 sessions
5. Face Flip (15) – Draw half a cartoon face & use a mirror to finish
6. Shadow Flip (10) – Trace shadow on tiger drawing
7. Double Shapes (15) – Make a symmetrical design
8. Clean Up (5) – Everyone helps
Tap the Plus Icon (above right) to open STANDARDS information, including an Overview, Learning Targets and a Syllabus. Copy and paste to send to your Administrators or use the button below to download a Word document with the same information that you can add your info to and email to them as an attachment.
Student Work
SCROLL & TEACH LESSON PLAN
Don’t worry about rewriting anything. Just spend a few minutes reading the lesson plan and printing out your PDFs. Then check out the READY, SET, GO! section and print your prep-page, which includes checklists and an “at a glance” outline of the lesson so you can stay on track when you’re teaching. Set out the materials from the list on your prep page and you’re ready.
That’s all you need to know. Use your smartphone to Scroll & Teach!
Lesson At A Glance
A brief overview of each step. Buttons jump to each section for detailed information.
5 Minutes – Artists’ Choice
10 Min – Invent different lines with a fun game
10 Min – learn about color mixing & blending
20 Min – Students will paint a design & make a mono-print.
15 Min – Draw half a cartoon face & use a mirror to finish
10 Min – Trace shadow on tiger drawing
15 Min – Make a symmetrical design
5 Min – Everyone helps
Use this button to jump down to the preparation section.
SCROLL & TEACH
LESSONPLAN
Each section is a different color. Read over once and then you can SCROLL & TEACH using any device you like. It’s designed to work best with your phone.
LEARNING TARGETS

Students know how to use their imagination
M A T E R I A L S
- 8.5″ x 11″ copy paper
- 2B Pencil
- White Eraser
- Markers
All materials are suggestions and may be modified as you see fit. We have tried many items, and these seem to allow the most versatility for the cost.
1.1 Greet
Greet students as they come in and help them choose a chair.
Kneel down so that you are on their level. Bending over emphasizes the differences in your height, while kneeling makes them feel more important. Have tape and marker ready so you can stick some tape on the table by each student and write their name on it as they sit down.
1.2 Choose
Encourage students to work with one piece of paper for a while. If someone uses the phrase, “free draw”, explain that artists’ choice is something only artists can do, while free-draw is something anyone can do. You want to use the phrase to elevate the students’ expectations of their work.
Everyone should take their time with the work and make a finished piece of art. Limiting the paper can also help kids focus on the work. If someone finishes in super-fast time, ask them what more they can do to the existing paper. Ask again several times – unless they appear overly frustrated; then you can allow them to move on to a new work.
Use this button to jump down to the preparation section.
LEARNING TARGETS
Students know how to create different types of lines
M A T E R I A L S
- Lines & Tiger pdf printouts
- 2B pencil
- White erasers
- Pad or cardboard surface to draw on
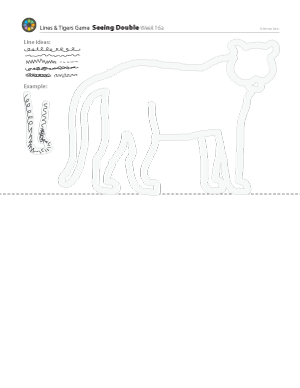
2.1 Print
Worksheet
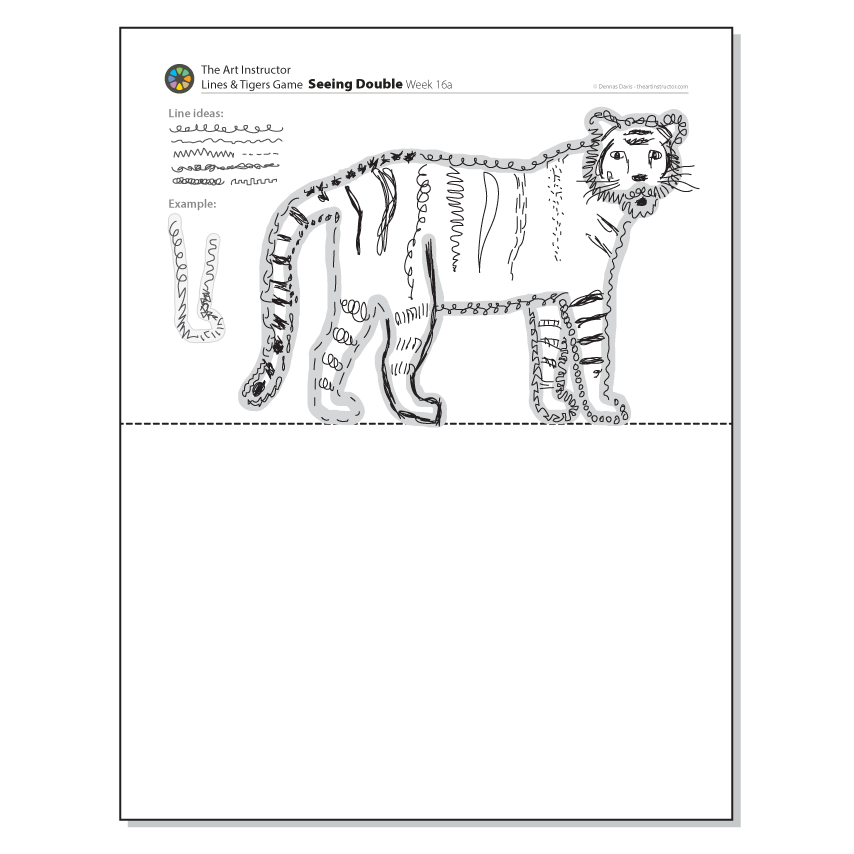
Lines & Tiger
Print this game page on regular copy paper. Make sure students leave the bottom blank for another project later today.
Hand out reference prints.
Every student should get one to work on.
1 Page – Opens in new window
2.2 draw
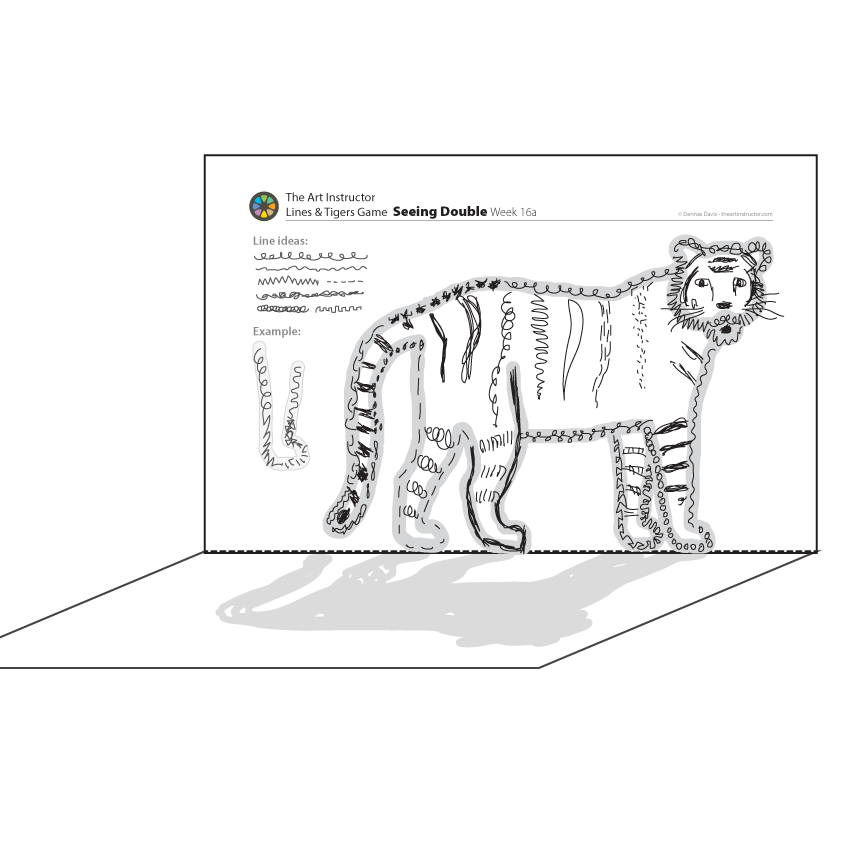
Students will have fun with an art game, inventing as many different kinds of lines as they can while trace-drawing a tiger.
Give everyone a game printout, and explain the game. Make sure students write names on their artwork and make sure they understand to NOT DRAW ANYTHING ON THE BOTTOM AREA. There will be another stage to this game sheet later in the lesson.
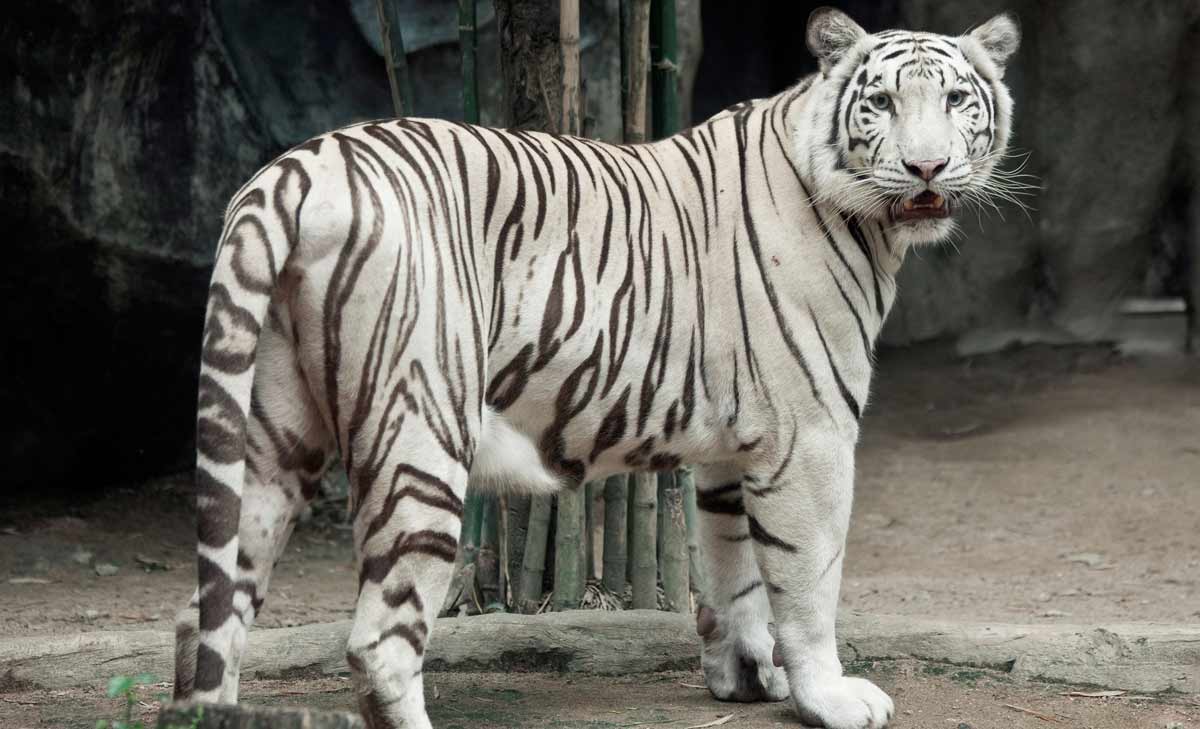
Display the following two images on a larger screen so students can see what a tiger looks like and how they can make the lines.
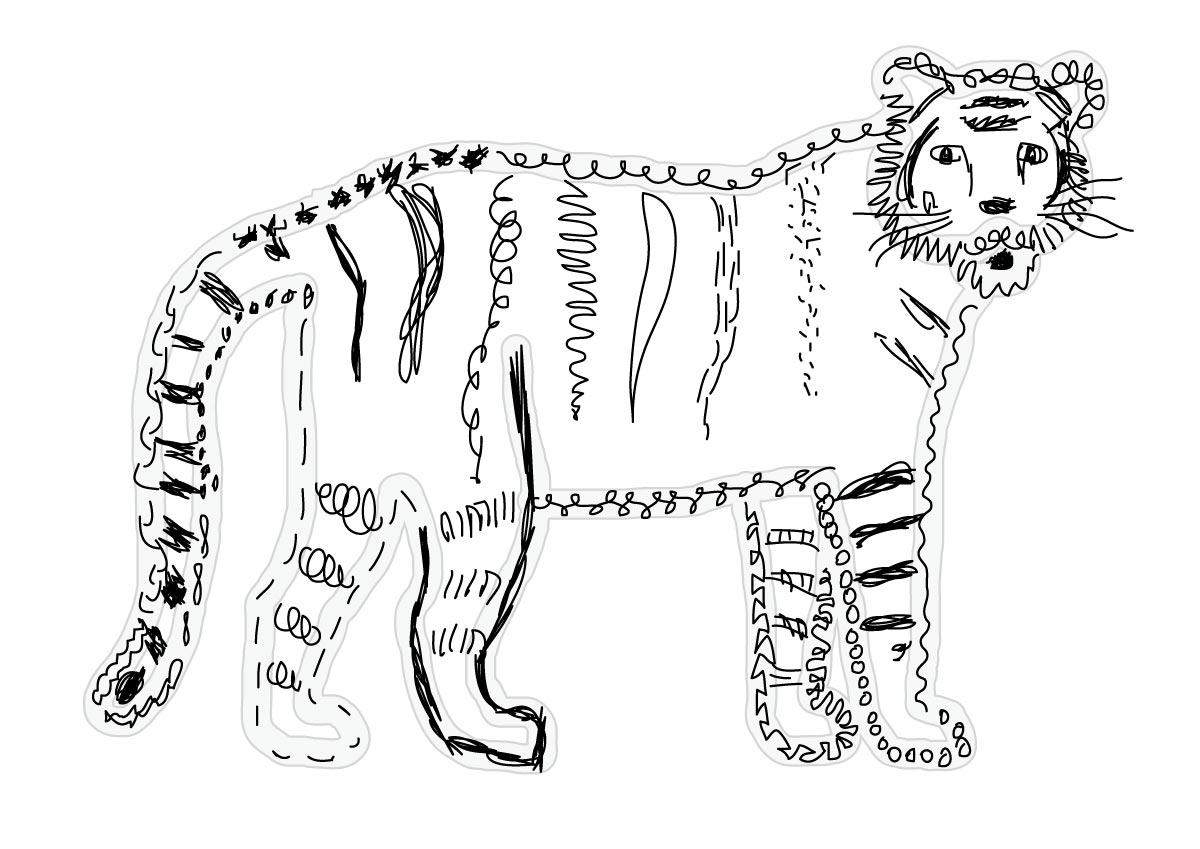
“When I say go, you’ll trace-draw lines over this tiger guideline drawing. It’s artwork, but also a game to see how many different kinds of lines you can make. Here’s an example of how it can be done, and there are some line ideas on your page to get you started.
We’re going to do another project later on, using the bottom section, so don’t draw or write on it until later when we get to that part of the lesson.
Keep the line designs inside the two guidelines as shown, so it will keep the tiger shape.”
Use this button to jump down to the preparation section.
LEARNING TARGETS
Students know how to mix and blend colors
M A T E R I A L S
- Oil pastels
- Blender sticks (stumps)
3.1 Print
Reference
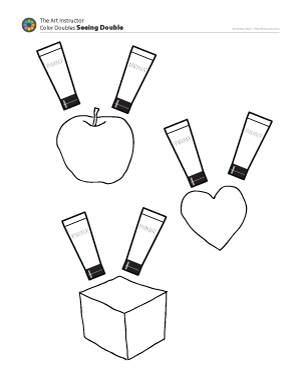
Color Doubles
Print enough for each student.
Hand out reference prints.
1 Page – Opens in new window
3.2 color
Give everyone a color double printout
If you can, have students work with the paper on the back of a sketch pad or on a stack of paper so the surface is softer than a table.
3.3 color
Begin with one color for the apple. Have students wait until you say begin, before coloring anything. Then walk them through the following steps to get started.
“Look at the 3 objects on this page. What color do you think each one should be? Let’s start with the apple at the top. What color do you want your apple to be?
Select an oil pastel for your apple, but don’t fill in the apple. Instead, fill the paint tube to the left that has #1 on it. Then put some of the color on the apple – but don’t fill it really solid. Let it be a little sloppy, with some paper showing through.”
(Let your students finish before continuing)”
3.4 color
Add a second color that is like the first.
Blend the colors together with blender sticks or oil pastels.
Explain to students that there are 3 ways to blend oil pastels. Have them choose how they want to blend theirs.
- Use the lighter of the two colors and smear it over the first one
- Use a white, and smear both colors together
- Use a blender stick to smear the colors together
Continue the next two items the same way. Walk around and encourage students as they work. They can try different blending methods.
Use this button to jump down to the preparation section.
STEP 4. Paint Print
Students will paint a design and fold the paper to make a symmetrical mono-print. 20 MinutesLEARNING TARGETS
Students know how to make a mono-print
M A T E R I A L S
- 11″ x 17″ card stock copy paper
- Tempera paints in bowls – pre-mixed colors
- large brush
- Paper towels
- Water tubs for brush cleaning
Color Mixing
Have 4 to 6 bowls of fun colors pre-mixed with some white in them. Make colors that look good together. Have lots of cool colors and one warm, or vice-versa.
4.1 prepare
Students fold their paper and get ready for their project. Pre-mix 5 bright colors that go well together. Set out enough bowls so each student can get to 3 colors. Bowls can be passed around in-between painting.
Have students place the paper in a bathtub position (horizontal) and fold it in half like a book. Then open it back up.
There are 3 colors, but we’ll use one at a time.
“We’re going to make a fun and colorful design now. I went ahead and mixed up some nice colors for us to use. We will each only use 3 colors, but if we have time, we might do more.
Use your brush and work with only one color at a time.
So, to begin, choose your first color and paint an open circle on left side of the fold line. You can make it any size and any place you want. Just paint the outline of the circle, and use plenty of paint.”
4.2 print
Close the “Book” and press all over to make the print.
Clean your brush for the second color: Wipe/Wash/Wipe. Have everyone clean their brushes out by wiping, washing, and wiping it dry again, using a paper towel for the wiping parts.
“Now set your brush down for a minute, and fold the paper closed again, like a book. Press the paper gently all over. When you open it back up, you’ll see the circle on both sides because you printed the other side using the paint on the first side. Let’s try it again with a different color.
Now use a second color, and make something different. You can fill in the circle, or paint polka dots or a line. Don’t paint more than 3 or 4 things with this color.
Set your brush down and fold the paper again. Press all over. Open it back up to see the new design! This is pretty fun, don’t you think?
OK, now clean out your brush and work with the third color. Fill the left side of your paper, but don’t add paint over other paint or your design will become a mess. Paint several things with the third color and then press the paper again.”
4.3 print
Press after each color & explain symmetry. If there is time, you can have them add a fourth color to the design. Remember to allow time to clean up and write names in pencil before setting these aside to dry.
Clean up: sign work in pencil and wash brushes well.
TIP
Use this button to jump down to the preparation section.
STEP 5. Face Flip
Students draw half of a cartoon face on PDF page and use a mirror to make it complete. 15 MinutesLEARNING TARGETS
Students know how to identify symmetry
M A T E R I A L S
- 8.5″ x 11″ copy paper
- Pencil and eraser
- Black marker
- Mirror – frameless is great, but any medium to large mirror will do
5.1 draw
Have everyone place their paper in a shower position (vertical). Then draw a large oval shape on the paper (this is a face shape), using the pencil. Fold the paper in half like a tall book, and then open back up.
Students are welcome to draw in pencil first, but a marker should be used for the final. Most will be fine with just the marker.
“We’re only going to draw on one side of the page. Don’t draw on the right side of the fold at all.”
5.2 draw
5.3 draw
5.3 Show
Have the class gather together and use the mirror to view faces. If your mirror has a frame, you can fold the papers backwards to hold up the mirror surface. If the mirror is frameless, like a tile, you can slide the paper around on the edge and have fun making the face look skinny or wide. Tilt it to make it really silly!
Make sure everyone’s drawings are shown on both sides, and have a lot of fun.
Use this button to jump down to the preparation section.
LEARNING TARGETS
Students know how to understand basic shadows
M A T E R I A L S
- Tiger drawing from Step 2
- Extra sheet of white copy paper to place underneath
- Pencil
- Black marker
- Light Gray marker (or oil pastel)
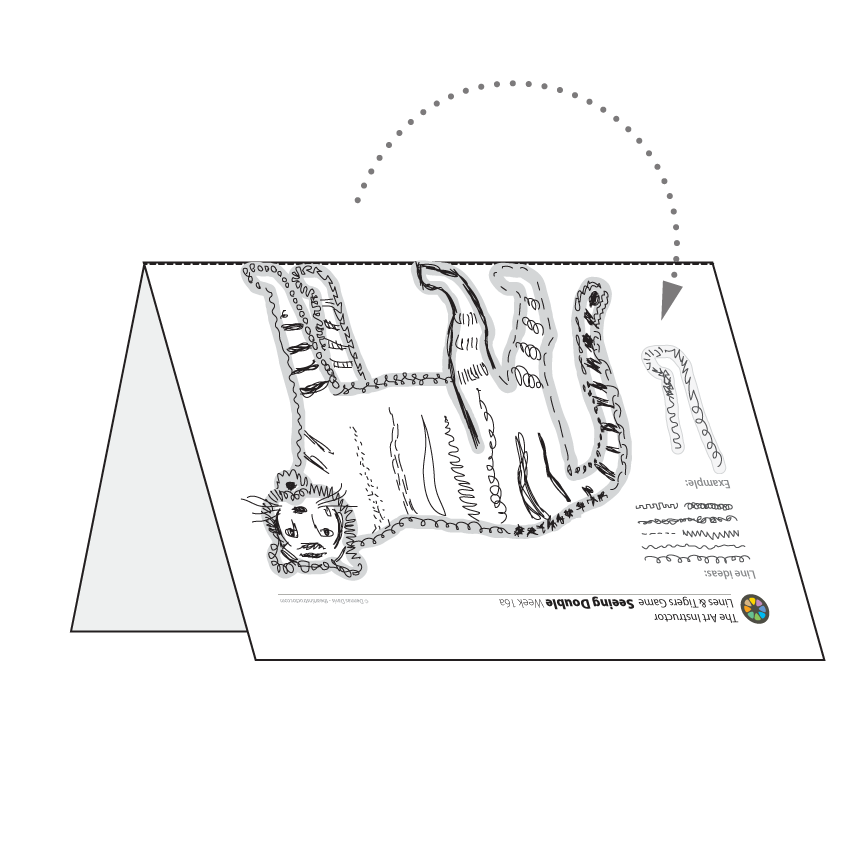
6.1 fold
6.2 fold
Fold the paper so that the tiger flips towards you, and goes down. It should be inside the fold so you can’t see it.
Then turn the paper over so you’re looking at the backside of the the bottom half. If you look closely, you can see the tiger shape through the paper upside down.
Trace the upside-down shape, first in pencil and then in black marker on the back side of the bottom half.
“Now you should be able to see your tiger just enough, through the paper. Use a pencil to trace the tiger shape. Just do the outline, and no details at all.
Now fill in the tiger shape with your black marker. Make it as dark and solid as you can.”
6.3 prep
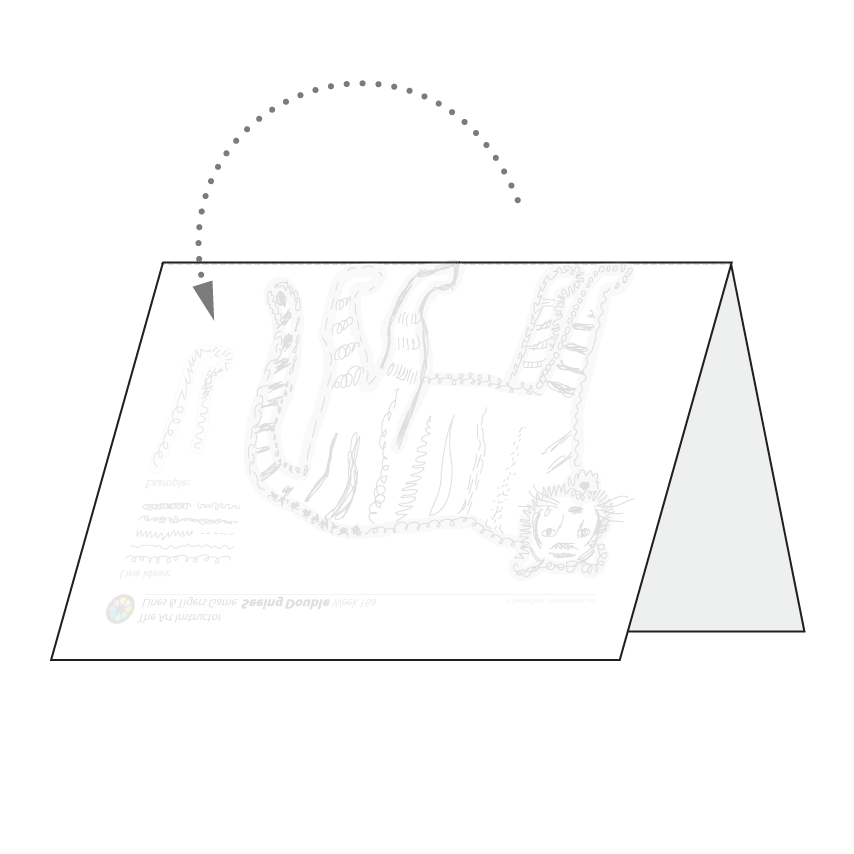
When everyone is finished, have the students open the paper and look at the tiger drawing again, right-side up. If you need to, hold it up so the light shows through, and you can see the tiger’s shadow! The shadow is a mirror image of the tiger, or symmetrical.
Have the students set the paper back down on a nice clean sheet of white copy paper. This allows the shadow to show through just enough to see it.
6.4 color
It’s your choice if you want to use a light gray marker or a light gray oil pastel. Have the kids re-trace and fill the tiger shape to finish their shadow on the same side as the original line drawing. Awesome shadows!
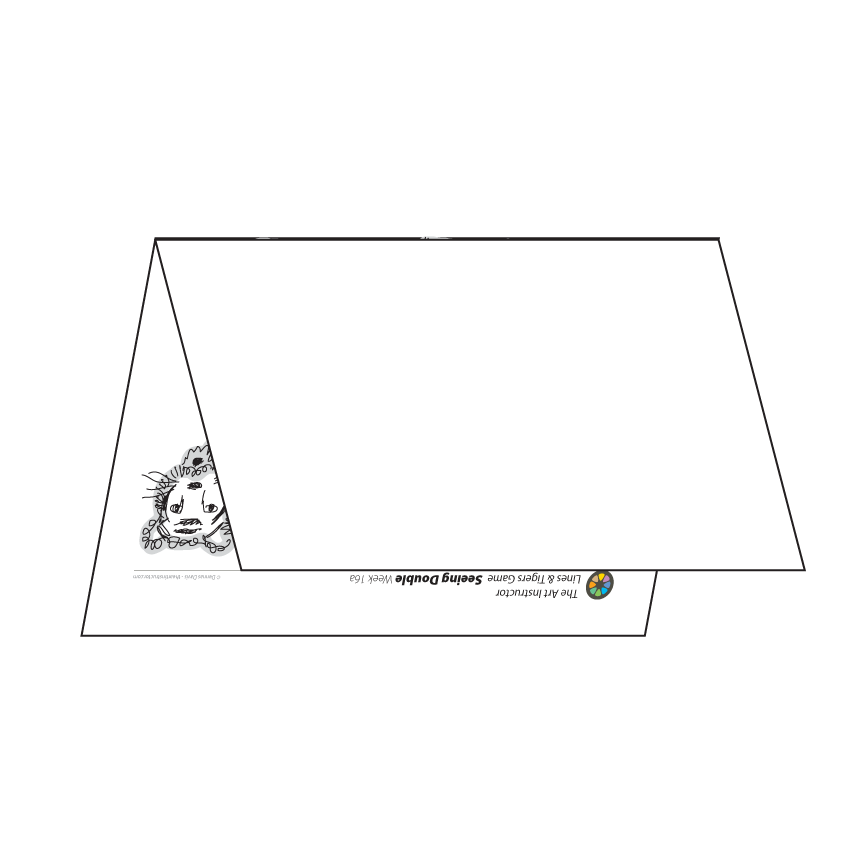
If you have time, fold top of the paper up, so the shadow/bottom half is flat on the table, and the tiger is standing up. Get down and look at it with your eyes near the table, holding your hand over one eye to see a tiger with a shadow in perspective!
How to create the tiger shadow (tap any image to open viewer)
TigerShadow1
The tiger page!
TigerShadow2
Fold the tiger page like this first, and then flatten back out.
TigerShadow3
Fold again, but forward so that the tiger goes inside the paper and is upside-down. You can see the image through the paper just a bit.
Flip it over sideways so you have the bottom back facing up, and can see the tiger through the paper, upside-down.

Draw the tiger shape and fill in with black marker.
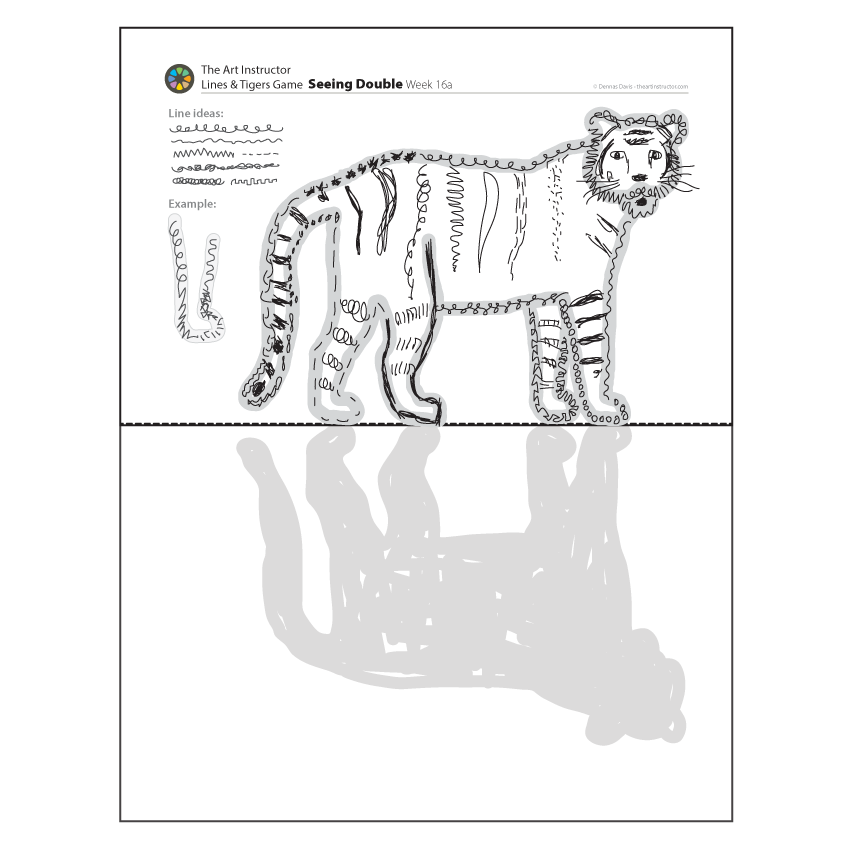
View the shadow through the paper. Also fill it in with gray color.
Fold the shadow on the table and hold up the tiger to see a perspective version
Use this button to jump down to the preparation section.
STEP 7. Double Shapes
Double Shapes Students cut out two paper shapes at a time using a folded paper. 15 MinutesLEARNING TARGETS
Students know how to identify symmetry
M A T E R I A L S
- Colored copy papers cut into halves and folded in half again for easy shape cutting.
- (make sure they’re the same color on both sides)
- Pencil and eraser
- scissors
- 11″ x 17″ card stock
- Glue
7.1 cut
“If you hold the folded paper, you can cut two shapes at once. Cut out shapes from each color you have. You can make several small shapes or one big shape. Make shapes you like; wiggly shapes, round shapes, long shapes, stars, flowers, or anything you like.”
7.2 craft
7.3 craft
Fold the blank side over very, very slowly, especially as they close together, or the shapes may move. The glue on top of the shapes should connect to the blank side, and stick all of the duplicate shapes in a mirror image on it. Press well all over and then open it back up to reveal the symmetrical collage!
It’s ok if the design is not perfect, but if a student wants it to look more symmetrical, the shapes can be moved by hand. Help everyone finish up!
“Once all the shapes are glued down, set the duplicate shapes on top of them in the same place, right on top!. Carefully add glue to the duplicate shapes on the face-up side.”
TIP
Make sure you help students if they have overlapped shapes so that the mirror image will be in the same layered configuration.
Use this button to jump down to the preparation section.
LEARNING TARGETS
Students know the importance of cleaning up.
M A T E R I A L S
- Paper Towels
- Cleaning wipes
- Sink
- Waste baskets
- Well-lit spot for photos
- Camera or phone-camera
8.1 clean
Students clean up their work area.
- Wash hands
- Super-wash brushes if used
- Put art supplies away
- Wipe tables & toss trash
- Remove any smocks (last)
- Check for items on floors and tables
8.2 photo
Try to get photos of your student’s artwork. Find a good spot for quick lighting without highlights or shadows from your hands and device. Ideally in-between two strong lights on each side.
8.3 connect
Make sure you see the kids connect with parents and tell them about the class if you can!
%
Insights
This lesson provides understanding
%
Technique
This lesson shows application and movement
%
Self Expression
This lesson allows personal freedom
OBJECTIVES
- Practice and improvement with visualization and composition
- Understanding symmetrical designs and shadow shapes
- Accomplishment in making several fun projects
- Fulfillment in having control over the choices for artwork
TROUBLESPOTS
STEP 2: Playing too much with line ideas. The shape of the tiger in Step 2 is very important for using later on.
STEP 4: Details in paint. The folded mono-print will destroy any details. Help students realize that the paint will be mashed so the shapes should be very bold and simple.
ART WORDS
Mono-print – When you use paint to make a print, you can only make one print before the paint is used up or deteriorates. Mono means one.
Symmetry – Any image that has a dividing line in the center where the image is reversed on the other side, like holding one side up to a mirror.
CLASSROOM
PREP
Have a bunch of amazing supplies ready, and cut a few things apart before-hand in a way that make you look amazing.
Print all of your PDFs from the lesson plan and cut any references apart as needed.
What your room needs
Here are your printable lists and room prep instructions.
Opens in new window
CLASSROOM
MATERIALS
- 11×17” Card Stock Paper
- 8.5 x 11” Copy paper
- 2B Pencils
- White Eraser
- Markers
- Lines & Tiger PDF Printouts
- Pad or Cardboard surface to draw on
- Oil Pastels
- Blender Sticks (stumps)
- Tempera paints in bowls – pre-mixed
- Large brush
- Paper towels
- Water tubs for brush cleaning
- Mirror (frameless is great, but any medium to large mirror will do)
- Colored copy papers cut into halves and folded in half again for easy shape cutting.
- Kids’ Scissors
- Glue stick
PREVIEW
Week 17: Print Presents
Students will make multiple art prints using a simple technique to engrave a design into styrofoam. They will also create a frame for the print and paint it with acrylics. The lesson will teach how printing creates duplicates and they are a mirror image. Also, how to plan and design a simple printed piece of art and make a great presentation. The end result is a wonderful holiday art gift!
Week 18: White Christmas
Snow shows the colors of shadows, and white has many different shades of colors. To learn these insights, we begin by painting snow. building up a painting using 3 kinds of whites, shadows, and big tree trunks. Finally, we finish it off with a dash of bright red. A cardinal bird is painted and glued to a branch. It’s a wonderful painting that looks great in a frame and that kids are very proud of.