

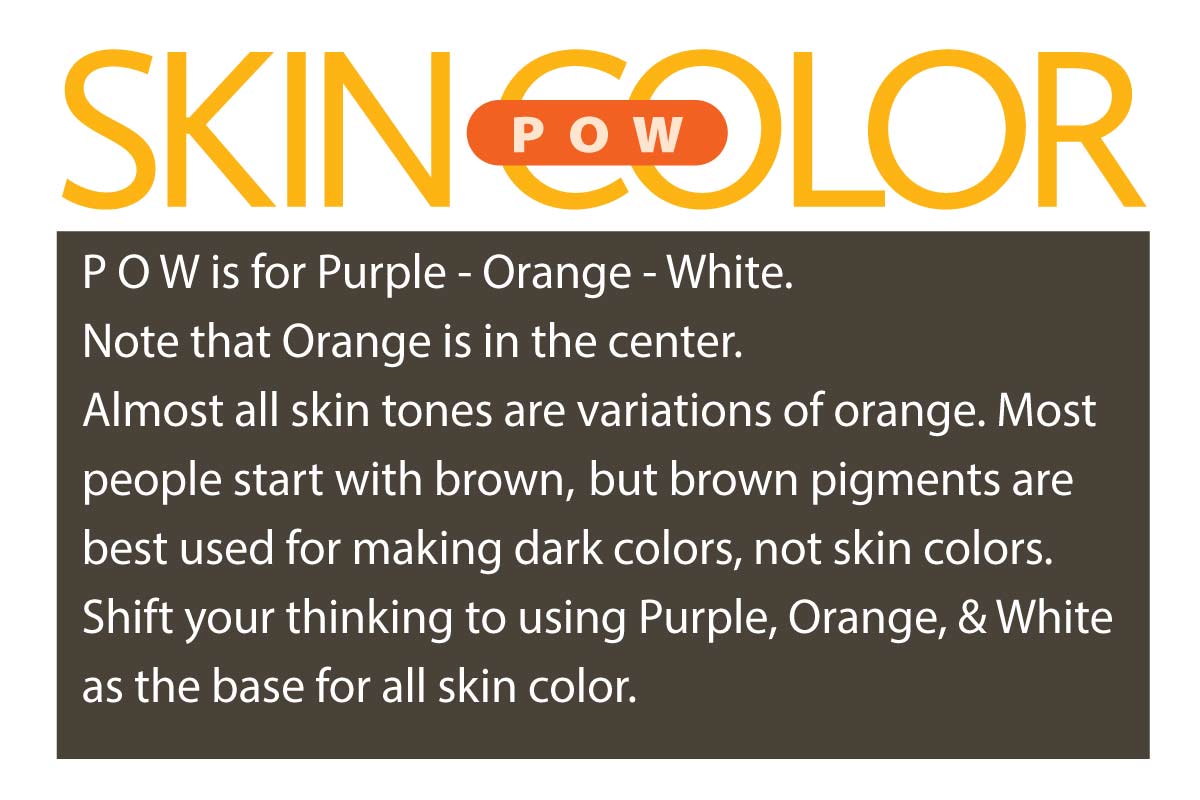
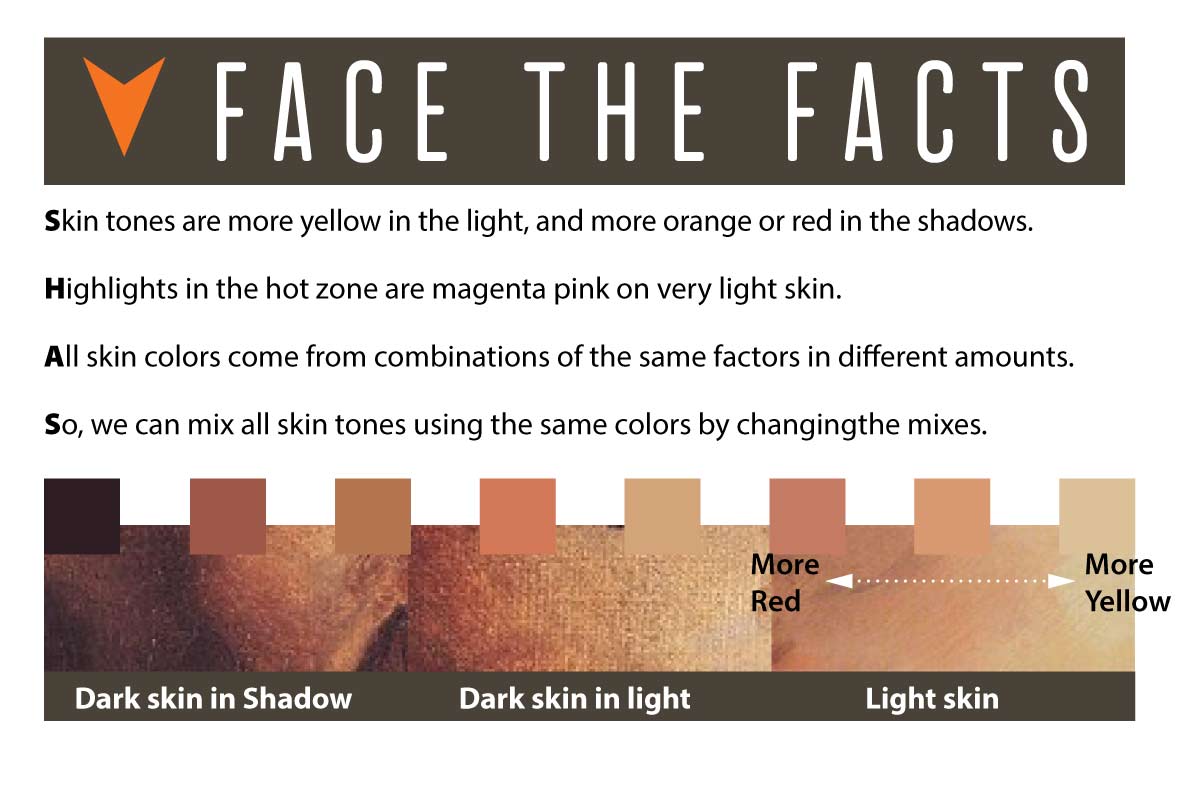
Color
Each lesson Plan focuses primarily on one of the 4 Cornerstones of Art:
Drawing | Painting | Color | Style
OVERVIEW
Students will warm up with face sketches and create a flesh tone Color Journal of 25 colors (only 16 for younger grades). Then there is a slideshow about the different color areas of the face and some exercises to practice making flesh tones work together. Young grades have some fun with alien faces too.– – –
Grades 3 – 5
Week of March 17 – 21
1 Hour & 45 Minutes
Student Work
Lesson At A Glance
Here’s a brief overview of the complete lesson. It’s also on your prep page in the Ready, Set, Go! section (below the lesson).
Colored buttons jump to each section in the full lesson plan below.
15 Minutes – Finish Dream Painting or sketch face
35 Min – Paint flesh tone color journal
2 Min – Organize Supplies
10 Min – Slideshow about face color zones
20 min – Practice painting face PDFs
20 min – Paint a silly face
2 min – Everyone helps
Use this button to jump down to the preparation section.
SCROLL & TEACH
LESSONPLAN
Each section is a different color. Read over once and then you can SCROLL & TEACH using any device you like. It’s designed to work well with your phone.
LEARNING TARGETS

Students know how to finish artwork they have started
M A T E R I A L S
-
- 14″ x 17″ sketch pad
- Ebony pencil
- White and kneaded erasers
- Charcoal
- Oil pastels
- Face PDF reference print
- Cheasel reference stand & clip
O R
- Dream Paintings
- Paint set up for acrylics
- Smock
All materials are suggestions and may be modified as you see fit. We have tried many items, and these seem to allow the most versatility for the cost.
Brushes should be nylon for springiness and durability. Round brushes are the most versatile.
Paint pigment list:
- Napthol or Pyrrol Red
- Hansa or Light Yellow
- Pthalo Green (blue shade)
- Cyan or Cerulean Blue
- Ultramarine Blue
- Dioxazine Purple
- Magenta
- Burnt Umber
- Raw Sienna
- Titanium White (professional grade only)
1.1 Print
Reference
Faces Sketching
Cut images apart and print enough for each student to choose from several.
Hand out reference prints. Set all of the images out on a table or counter, and let groups of students come choose what they want..
1 Page – Opens in new window
1.2 paint
Explain some options.
Students may want to finish working on the dream painting from last week. If so, they can go ahead and set up for that if your schedule has room. Otherwise, move to the warm up, sketching faces.
“If you want to work on finishing your dream painting, go ahead and set up your acrylics and put on a smock.
Please be ready and willing to switch to working on your color journal in 15 minutes though. There will be some more time after the journal to come back to the dream painting if you need it.”
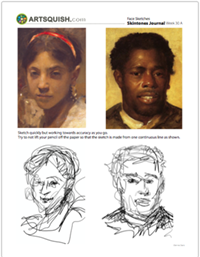
1.3 sketch
Make several rough sketches as shown on the example.
Using the example, create as many rough sketches from the reference as you can. Use any or all of these 3 materials:
- Ebony pencil
- Charcoal
- Oil pastels – black or color
Advanced Student Lesson
CREATIONS - tap here to open
Our Creations lessons are for students who have completed the two years of Foundations and are ready to begin using all that they have learned to create new work. These more challenging versions of the same concepts and techniques are easily taught along-side students in the Foundations course. This allows for excellent review, and is encouraging for students to see progress from each viewpoint.
Use the Student Instructions printout below to distribute to your Creations students. Tap the image to open the PDF in a new window.
Master Copy Project
Project
Begin a Master’s Copy project using acrylics – or oil (very advanced students). Student should select a painted reference that they enjoy and admire. It should be something that they would like to add to their portfolio of work, and/or to create for their own learning experience. A portrait is a good idea, since we are in a season of doing portraiture, but it’s not required if the student is not interested in this subject matter.
Use a search engine to find a painting example or use our references.
Some students may not remember their color journal from 2 years ago, may have lost it, or may just want to review. They should be encouraged to redo the flesh tones color journal! Practice and review is always good.
Purpose
The idea is to learn more about technique by imitating a painting in a style that the student would like to incorporate into their own style. It’s important to consider this a practice work.
- It’s ok if the work looks a bit stiff. It is difficult to paint after another painter’s work and recreate the inspiration, or the flow of the work. You can only mimic in a more structured way, what the other artist did on the fly. It’s a little like dancing while looking at your feet and counting off, as opposed to dancing from intuition and experience. This doesn’t mean that it’s not extremely valuable as an exercise. Often, you’ll get a very wonderful painting as well.
- The materials used may not be the same as the original. Most likely the original is an oil, and the student will be using acrylics.
- A style is almost never truly copied. Even if you come close on this project, it’s hard to continue working in the other artist’s style because it comes from the natural intuition and tendencies of the individual. So the goal is not to learn how to mimic another person’s style, but to incorporate the experience of it into your own style and learn how they view the world.
Tap images to open Creations Student Instructions and Reference Materials in new windows

Use this button to jump down to the preparation section.
LEARNING TARGETS
Students know how to paint flesh tones
M A T E R I A L S
- Color Journal PDFs
- Paint
- Water containers
- Brushes
- Paper towels
- 4B Pencils
- Sharpie
2.1 provide
2.2 Print
Reference
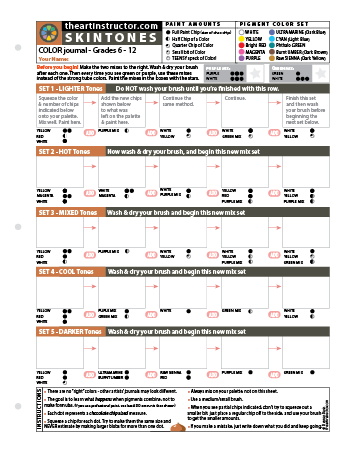
Skin Tone Color Journal
Print on card stock and print enough for each student to have one.
Hand out color journals
1 Page – Opens in new window
2.3 divide
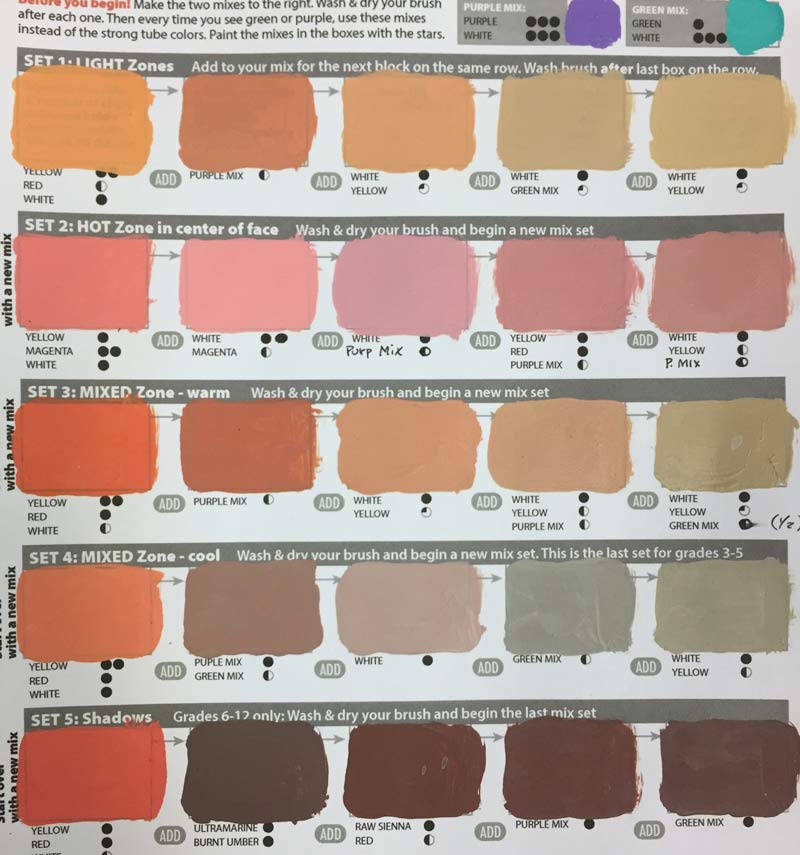
It really helps students keep their paint organized if you divide the palette into 4 or 5 sections, especially with the young students. Since they mix into the same blob of paint for each row, writing “Row 1”, “Row 2”, etc. on the sections, prevents accidentally using the wrong paint or starting a new blob in the middle of a row.
It also helps to keep the mixes from spreading out into giant blobs that take up most of the palette.
2.4 Demo
If you’re new to ArtSquish…
Here’s our demo for how to use and create our special color journals. These are not just a series of formulas since that would quickly become the only colors a student would use. Instead, the journal is designed to mimic the way artists actually mix colors, changing the color several times with the addition of new pigments to take the color to a new direction. The resulting colors are all useful and show artists how other pigments AFFECT colors.
2.5 DEMO
Color Journal Painting
Tap the 4 arrows icon to enlarge the video to full screen.
Review the demo video and demonstrate to your students, or you can simply display the video on a larger screen for them to watch.

Pinterest Gallery – John Singer Sargent
Tap the icon to the left to open our special Pinboard showing examples of artwork to display to your class. See our Article for making Pinterest work on larger displays. You can also use a laptop or large tablet and gather everyone around like you’re using a book.
2.6 show
“An artist painting a picture should have at his side a man with a club to hit him over the head when the picture is finished.”
John Singer Sargent
Many people consider John Singer Sargent one of the greatest portraitists of all time. He not only had great skill with color, light, and painting techniques, he was a master at capturing the spirit and personality of the people he painted. All through his life, however, he had a love/hate relationship with portraiture, and eventually gave it up to pursue other techniques and subject matter. Over his lifetime, he had at least 7 major styles, but all of them were based on realism and impressionism. Late in life, when these went out of popularity, he was considered behind the times.
Portraits are very difficult to do, and to drive home that point, he once stated, “every time I paint a portrait I lose a friend”.
An American who lived most of his life in Europe, he was trained in Italy and France. When he showed an early portrait of his instructor at a Paris art show, it was considered by some to be better than his master’s work, and one critic said it was “uncanny” that he was at the beginning of his career yet had no more to learn!
He moved to London and made that his home for most of his life, though he travelled extensively, many times to the U.S. and other places for commissioned work. Sargent painted portraits of famous people most often, but sometimes would draw and paint the world around him. He was a profound watercolorist too. In his lifetime, he produced thousands of paintings and even more drawings. His work can be found in museums all over the world, but most of them are in America.
2.7 finish
Use this button to jump down to the preparation section.
LEARNING TARGETS
Students know how to clean up
M A T E R I A L S
- Paper towels
- Water tubs
- Water mist bottle
3.1 clean
If this is the end of your first session, clean up completely by skipping down to a full cleanup shown in the final step. If continuing on today, just wash brushes out in the water tubs, and tidy up work space. Save any paint by piling it up in small blobs with a palette knife. Teacher can spray with water mist too, so it won’t dry out.
TIP
Wipe – Wash – Wipe! Using a paper towel to wipe the wet paint off the brush before rinsing in the water tub, keeps the water cleaner, and prevents stopped up drains.
Use this button to jump down to the preparation section.
LEARNING TARGETS
Students know how to paint skintones
M A T E R I A L S
- Ipad or tv to view slideshow
Painting Skin Shades (tap any image to open viewer)
SkinColorSlide1
SkinColorSlide3
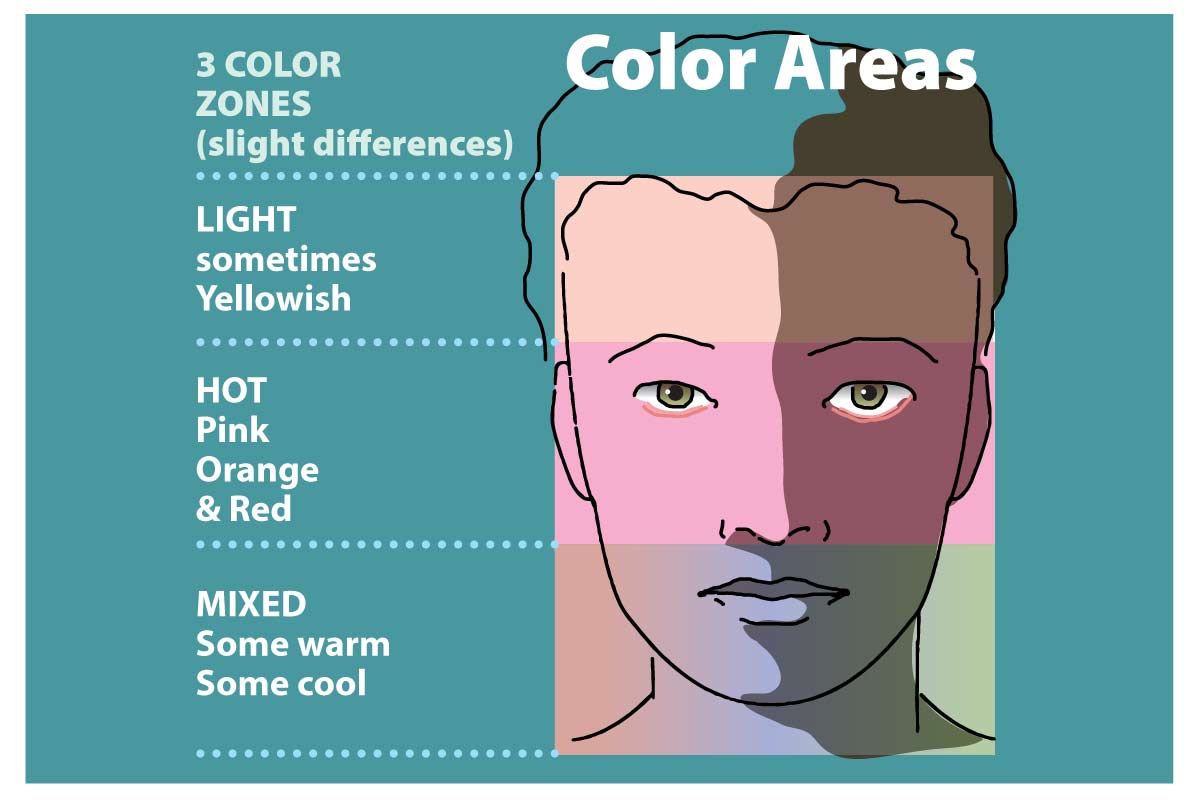
SkinColorSlide2
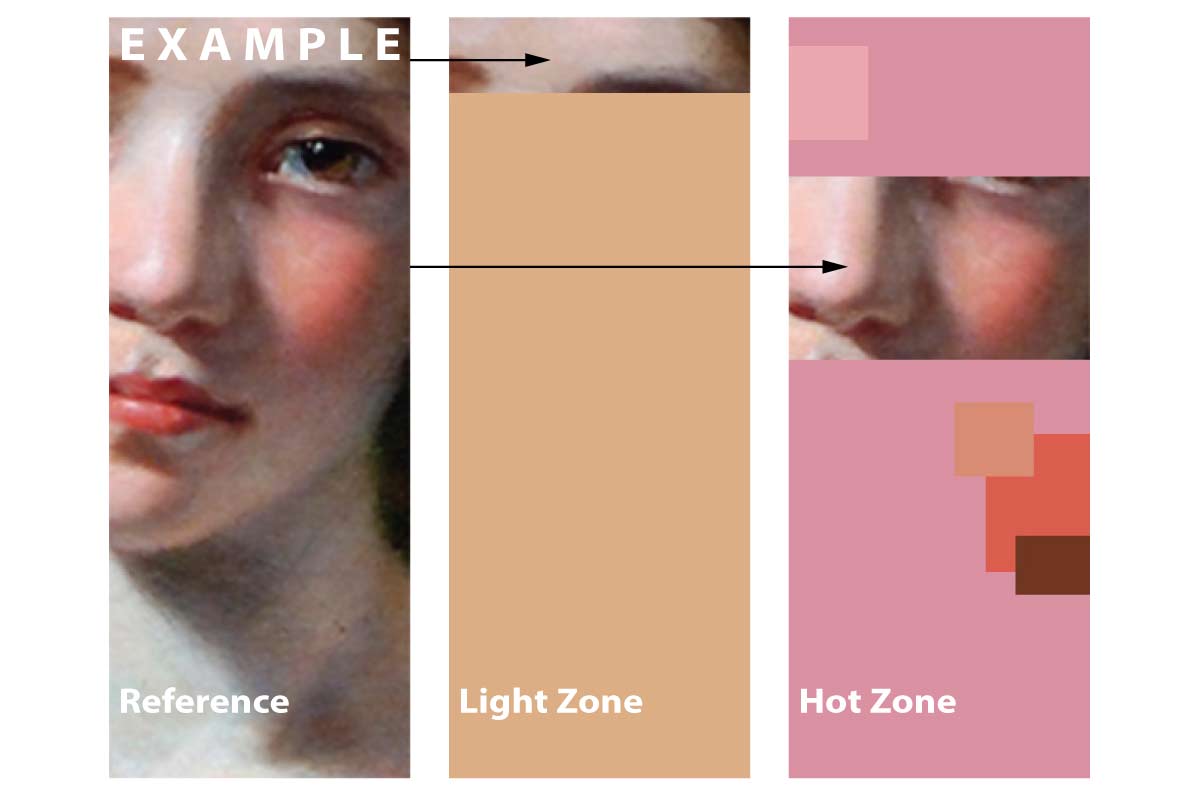
SkinColorSlide4
4.1 discuss
Display the slideshow and discuss
Use this button to jump down to the preparation section.
LEARNING TARGETS
Students know how to paint skin tones
- Canvas pad
- Reference photo on stand
- 2B pencils
- Erasers
- Paint
- Brushes
- Water containers
- Paper towels
5.1 print
Worksheet
Face Starter
Print on card stock and have students paint the face using their skin tones and mixing more as needed.
Hand out reference prints. Set all of the images out on a table or counter, and let groups of students come choose what they want..
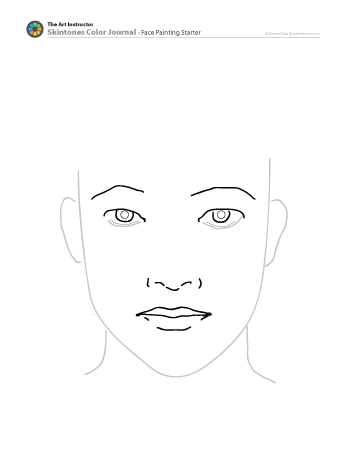
1 Page – Opens in new window
5.2 paint

Provide printout and use the color journals
Encourage students to use up any leftover paints, but mix new colors as needed. Paint the colors right onto the printout.
Shadow colors should not have too much contrast for these cartoon faces. If you see someone putting really dark shadows down, encourage them to lighten it up just a bit with a touch of white and by adding more of the bright colors like orange.
Remind students that shadows are full of color. They are not gray or dull.
TIP
Don’t add any water to the paints or the paper will buckle too much.
5.4 dry
Use this button to jump down to the preparation section.
STEP 6. Alien Face
Students will have fun using their paints and enjoy creating their own silly face. 20 MinutesLEARNING TARGETS
Students know how to make a silly face painting
M A T E R I A L S
- 11″ x 15″ sheet of watercolor paper
- 2B pencil
- Eraser
- Acrylic paints
- Brushes – small and medium sized
- Water containers
- Paper towels
6.2 paint
6.3 sign
Sign work and set aside to dry
Use this button to jump down to the preparation section.
LEARNING TARGETS
Students know the importance of cleaning up
M A T E R I A L S
- Paper Towels
- Cleaning wipes
- Sink
- Waste baskets
- Well-lit spot for photos
- Camera or phone-camera
7.1 clean
Students clean up their work area.
- Wash hands
- Super-wash brushes if used
- Put art supplies away
- Wipe tables & toss trash
- Remove any smocks (last)
- Check for items on floors and tables
7.2 photos
Try to get photos of your student’s artwork. Find a good spot for quick lighting without highlights or shadows from your hands and device. Ideally in-between two strong lights on each side
OBJECTIVES
- Practice and improvement in mixing flesh-tone colors, and working in acrylic paints using the dark-to-light technique.
- Understanding what certain pigments do when mixed into other colors.
- Accomplishment in finishing a color journal and practicing using the new knowledge in small paint studies.
- Fulfillment is limited today since there are no actual choices that the artists make.
TROUBLESPOTS
Mixing from scratch on the second square on a row – Each row is done using the existing paint and modifying it
Cleaning brush before the row end – it’s important to NOT clean during each row.
Not cleaning brush for the next row. Watch for the first swatch in a row. It should be bright.
Thinking, “I know how to do this” – but not remembering accurately, and heading in the wrong direction (not reading the instructions).
ART WORDS
Contrast – The difference between parts of a drawing or painting. There can be low or high contrast between different parts:
- Value (light/medium/dark)
- Color (alike or analogous vs opposites)
- Texture (rough/smooth).
Hue – Hue is what we typically refer to as a color, such as red, yellow, blue or green. The wavelength of light bouncing off or through a pigment determines the hue that we see.
Pigment – Each tube of paint uses a pigment or combination of them to create a color. Pigments are made by taking an ingredient, such as a chemical or plant source, and modifying them in various ways such as adding heat. This produces a specific hue. ArtSquish uses a set, or palette, of pigments that only have one ingredient per tube. This allows them to be used as translucent colors, or mixed with white to create opaque colors. Today we are making opaque colors and painting in the opaque technique of dark-to-light. Our pigments are not to be used right from the tube, but are designed to be very intense so that mixing is required. If painting is compared to cooking, pigments are like ingredients, and colors are like dishes. Paintings are full-course dinners!
CLASSROOM
PREP
Practice the demo if needed.
Print all of your PDFs from the lesson plan and cut any references apart as needed.
What your room needs
Here are your printable lists and room prep instructions.
Opens in new window
CLASSROOM
MATERIALS
- Clipboards
- Water containers
- Paper towels
- Sharpie
- Water mist bottle
- Cleaning wipes
- Sink
- Waste Basket
- Camera or camera phone
STUDENT’S
MATERIALS
- 14 x 17” Sketch pad
- 4B pencils
- Erasers
- Markers
- Oil pastels
- Blender sticks (stumps)
- Ebony Pencil
- Charcoal
- Paint
- Brushes
PREVIEW
Week 32: Acrylic Portrait
An underpainting in bright orange helps students create an easy portrait using acrylics and their newly learned skin tone color journals.
Week 33: Fun & Freaky Game Day
Students get a fun break while learning and practicing at the same time. Games are played for mixing colors, drawing, and observation.