

Painting
Each lesson Plan focuses primarily on one of the 4 Cornerstones of Art:
Drawing | Painting | Color | Style
OVERVIEW
An underpainting in bright orange helps students create an easy portrait using acrylics and their newly learned skin tone color journals.– – –
Grades 6 – 12
Week of March 24 – 28
1 Hour & 45 Minutes
Student Work


Lesson At A Glance
Here’s a brief overview of the complete lesson. It’s also on your prep page in the Ready, Set, Go! section (below the lesson).
Colored buttons jump to each section in the full lesson plan below.
7 Minutes – Students set up for acrylic painting
5 min – Create orange underpainting
5 Min – Choose a reference to paint
10 Min – Trace Frame – then draw Big Shapes
10 Min – Graphite transfer/trace to the canvas
15 Min – Paint the darkest shadows first
50 Min – Paint areas of the portrait
3 Min – Everyone helps clean up
Use this button to jump down to the preparation section.
LEARNING TARGETS

Students know how to set up their work area for painting with acrylics.
M A T E R I A L S
- Acrylic paints
- 4B pencil
- White and kneaded erasers
- Canvas pads
- Canvas boards
- Drawing boards
- Tape – blue painter’s tape
- Brushes – All sizes
- Water containers
- Paper towels
- Smocks
All materials are suggestions and may be modified as you see fit. We have tried many items, and these seem to allow the most versatility for the cost.
Brushes should be nylon for springiness and durability. Round brushes are the most versatile.
Paint pigment list:
- Napthol or Pyrrol Red
- Hansa or Light Yellow
- Pthalo Green (blue shade)
- Cyan or Cerulean Blue
- Ultramarine Blue
- Dioxazine Purple
- Magenta
- Burnt Umber
- Raw Sienna
- Titanium White (professional grade only)
1.1 SETUP
Students set up their work area. Ask several people to go get water tubs filled, and others to find smocks. That way you have two or three groups in different areas so you don’t get backed up with lines.
TIP
Teacher can facilitate timing by taping canvases before class or having canvas boards ready if you can provide these.
Advanced Student Lesson
CREATIONS - tap here to open
Our Creations lessons are for students who have completed the two years of Foundations and are ready to begin using all that they have learned to create new work. These more challenging versions of the same concepts and techniques are easily taught along-side students in the Foundations course. This allows for excellent review, and is encouraging for students to see progress from each viewpoint.Use the Student Instructions printout below to distribute to your Creations students. Tap the image to open the PDF in a new window.
Abstract Painting
Overview: Students will create a background using colors they choose, and then create an abstract line painting using photographic reference as their source.Use a canvas board, a sheet of taped canvas, or a stretched canvas if available.Step 1. (15 minutes) Set up for painting in acrylic, and cover the canvas with a thin coat of any colors of your choosing. Brilliant colors work well. Colors may be mixed with water instead of white, for a glaze effect, or white can be mixed in for opacity – colors that look more solid. Set aside to dry.Step 2. (20 min) Choose a reference source from any book or use the provided PDF photographs below. Use a pencil and sketchpad to create an abstract line drawing based on the photo. You should try to make it different enough so that it’s hard to recognize the subject.Step 3. (5) Write down some ideas for how color will be used as line and filling in areas. The original underpainting may be covered a lot, or it may show through and be an important element in the painting.Note: colorful lines and pattern can add a lot of visual interest to this painting.Step 4. Resume painting, using a variety of Brushes for different effects. Clean edges and lines are much easier to create when the paint is a very fluid.
Tap images to open Creations Student Instructions and Reference Materials in new windows


Use this button to jump down to the preparation section.
LEARNING TARGETS
Students know how to make an colorful underpainting
M A T E R I A L S
- Acrylic paint: red and yellow
- Canvas pad
- Canvas board on Drawing board
- Largest Brush
- Water container
- Paper towel
- Smock
2.2 prep
Cover the canvas. If you see students being too careful and going slowly, show them how to vigorously spread the paint. It should take only a minute or two. Use the 5 minute timer and make sure they know that it’s counting down.
Brushes are bent and pressure is used, to fully cover all parts of the canvas.
TIP
Too much water will sometimes prevent the paint from adhering to the canvas. Add more paint, and/or scrub the paint onto the surface.
Use this button to jump down to the preparation section.
LEARNING TARGETS
Students have the opportuniy to choose for themselves
M A T E R I A L S
- PDF printouts
- Sketchpad
- 2B Pencil OR charcoal
- Erasers
Reference Stand
Reference is easier to view while you work if it’s on a stand. Make your own DIY stands using leftover cardboard backs from empty pads and attaching an inexpensive paperboard easelback, available online in packs.

3.1 Print
Reference
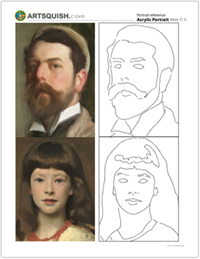
Portrait Reference
Cut images apart, keeping the portrait and it’s corresponding guideline attached. Print enough for each student to choose from several.
Hand out reference prints. Set all of the images out on a table or counter, and let groups of students come choose what they want..
 2 Pages – Opens in new window
3.3 Sketch
If time allows, have students practice sketch.Doing a couple of very fast sketches in just 2 or 3 minutes, like we did last week, will greatly enhance the accuracy of the guidelines in the next STEP.Fast sketches are made by working on the big shapes, and the proportions (where elements go and how big they are in relation to the other elements).
Use this button to jump down to the preparation section.
LEARNING TARGETS
Students know how to draw guidelines
- 14″ x 17″ Sketch pad
- Reference photo on stand
- 2B pencil
- Kneaded eraser
- White eraser
- Poster printout (optional)
4.1 sketch
“Before you start drawing this, Look at the biggest shapes. Only draw the big face shape, the neck shape, & the hair shape – not the eyes, nose or mouth – erase and correct until it looks accurate.”
TIP
If you have students who don’t follow your directions, quietly ask them if they trust you. Explain that your method is how professional and successful artists work. It’s ok to do things your own way, but working from big shapes first, allows an artist to put things in the right place BEFORE you do all the work. It doesn’t take long to prevent having to start all over – or sometimes giving up – because the eyes a just a little too far apart, or the mouth is too low.Save “doing it my way”, for the expression and artistic part of the work.
4.2 draw
Students should only draw outlines as shown. The lighter the line is, the better.Find the center of the face and make a vertical line down the center. Then draw a horizontal line across the center. Add eye outlines – on the center line. Add the bottom of the nose, and the mouth. Examine and erase for corrections.Encourage students to really work on placement of each feature. Erase and move it to make them more accurate. You don’t get to move anything later.
Use this button to jump down to the preparation section.
LEARNING TARGETS
Students know how to transfer an existing drawing to a new surface using graphite pencil
M A T E R I A L S
- Drawing from reference
- 2B pencil
- Kneaded eraser
- White eraser
- Canvas
5.1 transfer
5.2 tape
5.3 trace
TIP
If you use a bright warm colored pencil like orange or red, you can see where you’ve gone and not miss spots. But any pencil will do.
Use this button to jump down to the preparation section.
LEARNING TARGETS
Students know the method of painting dark to light
M A T E R I A L S
- Acrylic paint
- Brushes
- Water container
- Paper towel
- Smocks
6.1 Instruct
Everyone needs to have their Skin Color Journal out so they can remember how to mix. Go over these important points:
- The Color Journal is not a set of colors to make, but a guide for pushing colors where you want to take them.
- Every single color in the journal begins with orange
- Do not make the light colors yet
- Make dark colors using Purple, Orange, and a very small amount of white to increase opacity.
- Shadows colors look more red, not more purple.
- Make some black with Ultramarine Blue and Burnt Umber to mix into the darkest shadow colors
Mix and paint the shadows in the hair and skin
6.3 paint
Use this button to jump down to the preparation section.
LEARNING TARGETS
Students enjoy painting a portrait
M A T E R I A L S
- Acrylic paint
- Brushes
- Water container
- Paper towel
- Smocks
7.1 paint
7.2 help
, asking permission to help and encouraging your students. Always look for something you really like and point it out. Then if you see something really inaccurate or if they seem apprehensive at all, ask if they’re happy with everything. If you have a good suggestion, tell them, and then ask if they want to hear it or not.
Use this button to jump down to the preparation section.
LEARNING TARGETS
Students know the importance of cleaning up.
M A T E R I A L S
- Paper Towels
- Cleaning wipes
- Sink
- Waste baskets
- Well-lit spot for photos
- Camera or phone-camera
Wipe before Wash
Do your best to keep water buckets clean and plumbing free from excess paint, by encouraging wiping paint off the brushes before dunking into water. However, don't make the kids feel bad, and don't expect them to do it much.
8.1 CLEAN
- Wash hands
- Super-wash brushes if used
- Put art supplies away
- Wipe tables & toss trash
- Remove any smocks (last)
- Check for items on floors and tables
OBJECTIVES
- Practice and improvement in mixing skin tones for use in a project. Also in painting dark-to-light acrylic techniques.
- Understanding the process for creating a painting, and how to make a brilliant color underpainting. Also in viewing another artist’s work and learning from it.
- Accomplishment from setting up and moving through an important painting project.
- Fulfillment from creating realistic artwork.
TROUBLESPOTS
Mushy paints frustration – Artists who like to draw may have an irrational fear of the mushiness and uncontrollability of paint. They may even use too much paint on purpose to sabotage the process. Have patience! Help artists use small amounts of paint, smaller brushes, dry brush (less water and less paint), and to point the tip of the brush towards the edge of a painted area to make a clean edge.
Thinning and stretching paint to make it change color – If the paint becomes too thin with water, is stretched over another color so that it’s physically thin, or if there is not enough white mixed in, it will become translucent. Artists sometimes attempt to make a color change and fade by thinning it in one of these methods. This doesn’t look nearly as good as mixing actual colors for transitions.
ART WORDS
Anatomy – Anatomy is the science of the body. Artists learn bone, muscle, and skin anatomy to help them understand more about the mechanics, and basic proportions, of the body. This helps to draw more accurately.
Proportion – This is a relationship between two measurements. You have one measurement, that has a proportion to another measurement, such as twice the length, or half the length.
CLASSROOM
PREP
Print all of your PDFs from the lesson plan and cut any references apart as needed.
What your room needs
Here are your printable lists and room prep instructions.
Opens in new window
CLASSROOM
MATERIALS
- Drawing boards
- Water containers
- Paper towels
- Smocks
- Sink
- Camera or Camera phone
STUDENT’S
MATERIALS
- Acrylic paint
- 4B Pencil
- White and kneaded erasers
- Canvas pads
- Canvas boards
- Tape – blue painters tape
- Brushes
PREVIEW
Week 33: Fun & Freaky Game Day
Students get a fun break while learning and practicing at the same time. Games are played for mixing colors, drawing, and observation.
Week 34: Fun & Expressive Animal Art
This is a great expressive project that students really enjoy. Animals drawings are practiced and then drawn in bold expressive ink using a brush. After drying, the students add watercolor to the animals for a striking piece of artwork.