
OVERVIEW
Students will learn how to push their ideas and think creatively. Several exercises are used, along with dialog, to understand how to get outside the normal boundaries and use their imaginations along with their pencils. After idea thumbnails and sketches, an acrylic painting is begun.– – –
Grades 6 – 12
Week of Jan 22 – 26
1 Hour & 45 Minutes, or two 52-minute sessions
STANDARDS For This Lesson
SUBMIT YOUR SUMMARY
Copy and paste the text below to send your abbreviated lesson plan with national standards and learning targets to your supervisors and colleagues.
– – – – – – – – – – – – – – – – –
Week of Jan 22 – 26
OVERVIEW:
Students will learn how to push their ideas and think creatively. Several exercises are used, along with dialog, to understand how to get outside the normal boundaries and use their imaginations along with their pencils. After idea thumbnails and sketches, an acrylic painting is begun.
NATIONAL STANDARDS:
Grade 6
Grade 7
Grade 8
VA.CR.1.8 -Document early stages of the creative process visually and/or verbally in traditional or new media.
Grade HS Proficient
VA.CR.1.HSI – Use multiple approaches to begin creative endeavors
LEARNING TARGETS:
Students know how to formulate new visual ideas
Students know how to make a painting that conveys meaning
LESSON PLAN:
1. Warm Up (10 minutes)- Use pencils or charcoal for a quick sketch from still life
2. Brain Push #1 (5 min) – Teach talk on creative thinking.
3. Choose Reference (5 min) – Choose a reference to paint
4. Brain Push #2 (10 min)- 3 or 4 practice sketches
5. Set Up (10 min) – get ready for painting
6. Guide Lines (12 min)- Use canvas pencil to draw
7.Paint (47 min) – Paint
8. Clean Up (5 min)
Tap the Plus Icon (above right) to open STANDARDS information, including an Overview, LearningTargets and a Syllabus. Copy and paste to send to your Administrators or use the button below to download a Word document with the same information that you can add your info to and email to them as an attachment.
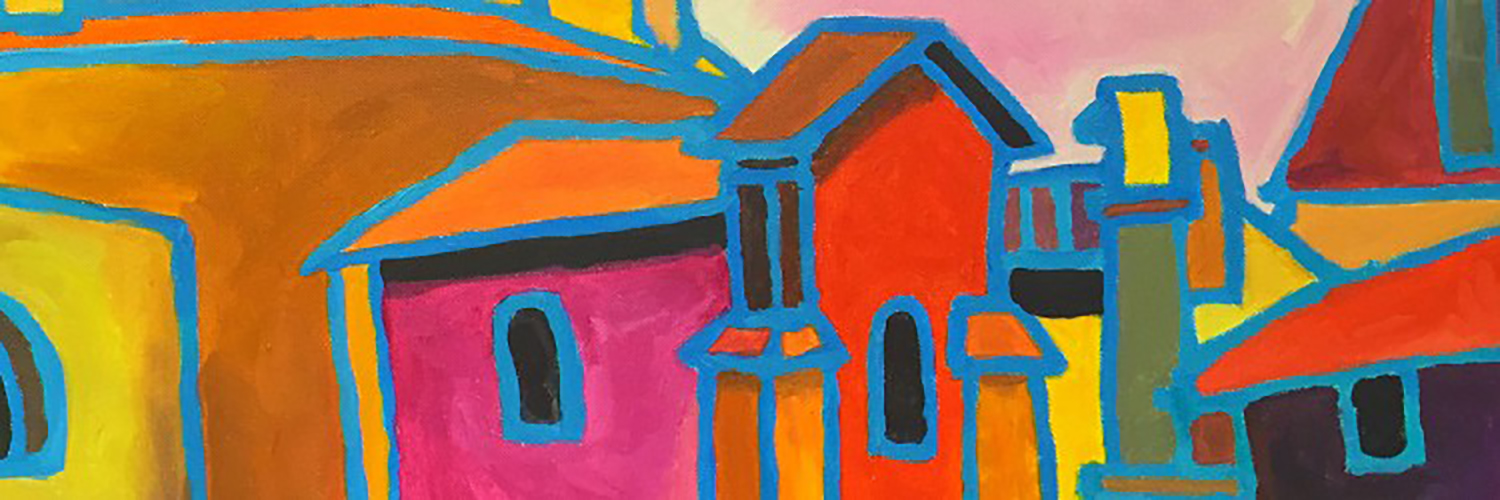
Student Work


SCROLL & TEACH LESSON PLAN
Don’t worry about rewriting anything. Just spend a few minutes reading the lesson plan and printing out your PDFs. Then check out the READY, SET, GO! section and print your prep-page, which includes checklists and an “at a glance” outline of the lesson so you can stay on track when you’re teaching. Set out the materials from the list on your prep page and you’re ready.
That’s all you need to know. Use your smartphone to Scroll & Teach!
Lesson At A Glance
A brief overview of each step. Buttons jump to each section for detailed information.
10 Minutes – Pencils or charcoal for quick still life sketch.
5 Min – Teacher talk on pushing creative thinking.
5 Min – Choose a reference to paint
10 Min – 3 or 4 practice sketches.
10 Min – Tape your canvas to a board & get supplies ready.
12 Min – Use canvas pencil to draw guide lines.
B R E A K
47 Min – begin painting
5 Min – Everyone helps
Use this button to jump down to the preparation section.
SCROLL & TEACH
LESSONPLAN
Each section is a different color. Read over once and then you can SCROLL & TEACH using any device you like. It’s designed to work best with your phone.
LEARNING TARGETS

Students know how to draw a still life.
M A T E R I A L S
- 14 x 17″ Sketchpads
- 2B Pencils OR
- Charcoal
All materials are suggestions and may be modified as you see fit. We have tried many items, and these seem to allow the most versatility for the cost.
1.1 draw
Collect and lay out different objects all around the table. Include some unusual objects for students to draw.
While students work, show the Pinboard and all the unusual surrealist paintings by Vladimir Kush.
If you have time today, try to mention the color star from last week. Next week we will be learning how our pigments make the best neutrals and shading colors. It’s good to prepare your students by letting them know about it.

Pinterest Gallery – Kush
Tap the icon to the left to open our special Pinboard showing examples of artwork to display to your class. See our Article for making Pinterest work on larger displays. You can also use a laptop or large tablet and gather everyone around like you’re using a book.
Advanced Student Lesson
CREATIONS - tap here to open
Our Creations lessons are for students who have completed the two years of Foundations and are ready to begin using all that they have learned to create new work. These more challenging versions of the same concepts and techniques are easily taught along-side students in the Foundations course. This allows for excellent review, and is encouraging for students to see progress from each viewpoint.
Use the Student Instructions printout below to distribute to your Creations students. Tap the image to open the PDF in a new window.
Surrealistic Painting with Neutrals –
Week 2 of 3 week project
Overview: Students will begin a larger painting project using mostly neutrals made by mixing perfect pigment opposites. The use of surrealism is encouraged, so drawing and planning is important too. Thumbnails are used to plan. There will be 3 weeks to complete this, so plan accordingly. If a student works fast, they should plan for a series of 2 or 3 paintings that work as a group.
While most colors should be muted neutrals, there can be a few areas of bright color for special emphasis (the most important spot). The neutral and shadow colors must be made using their color star and opposites color journal from 2 years ago.
Week 1: Plan and sketch. Begin underpainting.
- Find inspiration – look at art books, magazines, and Pinterest.
- Find reference.
- Draw lots of thumbnails. Use this time to be creative and to combine ideas.
- Think of the message you want to convey.
- Set up your paint and canvas on a board.
- Use a warm neutral to cover the canvas for an underpainting tone.
- Draw a larger version, practicing, deciding on details, and planning your colors.
Week 2: Painting most of the large areas.
- Draw guide lines on the underpainted canvas using canvas pencil.
- Begin painting – in each area, paint the darkest color first, then work towards lighter colors.
Week 3: Details and highlights to finish.
Tap images to open Creations Student Instructions and Reference Materials in new windows

Use this button to jump down to the preparation section.
LEARNING TARGETS
Students know how to think creatively
M A T E R I A L S
- 14″ x 17″ Sketch Paper
- 4B Pencil
- White Eraser
2.1 talk
Read teacher talk and discuss creative thinking.
“You may have heard the phrase, ‘breaking outside the box’ or a similar phrase, ‘pushing the envelope’. These refer to thinking so creatively that it isn’t what we normally expect. Art can often be highly creative and unusual, but how do artists do this?
About 80 years ago, a movement called surrealism brought about a lot of experimentation with taking realistic artwork, but making things look impossible. That’s one way to think outside of the box.
Pushing the boundaries of our thinking takes work, just like physical pushing does. First, you have to make a decision that you’re going to push your thinking, and then you have to experiment.
Ideas come when artists combine 2 things: their imagination and their pencil. You can sit there and think, think, think, but something magical happens when you draw at the same time. It doesn’t matter what you draw, as long as you keep doing it. Things that don’t even sound that good, lead to ideas that do, so draw everything that comes to mind.
What can you do to your warmup drawing for instance?”
2.2 draw
Have students make one tiny creative crazy-idea thumbnail sketch, that would modify their warmup drawing in some new way.
A thumbnail sketch is 2″ or less on a side, which is very small.It should only take a minute or two and be so small, that you can think more than draw. Small thumbnail sketches are for designing and conceptualizing, not actually creating artwork. After they’re finished, let them know they don’t have to use this idea unless they just want to. This was practice.
Use this button to jump down to the preparation section.
LEARNING TARGETS
Students know how to choose a reference
M A T E R I A L S
- 14″ x 17″ Sketch Paper
- References
3.1 Print
reference
Wild Things
Cut images apart and print enough for each student to choose from several.
Hand out reference prints. Set all of the images out on a table or counter, and let groups of students come choose what they want..

3 Pages – Opens in new window
3.2 choose
Help students choose a reference.
Use the printout with reference photos for students to look at. You can have several photo files or books ready too. Animals, architecture, landscape and still life can all be used, and even combined.
Make sure you keep to a time schedule for this step. A deadline is essential for choosing reference or kids can get lost in the process. The actual reference is not as important as what you do with it.
“This is can be a wild & crazy painting. There are no restrictions to your ideas. You can use any idea or reference that you want. Try to imagine something that is used in a way that is unexpected. don’t try to do an abstract work, because that’s not unusual. Combine things that don’t go together, or make things look surprising in some way. You can use color to do surprising things too.”
For young students: “This is not about YOU being wild and crazy, or your movement being crazy. It’s about the content of your painting being crazy.”
TIP
TIP: Here is one thing about this kind of work: don’t just make something weird with the “un-goal” of throwing it away afterwards. Make something amazingly unusual, that is also a cool piece of art that you want to keep or give to someone.
Use this button to jump down to the preparation section.
LEARNING TARGETS
Students know how to be creative
M A T E R I A L S
- 14″ x 17″ Sketch Paper
4.1 talk
Encourage students to combine their imagination and their sketching, using both at the same time. Make the rounds, helping individuals as needed by asking questions and giving your honest responses.
State the one rule for the project:
You must create something that all parents will be happy to see, not just tolerate. (that keeps the artwork safe & clean).
The final artwork should be a painting; watercolor on paper, or acrylics on canvas. For young students, painting is the wiser choice or students will draw silly things and say they’re finished within a few minutes. For teens, students can alternatively do a detailed pencil drawing (not a rough sketch), or an ink drawing.
“Spend some time creating 3 or 4 sketches that push your creativity as much as you can.
The key to this, is to make a wonderful work of art that is surprising to people when they see it.
What will they think? What kind of feeling will your work bring up in other people? How will you accomplish this? Will you use color in any unusual ways? Draw and think at the same time. It does not work very well to just think while you stare at photos and blank paper. Draw! The more drawings you make the better. Once you’re ready, move on to the next step.”
Use this button to jump down to the preparation section.
LEARNING TARGETS
Students know how to set up their work area for painting with acrylics.
M A T E R I A L S
- Acrylic paints
- Brushes
- Palette pad
- Water container
- Smocks
- Paper towels
Brushes should be nylon for springiness and durability. Round brushes are the most versatile.
Paint pigment list:
- Napthol or Pyrrol Red
- Hansa or Light Yellow
- Pthalo Green (blue shade)
- Cyan or Cerulean Blue
- Ultramarine Blue
- Dioxazine Purple
- Magenta
- Burnt Umber
- Raw Sienna
- Titanium White (professional grade only)
5.1 arrange
Prepare for painting.
Have water containers filled with water, smocks for students, and paper towels ready.
If you’ve been using the lessons, by now they should understand the setup routine. Remind them of the steps and help out where needed. Students will be painting on a canvas sheet so they will their board and tape.

Canvas DEMO Steps – 6 images (tap any image to open viewer)

Canvas Pad
This is a pad of real canvas with gesso. Don’t use “canvas paper”, which is just paper with a textured surface.

Angle
Tear off sheets at a 45 degree angle, pulling from the outside corner.

Gesso
The back is not primed with gesso, and should be recognizable by specks of color, and a slightly off-white color that is not as shiny. Never try to paint on the back!

Measure
Use a long piece of tape and make sure it’s half on the canvas and half on the board.

Pinch
Pinch with both hands close together to tear the painter’s tape.

Done
Finished set up with 2 pieces of tape pressed securely.

Pencil
This is a canvas pencil. A colored pencil in dark brown/gray to mimic graphite.
Use this button to jump down to the preparation section.
LEARNING TARGETS
Students know how to draw guidelines
M A T E R I A L S
- Canvas taped to board
- Canvas Pencil
6.1 lines
Use a canvas pencil to draw some basic guide lines on the canvas.
Remind artists to not do any shading with the pencil. This is not the artwork, just like a map is not the road. Guide lines tell you where to go with your artwork.
Guide lines are very important because they are the foundation to the painting. 12 minutes is just enough time to work slowly and carefully.
BREAK
This is the end of part one if you are dividing into two, 52-minute sessions.
Use this button to jump down to the preparation section.
LEARNING TARGETS
Students know how to make a creative painting
M A T E R I A L S
- Acrylic paints
- Brushes
- Palette pad
- Water container
- Smocks
- Paper towels
7.1 paint
Make your rounds to encourage students.
Play some music that helps your class focus. Walk around and coach each student, asking questions about their work or if they want any help. If you get permission, gently point out something you would like to suggest. It’s always good to state that they have the choice to follow your suggestions or not.
If a student does not see anything in their work they dislike, or does not wish to receive instruction, saying anything at all will only bring discouragement and confusion. Artists respond to suggestions only when they are ready, and give you permission to make them.
If artwork is not finished, there will be time to continue the work in the coming weeks.
Use this button to jump down to the preparation section.
LEARNING TARGETS
Students know the importance of cleaning up
M A T E R I A L S
- Paper Towels
- Cleaning wipes
- Sink
- Waste baskets
- Well-lit spot for photos
- Camera or phone-camera
8.1 Clean
Students clean up their work area.
- Wash hands
- Super-wash brushes if used
- Put art supplies away
- Wipe tables & toss trash
- Remove any smocks (last)
- Check for items on floors and tables
8.2 Photo
Try to get photos of your student’s artwork. Find a good spot for quick lighting without highlights or shadows from your hands and device. Ideally in-between two strong lights on each side.
8.3 connect
Make sure you see the kids connect with parents and tell them about the class if you can!
%
Insights
This lesson provides understanding
%
Technique
This lesson shows application and movement
%
Self Expression
This lesson allows personal freedom
OBJECTIVES
- Practice and improvement in thinking creatively
- Understanding how it takes purpose to generate original ideas
- Accomplishment by making an idea come to life
- Fulfillment from personal artwork and expression of ideas
TROUBLESPOTS
Pushing the rule instead of ideas – If you have a group of older and/or rebellious students – kids who can get morbid, gross, or like edgy video games – you may have to set more ground rules for this project. “There can be no actual depiction of violence”, for instance. Or “no guns unless you are making an anti gun statement”. If you can, though, just use the rule in Step 4, because that is not specific and usually takes care of things without arguments about each idea they come up with..
ART WORDS
Surrealism – When artwork looks realistic, but there is unusual or impossible scenes depicted.
Conceptual art– Any artwork that incorporates and idea that is communicated to the viewer beyond just a visualization of real life.
CLASSROOM
PREP
Have a bunch of amazing supplies ready, and cut a few things apart before-hand in a way that make you look amazing.
Print all of your PDFs from the lesson plan and cut any references apart as needed.
What your room needs
Here are your printable lists and room prep instructions.
Opens in new window
CLASSROOM
MATERIALS
- References
- Smocks
STUDENT’S
MATERIALS
- 14″ x 17″ Sketch Paper
- 2B Pencil
- White Eraser
- Brushes
- Palette Pad
- Palette Paper
- Acrylics
- Charcoal
PREVIEW
Week 23: Opposites Color Journal
Jan 29 – Feb 2nd
Our Color Journals continue with what might be the most important one we do in our full two years of Foundations. Each pigment in the color palette is matched with an opposite pigment or mix, that produces the most neutral color possible. First the opposites create shadow colors of each pigment, which are muted and slightly darker versions of each. Then they mix the colors to create a full neutral. We create 2 rich blacks, several grays, and browns. Each pure neutral is also tinted with white to create a lighter version.
Week 24: Ketchup Day
Feb 5 – 9
There should be a lot of half-finished color journals and artwork that students need to finish up. This week will be reviewing, creating organization, catching up (ketchup… get it? ha ha!), and thinking about future projects. Students who are completely finished with everything will have artists’ choice. A general subject of art history will also be incorporated into the lesson.
Use this button to view our parent’s blog. Share the link: http://parentart.org, with your student’s parents so your they can read about the lesson each week.