

[su_divider top=”no” size=”1″ margin=”0″]
[one_fifth]COURSE [/one_fifth]
[two_fifth]Foundations (year A)[/two_fifth]
[two_fifth_last]76 Weekly lessons/2 school years[/two_fifth_last]
[su_divider top=”no” size=”1″ margin=”0″]
[one_fifth]LENGTH [/one_fifth]
[two_fifth]1 hour & 45 minutes[/two_fifth]
[two_fifth_last]or two 52-minute lessons[/two_fifth_last]
[su_divider top=”no” size=”1″ margin=”0″]
[one_fifth]AGES[/one_fifth]
[two_fifth]Grades 3-5[/two_fifth]
[two_fifth_last]& Grades 6-12[/two_fifth_last]
[su_divider top=”no” size=”1″ margin=”0″]
[one_fifth]DATE[/one_fifth]
[two_fifth]Week of Jan 16 – 20[/two_fifth]
[two_fifth_last]2016[/two_fifth_last]
[su_divider top=”no” size=”1″ margin=”0″]
[su_spacer size=”10″]
L E S S O N P L A N
Overview: Students will learn how cylinders, one of the 3 most basic 3D forms, is drawn accurately. They’ll see that even famous old masters struggled with it, while doing an exercise that helps them understand and apply a new way of looking at it. The second half of the lesson is spent filling sketchbook pages with practice drawings they get to choose reference for: from cartoons to realism, all using cylindrical objects.
[su_divider top=”no” style=”dashed” divider_color=”#545454″ size=”1″ margin=”5″]
[su_button url=”#teachtools” style=”flat” background=”#909084″ color=”#ffffff” center=”no” radius=”round” icon_color=”#ffffff”]T E A C H T O O L S [/su_button] Everything you need to get your classroom ready is in the TEACHTOOLS section, below the LESSONPLAN. This button jumps right to it. Learn the objectives and focus of each lesson, and print a prep-page PDF, including checklists and an “at a glance” outline of the lesson.
Tap any underlined words for a pop-up definition or mini-lesson. On some tablets, you may need to tap/pause/tap again to dismiss these.
That’s all you need to know. Use your tablet or smartphone, and just start teaching!
[su_divider top=”no” style=”dashed” divider_color=”#545454″ size=”1″ margin=”5″]
[su_divider top=”no” style=”dashed” divider_color=”#545454″ size=”1″ margin=”5″]
1. Warmup (10 minutes)- Still life with paper towels.
2. The secret plate (15) – Slideshow to explain concept.
3. Believe! (5) – Use plate to self-demo concept
4. Exercise (10) – Show hidden circle and redraw towel roll with stripes
5. Artists (12 min) – Slideshow of cylinders in art & Gaugin
Break. This is the end of part one if you’re dividing into 2 sessions.
6. Practice (50) – Reference PDFs to practice sketching cylindrical elements.
7. Clean up (2)
[su_panel background=”#FBBC02″ color=”#ffffff” border=”1px none #cccccc” radius=”100″]STEP 1. Warmup[/su_panel]
Students will draw a still life of paper towels and stripes.
[su_button url=”http://e.ggtimer.com/10minutes” target=”blank” style=”flat” background=”#373732″ color=”#FBBC02″ size=”5″ radius=”round” icon=”icon: clock-o” icon_color=”#908C7D”]10 Minutes[/su_button] Tap the timer buttons to open a countdown in a new tab.
[su_spacer size=”15″]
[su_divider top=”no” style=”dashed” divider_color=”#545454″ size=”1″ margin=”5″]
M A T E R I A L S
- 14″ x 17″ sketch pad
- 4B pencil
- White and kneaded erasers
- Paper towels with ribbons or paper stripes
- Still life objects
[su_divider top=”no” style=”dashed” divider_color=”#545454″ size=”1″ margin=”5″]
[su_icon icon=”https://homeschoolingart.com/wp-content/uploads/2016/11/SqIconYellow.png” background=”#ffffff” color=”#ffffff” text_color=”#545454″ size=”25″ shape_size=”0″ text_size=”24″ margin=”0px 0px 0px 0px”]1. Still life set up (before class)[/su_icon]
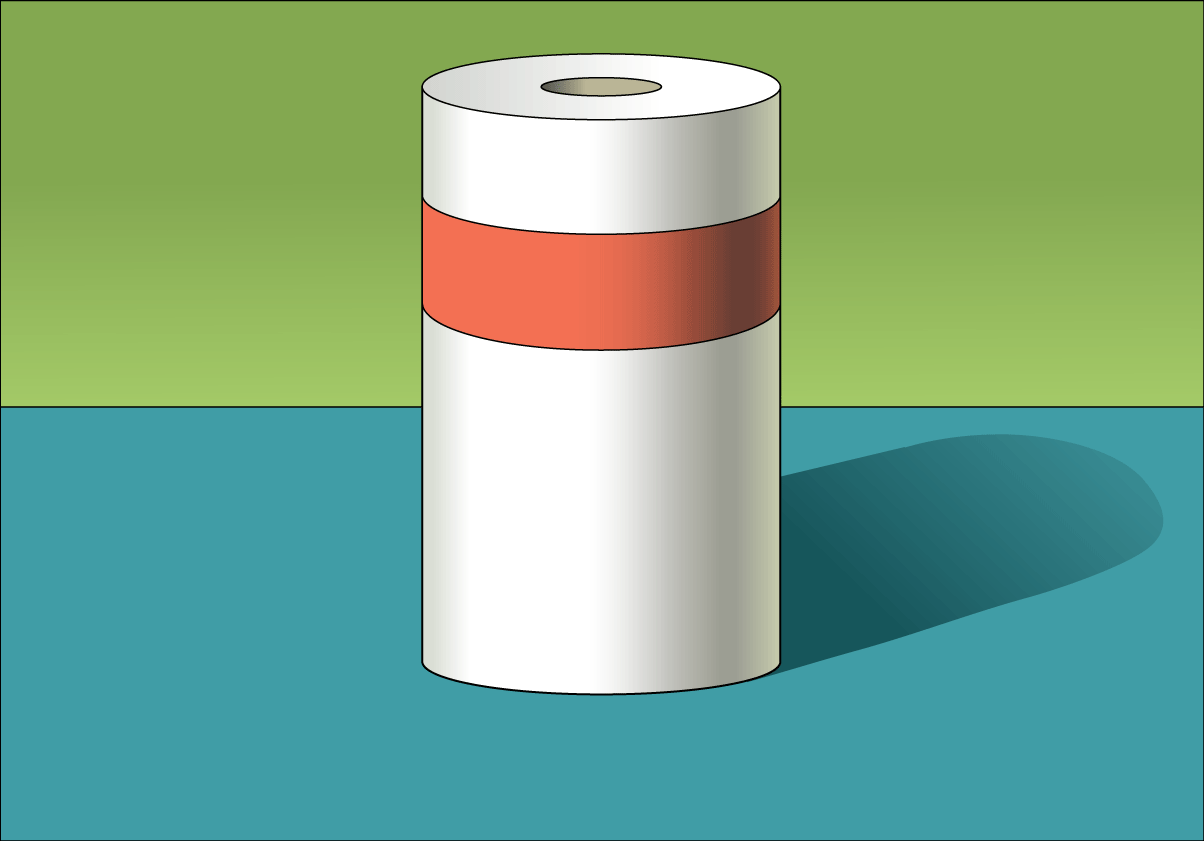
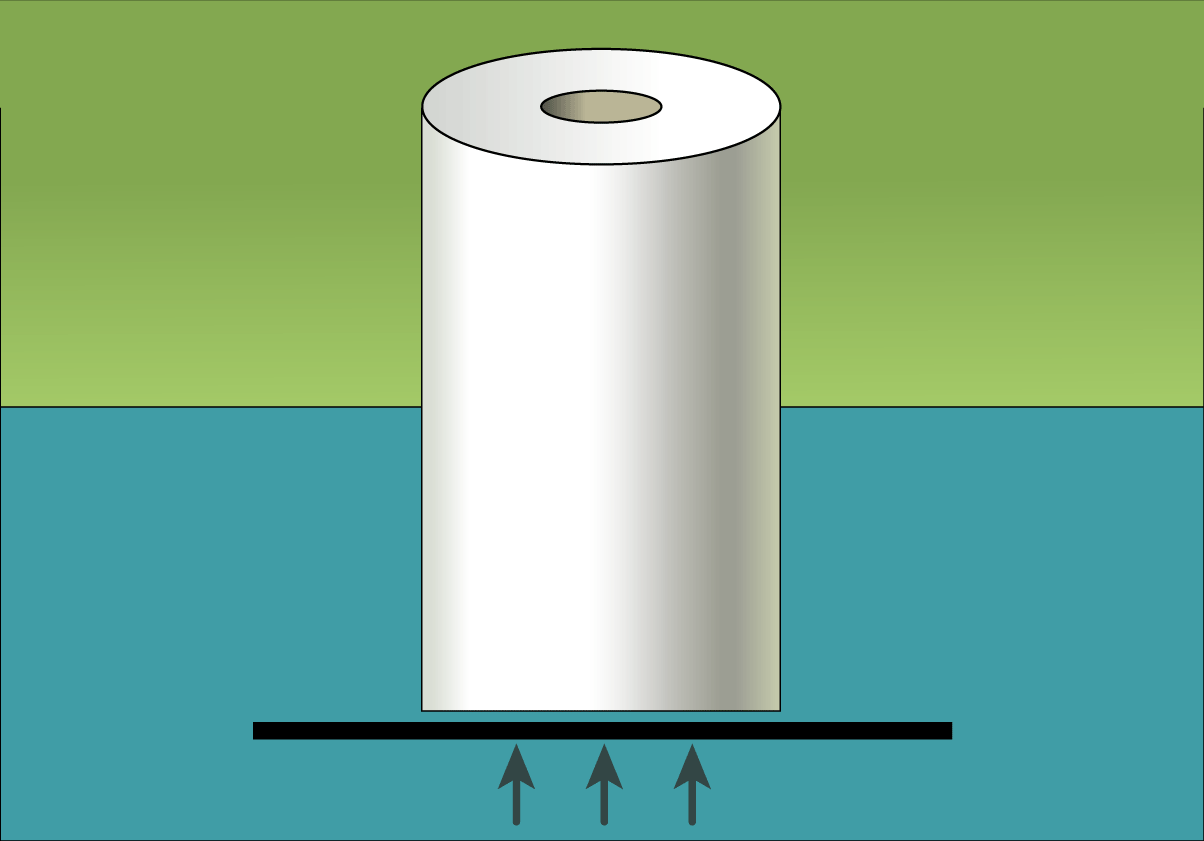
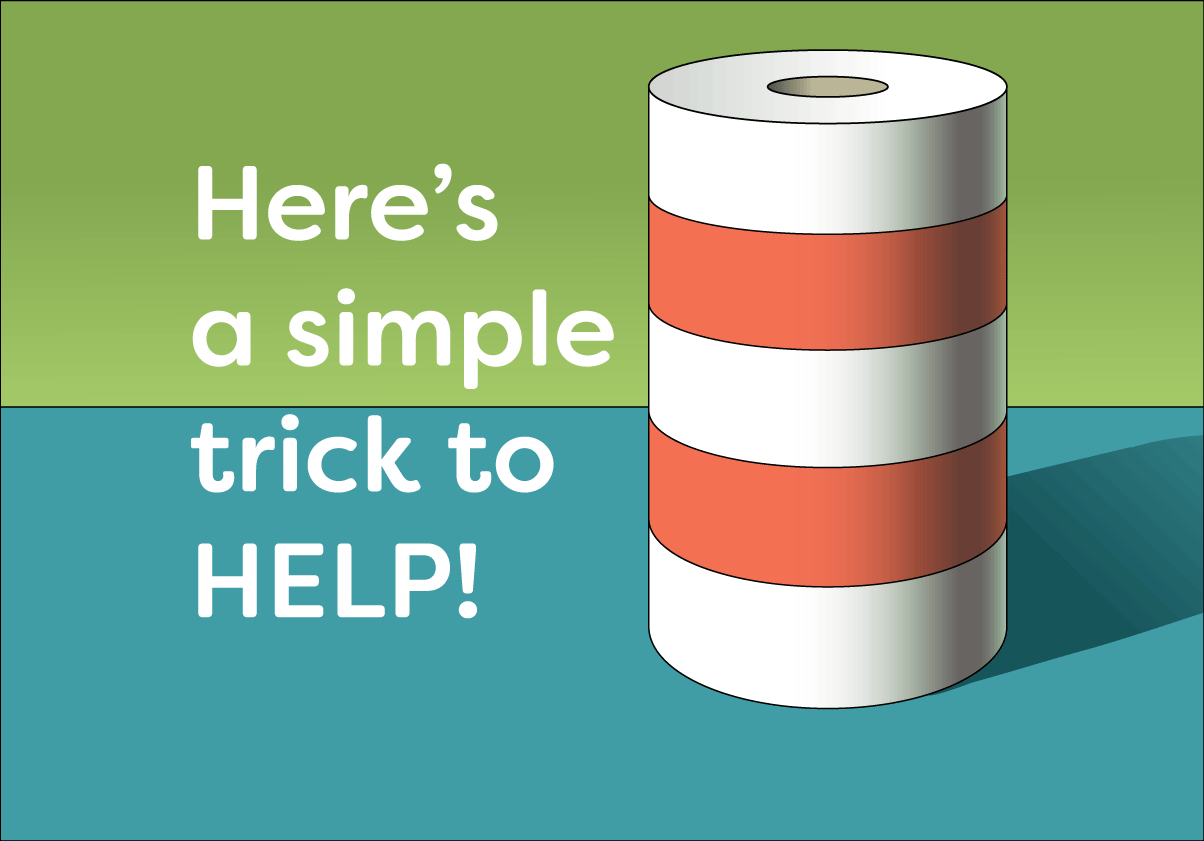
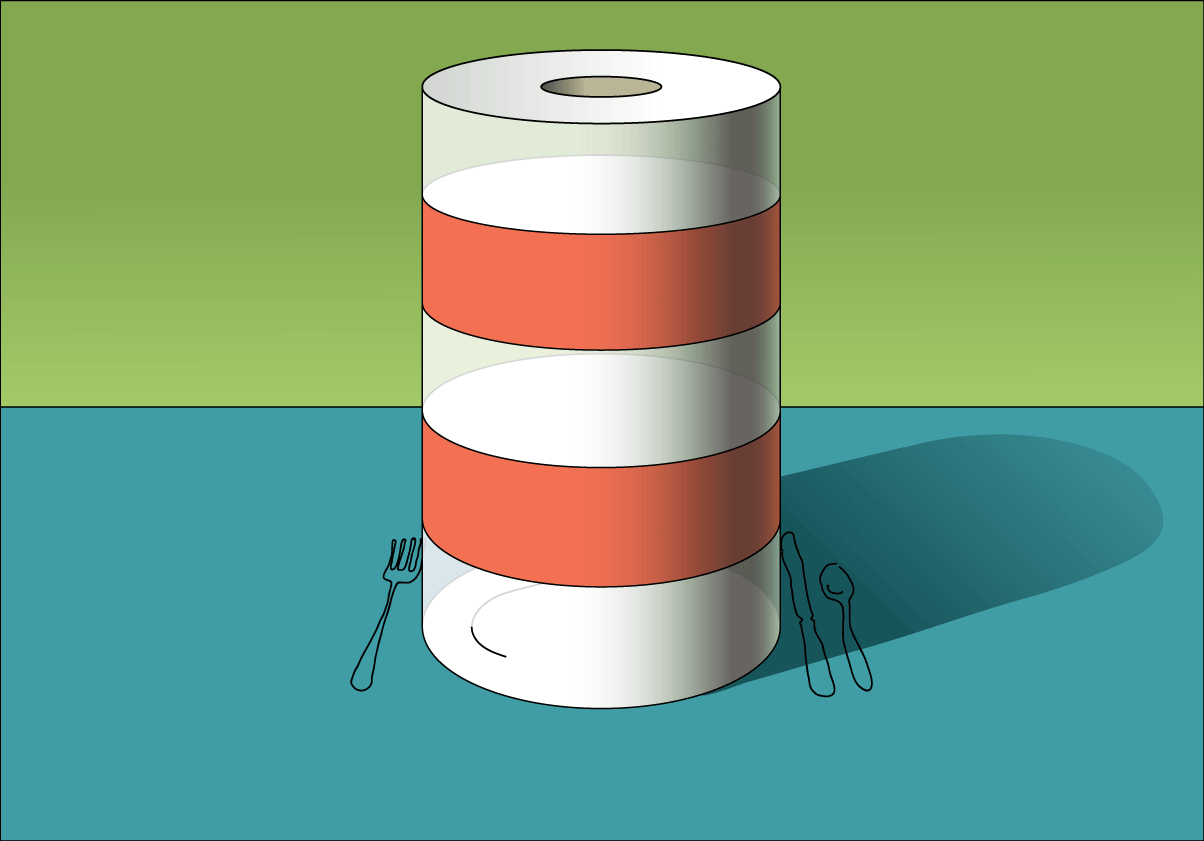
Set up a still life, or several if needed, with a roll of paper towels and stripes as shown.
- Place the still life on white paper
- There needs to be enough still life setups so students are within 3 to 5 feet of the roll. 1 for every 4 students if you have rectangular tables. Maybe 5 or 6 with large round tables.
- IMPORTANT: draw a circle underneath the roll of towels. First, draw around the base in very light pencil. Then move the roll and draw inside the pencil line in sharpie marker. The roll should cover up the marker circle which which will be revealed later.
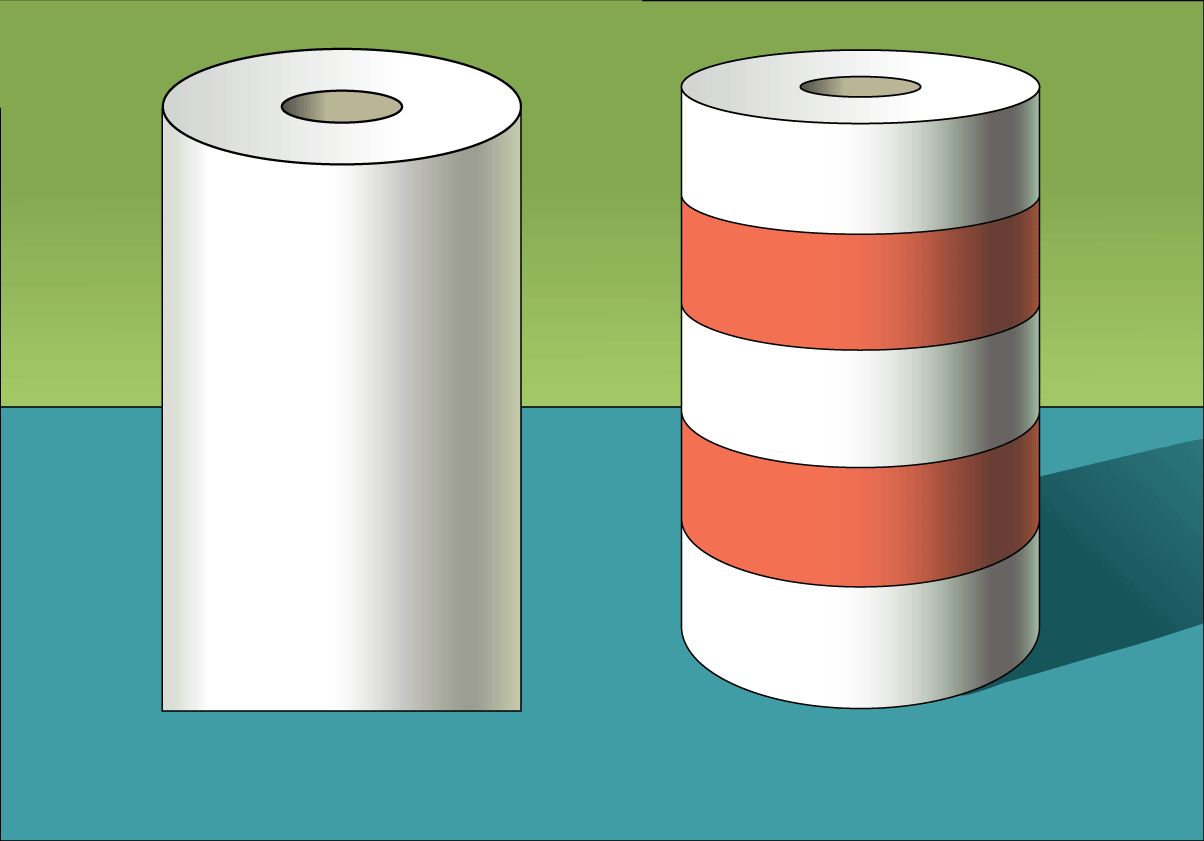
- Add two strips of colored paper stripes and secure with tape as shown below. You may tape two strips together to reach all the way around a full roll. It’s great to use unprinted towels if you can.
- Add a couple of small items around the area for early finishers.
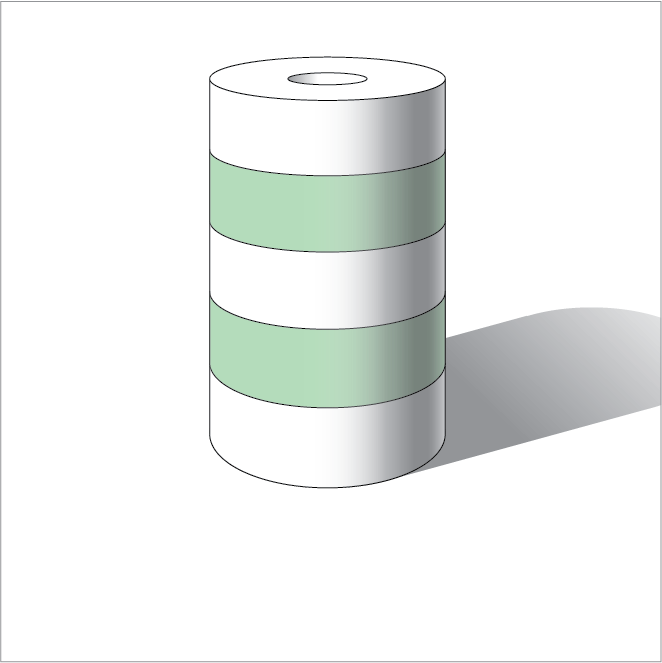
Wrap a roll of towels with 2 strips of construction paper to make stripes like this. Secure with clear tape.
[su_panel background=”#F5F6E4″ color=”#000″ border=”2px none #cccccc” shadow=”0px 0px 0px #eeeeee”]T I P: Make sure your students can see the top of the roll. If you have very young students, show the picture above and have them either stand up, or sit on some books.[/su_panel]
[su_divider top=”no” style=”dashed” divider_color=”#545454″ size=”1″ margin=”5″]
[su_icon icon=”https://homeschoolingart.com/wp-content/uploads/2016/11/SqIconYellow.png” background=”#ffffff” color=”#ffffff” text_color=”#545454″ size=”25″ shape_size=”0″ text_size=”24″ margin=”0px 0px 0px 0px”]2. Sketching & music[/su_icon]
Have students sketch this as best they can, adding shading and drawing the stripes. Play music while they work.
[su_member shadow=”0px 0px 0px #eeeeee” radius=”1″ photo=”https://homeschoolingart.com/wp-content/uploads/2016/09/CreationsBanner.jpg” name=”Advanced ” role=”Students in their 3rd or 4th year”]
Advanced students will practice drawing cylinder shapes. They should set up their own still life using cylindrical objects of bottles and bowls, and do a detailed sketch. Provide a space and lighting so the set up can be shaded well.
Steps:
- Find objects and set up still life
- Draw 2 or 3 charcoal sketches taking only 5 minutes each – full sheet of paper
- Draw guidelines sketch very lightly
- Continue by adding details and shading, making the lines bolder as you go
Make sure they use a real plate or circle to visualize cylinder bases. Have them close one eye and move the circle up and down so they can see the changes in perspective.
Remind students that this is a very difficult thing to draw and they should always practice the basic forms: 1) Cube, 2) Sphere, 3) Cylinder.
Draw the entire “secret plate” underneath every object.
 Tap to open the CREATIONS Instructions PDF. Print and cut down the middle for two instruction sheets. Provide to your advanced students so they can know the steps to follow for their advanced version of this lesson.
[/su_member]
[su_spacer size=”5″]
[su_button url=”#teachtools” style=”flat” background=”#909084″ color=”#ffffff” center=”no” radius=”round” icon_color=”#ffffff”]T E A C H T O O L S[/su_button] [su_button url=”#main 1″ style=”flat” background=”#909084″ color=”#ffffff” center=”no” radius=”round” icon_color=”#ffffff”]Top of Page[/su_button]
[su_spacer size=”50″]
[su_panel background=”#fc8902″ color=”#ffffff” border=”1px none #cccccc” radius=”100″]STEP 2. The Secret Plate[su_spacer size=”10″][/su_panel]
Display a slideshow to explain the lesson concept.
[su_button url=”http://e.ggtimer.com/15minutes” target=”blank” style=”flat” background=”#373732″ color=”#fda85a” size=”5″ radius=”round” icon=”icon: clock-o” icon_color=”#908C7D”]15 Minutes[/su_button]
[su_spacer size=”15″]
[su_divider top=”no” style=”dashed” divider_color=”#545454″ size=”1″ margin=”5″]
M A T E R I A L S
- 14″ x 17″ sketch pad
- 4B pencil
- White and kneaded erasers
- Cheasel reference stand & clip
[su_divider top=”no” style=”dashed” divider_color=”#545454″ size=”1″ margin=”5″]
[su_icon icon=”https://homeschoolingart.com/wp-content/uploads/2016/11/SqIconOrange.png” background=”#ffffff” color=”#ffffff” text_color=”#545454″ size=”25″ shape_size=”0″ text_size=”24″ margin=”0px 0px 0px 0px”]1. Display slides and read captions[/su_icon]
Explain that this slideshow is all about how to overcome one of the hardest things artists have to draw, and how it will help you make more accurate drawings than the famous artist, Paul Gauguin! This is a long slideshow with 20 images, so move along, but take care to read the captions verbatim so that this concept comes through. It’s good to practice a couple of times.
Keep up the excitement. This is an amazing technique that really helps.
[su_panel background=”ffff” color=”#908C7D” border=”2px dotted #cccccc” shadow=”0px 0px 0px #eeeeee”]
[su_icon icon=”https://homeschoolingart.com/wp-content/uploads/2050/01/Slideshowicon.png” background=”#ffff” color=”#FC7507″ text_color=”#373732″ size=”53″ shape_size=”0″ margin=”0px 0px 0px 0px”][/su_icon] S L I D E S H O W
[toggle title=”The Secret Plate • Tap to open – Scroll to view – Pinch to zoom” state=”closed”]

Here is a picture of a striped cylinder just like we’ve been drawing. Do you think it looks like an accurate cylinder shape? (Yes!)
[su_spacer size=”20″]
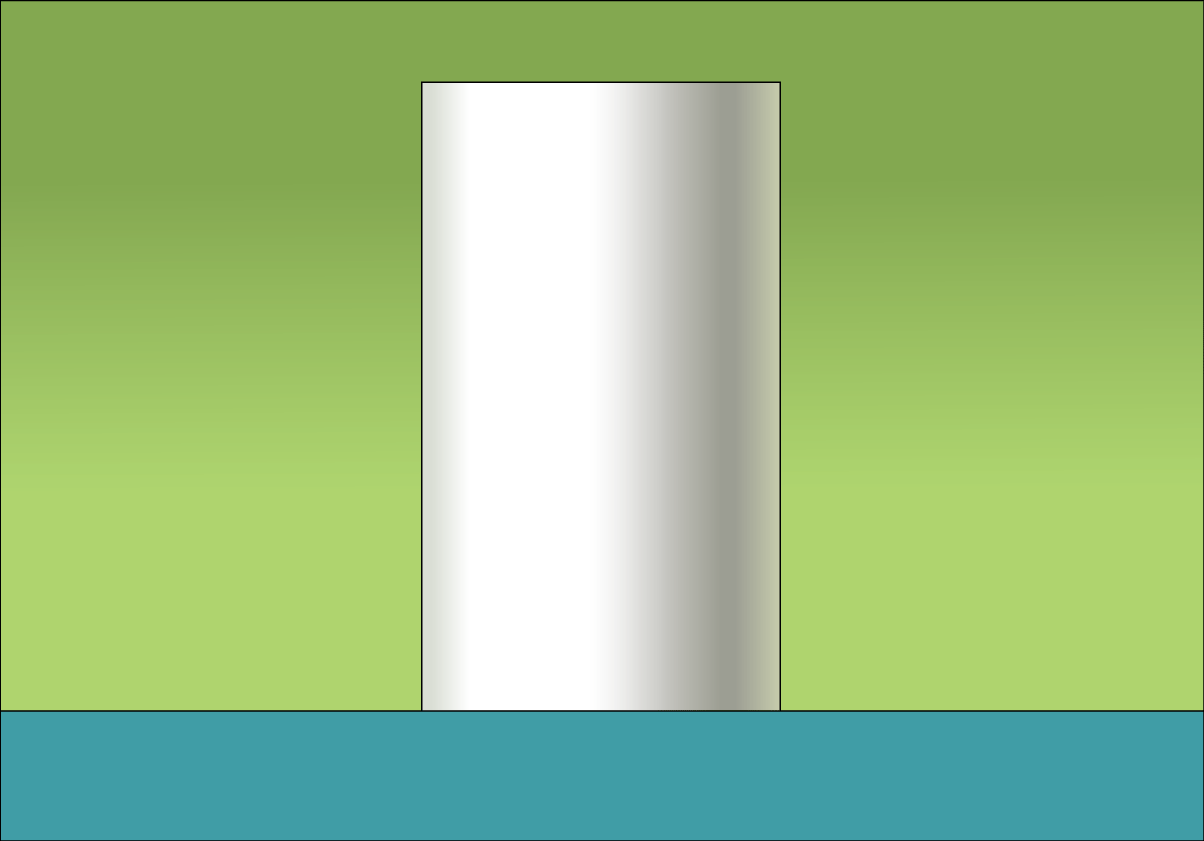
Our logical mind tells us some truths about a cylinder shape, but this is what is a logical cylinder looks like. A flat top and bottom on a flat table.
[su_spacer size=”20″]
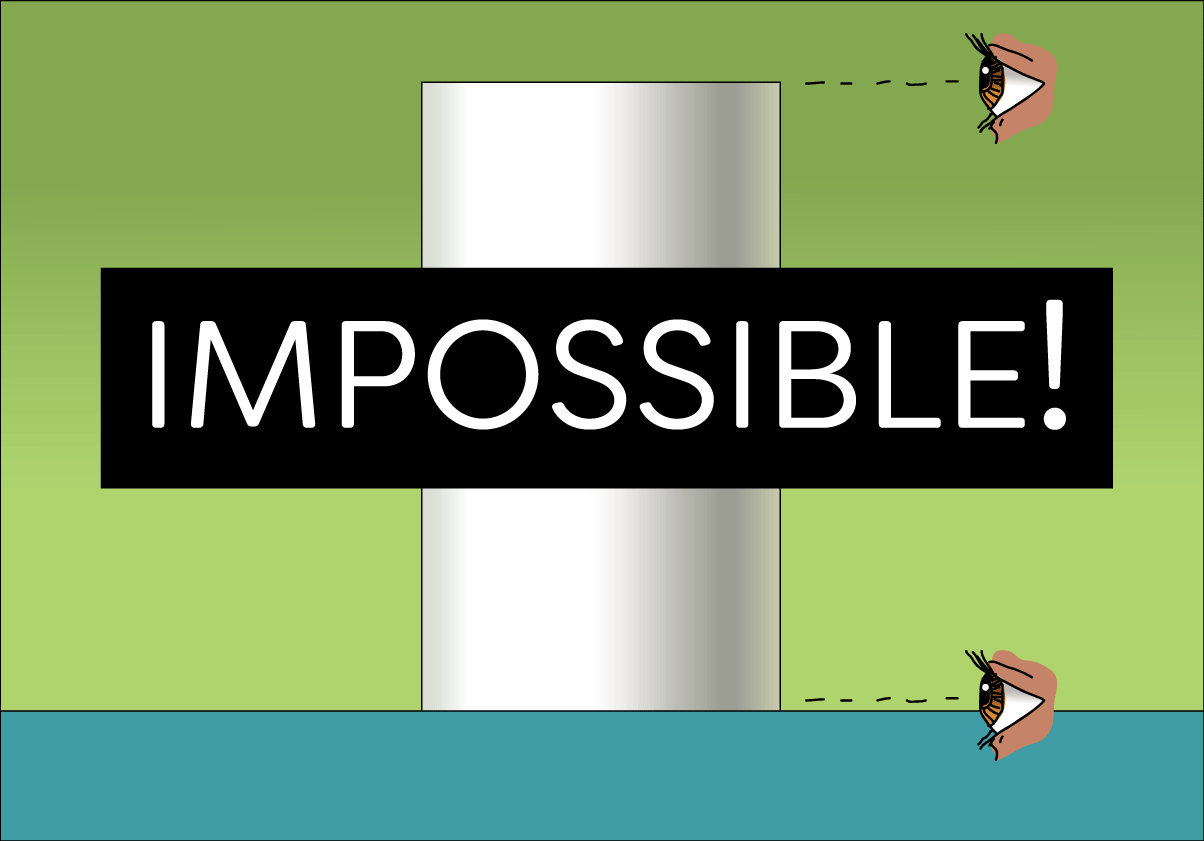
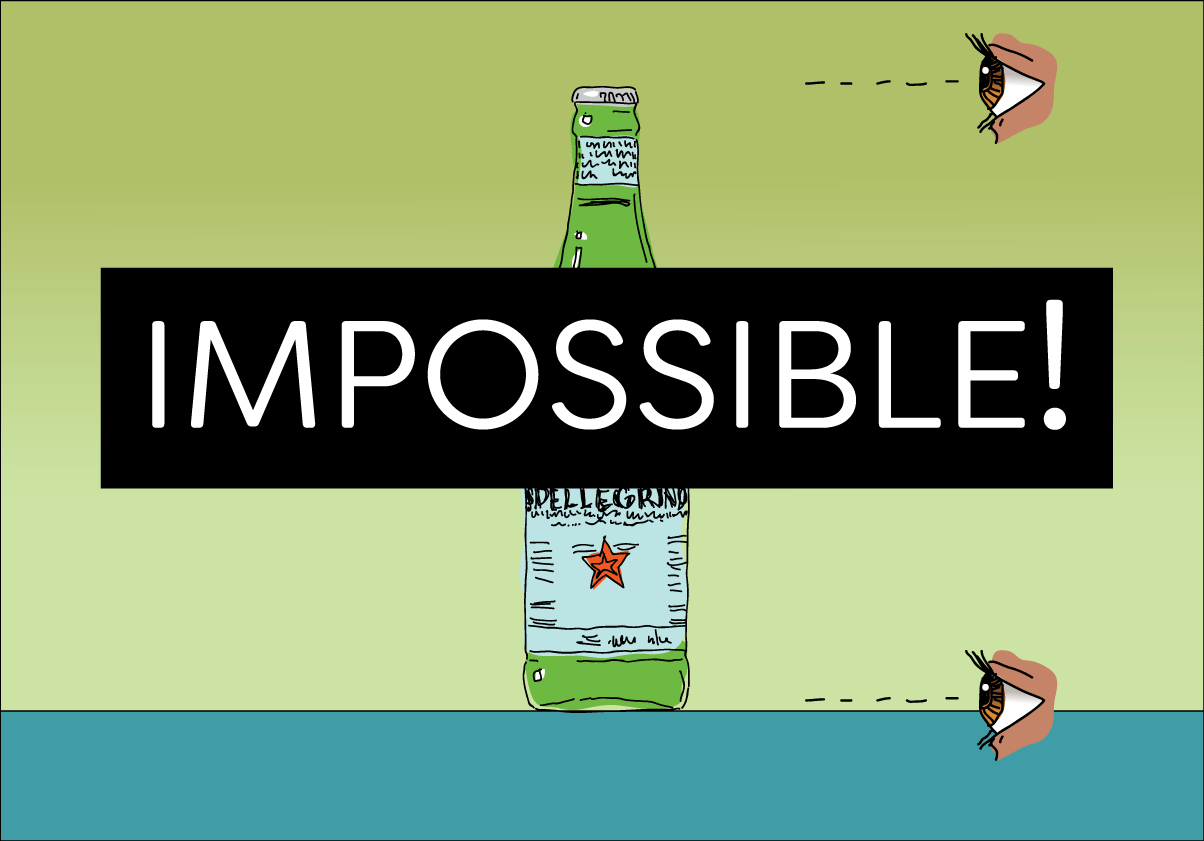
The problem is that to see the top as flat, your viewpoint must be right at the same height. That means you can’t see both the top and bottom as flat at the same time. It’s impossible! Your eyes can’t be in two places at once.
[su_spacer size=”20″]
We can draw things like this and they sometimes look very nice and sometimes we draw this way on purpose, like last week. However, it is VISUALLY impossible from a normal distance so for accuracy, you need to draw cylinders visually true. Note: Modern photography can actually make objects look like this. They are using several photographic tricks though.
[su_spacer size=”20″]
[su_spacer size=”20″]

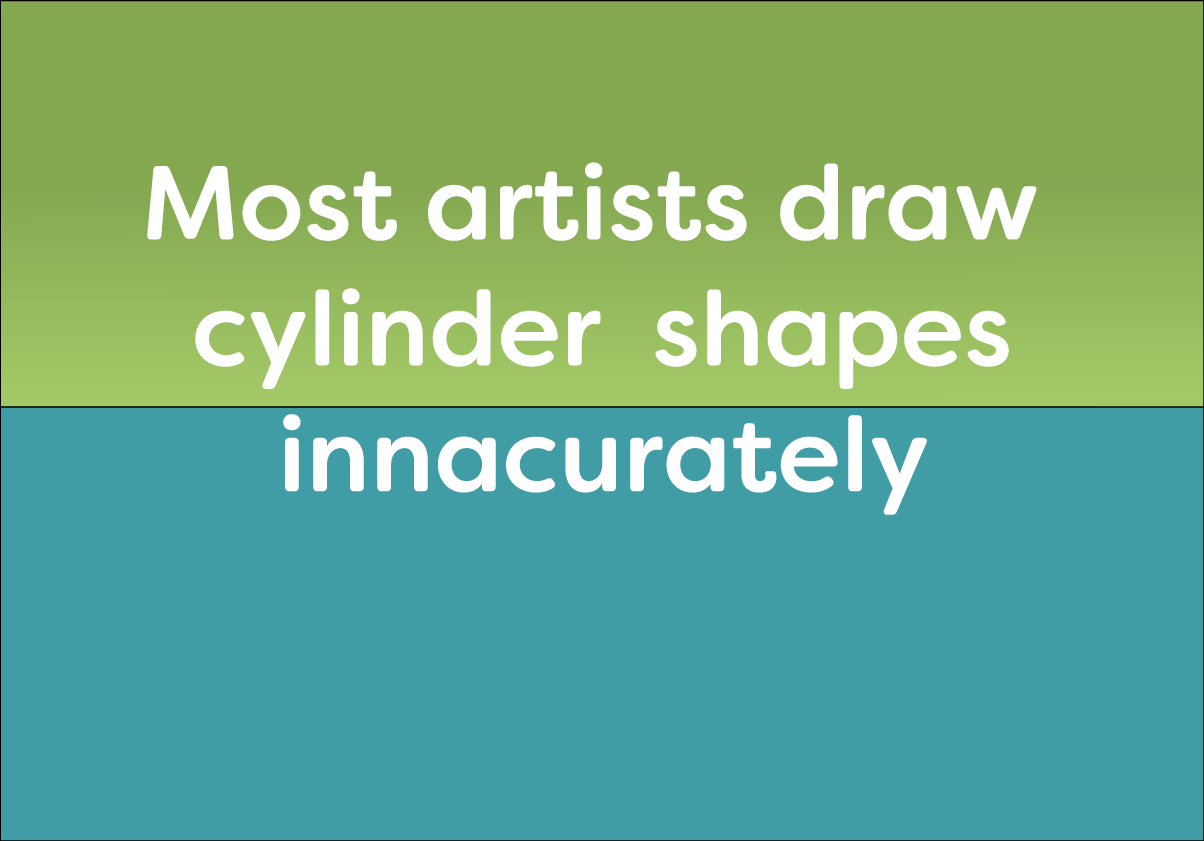
There are 3 reasons where logical ideas mess us up and cause artists to draw inaccurate cylinders.
[su_spacer size=”20″]
[su_spacer size=”20″]

Here is the top, and an exact copy moved down to the bottom. Seems like a great idea…
[su_spacer size=”20″]

However, it looks less accurate.
[su_spacer size=”20″]
Adding one stripe makes it easier to see how the bottom looks innacurate. If you cover up the bottom with your hand, the top looks fine. Close one eye and try it.
[su_spacer size=”20″]
[su_spacer size=”20″]

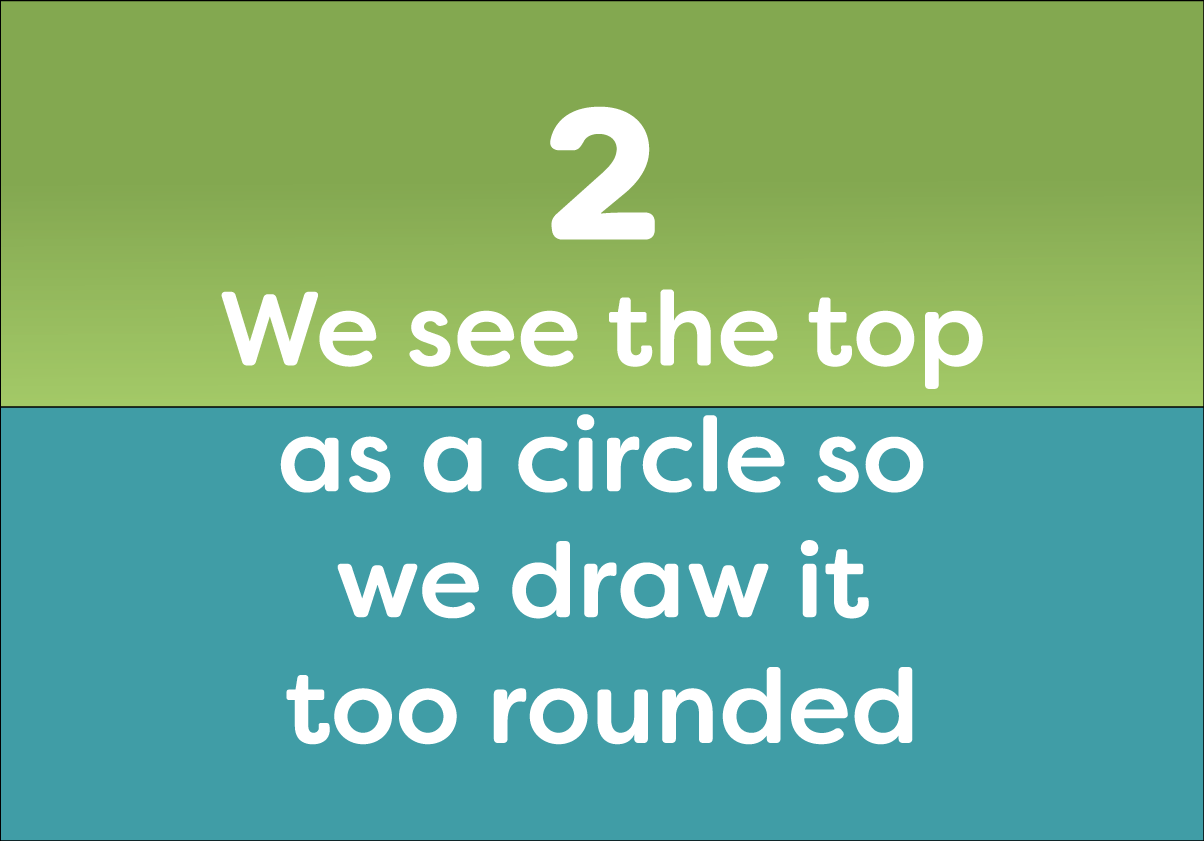
Now the top is more round. If you cover the bottom again, it seems fine to have the more rounded top, but artists often make the top too rounded.
[su_spacer size=”20″]
[su_spacer size=”20″]
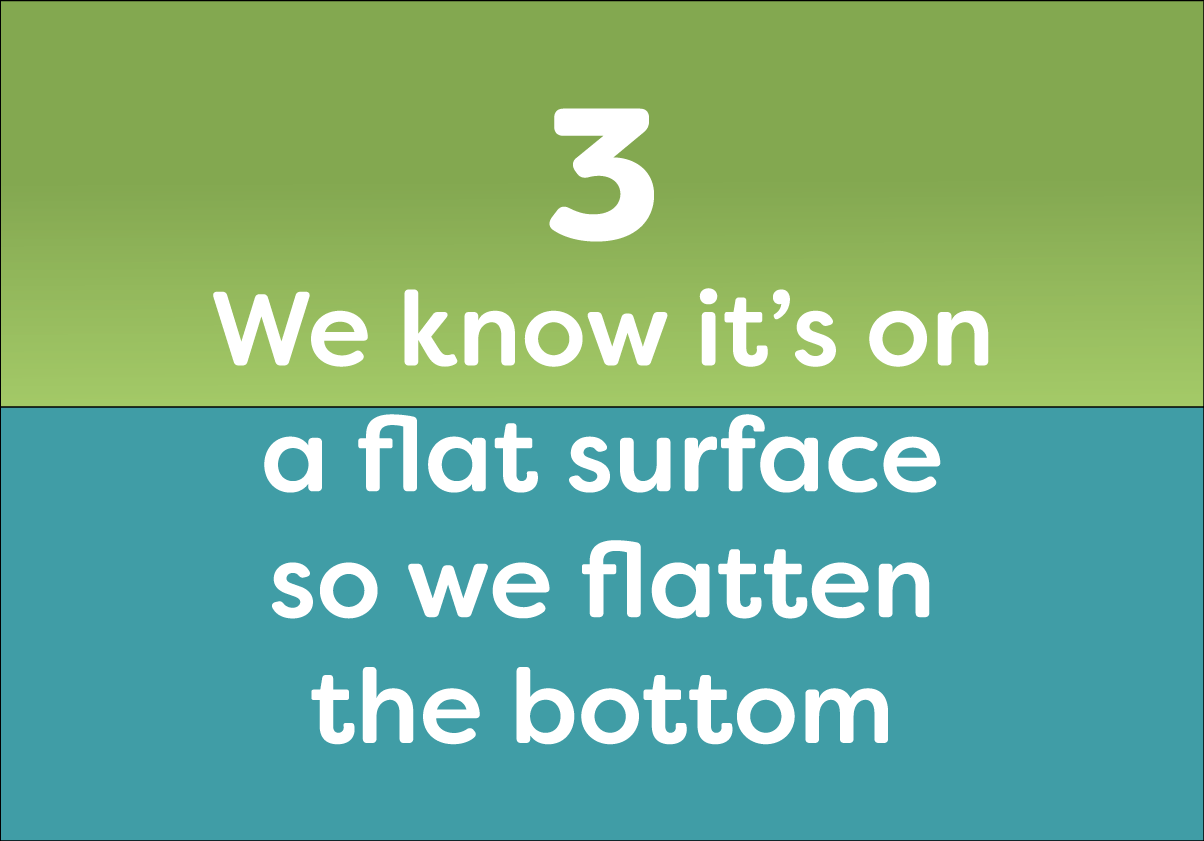
The table is flat. Why isn’t the bottom flat too? It’s a logical solution, but visually inaccurate.
[su_spacer size=”20″]
Putting the two cylinders side-by-side, the logical one is very weird looking. The one on the right looks great!
[su_spacer size=”20″]
Since most artists struggle with cylinders in these 3 ways, we have a trick that makes it easier. First, let me show you the bottom of this cylinder the way it really is. It will surprise you.
[su_spacer size=”20″]
This looks crazy! But this is the top and the bottom of the accurate cylinder that you’ve been looking at. Even the artist who came up with this trick has a hard time believing that this is accurate! But it is.
[su_spacer size=”20″]
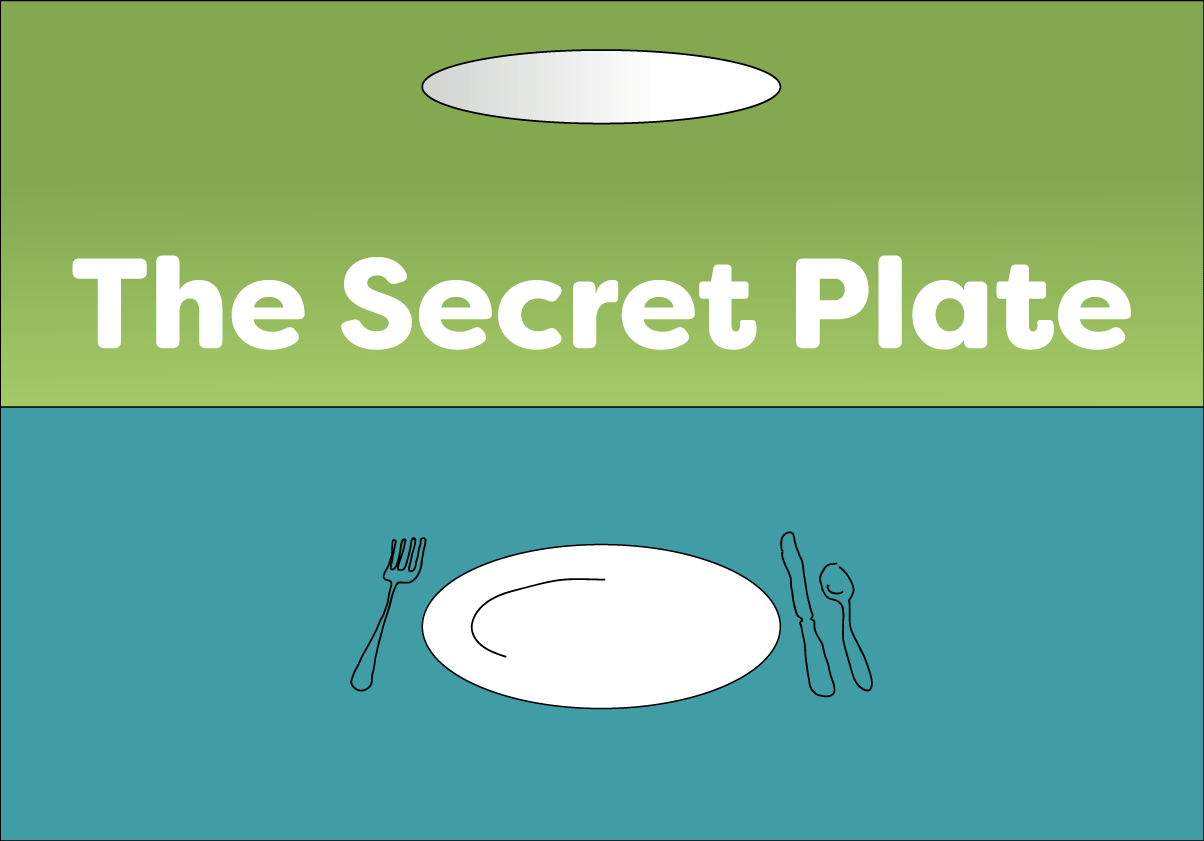
It suddenly makes all kinds of sense if you put the bottom into a different context. The Secret Plate! If you think of the bottom of the cylinder as if it were a hidden plate, you can draw it more rounded and more accurately. We can accept the much more rounded shape of a plate.
[su_spacer size=”20″]
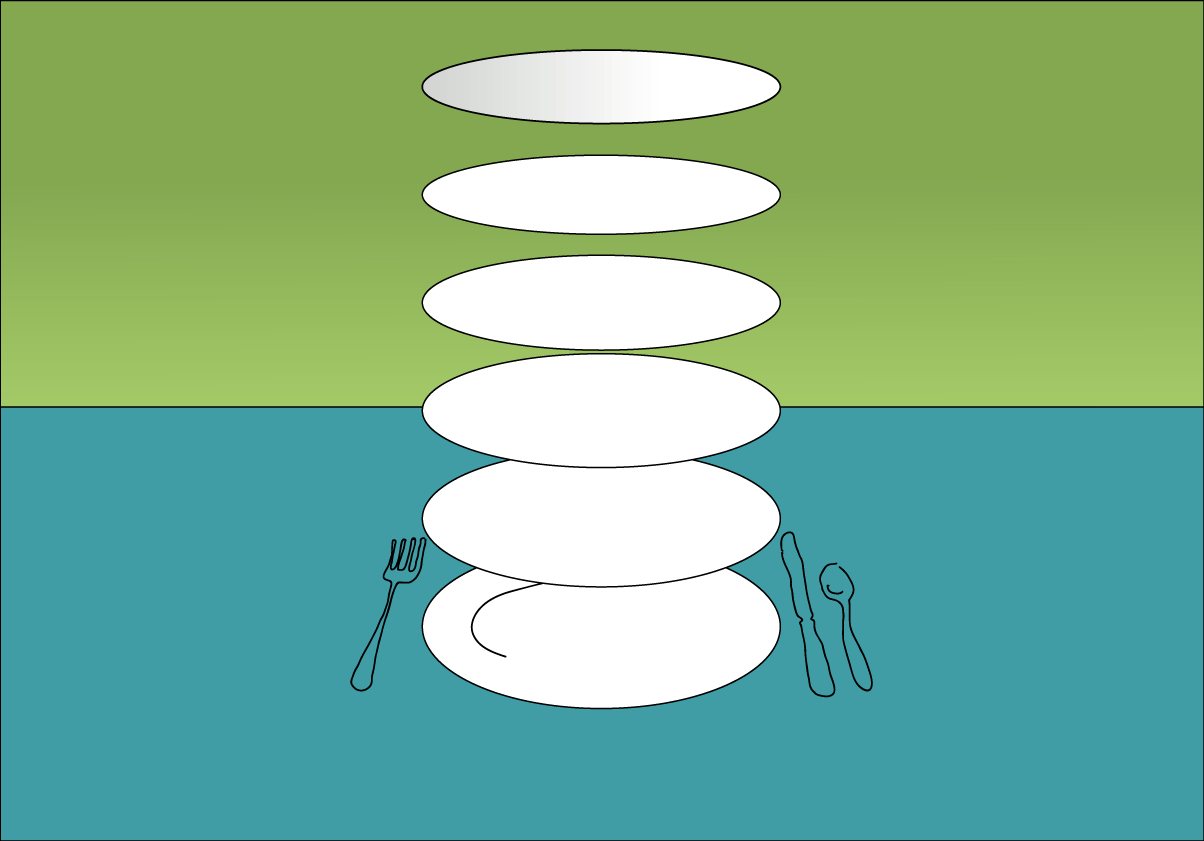
This progression shows how the perspective of the plate changes from the bottom to the top.
[su_spacer size=”20″]
Each of those secret plates show the roundness of the stripes as well as the top and bottom. Each is slightly different! Now you know the secret plate secret trick.
[/toggle][/su_panel]
[su_spacer size=”5″]
[su_button url=”#teachtools” style=”flat” background=”#909084″ color=”#ffffff” center=”no” radius=”round” icon_color=”#ffffff”]T E A C H T O O L S[/su_button] [su_button url=”#main 1″ style=”flat” background=”#909084″ color=”#ffffff” center=”no” radius=”round” icon_color=”#ffffff”]Top of Page[/su_button]
[su_spacer size=”50″]
[su_panel background=”#FC3926″ color=”#ffffff” border=”1px none #cccccc” radius=”100″]STEP 3. Believe![/su_panel]
Students will test out today’s concept with a self-demo.
[su_button url=”http://e.ggtimer.com/5minutes” target=”blank” style=”flat” background=”#373732″ color=”#fc5b5e” size=”5″ radius=”round” icon=”icon: clock-o” icon_color=”#908C7D”]5 Minutes[/su_button]
[su_spacer size=”15″]
[su_divider top=”no” style=”dashed” divider_color=”#545454″ size=”1″ margin=”5″]
M A T E R I A L S
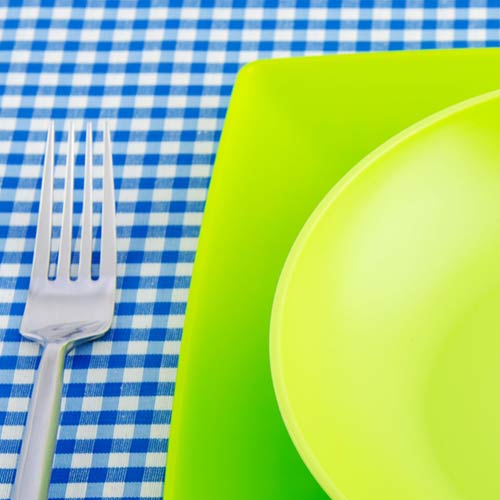
- Paper saucer or cut circle
[su_divider top=”no” style=”dashed” divider_color=”#545454″ size=”1″ margin=”5″]
[su_icon icon=”https://homeschoolingart.com/wp-content/uploads/2016/11/SqIconRed.png” background=”#ffffff” color=”#ffffff” text_color=”#545454″ size=”25″ shape_size=”0″ text_size=”24″ margin=”0px 0px 0px 0px”]1. Use paper circle or saucer to self-demo[/su_icon]
[su_testimonial name=”Teacher” photo=”https://homeschoolingart.com/wp-content/uploads/2052/11/TeachTalkSmileyGray.png” company=”(read verbatim or paraphrase)”]
“Use this paper saucer (or cut circle), and cover one eye to self-demo the concept. You’ll prove to your logical mind that the plate gets much more rounded the lower it is. It will always be hard to believe though, so never forget this trick.
Hold the plate in front of you at the same level as the top of the paper towel roll. You can see it’s flattened like the top of the towel roll.
Move it down to halfway, and see it grow dramatically in roundness! Move to the bottom, and it’s even bigger and more round. Try it a few more times slowly.”[/su_testimonial]
[su_spacer size=”5”]
[su_button url=”#teachtools” style=”flat” background=”#909084″ color=”#ffffff” center=”no” radius=”round” icon_color=”#ffffff”]T E A C H T O O L S[/su_button] [su_button url=”#main 1″ style=”flat” background=”#909084″ color=”#ffffff” center=”no” radius=”round” icon_color=”#ffffff”]Top of Page[/su_button]
[su_spacer size=”35″]
[su_panel background=”#FC2AA1″ color=”#ffffff” border=”1px none #cccccc” radius=”100″]STEP 4. Exercise[/su_panel]
Students will redraw the cylinder using the secret plate information.
[su_button url=”http://e.ggtimer.com/10minutes” target=”blank” style=”flat” background=”#373732″ color=”#FF80CB” size=”5″ radius=”round” icon=”icon: clock-o” icon_color=”#908C7D”]10 Minutes[/su_button]
[su_spacer size=”15″]
[su_divider top=”no” style=”dashed” divider_color=”#545454″ size=”1″ margin=”5″]
M A T E R I A L S
- Sketchbook
- 2B pencil
- Eraser
[su_divider top=”no” style=”dashed” divider_color=”#545454″ size=”1″ margin=”5″]
[su_icon icon=”https://homeschoolingart.com/wp-content/uploads/2016/11/SqIconPink.png” background=”#ffffff” color=”#ffffff” text_color=”#545454″ size=”25″ shape_size=”0″ text_size=”24″ margin=”0px 0px 0px 0px”]1. Move the roll of towels to reveal the circle underneath[/su_icon]
Here is the secret plate underneath our roll of towels!
[su_divider top=”no” style=”dashed” divider_color=”#545454″ size=”1″ margin=”5″]
[su_icon icon=”https://homeschoolingart.com/wp-content/uploads/2016/11/SqIconPink.png” background=”#ffffff” color=”#ffffff” text_color=”#545454″ size=”25″ shape_size=”0″ text_size=”24″ margin=”0px 0px 0px 0px”]2. Students draw the circle, or secret plate first[/su_icon]
[su_testimonial name=”Teacher” photo=”https://homeschoolingart.com/wp-content/uploads/2052/11/TeachTalkSmileyGray.png” company=”(read verbatim or paraphrase)”]
“Draw the circle first, but make it very light so you’ll be able to erase the back side of it. You cannot draw just the front. It’s impossible to draw half an oval truly accurately, so professional artists always draw the back half too, or the entire secret plate.”
[/su_testimonial]
[su_divider top=”no” style=”dashed” divider_color=”#545454″ size=”1″ margin=”5″]
[su_icon icon=”https://homeschoolingart.com/wp-content/uploads/2016/11/SqIconPink.png” background=”#ffffff” color=”#ffffff” text_color=”#545454″ size=”25″ shape_size=”0″ text_size=”24″ margin=”0px 0px 0px 0px”]3. Draw the rest of the roll of paper towels with stripes[/su_icon]
[su_divider top=”no” style=”dashed” divider_color=”#545454″ size=”1″ margin=”5″]
[su_icon icon=”https://homeschoolingart.com/wp-content/uploads/2016/11/SqIconPink.png” background=”#ffffff” color=”#ffffff” text_color=”#545454″ size=”25″ shape_size=”0″ text_size=”24″ margin=”0px 0px 0px 0px”]4. Add shading if there is time[/su_icon]
[su_spacer size=”5″]
[su_button url=”#teachtools” style=”flat” background=”#909084″ color=”#ffffff” center=”no” radius=”round” icon_color=”#ffffff”]T E A C H T O O L S[/su_button] [su_button url=”#main 1″ style=”flat” background=”#909084″ color=”#ffffff” center=”no” radius=”round” icon_color=”#ffffff”]Top of Page[/su_button][su_spacer size=”35″]
[su_panel background=”#BC2FE1″ color=”#ffffff” border=”1px none #cccccc” radius=”100″]STEP 5. Artists[/su_panel]
Students will learn about cylinders in the art of Paul Gaugin.
[su_button url=”http://e.ggtimer.com/12minutes” target=”blank” style=”flat” background=”#373732″ color=”#C079F5″ size=”5″ radius=”round” icon=”icon: clock-o” icon_color=”#908C7D”]12 Minutes[/su_button]
[su_spacer size=”15″]
[su_divider top=”no” style=”dashed” divider_color=”#545454″ size=”1″ margin=”5″]
M A T E R I A L S
- Sketchbook
- 2B pencil
- Eraser
[su_divider top=”no” style=”dashed” divider_color=”#545454″ size=”1″ margin=”5″]
[su_icon icon=”https://homeschoolingart.com/wp-content/uploads/2016/11/SqIconPurple.png” background=”#ffffff” color=”#ffffff” text_color=”#545454″ size=”25″ shape_size=”0″ text_size=”24″ margin=”0px 0px 0px 0px”]1. Display Pinterest page & point out inaccurate cylinders[/su_icon]
Gaugin struggled with cylinders and never fully understood how to draw and paint them accurately. He sometimes covered the bottoms of still life objects with cloth or other objects to hide this fact. Look for the kettle in the second image, which has a too rounded top, and a flattened bottom. Other works show flattened cylinder bottoms as well.
[su_divider top=”no” style=”dashed” divider_color=”#545454″ size=”1″ margin=”5″]
A R T I S T
Paul Gaugin
Tap the circle graphic to open the Pinterest page for examples of the artists work.
[su_spacer size=”20″]
[su_panel background=”#545454″ color=”#ffffff” border=”1px none #cccccc” shadow=”0px 0px 0px #eeeeee” radius=”50″]B R E A K – This is the end of part one, if you’re dividing into two lessons.[/su_panel]
[su_spacer size=”5″]
[su_button url=”#teachtools” style=”flat” background=”#909084″ color=”#ffffff” center=”no” radius=”round” icon_color=”#ffffff”]T E A C H T O O L S[/su_button] [su_button url=”#main 1″ style=”flat” background=”#909084″ color=”#ffffff” center=”no” radius=”round” icon_color=”#ffffff”]Top of Page[/su_button]
[su_spacer size=”35″]
[su_panel background=”#853fE1″ color=”#ffffff” border=”1px none #cccccc” radius=”100″]STEP 6. Practice[/su_panel]
Artists get to practice their new skills using reference!
[su_button url=”http://e.ggtimer.com/50minutes” target=”blank” style=”flat” background=”#373732″ color=”#a587ea” size=”5″ radius=”round” icon=”icon: clock-o” icon_color=”#908C7D”]50 Minutes[/su_button]
[su_spacer size=”15″]
[su_divider top=”no” style=”dashed” divider_color=”#545454″ size=”1″ margin=”5″]
M A T E R I A L S
- Sketchbook
- 2B pencil
- Eraser
[su_divider top=”no” style=”dashed” divider_color=”#545454″ size=”1″ margin=”5″]
[su_icon icon=”https://homeschoolingart.com/wp-content/uploads/2016/11/SqIconViolet.png” background=”#ffffff” color=”#ffffff” text_color=”#545454″ size=”25″ shape_size=”0″ text_size=”24″ margin=”0px 0px 0px 0px”]1. Draw sketches from reference pages[/su_icon]
[su_divider top=”no” style=”dashed” divider_color=”#545454″ size=”1″ margin=”5″]
P R I N T
Cylinder References for sketching – 6 pages
Tap the image to open the pdf in a new tab or window. Leave pages intact and let students swap them out often to have a large variety of things to sketch.
[su_spacer size=”15″]
Provide reference PDFs for students to choose and practice sketching cylindrical elements. Reference has a variety of things to copy and sketch: cartoon robots, super heroes, realistic sketches, bits of still lifes, and even copies of a Gaugin painting that needs to be corrected.
when one reference page is used, students can trade in for a different page.
[su_divider top=”no” style=”dashed” divider_color=”#545454″ size=”1″ margin=”5″]
[su_icon icon=”https://homeschoolingart.com/wp-content/uploads/2016/11/SqIconViolet.png” background=”#ffffff” color=”#ffffff” text_color=”#545454″ size=”25″ shape_size=”0″ text_size=”24″ margin=”0px 0px 0px 0px”]2. Encourage and help students work[/su_icon]
Play music at a level that doesn’t discourage talking. Encourage students often to “draw while talking”, instead of stopping to talk.
[su_spacer size=”5″]
[su_button url=”#teachtools” style=”flat” background=”#909084″ color=”#ffffff” center=”no” radius=”round” icon_color=”#ffffff”]T E A C H T O O L S[/su_button] [su_button url=”#main 1″ style=”flat” background=”#909084″ color=”#ffffff” center=”no” radius=”round” icon_color=”#ffffff”]Top of Page[/su_button]
[su_spacer size=”35″]
[su_panel background=”#574eFA” color=”#ffffff” border=”1px none #cccccc” radius=”100″]STEP 7. Clean up[/su_panel]
[su_button url=”http://e.ggtimer.com/2minutes” target=”blank” style=”flat” background=”#373732″ color=”#84B81E” size=”5″ radius=”round” icon=”icon: clock-o” icon_color=”#908C7D”]2 Minutes[/su_button]
[su_spacer size=”15″]
[su_divider top=”no” style=”dashed” divider_color=”#545454″ size=”1″ margin=”5″]
M A T E R I A L S
- Paper towels
[su_divider top=”no” style=”dashed” divider_color=”#545454″ size=”1″ margin=”5″]
[su_icon icon=”https://homeschoolingart.com/wp-content/uploads/2016/11/SqIconBlue.png” background=”#ffffff” color=”#ffffff” text_color=”#545454″ size=”25″ shape_size=”0″ text_size=”24″ margin=”0px 0px 0px 0px”]1. Clean up checklist:[/su_icon]
• Super wash brushes
[su_divider top=”no” style=”dashed” divider_color=”#545454″ size=”1″ margin=”5″]
• Empty water containers
[su_divider top=”no” style=”dashed” divider_color=”#545454″ size=”1″ margin=”5″]
• Put art supplies away (sop up runny paint before disposing of palette paper)
[su_divider top=”no” style=”dashed” divider_color=”#545454″ size=”1″ margin=”5″]
• Wipe tables & clean up trash
[su_divider top=”no” style=”dashed” divider_color=”#545454″ size=”1″ margin=”5″]
• Remove smocks
[su_divider top=”no” style=”dashed” divider_color=”#545454″ size=”1″ margin=”5″]
• Collect &/or distribute artwork – NAMES
[su_divider top=”no” style=”dashed” divider_color=”#545454″ size=”1″ margin=”5″]
• Check for personal items on tables and floors
[su_divider top=”no” style=”dashed” divider_color=”#545454″ size=”1″ margin=”5″]
[su_icon icon=”https://homeschoolingart.com/wp-content/uploads/2016/11/SqIconBlue.png” background=”#ffffff” color=”#ffffff” text_color=”#545454″ size=”25″ shape_size=”0″ text_size=”24″ margin=”0px 0px 0px 0px”]2. Take photos of artwork![/su_icon]
[su_divider top=”no” style=”dashed” divider_color=”#545454″ size=”1″ margin=”5″]
[su_icon icon=”https://homeschoolingart.com/wp-content/uploads/2016/11/SqIconBlue.png” background=”#ffffff” color=”#ffffff” text_color=”#545454″ size=”25″ shape_size=”0″ text_size=”24″ margin=”0px 0px 0px 0px”]3. Make sure you see the kids connect with parents and tell them about the class if you can![/su_icon]
[su_spacer size=”5″]
[su_divider top=”no” style=”dashed” divider_color=”#545454″ size=”1″ margin=”5″]
[su_button url=”#teachtools” style=”flat” background=”#909084″ color=”#ffffff” center=”no” radius=”round” icon_color=”#ffffff”]T E A C H T O O L S[/su_button] [su_button url=”#main 1″ style=”flat” background=”#909084″ color=”#ffffff” center=”no” radius=”round” icon_color=”#ffffff”]Top of Page[/su_button]
[su_icon icon=”https://homeschoolingart.com/wp-content/uploads/2015/11/Slideshowicon.png” background=”#ffffff” color=”#ffffff” text_color=”#FC4F07″ size=”70″ shape_size=”4″ text_size=”24″ margin=”0px 0px 0px 0px”][/su_icon]
[su_spacer size=”60″]
[su_section background=”#403F39″ parallax=”no” padding=”0px 0px 0px 0px” border=”0px none #cccccc” color=”#ffffff” text_shadow=”0px 0px 0px #ffffff”]
[su_spacer size=”30″]
G A L L E R Y
[su_spacer size=”30″]
[su_panel background=”#545454″ color=”#ffffff” border=”0px none #cccccc” shadow=”0px 0px 0px #eeeeee”]
[toggle title=”Student Work • Tap to open – Scroll to view – Pinch to zoom” state=”closed”]
Coming soon
[/toggle]
[/su_panel]
[su_spacer size=”20″]
[/su_section]
[su_spacer size=”80″]
[su_icon icon=”https://homeschoolingart.com/wp-content/uploads/2015/11/Slideshowicon.png” background=”#ffffff” color=”#ffffff” text_color=”#FC4F07″ size=”70″ shape_size=”4″ text_size=”24″ margin=”0px 0px 0px 0px”][/su_icon]
[su_section background=”#F5F6E4″ parallax=”no” padding=”0px 0px 0px 0px” border=”0px none #cccccc” color=”#000000″ text_shadow=”0px 0px 0px #ffffff”]
[su_spacer size=”30″]
T E A C H T O O L S
Everything you need to make your lesson work
[su_spacer size=”20″]
Paul Gaugin
Paul Gaugin was a contemporary of the impressionists, but did not stay true to the impressionists goals. He struggled early as a painter, and had difficulties making a living, but he eventually made friends with several important artists, including Eduard Degas, Camille Pissarro, and Also with Vincent Van Gogh. He had a falling out with the latter two artists, but Degas was a great admirer of his work.
His work became bolder and more outlined, and he was included in a style called, cloisonnism, which resembled enameled metals called cloisonné. Later his paintings evolved to include even more bold color, but the color did not overpower the complex compositions he favored.
Gaugin loved to travel to the tropics, going to Panama, Martinique, and eventually settling permanently in the South Pacific island of Tahiti. He is most known for his colorful tropical works later in life.
[su_divider top=”no” divider_color=”#373732″ size=”1″ margin=”15″]
[su_row]
[su_column size=”1/4″] [/su_column]
[su_column size=”3/4″]Paul Gaugin
Tap the circle graphic to open the Pinterest page for examples of their work to display. [/su_column][/su_row]
[su_spacer size=”30″]
[su_panel background=”#C14DBA” color=”#ffffff” border=”0px none #cccccc” shadow=”0px 0px 0px #eeeeee” radius=”1″]Tip of the day: Make sure to be excited about this concept, because it can seem dull to someone who doesn’t think instruction is fun. The word secret is important for engagment, and you can run with the idea that you’re a wizard of art, passing on the master alchemist’s closely guarded secrets.[/su_panel]
[su_spacer size=”15″]
[su_divider top=”no” style=”dashed” divider_color=”#545454″ size=”1″ margin=”5″][su_button url=”#main 1″ style=”flat” background=”#909084″ color=”#ffffff” center=”no” radius=”round” icon_color=”#ffffff”]Top of Page[/su_button]
[su_spacer size=”20″]
F O C U S
Each bar represents how much of the lesson involves that kind of training.
Insights for the brain – Techniques for the hand – Expression for the heart
[su_progress_bar percent=”100″ text=”Insights” bar_color=”#ffffff” fill_color=”#3687ae” text_color=”#ffffff”]
[su_progress_bar percent=”15″ text=”Techniques” bar_color=”#ffffff” fill_color=”#3562ca” text_color=”#ffffff”]
[su_progress_bar percent=”60″ text=”Expression” bar_color=”#ffffff” fill_color=”#6640c4″ text_color=”#ffffff”]
[su_spacer size=”15″]
[su_divider top=”no” style=”dashed” divider_color=”#545454″ size=”1″ margin=”5″]
[su_spacer size=”15″]
P R E P A R A T I O N
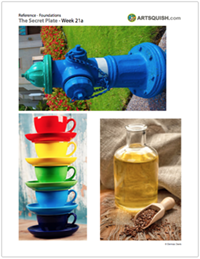
Tap the circle graphic to open the ArtSquish Prep-Page PDF in a new window. – includes the Checklist, Roomprep, and a Lesson-at-a-glance overview.
R O O M P R E P : Set up a still life, or several if needed, with a roll of paper towels and stripes as shown. Make sure to buy paper saucers or make cutout circles.
- Place the still life on white paper
- There needs to be enough still life setups so students are within 3 feet of the roll. 1 for every 4 students if you have rectangular tables. Maybe 5 or 6 with large round tables.
- IMPORTANT: draw a circle in sharpie underneath the roll of towels by first drawing around the base in very light pencil, then moving the roll and drawing inside the pencil line. The roll should cover up the marker circle which is revealed later.
- Add two strips of colored paper stripes and secure with tape as shown in step 1
- Make it interesting by adding a couple of small items around it.
M A T E R I A L S
- Paper towels with ribbons or paper stripes
- Still life objects
- Paper saucers or cut paper circles about 7 or 8 inches across
- Cheasels and clips to hold reference papers
- Pencil sharpener
Materials each student will need:
- 14″ x 17″ sketch pad
- 4B pencil, 2B pencil
- White and kneaded erasers
[su_spacer size=”15″]
[su_divider top=”no” style=”dashed” divider_color=”#545454″ size=”1″ margin=”5″][su_button url=”#main 1″ style=”flat” background=”#909084″ color=”#ffffff” center=”no” radius=”round” icon_color=”#ffffff”]Top of Page[/su_button]
[su_spacer size=”15″]
R E S O U R C E S
These are also found in the lesson plan at the times they are used
CREATIONS Instructions PDF
1 page/2-up
S T E P 6.
Cylinder References PDF
6 pages
[su_divider top=”no” style=”dashed” divider_color=”#545454″ size=”1″ margin=”5″][su_spacer size=”15″]

Tap the circle graphic to open the ArtSquish Pin Board for examples of Air Shapes to display (may open the Pinterest app on iOS devices).
[su_spacer size=”30″]
[su_divider top=”no” style=”dashed” divider_color=”#545454″ size=”1″ margin=”5″]
[su_spacer size=”15″][su_panel background=”ffff” color=”#908C7D” border=”2px dotted #cccccc” shadow=”0px 0px 0px #eeeeee”]
[su_icon icon=”https://homeschoolingart.com/wp-content/uploads/2050/01/Slideshowicon.png” background=”#ffff” color=”#FC7507″ text_color=”#373732″ size=”53″ shape_size=”0″ margin=”0px 0px 0px 0px”][/su_icon] S L I D E S H O W
[toggle title=”The Secret Plate • Tap to open – Scroll to view – Pinch to zoom” state=”closed”]
[su_spacer size=”20″]
[su_spacer size=”20″]
[su_spacer size=”20″]
[su_spacer size=”20″]
[su_spacer size=”20″]
[su_spacer size=”20″]
[su_spacer size=”20″]
[su_spacer size=”20″]
[su_spacer size=”20″]
[su_spacer size=”20″]
[su_spacer size=”20″]
[su_spacer size=”20″]
[su_spacer size=”20″]
[su_spacer size=”20″]
[su_spacer size=”20″]
[su_spacer size=”20″]
[su_spacer size=”20″]
[su_spacer size=”20″]
[su_spacer size=”20″]
[/toggle][/su_panel]
[su_spacer size=”30″][su_divider top=”no” style=”dashed” divider_color=”#545454″ size=”1″ margin=”5″]
[su_spacer size=”15″]
P R E V I E W
Week 22: Two-Week Still Life
Jan 23 – 27
Using recent lesson insights will be helpful when drawing a detailed still life of bottles, bowls, fruit, and striped fabric. The drawing will continue for two weeks instead of our usual one.
[su_divider top=”no” style=”dashed” divider_color=”#545454″ size=”1″ margin=”5″]
Week 23: Watercolor Architecture
Jan 30 – Feb 3
Students will use reference photos of architecture that does not require perspective knowledge. They’ll do warmup sketches and then sketch on watercolor paper before setting up and painting with watercolors made from their acrylic paints.
[su_spacer size=”30″]
[su_divider top=”no” style=”dashed” divider_color=”#545454″ size=”1″ margin=”5″]
[su_spacer size=”15″]
I N F O R M
[su_row][su_column size=”1/2″][su_button url=”http://parentart.org” target=”blank” style=”flat” background=”#2CAAE1″ size=”8″ wide=”no” radius=”round” icon=”icon: chevron-circle-right” icon_color=”#ffffff”]ParentArt.org[/su_button][/su_column][su_column size=”1/2″]
Use this button to view our parent blog. Share the link: http://parentart.org so your student’s parents can read about the lesson each week.[/su_column][/su_row]
[su_spacer size=”15″]
[/su_section]
[su_divider top=”no” style=”dashed” divider_color=”#545454″ size=”1″ margin=”5″]
[su_button url=”#teachtools” style=”flat” background=”#909084″ color=”#ffffff” center=”no” radius=”round” icon_color=”#ffffff”]T E A C H T O O L S[/su_button] [su_button url=”#main 1″ style=”flat” background=”#909084″ color=”#ffffff” center=”no” radius=”round” icon_color=”#ffffff”]Top of Page[/su_button]
[su_spacer size=”20″]