
Style
Each lesson Plan focuses primarily on one of the 4 Cornerstones of Art:
Drawing | Painting | Color | Style
OVERVIEW
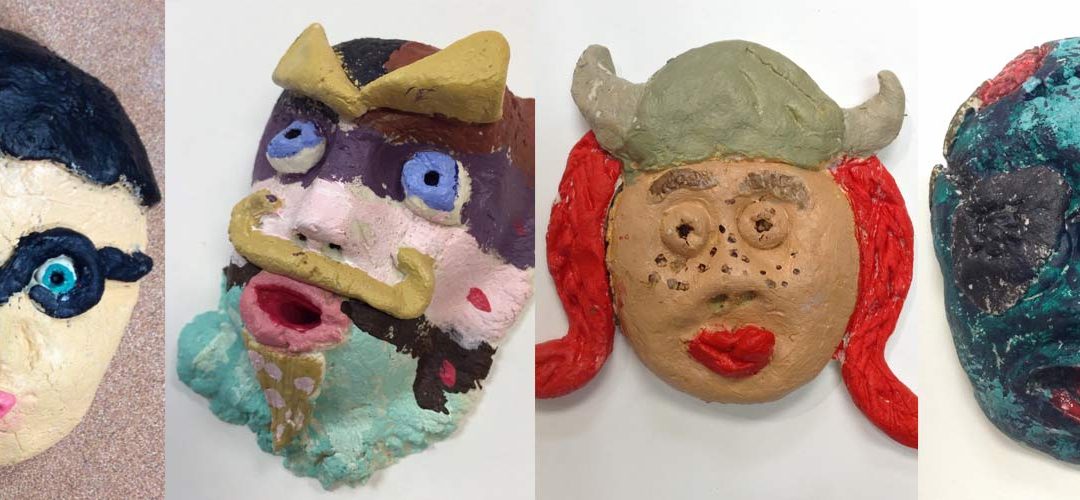
Last week’s face sculptures have been drying all week. The first half of the lesson this week, is painting the sculptures with acrylic paints. The second half is artists’ choice with dreams: using the acrylics in an expressive painting of a happy dream.– – –
Grades 3 – 5
Week of April 28 – May 2
1 Hour & 45 Minutes
STANDARDS For This Lesson
SUBMIT YOUR SUMMARY
Copy and paste the text below to send your abbreviated lesson plan with national standards and learning targets to your supervisors and colleagues. Or access the WORD doc by using the blue button below.
– – – – – – – – – – – – – – – – –
Week of March 11 – 15
OVERVIEW:
Last week’s face sculptures have been drying all week. The first half of the lesson this week, is painting the sculptures with acrylic paints. The second half is artists’ choice with dreams: using the acrylics in an expressive painting of a happy dream.
NATIONAL STANDARDS:
Grade 6
Grade 7
Grade 8
Grade HS Proficient
Explain how traditional and non-traditional materials may impact human health and the environment and demonstrate safe handling of materials, tools, and equipment.
LEARNING TARGETS:
Students know how to make an expressive piece of art
LESSON PLAN:
1. Set Up (10 minutes)- Get ready to paint acrylics
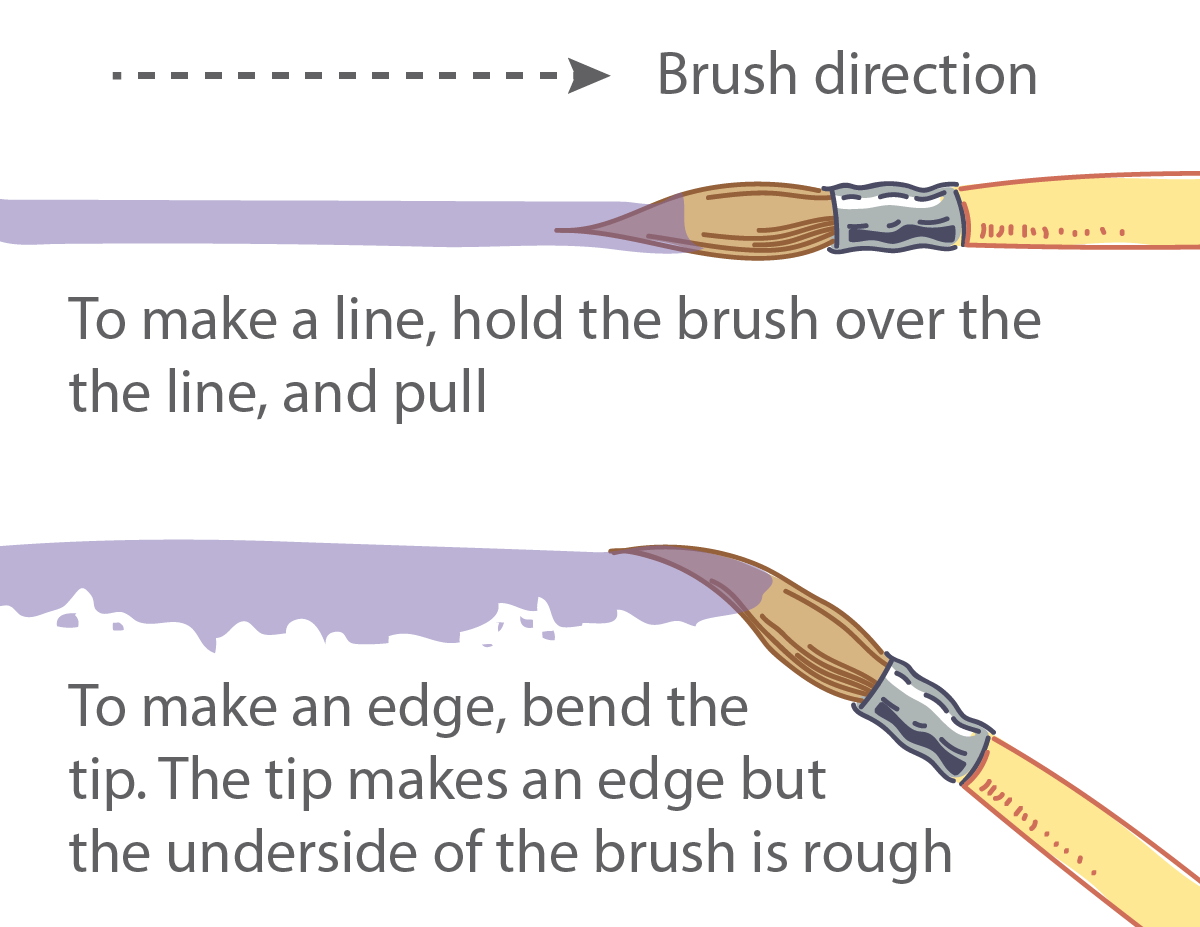
2. Demo (5 min) – Techniques – painting edges
3. Practice (10) – Name & smiley face on back
4. Paint Faces (27) – Paint sculptures & Clean brushes
– – – – – –
Break – end of part one if dividing into 2 sessions
5. Dreams (5) – Marc Chagall & talk about dreams
6. Sketch Ideas (5) – Dream paintings
7. Canvas Setup (3) – Tape canvas to board
8. Guidelines (5) – draw light sketch
9. Dream Painting (30) – Create from Imagination
10. Clean Up (4) – Everyone helps
Tap the Plus Icon (above right) to open STANDARDS information, including an Overview, Learning Targets and a Syllabus. Copy and paste to send to your Administrators or use the button below to download a Word document with the same information that you can add your info to and email to them as an attachment.
Student Work

Lesson At A Glance
Here’s a brief overview of the complete lesson. It’s also on your prep page in the Ready, Set, Go! section (below the lesson).
Colored buttons jump to each section in the full lesson plan below.
10 Minutes – Get ready to paint acrylics
5 min – Techinques – painting edges
10 min – Name & smiley face on back
27 min – Paint sculptures & clean brushes
5 min – Marc Chagall & talk about dreams
5 min – 8.5″ x 11″ dream painting ideas
3 min – Tape canvas to board
5 min – Canvas pencil – draw 8.5″ x 11″ frame and light sketch
30 min – Enjoy creating from imagination
4 Min – Everyone helps
Use this button to jump down to the preparation section.
SCROLL & TEACH
LESSONPLAN
Each section is a different color. Read over once and then you can SCROLL & TEACH using any device you like. It’s designed to work well with your phone.
LEARNING TARGETS

Students know how to set up their work area for painting with acrylics.
M A T E R I A L S
- Acrylic paints
- Palette pad
- Brushes – small and detail
- Water tubs
- Paper towels
All materials are suggestions and may be modified as you see fit. We have tried many items, and these seem to allow the most versatility for the cost.
Brushes should be nylon for springiness and durability. Round brushes are the most versatile.
Paint pigment list:
- Napthol or Pyrrol Red
- Hansa or Light Yellow
- Pthalo Green (blue shade)
- Cyan or Cerulean Blue
- Ultramarine Blue
- Dioxazine Purple
- Magenta
- Burnt Umber
- Raw Sienna
- Titanium White (professional grade only)
1.1 Setup

Advanced Student Lesson
CREATIONS - tap here to open
Our Creations lessons are for students who have completed the two years of Foundations and are ready to begin using all that they have learned to create new work. These more challenging versions of the same concepts and techniques are easily taught along-side students in the Foundations course. This allows for excellent review, and is encouraging for students to see progress from each viewpoint.
Use the Student Instructions printout below to distribute to your Creations students. Tap the image to open the PDF in a new window.
Abstract Painting
Overview: Students will create a background using colors they choose, and then create an abstract line painting using photographic reference as their source.
Use a canvas board, a sheet of taped canvas, or a stretched canvas if available.
Step 1. (15 minutes) Set up for painting in acrylic, and cover the canvas with a thin coat of any colors of your choosing. Brilliant colors work well. Colors may be mixed with water instead of white, for a glaze effect, or white can be mixed in for opacity – colors that look more solid. Set aside to dry.
Step 2. (20 min) Choose a reference source from any book or use the provided PDF photographs below. Use a pencil and sketchpad to create an abstract line drawing based on the photo. You should try to make it different enough so that it’s hard to recognize the subject.
Step 3. (5) Write down some ideas for how color will be used as line and filling in areas. The original underpainting may be covered a lot, or it may show through and be an important element in the painting.
Note: colorful lines and pattern can add a lot of visual interest to this painting.
Step 4. Resume painting, using a variety of Brushes for different effects. Clean edges and lines are much easier to create when the paint is a very fluid.
Tap images to open Creations Student Instructions and Reference Materials in new windows


Use this button to jump down to the preparation section.
LEARNING TARGETS
Students know how to paint edges and lines
M A T E R I A L S
- Acrylic paints
- Palette pad
- Small sized brush
- Water tub
- Paper towels
- Surface to paint on (paper, canvas, your own sculpture model)
2.1 demo
2.2 demo
TIP
Turn the direction of the brush so the tip points towards the edge you want. You can move the brush around, or you can move the artwork.
Use this button to jump down to the preparation section.
STEP 3. Practice
Students will practice what they just learned by signing their name on the sculptures 10 MinutesLEARNING TARGETS
Students know how to practice painting
M A T E R I A L S
- Dried clay sculpture from previous week
- Acrylic paints
- Palette pad
- Brush: small with long bristles and pointy tip
- Water tubs
- Paper towels
- Paper towels
- Smocks
3.1 paint
Use this button to jump down to the preparation section.
LEARNING TARGETS
Students know how to paint a sculpture
M A T E R I A L S
- Clay sculpture
- Acrylic paints
- Palette pad
- Brushes
- Water tubs
- Paper towels
4.1 paint
4.2 help
Make a special effort to help students who are having difficulty with controlling their paint. There are 5 problems to watch for:
- Too big brush.
- Not enough paint on the brush. A dry brush makes rough paint. It’s a fine technique if you’re painting a lighter color and looking for texture.
- Too much paint on the brush. Globs make a mess. Keep the paint inside the bristles, not globbed all over the outside.
- Mashing to hard. Only the tip can make a clean paint stroke. Unless you’re painting a large area, you want to have a light touch.
- Not pointing the tip towards the clean edge.
4.3 dry
Use this button to jump down to the preparation section.
LEARNING TARGETS
Students know how to appreciate artwork

Pinterest Gallery – Marc Chagall
Tap the icon to the left to open our special Pinboard showing examples of artwork to display to your class. See our Article for making Pinterest work on larger displays. You can also use a laptop or large tablet and gather everyone around like you’re using a book.
Be careful not to wander off our Pinboard if you do not want to show Chagall paintings with nudity.
Use this button to jump down to the preparation section.
LEARNING TARGETS
Students know how to plan out a painting
M A T E R I A L S
- 11″ x 17″ sketch pad
- 2B & 4B pencils
- Erasers
6.1 plan
Use this button to jump down to the preparation section.
LEARNING TARGETS
Students know how to set up their work area for painting with acrylics.
M A T E R I A L S
- Canvas from pad
- 8.5″ x 11″ card stock for template (to draw the frame)
- Painter’s tape
- Drawing board
- Canvas pencil (dark gray colored pencil)
- Erasers
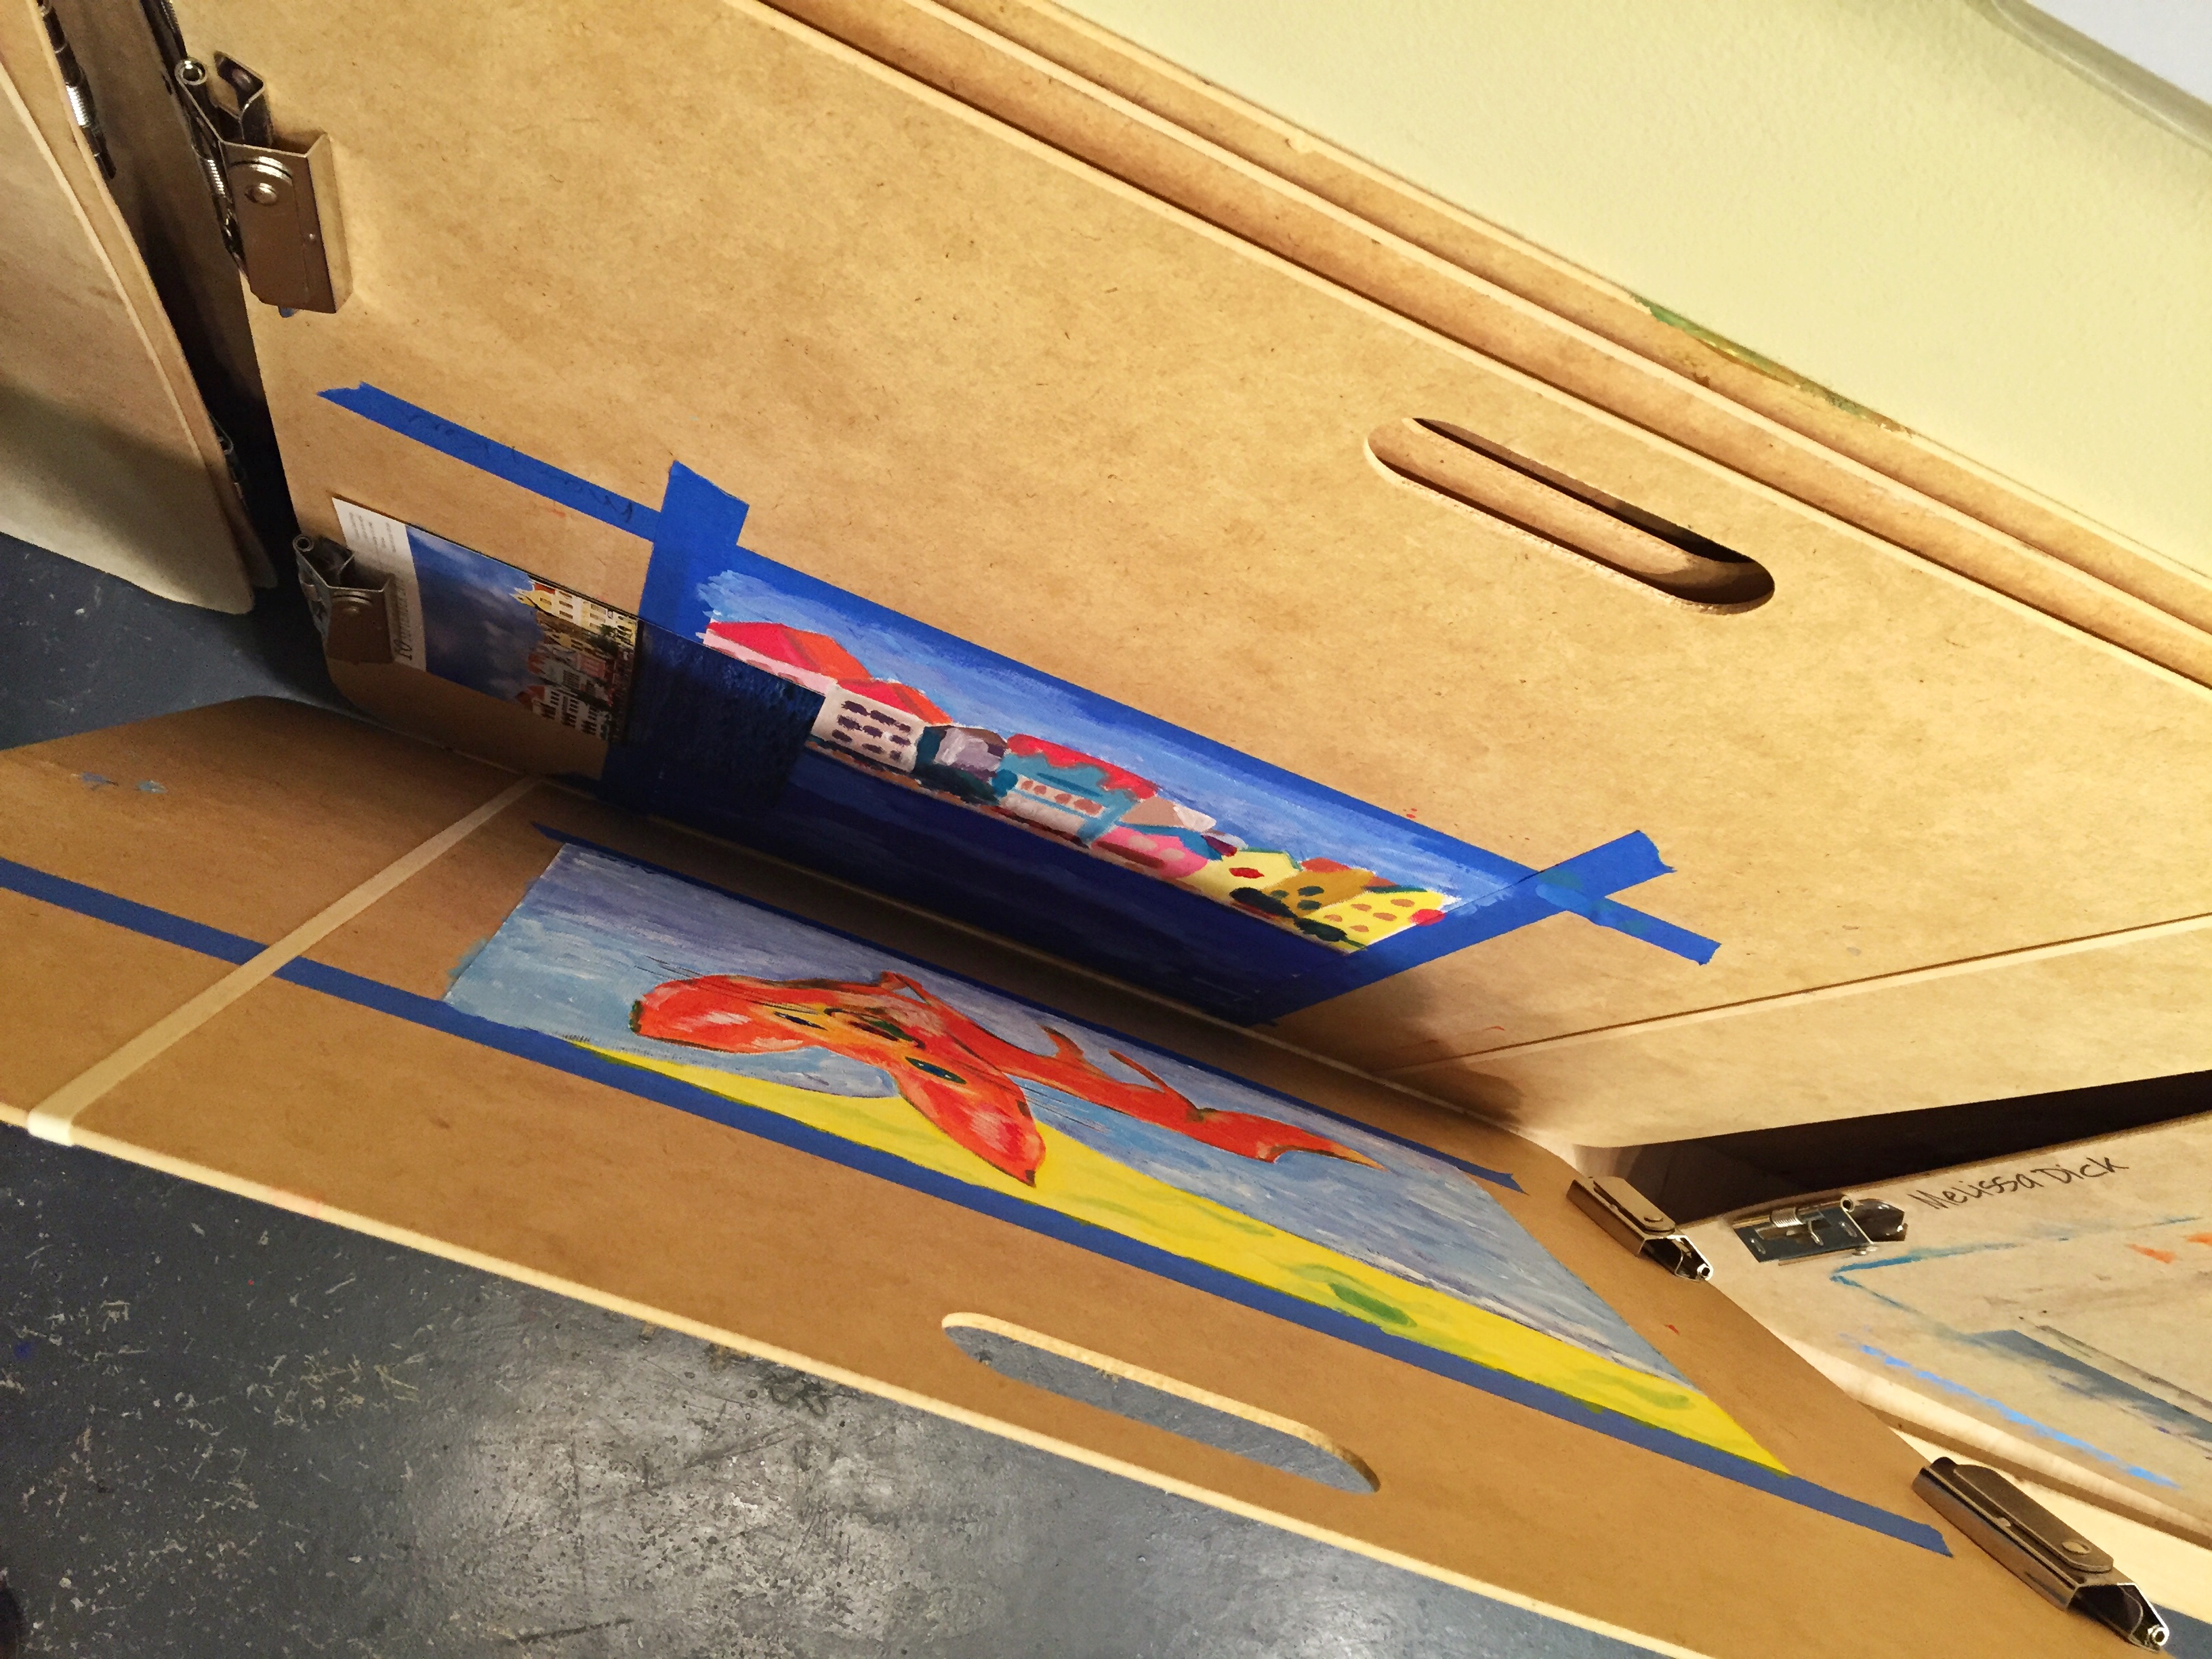
7.1 Tape
TIP
It helps to place the canvas at the bottom of the board so it’s near you as you work, and to the left for a right-handed student. This allows the palette to be on the left of the board, taking up less room.
7.2 prep
Use this button to jump down to the preparation section.
LEARNING TARGETS
Students know how to draw guidelines
M A T E R I A L S
- Canvas on board
- Canvas pencil
8.1 draw
Drawing in the colored pencil works well on canvas. If drawn lightly it will erase off easier than graphite pencil. Also, graphite mixes into the paint, muddying the color, but the colored pencil stays put since it is wax based.
The pencil drawing can be part of the final work, and will show through if you paint with watery acrylics and don’t use white paint. The pigments we use are all translucent except for the white. Or you can just draw the guidelines and paint with normal mixed colors and completely cover the drawing.
Use this button to jump down to the preparation section.
LEARNING TARGETS
Students know how to paint an imaginative painting
M A T E R I A L S
- Acrylic paints
- Drawing on canvas on board
- Brushes – small and medium sizes
- Water tub
- Paper towels
- Palette pad
9.1 help
Critique without permission is discouraging. Only offer help to artists who seem to be struggling or who you ask and they say that they have a problem.
Then ask if they would like any suggestions. Once you have permission, you can help them with the problems they have.
How to approach discouraged students
Make sure that you talk in a way that isolates the problem from the entire artwork and from their abilities as an artist. Artists are hard on themselves. They also tend to use a problem as evidence that they’re not a “real artist”, and dismiss the entire work based on one problem; ie: “I can’t draw hands! This work is a disaster. I’m horrible.” None of these statements are accurate. Instead restate their intent and truth: “I’m not good at hands yet, but I’ll keep practicing. This work is good except for the hand I’m having problems with. I’m learning from this and because I can see the things that need to be improved, I’ll be able to improve them with practice.”
9.2 Sign
Put name and signature on painting when finished, then s
Drawing boards can hold a lot of paintings in a small area. If the clips are all on the same side it’s really easy. We set a bunch of boards with wet paint stacked against the wall like this below. Two boards are faced together, so that the clips are on opposite sides. The clips create a space between the two boards keeping the paintings from touching. Make sure the tape is well secured or the paintings can pull away from the board, especially with heavy paint.
Use this button to jump down to the preparation section.
LEARNING TARGETS
Students know the importance of cleaning up.
M A T E R I A L S
- Paper Towels
- Cleaning wipes
- Sink
- Waste baskets
- Well-lit spot for photos
- Camera or phone-camera
10.1 CLEAN
Students set up their work area.
- Wash hands
- Super-wash brushes if used
- Put art supplies away
- Wipe tables & toss trash
- Remove any smocks (last)
- Check for items on floors and tables
10.2 PHOTO
Try to get photos of your student’s artwork. Find a good spot for quick lighting without highlights or shadows from your hands and device. Ideally in-between two strong lights on each side.
Use this button to jump down to the preparation section.
OBJECTIVES
- Practice and improvement in using paint and brushes to create details and precise edges. Also in planning and drawing guidelines.
- Understanding how to apply paint and move a brush to use the tip for clean edges. Also learning about Marc Chagall in art history.
- Accomplishment from finishing a painted sculpture and small canvas.
- Fulfillment in have complete control over the sculpture and the way it’s painted – self-expression. Also in painting entirely from their own imagination and portraying dreams.
TROUBLESPOTS
Discouragement – Finding discouraged students can be very easy, but sometimes they’ll hide it. Ask a student how they feel about their work, and really try for an honest answer.
Make sure that you talk in a way that isolates the problem from the entire artwork and from their abilities as an artist. Artists are hard on themselves. They also tend to use a problem as evidence that they’re not a “real artist”, and dismiss the entire work based on one problem; ie: “I can’t draw hands! This work is a disaster. I’m horrible.” None of these statements are accurate. Instead restate their intent and truth: “I’m not good at hands yet, but I’ll keep practicing. This work is good except for the hand I’m having problems with. I’m learning from this and because I can see the things that need to be improved, I’ll be able to improve them with practice.”.
ART WORDS
Sculpture – Artwork that has different viewpoints because it has 3 dimensions.
CLASSROOM
PREP
Print all of your PDFs from the lesson plan and cut any references apart as needed.
What your room needs
Here are your printable lists and room prep instructions.
Opens in new window
CLASSROOM
MATERIALS
- Water tubs
- Paper towels
- Smocks
- Drawing board
STUDENT’S
MATERIALS
- Acrylic Paints
- Palette Pad
- Brushes
- 11” x 17” Sketch Pad
- 2B & 4B Pencils
- Erasers
- Painter’ tape
- Canvas pencil
PREVIEW
Week 31: Color Journal – Skintones
Students learn how to mix vibrant and realistic skin tones, one of the hardest colors to master. A PDF print is provided with our exclusive 25-color journal pages. Younger students only do 16 of the colors. The ArtSquish Color Journals are divided into 4 or 5 sets of mixes, that are made in the natural way that painters work on their palettes. The colors are all useful, and not just a formula to create lots of random variation.
Week 32: Acrylic Portrait
An underpainting in bright orange helps students create an easy portrait using acrylics and their newly learned skin tone color journals.
Use this button to view our parent’s blog. Share the link: http://parentart.org, with your student’s parents so your they can read about the lesson each week.