
Color
Each lesson Plan focuses primarily on one of the 4 Cornerstones of Art:
Drawing | Painting | Color | Style
OVERVIEW
Students learn how to mix colors and how they are affected by other pigments. Using a special page, they'll mix and fill swatches for 16 colors (grades 3 - 5) or 25 colors (grades 6 - 12) in different variations of blues. The lesson continues with the Darks Color Journal using black, grays, and a few browns, in the same manner. The mixed colors use pigments from the Art Instructor program, and produce colors that artists often need to use when actually painting. Advanced students create an expressive acrylic painting on canvas from provided reference, that uses dark colors.– – –
Grades 3 – 5
Week of November 18 – 22
1 Hour & 45 Minutes
Lesson At A Glance
Here’s a brief overview of the complete lesson. It’s also on your prep page in the Ready, Set, Go! section (below the lesson).
Colored buttons jump to each section in the full lesson plan below.
10 Minutes – Students sketch still life objects
10 Min – How to do color journal
5 Min – Gather supplies
27 Min – Students work on journals
40 Min – Students work on darks color journals
10 Min – Use leftover paints
2 Min – Everyone helps
Use this button to jump down to the preparation section.
SCROLL & TEACH
LESSONPLAN
Each section is a different color. Read over once and then you can SCROLL & TEACH using any device you like. It’s designed to work best with your phone.
LEARNING TARGETS

Students know how to draw to warmup
M A T E R I A L S
- 14″ x 17″ sketch pad
- Charcoal
- Pencils (any)
- Kneaded eraser
All materials are suggestions and may be modified as you see fit. We have tried many items, and these seem to allow the most versatility for the cost.
1.1 draw
Students draw still life objects.
As students enter, have them select an object from still life library or simple things in the room. Even art supplies will work well. Draw using compressed charcoal or pencil. All students should warm up using life sketching.
Encourage students to use this time well, and not blow it off as “something the teacher made me do”. It can sometimes mean speaking their language, like “level up” for kids who like games. If you still have bad attitudes, find out what’s going on by talking to the student, like you would speak to an adult. Getting this kind of respect can sometimes turn a bad attitude around.

Pinterest Gallery – Franz Kline
Tap the icon to the left to open our special Pinboard showing examples of artwork to display to your class. See our Article for making Pinterest work on larger displays. You can also use a laptop or large tablet and gather everyone around like you’re using a book.
1.2 teach
While students work, discuss and show images of Franz Kline.
Born in Pennsylvania in 1910, Franz Kline focused on Abstract Expressionism in his work beginning with an experiment in his studio. In 1948, he was becoming increasingly frustrated with his work, and his good friend Willem de Kooning suggested that he project his art on the wall. Kline did so using a small black and white sketch of a chair. He was struck by the simplistic and abstract beauty of the image, and how it was more about the massive lines and spaces around them than the chair itself. This event was a watershed moment and led to his signature style that made him famous.
Though he experimented with color later on in life, Kline mostly used a limited palette of black thick, rugged lines painted with large housepainter’s brushes on white ground. He said that he wanted the limited palette to emphasize the pure forms of line and spaces in both positive and negative areas; “I paint the white as well as the black, and the white is just as important.”
Many people say that his paintings remind them of calligraphy brush strokes, but Franz Kline accredited his inspiration to New York’s cityscape and atmosphere. He was also inspired by artists such as Willem de Kooning and Jackson Pollock.
Advanced Student Lesson
CREATIONS - tap here to open
Our Creations lessons are for students who have completed the two years of Foundations and are ready to begin using all that they have learned to create new work. These more challenging versions of the same concepts and techniques are easily taught along-side students in the Foundations course. This allows for excellent review, and is encouraging for students to see progress from each viewpoint.
Use the Student Instructions printout below to distribute to your Creations students. Tap the image to open the PDF in a new window.
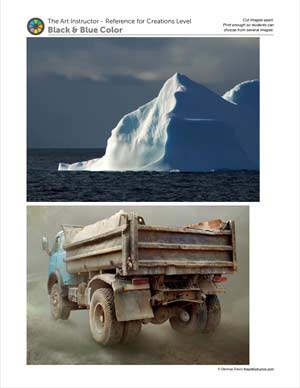
Abstract – or Not – Painting or other media
Overview: Students will create artwork based on blue and dark colors using the reference photos to create some level of stylization or abstraction.
Use a canvas board, a sheet of taped canvas, or a stretched canvas if available. Other mediums to use are oil pastels, colored pencils, or even graphite if a student is not interested in color at all.
Step 1. (15 minutes) Set up for the medium and tools of choice.
Step 2. (20 min) Choose a reference source from the provided PDF photographs below. Use a pencil and sketchpad to create several warm up sketches.
Step 3. (5) Try an abstract line drawing based on the photo. You can try to make it different enough so that it’s hard to recognize the subject, or just stylize it a little bit. You can also just go for a realistic version if you like.
Simplicity can make a composition very powerful but that takes working on it. Try several ideas by drawing small thumbnails, and then choose the one you like best.
Step 4. Begin drawing or painting, using a variety of Brushes for different effects. Clean edges and lines are much easier to create when the paint is a very fluid. Enjoy yourself and see what you can do.
Tap images to open Creations Student Instructions and Reference Materials in new windows

Use this button to jump down to the preparation section.
LEARNING TARGETS
Students know how to paint a color journal
M A T E R I A L S
- Acrylic paints
- Palette pad
- Brushes
- Water tub
- Paper towel
- Color Journal PDF (extra copy)
2.1 Print
Worksheet
Blues Color Journal
A worksheet that uses the Art Instructor set of 10 pigments in acrylic paints. There are 4 rows of mixes that are modified 4 times each. There is an extra row for early finishers
Hand out reference prints. Be sure to print on Cover Stock and every student should have their own. Write names on them.
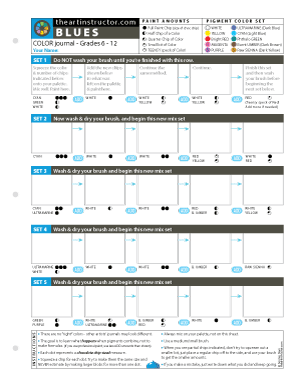
1 Page – Opens in new window
2.2 DEMO
Use the Blue Color Journal on card stock. It is best if you can watch the video and learn to do the demo yourself, but you can show the video directly to your students if you need help or have a large group that can’t all watch one person.
Tap the 4 arrows icon to enlarge the video to full screen.
Review the demo video and demonstrate to your students, or you can simply display the video on a larger screen for them to watch.
Use this button to jump down to the preparation section.
LEARNING TARGETS
Students know how to set up their work area for painting with acrylics.
M A T E R I A L S
- Acrylic paints
- Brushes
- Palette pad
- Water container
- Smocks
- Paper towels
Brushes should be nylon for springiness and durability. Round brushes are the most versatile.
Paint pigment list:
- Napthol or Pyrrol Red
- Magenta
- Hansa or Light Yellow
- Pthalo Green (blue shade)
- Ultramarine Blue
- Cyan or Cerulean Blue
- Dioxazine Purple
- Burnt Umber
- Raw Sienna
- Titanium White (professional grade only)
VERY IMPORTANT!
Make sure no one squeezes any paint out yet. The worksheet will instruct on how to get exact amounts of certain pigments for each row of mixes.
3.1 Prepare
Begin setting up for painting. Follow the steps below.
Create a neat work area.
- Water should be near the palette.
- Tubes that have a flat cap should NOT be standing up, because they can easily fall into your work or palette.
- Palette, brushes, water, and paper towel should be on the right if you are right handed or the left, if you’re left-handed.
- Smocks

Use this button to jump down to the preparation section.
LEARNING TARGETS
Students know how certain pigments affect others when mixed
M A T E R I A L S
- Acrylic paints
- Brushes
- Palette pad
- Water container
- Smocks
- Paper towels
4.1 Paint
TIP
This is a journal, a record of what you’re doing. The purpose is to learn what happens when certain pigments mix together more than actually getting to a specific color. When students have different results from other students, that’s normal. Each person has their own tendencies and a journal will reflect these, being more useful to the artist who made it.
Also, that means if someone makes an error in the formulas, don’t try to correct the paint. Just move on and change the formulas underneath to show what was actually done.
Use this button to jump down to the preparation section.
LEARNING TARGETS
Students know how certain pigments affect others when mixed
M A T E R I A L S
- Acrylic paints
- Brushes
- Palette pad
- Water container
- Smocks
- Paper towels
5.1 print
worksheet
Darks Color Journal
A worksheet that uses the Art Instructor set of 10 pigments in acrylic paints. There are 4 rows of mixes that are modified 4 times each. There is an extra row for early finishers
Hand out reference prints. Be sure to print on Cover Stock and every student should have their own. Write names on them.
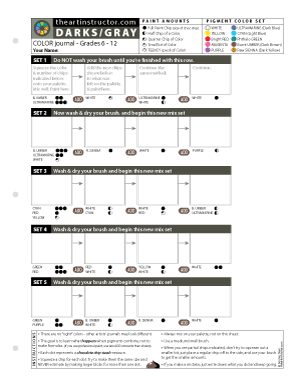
1 Page – Opens in new window
5.2 SetUp
If PART TWO is the beginning of a new class session…
Students set up their work area for painting in acrylics.
Do NOT squeeze out paint until following the instructions on the first row of the journal.
Ask several people to go get water tubs filled, and others to find smocks. That way you have two or three groups in different areas so you don’t get backed up with lines.
TIP
Use this button to jump down to the preparation section.
LEARNING TARGETS
Students know how to make a sketch into a painting
M A T E R I A L S
- Leftover paints
- Same paint set up
- Large brush
- Still life objects and warmup drawings
- 1 Sheet 11″ x 15″ (or any medium size) watercolor paper
6.1 paint
Explain the project to early finishers.
Speak to one student at a time, or all at once if everyone looks like they’ll make it.
Tell your students that they can now make a bold dark painting using the leftover paints and the same reference from the warmup time.
Remind them of the work of abstract expressionist, Franz Kline. Explain that accuracy is not as important for this project, but making bold expressive outlines is. The paint and the composition are the main things. It should also go fairly quickly. The paint can be reworked as needed to make it look more satisfying.
Use this button to jump down to the preparation section.
LEARNING TARGETS
Students know the importance of cleaning up
M A T E R I A L S
- Paper Towels
- Cleaning wipes
- Sink
- Waste baskets
- Well-lit spot for photos
- Camera or phone-camera
7.1 clean
Students clean up their work area.
- Wash hands
- Super-wash brushes if used
- Put art supplies away
- Wipe tables & toss trash
- Remove any smocks (last)
- Check for items on floors and tables
7.2 photos
Try to get photos of your student’s artwork. Find a good spot for quick lighting without highlights or shadows from your hands and device. Ideally in-between two strong lights on each side
OBJECTIVES
- Practice and improvement in mixing pigments to create useable colors
- Understanding what happens when certain pigments mix into others
- Accomplishment in finishing a journal page and also an exercise using colors
- Fulfillment by having more confidence with color mixing
TROUBLESPOTS
Unequally sized paint chips which will create different colors than the journal is going for.
Washing brush between colors on the same row will waste paint and create different colors.
Small chips – Not making enough paint by having tiny chips
Huge mixing blobs – Making gigantic mixing swirls which will dry out paint
ART WORDS
Journal – Any practice work that an artist does that can be saved and referenced later
Formula – An exact recipe for making a color. The first square on each row is a formula. The subsequent squares are not; they show formulas that affect the current color after mixing in, but not a complete formula for the square above.
Affect – What happens when something is mixed into something else. The goal of the color journal is to learn how certain pigments affect other colors when mixed into them.
CLASSROOM
PREP
Have a bunch of amazing supplies ready, and cut a few things apart before-hand in a way that make you look amazing.
Print all of your PDFs from the lesson plan and cut any references apart as needed.
What your room needs
Here are your printable lists and room prep instructions.
Opens in new window
CLASSROOM
MATERIALS
- Water tub
- Color Journal PDF
- Smocks
- Paper towels
- Cleaning wipes
- Waste baskets
- Camera or phone-camera
STUDENT’S
MATERIALS
- Sketch Pad
- Charcoal
- Pencils
- Kneaded eraser
- Acrylic Paint
- Palette pad
- Brushes
- Water tub
PREVIEW
Week 17: Color Wrapped Presents
Using color in shadows is essential to good artwork. In keeping with the holiday season, we paint a red-wrapped cube-shaped gift with a green ribbon and bow. Students learn the basics of cube shapes and accuracy, as well as using opposites to create shadow colors.
Week 18: Recycled Ornaments
Students will use two empty water bottles to create an old fashioned-looking ornament. The top of two bottles are cut off and glued together, but before-hand, the inside is painted. The result is a is colorful ornament that is so glossy it mimics glass. Ribbons are added and a hanging loop can be made out of the cap and ring.
Use this button to view our parent’s blog. Share the link: http://parentart.org, with your student’s parents so your they can read about the lesson each week.